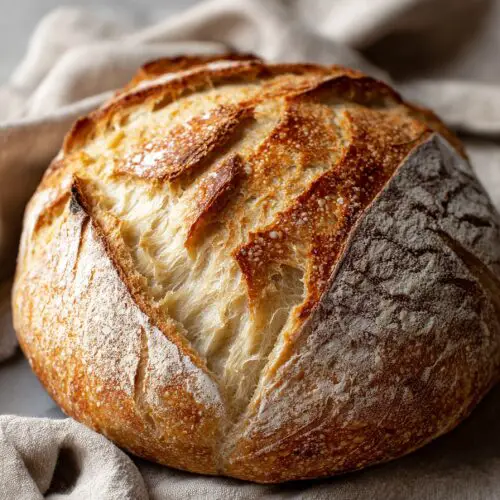
Same Day Sourdough Bread Recipe (No Overnight Wait!)
If you’ve been craving a crusty, rustic loaf but don’t want to wait 24 hours, this Same Day Sourdough Bread Recipe brings you chewy, tangy, artisan-style bread… by dinner time.
I know that sounds a little magical, but stick with me. This same day sourdough, made with an active starter and a touch of strategy, gives you that classic farmhouse sourdough loaf feel—crackly crust, tender crumb, and all—without the usual overnight bulk fermentation. It’s a wonderful “bridge” recipe between a quick sourdough bread and the long-fermented bakery loaves we all admire.
As a 50‑year‑old mom and long-time home baker who remembers when “starter” meant the Tupperware my neighbor Mary kept on her counter, I promise you: if you can stir batter and fold laundry, you can bake this same day sourdough bread.
What Makes This Same Day Sourdough Bread Recipe Special
This is a lean, rustic sourdough bread recipe that uses a strong, bubbly starter, warm fermentation, and a little planning to speed up the process. You’ll mix your dough in the morning and have a beautiful homemade sourdough bread on the table by evening—no overnight sourdough, no complicated schedules, no fancy equipment required.
It’s perfect for:
- Busy weekdays when you still want something homemade and nourishing
- Last‑minute dinner parties (that somehow always involve soup)
- Beginner sourdough bakers nervous about long ferment times
- Anyone who loves crusty sourdough bread but doesn’t want to babysit a dough for 18 hours
And even though we’re shortening the timeline, we’re not skipping flavor. We use a higher percentage of active starter and a warm “same day fermentation” window so you still get that gentle tang and that beautiful, airy crumb.
Why You’ll Love This Recipe
1. Truly same-day friendly
Start your dough in the morning, and you’ll be slicing into a warm farmhouse sourdough loaf by dinner—no overnight rest required.
2. Beginner‑friendly method
This is a very forgiving beginner sourdough recipe: no scoring art required, and I’ll tell you exactly what the dough should look and feel like.
3. Uses your same day starter sourdough
Got a bubbly starter that peaked this morning? Perfect—this recipe is designed to work with a freshly fed, active starter.
4. No special tools required
A Dutch oven is nice, but you can bake this rustic sourdough bread on a sturdy sheet pan or in a heavy pot with a lid.
5. Flexible timing
The bulk fermentation has a window, not an exact minute, so you can juggle work, errands, or school pick‑up without stress.
6. Crispy crust, tender crumb
You still get that classic artisan sourdough bread texture: a deep golden crust with a soft, chewy, slightly open crumb.
7. Easy to flavor or customize
This easy sourdough recipe is a blank canvas—add herbs, cheese, seeds, or whole grains and make it your own.
8. More digestible than yeasted bread
Even in a same day baking format, the natural fermentation helps many folks find sourdough gentler on the stomach than regular sandwich bread.
Ingredients
This Same Day Sourdough Bread Recipe makes one medium round loaf (about 750–800 g baked weight).
- 150 g active sourdough starter (100% hydration – equal parts flour and water, bubbly and doubled)
- 325 g warm water, about 80–85°F (lukewarm; warmer room temps may need slightly cooler water)
- 450 g bread flour (or 400 g bread flour + 50 g whole wheat for a rustic sourdough bread flavor)
- 9 g fine sea salt (about 1 ½ teaspoons)
- 10 g olive oil (about 2 teaspoons; optional, for a slightly softer crumb and easier handling)
- Rice flour or extra all‑purpose flour, for dusting the banneton or towel
A few ingredient tips:
- Starter: Your starter should pass the “float test”—a small spoonful in water should float. If it sinks, feed it and wait 2–4 hours. Same day sourdough bread lives or dies by an active starter.
- Flour: Bread flour helps with structure and rise. If you only have all‑purpose, it’ll work; your loaf may spread a bit more, but it will still be delicious.
- Salt: Don’t skip or reduce too much; salt strengthens gluten and balances flavor.
- Olive oil: Purists can leave it out. I like the slight softness it brings to a quick sourdough bread like this.
Directions
You’ll start this same day sourdough bread recipe in the morning (around 8–9 a.m.) and bake late afternoon or early evening. Adjust times for your schedule and kitchen temperature.
1. Mix the starter and water
In a large bowl, whisk together the 150 g active starter and 325 g warm water until the starter is mostly dissolved and milky. This helps distribute the wild yeast evenly, which is extra important when we’re shortening the fermentation.
2. Add flour and rest (autolyse)
Stir in the 450 g flour with a sturdy spoon or dough whisk until no dry bits remain. It’ll look shaggy and a bit stiff—totally fine. Cover the bowl with a damp towel and let it rest for 30–40 minutes. This “autolyse” lets the flour hydrate and gluten start forming, which means less kneading and a better texture.
3. Add salt and olive oil
Sprinkle the 9 g salt and drizzle the 10 g olive oil over the dough. With wet fingers, pinch and fold the dough several times until the salt and oil are fully incorporated. The dough will feel more cohesive and slightly smoother.
4. Start bulk fermentation (first 30 minutes)
Cover the bowl and let the dough rest at room temperature for 30 minutes. Ideally, your kitchen is between 72–78°F. Cooler kitchens might stretch fermentation longer; warmer kitchens will shorten it. That’s okay—we’re aiming for signs of fermentation, not just the clock.
5. Perform stretch and folds (3–4 rounds)
Every 30 minutes for the next 1½–2 hours, do a set of stretch and folds:
- Wet your hand.
- Grab one edge of the dough, stretch it up gently, and fold it over to the center.
- Rotate the bowl and repeat 4–6 times around.
You’ll do this 3–4 times total. With each set, the dough should feel more elastic and hold its shape a little better. This is your “no-knead kneading” and it helps build strength quickly so same day fermentation still gives you structure.
6. Let the dough rise until puffy (about 2–3 additional hours)
After your last stretch and fold, cover the bowl and let the dough rest undisturbed. For a same day sourdough bread, we’re generally looking at a total bulk fermentation of 3½–5 hours from mixing, depending on temperature.
You’re ready for shaping when:
- The dough has risen about 50–75% (not doubled like yeasted bread)
- You see bubbles along the sides and bottom of the bowl
- The top looks slightly domed and airy
If your kitchen is cool, give it extra time. Rushing this stage is the most common reason a quick sourdough bread turns dense.
7. Pre‑shape the dough
Lightly flour your work surface and gently turn out the dough. Try not to tear it or deflate all the gas. With floured hands or a bench scraper, tuck the edges underneath to form a loose round. Let it rest, uncovered, for 15–20 minutes. This rest makes final shaping easier and helps you get that pretty farmhouse sourdough loaf look.
8. Final shape: round (boule) or oval (batard)
For a round loaf, use your hands or a bench scraper to drag the dough toward you in small pulls, rotating as you go, to create surface tension and a tight, smooth top. For an oval, gently elongate it, then fold like a letter and roll it snug.
You want the dough to feel bouncy and hold its shape—not sagging like pancake batter, not stiff like play‑dough.
9. Prepare the proofing basket
Dust a banneton generously with rice flour, or line a medium bowl with a clean kitchen towel and flour it well. Place the shaped dough seam‑side up into the basket or bowl.
10. Final proof (short, same day)
Cover and let the dough proof at room temperature 45–75 minutes. Because we’re doing same day baking and the dough is already well fermented, this final rise is shorter than an overnight sourdough proof in the fridge.
You’re ready to bake when:
- The dough has risen slightly and feels airy
- A gentle poke springs back slowly and leaves a slight indentation
11. Preheat the oven
About 30–40 minutes before baking, place a Dutch oven (with its lid) in your oven and preheat to 475°F (245°C). If you don’t have a Dutch oven, place a baking stone or a heavy sheet pan on the middle rack, and an empty metal pan on the lower rack (for steam).
12. Turn out and score
Cut a piece of parchment slightly larger than your dough. Turn the proofed dough out onto the parchment so it’s seam‑side down. Dust lightly with flour, then use a sharp lame or serrated knife to score about ¼–½ inch deep. A simple long slash down the center works beautifully for this quick sourdough bread.
13. Bake with steam for oven spring
Carefully place the dough (with parchment) into the preheated Dutch oven, cover with the lid, and bake 20 minutes.
If using a sheet pan, slide the dough (and parchment) onto the hot pan and pour a cup of hot water into the empty pan on the lower rack to create steam—then shut the oven door quickly.
14. Finish baking uncovered
After 20 minutes, remove the lid (or the steam pan) and reduce the temperature to 450°F (230°C). Bake another 20–25 minutes, until the crust is a deep golden brown and the loaf sounds hollow when tapped on the bottom. Internal temperature should be around 205–210°F if you use a thermometer.
15. Cool completely (yes, really)
This is the hardest part. Transfer your same day sourdough bread to a cooling rack and let it cool at least 1 hour before slicing. The crumb is still setting as it cools; slicing too soon can make it gummy.
Servings & Timing
- Yield: 1 medium loaf (about 10–12 slices)
- Prep Time: 25 minutes active (mixing, folds, shaping)
- Rise/Fermentation Time: 4–6 hours, depending on room temp
- Bake Time: 40–45 minutes
- Total Time: About 6–8 hours, start to finish (morning to dinner)
This same day sourdough bread recipe asks for clock time, not constant hands‑on time. Most of that span is just the dough doing its thing while you live your life.
Variations
You know what? Once you’re comfortable with this base, you can really have fun:
- Herb & Garlic Same Day Sourdough – Add 1–2 teaspoons dried Italian herbs and 1 teaspoon garlic powder with the flour.
- Seeded Artisan Sourdough Bread – Fold in 40–60 g mixed seeds (sunflower, sesame, flax) during the last stretch and fold.
- Cheddar & Chive Farmhouse Loaf – Add 75–100 g shredded sharp cheddar and 2 tablespoons chopped chives during shaping.
- Whole Grain Rustic Sourdough Bread – Use 100–150 g whole wheat or spelt flour in place of part of the bread flour, and add an extra tablespoon of water if the dough feels stiff.
- Olive & Rosemary Same Day Baking Loaf – Gently knead in 60 g chopped, drained olives and 1 tablespoon fresh rosemary leaves before the final shaping.
- Cinnamon Raisin “Breakfast” Sourdough – Add 1 teaspoon cinnamon and 70 g raisins; expect a slightly denser but wonderfully fragrant loaf.
Storage & Reheating
Homemade sourdough bread stores differently than supermarket loaves, so a few pointers help.
-
Room temperature storage:
Keep your cooled loaf cut‑side down on a cutting board, or wrap loosely in a clean kitchen towel. It stays nice 1–2 days this way. Avoid sealing it in plastic right away; it softens the crust. -
Longer storage (3–4 days):
After day 2, you can place the loaf (or slices) in a paper bag inside a loose plastic bag, or in a bread box, to slow down drying while keeping some crust crispness. -
Freezer:
Slice the cooled loaf, wrap stacks in foil, then place in a freezer bag. Freeze for up to 2 months. This is my favorite way to always have same day sourdough bread on hand… even when it’s not the same day anymore. -
Reheating:
Toast slices straight from the freezer, or warm a partial loaf in a 325°F oven for 8–10 minutes to refresh the crust. For extra crunch, place it directly on the oven rack. -
Make‑ahead tip:
You can mix and bulk ferment in the morning, shape in the early afternoon, and hold the final proof in the fridge for 2–3 hours if your schedule changes. Let it sit at room temp 20–30 minutes while the oven heats before baking.
Notes from My Kitchen to Yours
- Watch the dough, not the clock. Same day fermentation is more sensitive to temperature. If your kitchen is cool, everything takes longer—don’t panic, just give it time.
- Stronger starter = better same day sourdough. If your starter has been in the fridge for a while, feed it for a day or two before baking this quick sourdough bread. A sluggish starter is the #1 reason loaves stay flat.
- Hydration tweaks. Flour brands vary. If the dough feels very stiff, add a teaspoon or two of water and work it in with your fingers. If it’s a sticky, unmanageable puddle, sprinkle on a tablespoon of flour during folds.
- Embrace “rustic”. This is a rustic sourdough bread; it might not look like a bakery Instagram loaf on your first try—and that’s okay. If it tastes good and has some chew and crust, you’re winning.
- Use what you have. No Dutch oven? No fancy lame? A heavy pot with a lid and a sharp serrated knife will absolutely get you there. I baked my first sourdough in an old enamel pot from my mother‑in‑law.
- Take notes. Jot down your room temperature, how long fermentation took, and how the loaf turned out. It’s very “old‑school baker,” but it really helps you tune this same day sourdough bread recipe to your kitchen.
FAQs
1. Can I really make sourdough bread in one day?
Yes. By using an active starter, warm water, and a slightly higher starter percentage, this Same Day Sourdough Bread Recipe fits comfortably in an 8‑hour window.
2. What if my dough doesn’t rise much during bulk fermentation?
Give it more time, and check that your starter is truly active. If after 6–7 hours it’s still very flat, your starter probably needs a few days of regular feedings before you try again.
3. Can I use all‑purpose flour instead of bread flour?
You can. The loaf may spread a bit more and have a slightly softer chew, but it will still be a delicious homemade sourdough bread.
4. How do I know when the dough is proofed and ready to bake?
Use the “poke test”—press a floured fingertip gently into the dough. If it springs back slowly and leaves a faint dent, it’s ready.
5. Can I skip the stretch and folds and just knead the dough?
You can knead for 8–10 minutes instead of doing folds, but the stretch‑and‑fold method builds structure gently and is easier on your arms.
6. What’s the best way to get a super crusty sourdough bread crust?
Bake in a preheated Dutch oven, use steam in the first part of baking, and let the loaf bake until it’s a deep golden brown—not just pale tan.
7. Can I ferment this dough overnight instead if I change my mind?
Yes; you can shorten the room‑temp bulk (stop when the dough has just puffed), then refrigerate overnight and shape/bake the next day like a traditional sourdough.
8. Why does my same day sourdough taste less tangy than store‑bought?
Flavor develops over time; longer, cooler ferments bring more tang. For a stronger sour flavor, you can refrigerate the shaped loaf for a few hours before baking next time.
Conclusion
This Same Day Sourdough Bread Recipe is my happy middle ground between slow, meditative baking and real‑life schedules. You still get that beautiful artisan sourdough bread character—chewy crumb, crackling crust, and gentle tang—without sacrificing a whole day and night.
If you try this same day sourdough bread, I’d love to hear how it turns out for you—tell me what flour you used, whether your family demolished it warm with butter (mine always does), and what you’d like to bake next. And if you’re hooked on sourdough now, feel free to explore more recipes and tips, from sandwich‑style loaves to sweet breakfast variations.
Same Day Sourdough Bread (No Overnight Wait)
Ingredients
- 150 g active sourdough starter 100% hydration, bubbly and doubled, passes float test
- 325 g warm water about 80–85°F (lukewarm; slightly cooler in a warm kitchen)
- 450 g bread flour or 400 g bread flour + 50 g whole wheat flour
- 9 g fine sea salt about 1 1/2 teaspoons
- 10 g olive oil about 2 teaspoons; optional, for softer crumb and easier handling
- rice flour or all-purpose flour for dusting the banneton or towel
Instructions
- In a large bowl, whisk together the 150 g active sourdough starter and 325 g warm water until the starter is mostly dissolved and the mixture looks milky. This distributes the wild yeast evenly for faster, even fermentation.150 g active sourdough starter, 325 g warm water
- Stir in the 450 g flour with a sturdy spoon or dough whisk until no dry bits remain. The dough will look shaggy and somewhat stiff. Cover the bowl with a damp towel and let it rest for 30–40 minutes to allow the flour to fully hydrate and gluten to start developing.450 g bread flour
- Sprinkle the 9 g fine sea salt over the dough and drizzle on the 10 g olive oil. With wet fingers, pinch and fold the dough repeatedly until the salt and oil are fully incorporated and the dough feels more cohesive and slightly smoother.9 g fine sea salt, 10 g olive oil
- Cover the bowl and let the dough rest at room temperature for 30 minutes. Aim for a kitchen temperature of about 72–78°F; cooler rooms will lengthen, and warmer rooms will shorten the total fermentation time.
- Every 30 minutes for the next 1 1/2–2 hours, perform a set of stretch and folds. With a wet hand, grab one edge of the dough, gently stretch it up, and fold it over the center. Rotate the bowl and repeat 4–6 times to go all the way around. Do 3–4 rounds total. The dough should gradually feel more elastic, smoother, and better able to hold its shape.
- After the final stretch and fold, cover the bowl and let the dough rise undisturbed for about 2–3 more hours. Total bulk fermentation from initial mixing is usually 3 1/2–5 hours, depending on temperature. The dough is ready to shape when it has risen about 50–75%, shows bubbles along the sides and bottom, and the top looks slightly domed and airy.
- Lightly flour your work surface and gently turn the dough out of the bowl, trying not to tear it or knock out all the gas. With floured hands or a bench scraper, tuck the edges underneath to form a loose round. Let it rest on the counter, uncovered, for 15–20 minutes to relax and make final shaping easier.
- For a round loaf (boule), use your hands or a bench scraper to gently drag the dough toward you on the counter, rotating as you go, to create surface tension and a tight, smooth top. For an oval loaf (batard), gently elongate the dough, fold it like a letter, then roll it up snugly. The dough should feel bouncy and hold its shape without spreading like batter.
- Generously dust a banneton with rice flour, or line a medium bowl with a clean kitchen towel and flour it well. Place the shaped dough seam-side up in the basket or bowl.rice flour or all-purpose flour
- Cover and let the dough proof at room temperature for 45–75 minutes. The dough is ready to bake when it has risen slightly, feels airy, and a gentle, floured fingertip poke springs back slowly, leaving a slight indentation.
- About 30–40 minutes before baking, place a Dutch oven with its lid in your oven and preheat to 475°F (245°C). If you don’t have a Dutch oven, preheat a baking stone or heavy sheet pan on the middle rack and place an empty metal pan on the lower rack to use for steam.
- Cut a piece of parchment slightly larger than your dough. Gently invert the proofed dough onto the parchment so it is seam-side down. Lightly dust the top with flour, then score it about 1/4–1/2 inch deep with a sharp lame or serrated knife. A single long slash down the center works well.rice flour or all-purpose flour
- Carefully transfer the dough on the parchment into the preheated Dutch oven, cover with the lid, and bake for 20 minutes. If baking on a sheet pan, slide the dough on its parchment onto the hot pan, pour about 1 cup of hot water into the preheated empty pan on the lower rack to create steam, and quickly close the oven door.
- After 20 minutes, remove the Dutch oven lid (or remove the steam pan) and reduce the oven temperature to 450°F (230°C). Continue baking for 20–25 minutes, until the crust is a deep golden brown and the loaf sounds hollow when tapped on the bottom. The internal temperature should be about 205–210°F if checked with an instant-read thermometer.
- Transfer the baked sourdough loaf to a wire rack and let it cool completely for at least 1 hour before slicing. The crumb continues to set as it cools; slicing too soon can result in a gummy texture.