- Common troubleshooting and customization questions
-
Conclusion
- Closing emotional hook
- Encouragement to gather and share
A hush fell over the kitchen the moment the first flake caught the windowsill. Inside, warm light pooled around my siblings and me as we pressed our noses against the counter, watching Mom whisk red and green Jello until it shimmered like holiday ornaments in liquid form. It was a ritual we never tired of—part science experiment, part festive magic.
You know what? Those little spheres of joy weren’t just about sugar and color. They were about connection: sticky marshmallows pressed between tiny fingers, pineapple bits snagging on lips, and the thrill of rolling each orb into a snow-dusted pillow of sweetness. Now, it’s your turn to bring that same spark to your gatherings.

Why You’ll Love It
Half the fun of the season is revisiting the treats that anchored our childhood memories. These Jello balls deliver bright, nostalgic flavor without demanding a hyper-precise piping bag or a pastry thermometer. When you bite into one, the marshmallow bits feel like tiny clouds, the pineapple adds a surprise tropical note, and the gelatin glows like a jewel under twinkling lights. Plus, there’s real value in a recipe that doubles as playtime—kids, roommates or co-workers all get a kick out of squishing and shaping these sweet orbs.
Here’s the thing: nobody wants to be stuck staring at a recipe that feels like a second job. This one runs on a lean workflow—boil, mix, chill, roll—and still makes you look like the holiday hero. Honestly, juggling email threads and family gatherings never felt so tasty.
Timing and Servings
Plan on about 15 minutes of hands-on work, then let the fridge handle the rest. Two to three hours of chill time gives the Jello just enough firmness for rolling, though overnight stashing only deepens the flavor. You’ll end up with roughly 24 to 30 bite-size balls—perfect for a medium-sized potluck or a festive office breakroom. Need more? Double (or triple) the recipe, recruit a couple of helpers, and turn it into a mini production line.
Ingredients
• 3-ounce package red Jello (cherry, strawberry or another favorite)
• 3-ounce package green Jello (classic lime or green apple)
• 1 cup boiling water
• 1 cup mini marshmallows
• 1 cup crushed pineapple, thoroughly drained
• ½ cup chopped nuts (pecans or walnuts; omit for nut-free)
• Powdered sugar, for rolling
Directions
-
Dissolve the Jello
Pour ½ cup of boiling water into each bowl of colored Jello. Stir briskly until completely smooth—think of it like priming a paint can, but you’re painting with flavor. -
Incorporate marshmallows
Add ½ cup of mini marshmallows to each mixture. Stir until most soften but some remain intact for that pop of chew. -
Fold in pineapple and nuts
Gently coax ½ cup of drained pineapple into each bowl, followed by ¼ cup of nuts if you’re using them. This step is kind of like mixing a quick holiday spreadsheet—keep it gentle to preserve texture. -
Cool slightly
Let the bowls sit at room temperature until lukewarm. If you rush this, the marshmallows will vanish, and you’ll end up with a soupy mess. -
Shape the balls
Dust your palms with powdered sugar. Scoop a teaspoon of mixture and roll between your hands. Imperfections are cozy; they remind everyone these came from home. -
Sugar coat and chill
Give each sphere a snowy dusting of powdered sugar. Arrange on a parchment-lined sheet and refrigerate for at least 2 hours. -
Serve with flair
Arrange in paper cups, on tiered trays or in a candy dish—whatever matches your holiday vibe. Enjoy the oohs and ahhs.
Variations
• Tropical twist: Swap in coconut gelatin and roll in toasted coconut flakes.
• Peppermint snap: Add a couple drops of peppermint extract and finish with crushed candy cane bits.
• Layered jewels: Build mini-muffin–sized layers of different colors, letting each set for 10–15 minutes before adding more. Slice into pretty rounds.
• Vegan friendly: Use agar-agar instead of gelatin and vegan marshmallows.
• Nut-free crunch: Toss chia seeds or festive sprinkles onto the wet balls for extra bite.
Storage & Reheating Tips
Store these orbs in an airtight container in the fridge for up to five days. If the sugar coating gets damp, roll them in fresh powdered sugar before serving. No microwave or oven needed—just let them sit at room temperature for 10 minutes to soften slightly. Want a make-ahead hack? Freeze the balls on a tray for an hour, then bag them. Thaw in the fridge and touch up with a light dusting of sugar.
FAQs
Q: Can I skip the pineapple?
A: Absolutely—though you’ll lose a bit of tang. You can stir in a teaspoon of lemon juice to bring back some brightness.
Q: Why are my balls too wet?
A: Excess moisture from pineapple is usually the culprit. Press the fruit in a fine mesh strainer or wrap it in paper towels before folding it in.
Q: What if I use fresh fruit instead of canned?
A: Fresh pineapple or berries work fine—just chop small and drain thoroughly to avoid extra juice.
Q: My marshmallows vanished—what happened?
A: Warm Jello can dissolve them. Let the gelatin cool more before mixing in the marshmallows to keep them whole.
Q: Can kids help?
A: Definitely. Let them handle the rolling and sugar-coating while you manage the hot water and chilling steps.
Conclusion
Simple, clever and packed with holiday nostalgia, Mom’s Christmas Jello Balls are the kind of treat that sparks smiles—and makes you look like a kitchen wizard without breaking a sweat. Gather your loved ones, cue up a festive playlist, and let these colorful bites do the magic. One sweet sphere at a time, you’re making memories that will jingle long after the snow melts.
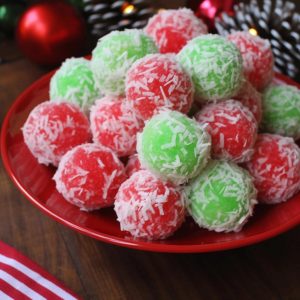
Mom’s Christmas Jello Balls
Ingredients
- 1 package 3 oz red Jello (flavor of choice)
- 1 package 3 oz green Jello (flavor of choice)
- 1 cup boiling water
- 1 cup mini marshmallows
- 1 cup crushed pineapple drained
- 1/2 cup chopped nuts optional, such as pecans or walnuts
- Powdered sugar for rolling
Instructions
- Prepare the Jello Mixtures:
- In two separate bowls, dissolve the red and green Jello each in 1/2 cup of boiling water. Stir well until fully dissolved.
- Add Mini Marshmallows:
- Stir 1/2 cup of mini marshmallows into each bowl of Jello while still warm. Mix until the marshmallows start to melt and slightly incorporate into the Jello.
- Incorporate Pineapple and Nuts:
- Add 1/2 cup of drained crushed pineapple to each bowl. If using, add 1/4 cup of chopped nuts to each bowl and stir gently to combine.
- Cool the Mixtures:
- Allow both Jello mixtures to cool to room temperature. This step helps maintain a good texture for rolling.
- Roll the Jello Balls:
- Use a teaspoon to scoop out small portions of the cooled Jello mixtures and roll them into balls with your hands.
- Coat in Powdered Sugar:
- Roll each Jello ball in powdered sugar until evenly coated.
- Chill the Jello Balls:
- Place the Jello balls on a baking sheet lined with parchment paper and refrigerate for 2-3 hours or until firm.
- Serve and Enjoy:
- Once chilled, serve the Jello balls and enjoy the fruity, festive treat!