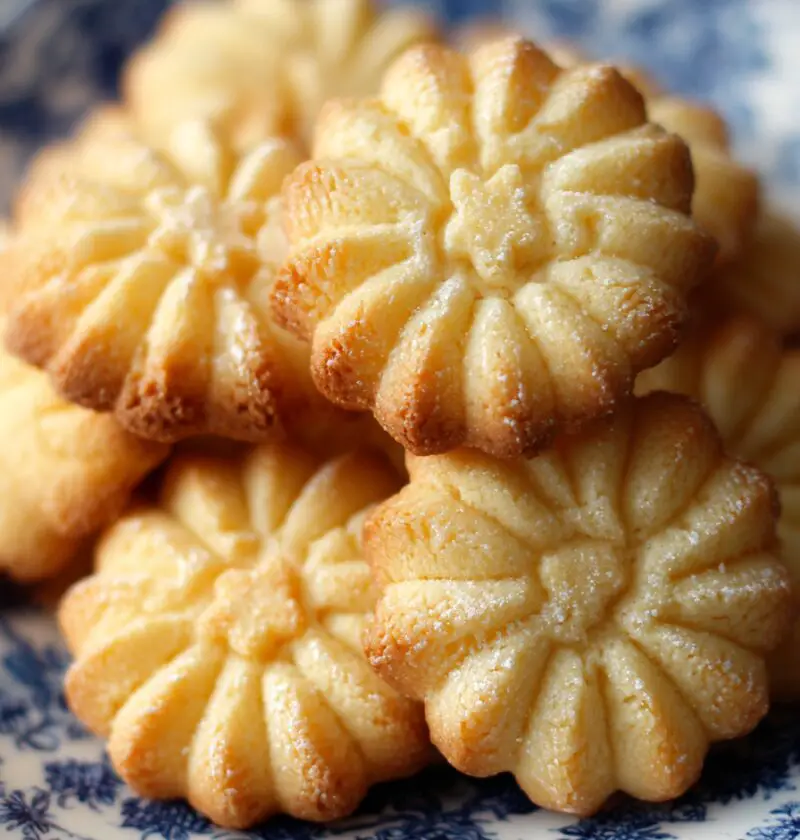
Danish Butter Cookies Recipe
Buttery, crisp, and wonderfully simple, this Danish Butter Cookies Recipe gives you those classic “blue tin” cookies at home—perfect for gifting, holidays, or a cozy afternoon with coffee.
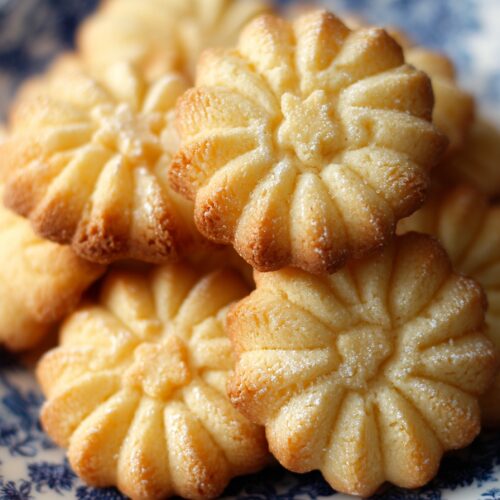
There’s something timeless about homemade danish butter cookies. They’re not flashy or fussy, but that first bite—tender, crisp, and rich with real butter and vanilla—tells you everything you need to know. This is my go-to traditional danish butter cookies recipe for Christmas cookie trays, teacher gifts, and honestly, any random Tuesday when I’m craving something nostalgic and a little fancy without much effort.
What I love about this classic butter cookies recipe is how dependable it is. The dough holds its shape for piped butter cookies, bakes into delicate golden rings, and makes the kitchen smell like a bakery in Copenhagen. If you grew up sneaking those danish cookie tin style cookies out of your grandma’s sewing box (you know exactly what I mean!), this is your “from scratch” version—with simple ingredients and clear, tested directions.
Why You’ll Love This Recipe
- Simple, pantry-friendly ingredients – Just butter, sugar, flour, egg, vanilla, and salt; nothing weird or hard to find.
- Tastes like the classic blue tin – These authentic danish butter cookies have that familiar flavor and snap, but fresher and more fragrant.
- Perfect for piping – The danish butter cookie dough is soft yet sturdy, so it pipes beautifully into swirls and rings that hold their shape.
- Ideal for gifting and holidays – This is a lovely danish Christmas cookies recipe for tins, boxes, cookie exchanges, and hostess gifts.
- Customizable flavors – Start with a buttery vanilla cookies recipe, then add citrus zest, spices, or chocolate for fun variations.
- Makes crisp, not cakey, cookies – You’ll get a true crisp butter cookies recipe, not soft sugar cookies pretending to be Danish.
- Freezer-friendly – The dough and the baked cookies both freeze well, which makes holiday prep so much easier.
- Foolproof for beginners – If you’re new to baking, these easy danish butter cookies are forgiving and well explained step-by-step.
Ingredients
Here’s everything you need for this homemade danish cookie recipe. I’m including both cups and grams—use a digital scale if you can; it truly helps with consistent texture.
- 1 cup (226 g) unsalted butter, very soft but not melted
- Use good-quality, high-fat butter (82% fat or higher if possible). European-style butter gives extra richness.
- 3/4 cup (150 g) granulated sugar
- Regular fine granulated sugar works best; avoid coarse sugar which doesn’t cream as smoothly.
- 1 large egg, room temperature
- Room temperature helps the dough stay smooth and pipeable.
- 2 tsp pure vanilla extract
- For even more aroma, you can swap 1 tsp for vanilla bean paste.
- 1/4 tsp almond extract (optional but lovely)
- Just a hint gives that classic bakery-style flavor.
- 2 cups (240 g) all-purpose flour, spooned and leveled
- Don’t pack the flour; too much will make the cookies dense and hard.
- 1/4 tsp fine sea salt
- Balances the sweetness and highlights the butter.
- 2–3 tsp whole milk or heavy cream, as needed
- Only if the dough is too stiff for piping.
- Coarse sugar or sanding sugar (optional, for topping)
Tip: If your kitchen runs warm, chill your baking sheets in the fridge before piping. It helps the cookies keep those pretty ridges.

Servings & Timing
- Yield: About 30–36 cookies, depending on size
- Prep Time: 20 minutes
- Chill Time (optional but helpful): 15–20 minutes on the tray
- Bake Time: 10–14 minutes per batch
- Total Time: About 45–60 minutes, including short chilling
If you’re doing multiple trays or doubling the recipe for Christmas tins, plan on an extra 20–30 minutes of hands-on time for piping.
Directions
This danish butter cookies recipe is all about technique: gentle mixing, proper butter texture, and a steady hand with the piping bag. Let me walk you through it.
-
Preheat and prep your pans
Preheat your oven to 350°F (175°C). Line two baking sheets with parchment paper or silicone baking mats. Avoid greasing the pans; the extra fat can make the cookies spread too much. -
Cream the butter and sugar
In a large mixing bowl, beat the softened butter and granulated sugar with a hand mixer or stand mixer (paddle attachment) on medium speed for about 3–4 minutes, until light, fluffy, and slightly paler. Scrape down the sides once or twice. This step adds air, which helps create that delicate, crisp bite. -
Add the egg and extracts
Beat in the egg, vanilla, and optional almond extract. Mix on medium speed just until fully combined and smooth—about 30–45 seconds. If the mixture looks slightly curdled, keep mixing; it usually comes together. -
Add dry ingredients
In a separate bowl, whisk together the flour and salt. Add this mixture to the butter mixture in two additions, mixing on low speed after each just until no dry streaks remain. Don’t overmix or your cookies can turn tough. -
Adjust consistency for piping
Check the texture of your danish butter cookie dough. It should be soft and thick, like very stiff frosting. If it’s too firm for piping, beat in 1 teaspoon of milk or cream at a time, up to about 2–3 teaspoons total, until it passes through your piping tip with steady pressure. If it’s too soft, pop the bowl in the fridge for 10 minutes. -
Fill your piping bag
Transfer the dough to a large piping bag fitted with an open star tip (a Wilton 1M or Ateco 826 works beautifully). Scoop the dough in batches, pressing it down to eliminate air pockets. Twist the top of the bag to keep pressure consistent. -
Pipe the cookies
Pipe 2–2.5 inch circles or rosettes onto the prepared baking sheets, spacing them about 2 inches apart. For traditional danish butter cookies from scratch, make small rings or “C” shapes. If you like, sprinkle a few with coarse sugar for sparkle and crunch. -
Chill briefly (optional but recommended)
Place the trays in the fridge for 15–20 minutes. This quick chill helps the piped butter cookies keep their distinct ridges and prevents excessive spreading. -
Bake to golden perfection
Bake one tray at a time for 10–14 minutes, rotating the pan halfway through. Watch the edges—they should be just turning light golden brown while the centers stay pale. That color contrast is key for a crisp butter cookies recipe. -
Cool completely
Let the cookies cool on the sheet for about 5 minutes, then transfer to a wire rack to cool fully. They firm up as they cool, so don’t worry if they feel a bit soft at first. -
Repeat and enjoy
Pipe and bake remaining dough, chilling between batches if your kitchen is warm. Once cool, enjoy with coffee, tea, or a little evening cocoa—you’ve just made authentic danish butter cookies at home.
Variations
Once you’ve mastered this classic, it’s fun to play. Here are some easy twists on this homemade danish butter cookies base:
- Lemon Almond Danish Cookies – Add 1–2 tsp lemon zest and increase almond extract to 1/2 tsp for a bright, bakery-style flavor.
- Chocolate-Dipped Butter Cookies – Dip cooled cookies halfway in melted dark or milk chocolate and sprinkle with chopped nuts or sprinkles.
- Spiced Holiday Danish Christmas Cookies – Add 1/2 tsp ground cinnamon and a pinch of nutmeg for a cozier, holiday version.
- Vanilla Bean Butter Cookies – Use 1 tsp vanilla bean paste plus 1 tsp extract for extra-deep vanilla notes.
- Gluten-Free Version – Swap the flour for a good 1:1 gluten-free baking blend and add 1 extra teaspoon of milk if the dough seems dry.
- Coffee Butter Cookies – Stir in 1–2 tsp instant espresso powder with the sugar for a subtle coffee-kissed cookie.
Storage & Reheating
One of the big advantages of this rich butter cookies recipe is how well it stores—very cookie-tin friendly.
-
Room Temperature:
Store baked cookies in an airtight tin or container at cool room temperature for 7–10 days. Layer with parchment to protect the delicate shapes. -
Freezer (Baked Cookies):
Freeze fully cooled cookies in a well-sealed container or freezer bag for up to 2 months. Thaw at room temperature for 20–30 minutes—no reheating needed. -
Freezer (Unbaked Dough):
You can pipe the dough onto a tray, freeze until firm, then transfer the frozen shapes to a freezer bag. Bake from frozen at 350°F, adding 1–2 extra minutes. -
Make-Ahead Tips:
For a busy season, make your danish butter cookie dough up to 3 days in advance, store it in an airtight container in the fridge, and bring it back to pipeable consistency by letting it sit at room temperature for 20–30 minutes before piping.
Notes
-
Butter temperature matters:
The butter should be soft enough to press a finger through, but not shiny or beginning to melt. Too cold and you’ll struggle to pipe; too warm and the cookies spread flat. -
For the best “tin” look:
Use a large open star tip and try to keep your piping pressure even. A slow, steady squeeze creates those iconic ridges you see in danish cookie tin style cookies. -
Browning is flavor—but don’t overdo it:
A faint golden edge gives that toasty, caramelized note traditional danish butter cookies are known for. If you see deep brown, they’ll taste more toasty than buttery. -
Batch testing helps:
If you’re nervous, bake just 3–4 test cookies first. Check spread, color, and time, then adjust for the rest of the batch. -
Humidity matters more than we think:
On very humid days, the dough can feel softer, and cookies might spread more. Chill a bit longer and avoid over-softening the butter at the start. -
My “grandma test”:
I always ask myself: “Would these hold up in a cookie tin mailed across the country?” With this recipe, the answer is yes—sturdy enough to ship, but still tender and buttery.
FAQs
1. Can I make these homemade danish butter cookies without a piping bag?
Yes. You can scoop small balls of dough, then flatten them lightly with the bottom of a glass or a fork. They won’t be classic rosettes, but they’ll still taste wonderful.
2. Why is my dough too stiff to pipe?
Your butter may have been too cold, or your flour measurement a bit heavy. Beat in milk or cream 1 teaspoon at a time until the dough passes through the piping tip with firm but doable pressure.
3. Why did my cookies spread too much?
Most often, the butter was too warm or the dough wasn’t chilled at all. Next time, chill the piped cookies for 15–20 minutes and consider using a slightly cooler oven if your oven tends to run hot.
4. Can I use salted butter instead of unsalted?
You can. Reduce the added salt to a tiny pinch or omit it. The flavor will be a bit different from authentic danish butter cookies, but still tasty.
5. How do I get a stronger vanilla flavor?
Use a mix of vanilla extract and vanilla bean paste, or scrape half a vanilla bean into the creamed butter and sugar for a more aromatic buttery vanilla cookies recipe.
6. Are these the same as shortbread cookies?
Not exactly. Shortbread usually skips the egg and sometimes uses more butter and sugar relative to flour. These are a cross between shortbread and sugar cookies—crisp, but a bit lighter.
7. Can I make this recipe in a food processor?
I don’t recommend it. Overmixing in a food processor can make the danish butter cookies from scratch tough and can warm the butter too much, which affects piping and shape.
8. How do I package these for gifts?
Layer cookies in tins or boxes with parchment between each layer. For mailing, wrap smaller stacks in plastic wrap first so they don’t bang around as much in the box.
Conclusion
This Danish Butter Cookies Recipe gives you everything you love about those nostalgic, blue-tin favorites—crisp edges, rich buttery flavor, and pretty piped shapes—made fresh in your own kitchen. It’s an easy danish butter cookies recipe that works for the holidays, but it’s just as lovely for an everyday treat.
If you try this homemade danish butter cookies batch, let me know how it went—leave a comment, share a photo, or tell me which variation you liked best. And if you’re building a cookie tray, you might enjoy pairing these with simple chocolate crinkle cookies or a soft sugar cookie recipe next.
Danish Butter Cookies
Ingredients
- 1 cup unsalted butter 226 g, very soft but not melted; use good-quality high-fat butter, European-style if possible
- 3/4 cup granulated sugar 150 g; regular fine granulated sugar
- 1 large egg room temperature
- 2 teaspoons pure vanilla extract can swap 1 teaspoon for vanilla bean paste for more aroma
- 1/4 teaspoon almond extract optional but lovely; adds classic bakery-style flavor
- 2 cups all-purpose flour 240 g, spooned and leveled; do not pack
- 1/4 teaspoon fine sea salt balances sweetness and enhances flavor
- 2-3 teaspoons whole milk or heavy cream use only as needed to loosen dough for piping
- coarse sugar or sanding sugar optional, for topping/sprinkling before baking
Instructions
- Preheat your oven to 350°F (175°C). Line two baking sheets with parchment paper or silicone baking mats. Do not grease the pans, as extra fat can cause the cookies to spread.
- In a large mixing bowl, beat the softened unsalted butter and granulated sugar with a hand mixer or stand mixer fitted with the paddle attachment on medium speed for 3–4 minutes, until light, fluffy, and slightly paler. Scrape down the sides of the bowl once or twice while mixing.1 cup unsalted butter, 3/4 cup granulated sugar
- Beat in the egg, vanilla extract, and optional almond extract on medium speed just until fully combined and smooth, about 30–45 seconds. If the mixture looks slightly curdled at first, continue mixing until it becomes smooth.1 large egg, 2 teaspoons pure vanilla extract, 1/4 teaspoon almond extract
- In a separate bowl, whisk together the all-purpose flour and fine sea salt. Add this dry mixture to the butter mixture in two additions, mixing on low speed after each just until no dry streaks remain. Avoid overmixing to keep the cookies tender and crisp.2 cups all-purpose flour, 1/4 teaspoon fine sea salt
- Check the texture of the dough. It should be soft and thick, similar to very stiff frosting. If it is too firm to pipe, beat in 1 teaspoon of milk or cream at a time, up to about 2–3 teaspoons total, until it passes through your piping tip with steady pressure. If it becomes too soft, chill the bowl in the refrigerator for about 10 minutes.2-3 teaspoons whole milk or heavy cream
- Transfer the dough to a large piping bag fitted with an open star tip (such as Wilton 1M or Ateco 826). Add the dough in batches and press it down to eliminate air pockets. Twist the top of the bag to maintain consistent pressure while piping.
- Pipe 2–2.5 inch circles, rosettes, rings, or 'C' shapes onto the prepared baking sheets, spacing them about 2 inches apart. For a traditional look, pipe small rings or crescents. If desired, sprinkle some cookies with coarse or sanding sugar for extra sparkle and crunch.coarse sugar or sanding sugar
- Place the baking sheets with the piped cookies in the refrigerator for 15–20 minutes. This brief chill helps the cookies keep their defined ridges and prevents excessive spreading during baking.
- Bake one tray at a time for 10–14 minutes, rotating the pan halfway through baking. The edges should be just turning light golden brown while the centers remain pale. This color contrast is key for a crisp texture without overbrowning.
- Allow the cookies to cool on the baking sheet for about 5 minutes, then transfer them carefully to a wire rack to cool completely. They will firm up as they cool, so don’t worry if they feel slightly soft at first.
- Pipe and bake any remaining dough, chilling the trays between batches if your kitchen is warm. Once the cookies are completely cool, serve them with coffee, tea, or cocoa, or pack them into tins for gifting.