Cheerio Bars: A Cozy No-Bake Cereal Treat
Have you ever had one of those mornings where the toast burns, the coffee spills, and you swear your day is off to a disastrous start? That was me last Saturday—frantically juggling breakfast for my gang of grandkids, juggling sippy cups, scrambling eggs, and almost forgetting to actually enjoy my cup of joe. Then I remembered I had a pan of my favorite no-bake Cheerio Bars cooling on the counter. One bite of that sweet, chewy goodness and suddenly everything felt right in the world again. Seriously, it was like wrapping myself in a warm, toasty blanket—comfort food at its finest.
These Cheerio Bars are the ultimate pantry-rescue snack. With just a handful of simple ingredients—whole-grain cereal, butter, and gooey marshmallows—you can whip up a batch in under half an hour. Bonus: they’re totally kid-approved (my three-year-old niece declared them “better than cookies”), and they hold up beautifully in lunchboxes, bake sales, or an afternoon pick-me-up when you’re craving something a little sweet and a little crunchy.

Why You’ll Love This
- No baking required—just a sturdy pot and a spatula (no oven preheat drama!).
- Ready in about 25 minutes from start to finish (perfect for busy afternoons).
- Crunchy, chewy texture that feels like a warm hug with every bite.
- Family-friendly appeal—everyone from toddlers to grandparents goes nuts for these.
- Customizable—stir in chocolate chips, nuts, or dried fruit for endless flavor twists.
- Portable and kid lunchbox–approved (you’ll want to make a double batch!).
- Uses everyday pantry staples you probably already have on hand.
Ingredient Notes
- Whole-Grain Cheerios (6 cups): If you’re after a budget-friendly swap, store-brand “O” cereals work beautifully. For a gluten-free version, use certified gluten-free rice cereal or corn puffs.
- Unsalted Butter (3 tablespoons): You can swap in coconut oil for a dairy-free or vegan option—just keep an eye on the melting process (coconut oil melts faster!).
- Mini Marshmallows (10 oz/one bag): I love grabbing store-brand marshmallows in the winter—they’re plumper and more wallet-friendly. If you only have large marshmallows, you’ll need about 20 pieces (chop them roughly so they melt evenly).
- Pure Vanilla Extract (½ teaspoon, optional): This little touch of vanilla takes the flavor from “yum” to “oh wow!”—don’t skip it if you can help it.
- Pinch of Fine Salt: Balances all that sweetness and really makes the flavors pop.
- Optional Mix-Ins: ¼ cup mini chocolate chips (dark, milk, or even white), chopped toasted nuts (pecans, almonds, peanuts—go wild), dried cranberries, sprinkles, or even a handful of gummy bears (yes, really!).
Tip: If you’re feeling adventurous, add a sprinkle of cinnamon or a drop of almond extract for a subtle flavor upgrade. My grandkids are obsessed with when I swirl in a bit of creamy peanut butter before stirring in the cereal—so craveable!
Directions
- Grab an 8×8-inch baking pan and line it with parchment paper, leaving a couple-inch overhang on two sides. Lightly grease the paper so nothing sticks.
- Set a large, heavy-bottomed pot over low heat. Add the butter (or coconut oil) and let it melt completely—stir gently so it doesn’t brown. This is the part where patience kicks in!
- Toss in all the mini marshmallows. Stir constantly with a silicone spatula (or wooden spoon) until you have a smooth, glossy sea of marshmallow goodness—about 2–3 minutes. If you spot any unmelted bits clinging to the sides, just lower the heat and keep stirring.
- Take the pot off the heat. Stir in the vanilla extract and pinch of salt for that extra depth (don’t skip this, friends!).
- Quickly fold in the Cheerios and any mix-ins you’ve chosen. Move fast, because as it cools the mixture will start to set up. Think of it like building a sandcastle—you want everything in place before it’s too late.
- Transfer the cereal-marshmallow combo into your prepared pan. Use a piece of wax paper or a buttered spatula to press it down firmly and evenly. Pro tip: firm, even pressure helps the bars stick together without turning into hockey pucks.
- Let the pan sit at room temperature for about 20 minutes, then pop it into the fridge for another 10–15 minutes so the bars slice like a dream.
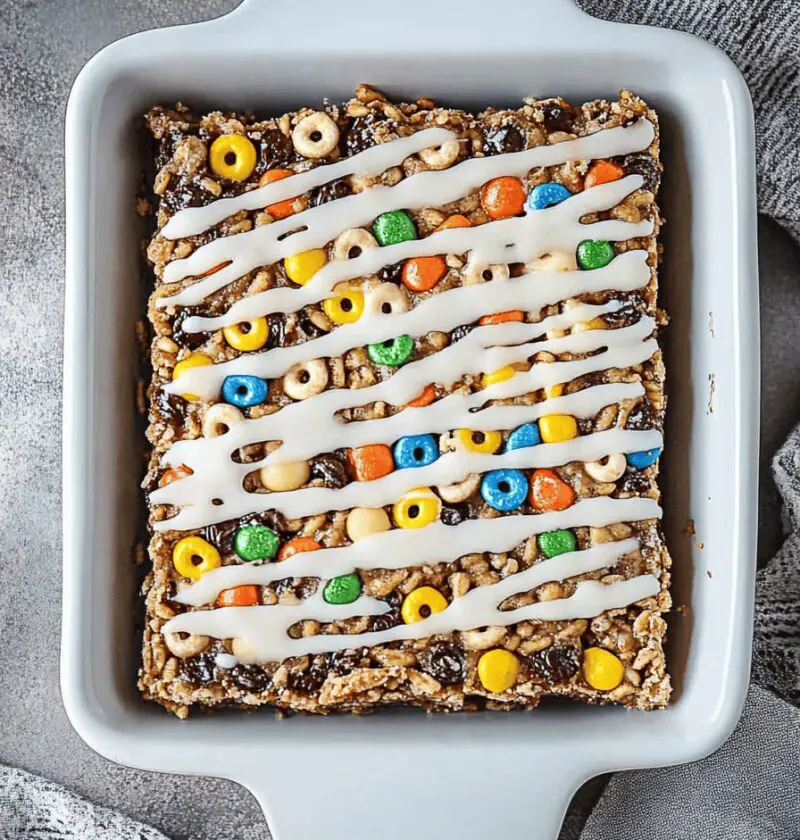
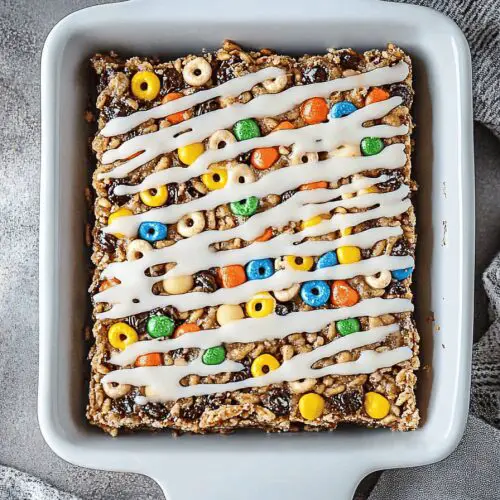
- Lift the parchment overhang to remove the block of bars, place on a cutting board, and slice into 12 generous squares or 16 smaller snack-size bars. Clean cuts are just so satisfying, aren’t they?
Makes 12–16 bars
Prep Time: 10 minutes
Chill/Rest Time: 30 minutes
Total Time: 40 minutes
Variations & Flavor Twists
- Peanut Butter Swirl: Melt ¼ cup creamy peanut butter into the marshmallow mixture before adding Cheerios—peanut buttery heaven!
- Chocolate Drizzle: Once your bars are set, melt 2–3 tablespoons of dark or milk chocolate and drizzle over the top. Let it firm up, then get ready for some serious finger-licking.
- Fruity Crunch: Stir in ½ cup chopped dried cranberries, cherries, or raisins for a bright, chewy pop in every bite.
- S’mores Style: Add a handful of mini chocolate chips and a few extra marshmallows right before pressing into the pan—instant campfire vibes.
- Nutty Boost: Toss in ¼ cup toasted pecans, almonds, or sunflower seeds for extra crunch and a little protein punch.
- Spicy Kick: For you adventurous souls, sprinkle in a pinch of cayenne or chili powder with the salt. Sounds wild, but trust me—it’s addictive!
Storage & Reheating Tips
Once your Cheerio Bars have cooled and been cut, store them in an airtight container at room temperature for up to three days (if they last that long!). For longer shelf life, wrap each bar individually in plastic wrap or wax paper and stash them in the freezer for up to one month. When you’re ready to indulge, let them thaw at room temp for 10 minutes—or pop them on top of the fridge for a few minutes to revive that gooey marshmallow pull. No microwave needed, but if you’re in a hurry, a 5-second zap will do the trick.
Parting Thoughts (Come Chat with Me!)
And there you have it—my cozy, comforting, no-fuss Cheerio Bars that feel like a childhood memory and an afternoon pick-me-up all in one. Whether you’re feeding a crowd at a bake sale, packing lunchboxes for picky little eaters, or simply craving a sweet, crunchy treat with minimal cleanup, these bars have your back. I seriously can’t get enough of them (my husband caught me sneaking a piece late at night—oops!).
Give them a whirl and let me know how you spiced them up. Did you try that cayenne twist, or maybe the classic peanut butter swirl? Drop a comment below with your favorite mix-ins, questions, or even a funny kitchen mishap—because let’s be honest, that’s half the fun. Until next time, happy snacking, friends!
Cheerio Bars
Ingredients
- 6 cups whole-grain Cheerios cereal about 180 g
- 3 tablespoons unsalted butter or coconut oil for dairy-free
- 10 oz mini marshmallows about one bag
- 1/2 teaspoon pure vanilla extract optional
- Pinch fine salt balances sweetness
- 1/4 cup mini chocolate chips, chopped nuts, sprinkles, or dried cranberries optional mix-ins
Instructions
- Line an 8×8-inch pan with parchment paper, leaving overhang for easy removal. Grease lightly.
- Melt butter in a pot over low heat. Add marshmallows, stir until smooth (2-3 minutes).
- Remove from heat. Stir in vanilla extract, salt, and Cheerios. Add mix-ins and combine quickly.
- Transfer to pan, press evenly. Chill for 20 minutes at room temperature, then 10-15 minutes in the fridge.
- Lift bars from the pan, cut into squares or snack-sized bars.