Candy Cane Bark Recipe
If you’re looking for a no-bake, quick, and ridiculously festive treat, this Candy Cane Bark Recipe is your new holiday best friend—crunchy, chocolatey, pepperminty, and ready before your favorite Christmas movie is over.
This classic layered chocolate bark has been on my Christmas baking list for almost two decades now. It’s the homemade Christmas candy I pull out when the kids are decorating the tree, when neighbors stop by with gifts, and when I realize (yet again) that I promised to bring “a little something sweet” to the office and completely forgot. This peppermint bark looks fancy, tastes like a gourmet confection, but takes almost no real effort. That’s my kind of holiday dessert.
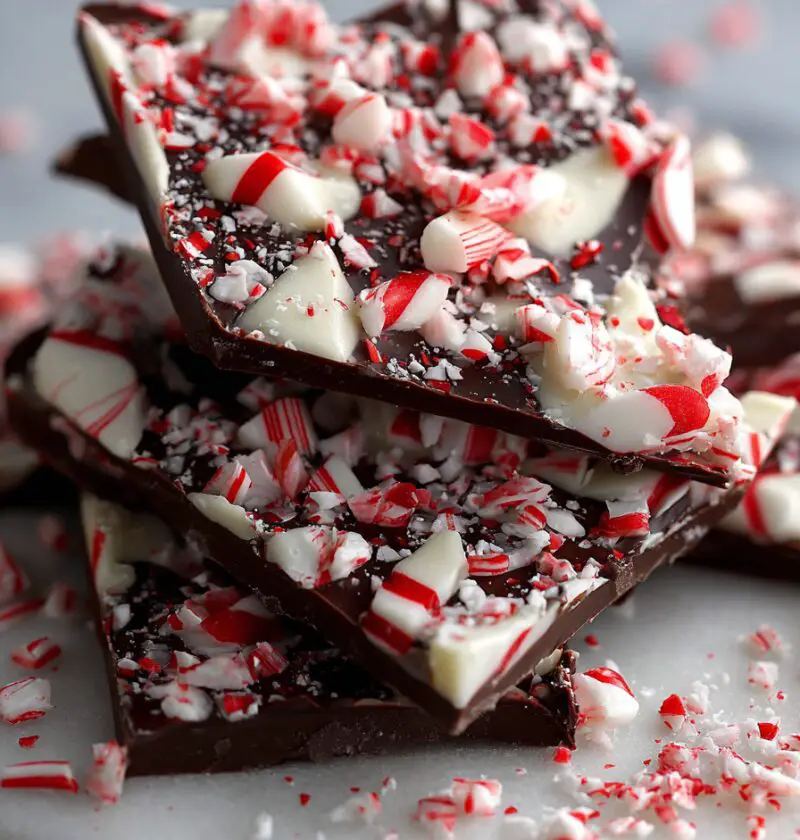
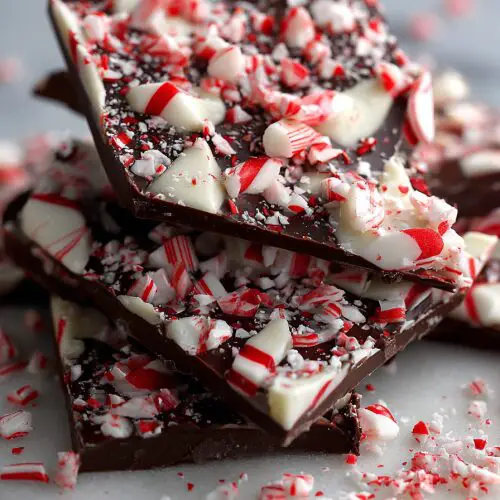
Think creamy white chocolate bark layered over rich dark chocolate bark, topped with crunchy crushed candy canes. It’s a simple Christmas dessert that feels special, travels well, and makes a beautiful holiday treat box filler. And between you and me, I’m 50 now and I appreciate any Christmas baking recipe that lets me stay in my slippers while the microwave does most of the work.
Why You’ll Love This Recipe
- No baking required—your oven can stay busy with cookies and ham.
- Ready in about 1 hour total, with less than 20 minutes of hands-on time.
- Perfect for gift boxes, cookie trays, and last-minute Christmas treats.
- Budget-friendly holiday candy that looks like something from a fancy chocolate shop.
- Easy to customize—use milk, dark, or semi-sweet chocolate, or even swirl them.
- Naturally gluten-free (just check your candy cane labels).
- Great make-ahead Christmas dessert; keeps well in the fridge or freezer.
- Fun for kids to help with—especially the “smash the candy canes” part.
- Scales beautifully—double or triple the batch for parties and holiday baking marathons.
Ingredients
Here’s everything you need for this classic Candy Cane Bark Recipe. Keep the list simple and the quality good—since there are only a few ingredients, each one matters.
-
8 ounces dark or semi-sweet chocolate, chopped
- Use good-quality chocolate bars or baking wafers (Ghirardelli, Guittard, or similar). Chips work in a pinch but don’t melt quite as smoothly.
-
8 ounces white chocolate, chopped
- Look for real white chocolate made with cocoa butter, not just “white chips” made with palm oil. It melts more smoothly and tastes richer.
-
1 teaspoon neutral oil, divided (optional)
- Canola, avocado, or light vegetable oil helps your chocolate melt shinier and smoother. Use ½ teaspoon for each layer if your chocolate seems thick.
-
½ teaspoon peppermint extract (divided or mostly in the white layer)
- Use pure peppermint extract, not “mint” extract, which can taste like toothpaste. Start with ¼ teaspoon and taste—peppermint gets strong fast.
-
5–6 regular-sized candy canes, crushed (about ½ cup)
- Any brand works; I like classic red-and-white peppermint candy canes for that nostalgic holiday candy look.
-
Small pinch of fine sea salt (optional but lovely)
- Just a tiny pinch in the dark chocolate layer makes the chocolate flavor pop.

Gear you’ll want handy:
- 8×8-inch baking pan (or similar size)
- Parchment paper
- Microwave-safe bowls (or a double boiler)
- Small spatula or offset spatula
- Zip-top bag and rolling pin (for crushing candy canes)
A quick note: If you’re planning a big Christmas baking recipe day, go ahead and prep enough ingredients for two pans. This festive chocolate bark disappears faster than you think.
Directions
-
Prepare your pan
Line an 8×8-inch baking pan with parchment paper, leaving some overhang on the sides so you can lift the bark out later. Smooth the parchment into the corners so the chocolate spreads evenly. -
Crush the candy canes
Place the candy canes in a zip-top bag, press out extra air, and seal. Use a rolling pin, meat mallet, or even the bottom of a saucepan to crush them into small pieces—aim for a mix of tiny shards and slightly larger bits for texture. Set aside. -
Melt the dark chocolate
Add the chopped dark or semi-sweet chocolate to a microwave-safe bowl. Heat in 20–30 second bursts, stirring well between each, until almost melted. When just a few small pieces remain, stir until completely smooth. If it seems thick or grainy, stir in up to ½ teaspoon of neutral oil. -
Flavor the dark chocolate (optional)
Stir in a tiny pinch of sea salt and ⅛ teaspoon peppermint extract if you want peppermint in both layers. Taste first—peppermint can get strong fast, and you’ll add more in the white chocolate layer. -
Spread the first layer
Pour the melted dark chocolate into the prepared pan. Use a spatula to spread it evenly into the corners. Gently tap the pan on the counter a few times to knock out air bubbles and smooth the surface. -
Chill briefly
Place the pan in the fridge for about 10–15 minutes, just until the dark chocolate is mostly set but not rock hard. You should be able to touch it lightly without chocolate coming off on your finger, but it should still feel slightly tacky. That helps the layers stick together. -
Melt the white chocolate
While the dark layer chills, melt the white chocolate in a clean microwave-safe bowl. Again, use short bursts of 20–30 seconds, stirring well each time. White chocolate burns quickly, so don’t walk away. If it feels too thick, stir in ½ teaspoon neutral oil. -
Add peppermint to the white layer
Stir in ¼–⅜ teaspoon peppermint extract into the melted white chocolate. Start with the smaller amount, taste, and add a tiny bit more if you like a stronger peppermint flavor. -
Layer the white chocolate
Remove the pan from the fridge. Gently pour the white chocolate over the dark chocolate layer. Work quickly but calmly—white chocolate starts to firm up as it hits the cooler layer. Use a spatula to spread it evenly without pressing too hard, so you don’t disturb the dark chocolate underneath. -
Add the candy cane topping
Immediately sprinkle the crushed candy canes over the warm white chocolate layer. Press very lightly with your fingertips so the peppermint candy bark topping adheres without sinking in too far. -
Chill until set
Place the pan back in the fridge for 30–40 minutes, or until the bark is firm all the way through. If you’re not rushed, you can also let it set at cool room temperature for 1–2 hours. -
Cut or break into pieces
Once fully set, lift the bark out of the pan using the parchment overhang. You can either use a sharp knife to cut it into squares or let kids have fun breaking it into rustic shards. If the chocolate cracks unevenly, that’s part of the charm of homemade candy bark. -
Serve and enjoy
Pile your peppermint chocolate bark onto a pretty plate, tuck pieces into tins for gifts, or store in an airtight container. Try not to “taste test” half the batch—I always warn you, but I do it anyway.
Servings & Timing
- Yield: About 20–24 pieces, depending on size
- Prep Time: 15–20 minutes
- Chill Time: 30–45 minutes
- Total Time: About 1 hour
This makes enough Christmas candy for a small gathering or a few gift bags. For big parties or cookie exchanges, just double the recipe and use a 9×13-inch pan.
Variations
You know what? This Candy Cane Bark Recipe is wonderfully flexible—treat it as your base holiday bark template.
- Triple Chocolate Bark: Use a mix of milk, dark, and white chocolate layers for an extra indulgent Christmas dessert.
- Salted Peppermint Bark: Sprinkle a tiny bit of flaky sea salt over the top with the candy canes for a sweet-salty festive chocolate bark.
- Mocha Peppermint Bark: Stir 1 teaspoon instant espresso powder into the dark chocolate for a coffee shop-style holiday treat.
- Nutty Holiday Bark: Add a layer of toasted, finely chopped almonds, pecans, or pistachios between the dark and white chocolate layers.
- Swirled Chocolate Bark: Instead of two solid layers, spoon melted dark and white chocolate randomly, then swirl with a toothpick before adding candy canes.
- Colorful Kid-Friendly Bark: Toss in a few red and green sprinkles with the candy canes for extra-fun Christmas treats.
Storage & Reheating
Candy cane bark is very forgiving, which is exactly what we need during a busy holiday season.
- Room temperature: Store in an airtight container in a cool, dry place for up to 1 week. Keep away from direct sunlight or heat so the layers don’t soften.
- Refrigerator: For longer storage, keep the bark in a sealed container in the fridge for up to 2–3 weeks. The peppermint flavor often deepens over time.
- Freezer: Place pieces in a freezer-safe container with parchment between layers and freeze for up to 2 months. Let sit at room temperature for 10–15 minutes before serving so the chocolate softens slightly.
No true “reheating” is needed—just bring chilled or frozen peppermint bark back to a pleasant temperature. If you freeze it, don’t thaw uncovered in a humid kitchen or it may collect condensation.
Make-ahead tip: I often make this festive chocolate bark the first week of December, freeze it, and pull out a container for parties and cookie trays whenever I need a quick holiday dessert.
Notes
- About the chocolate: The better your chocolate, the better your peppermint bark. I’m not talking fancy $10 bars, but choose something you like to eat plain. Bar chocolate usually melts smoother than chocolate chips because chips are designed to hold their shape.
- White chocolate quirks: White chocolate scorches faster than dark chocolate. If you see it getting thick and grainy, it’s getting too hot. Short bursts, lots of stirring, and patience are your friends.
- Layer connection: The first chocolate layer should be set but not rock solid when you add the second. If it’s fully hard and cold, you sometimes get layers that separate. If that happens, don’t stress—people will still eat every last crumb.
- Candy cane color: Crush the candy canes just before sprinkling. If they sit too long, the red can bleed a bit. It’s still tasty, but it looks prettiest when fresh.
- Cutting clean pieces: For neat squares, let the bark sit at room temperature for 5–10 minutes, then use a large sharp knife. Wipe the knife between cuts. For rustic shards, just break it apart while it’s still chilled.
- Noise warning: If you have sleeping kids, maybe crush the candy canes earlier in the day. Ask me how I learned that one.
FAQs
Can I make this Candy Cane Bark Recipe without a microwave?
Yes. Melt both the dark and white chocolate in a heatproof bowl set over a pot of gently simmering water (double boiler style), stirring until smooth.
My chocolate seized and got grainy—what happened?
It likely overheated or came into contact with a bit of water. Try stirring in a teaspoon of neutral oil to smooth it out, but if it’s very thick and dull, it may be past saving for bark.
Can I use chocolate chips instead of chopped chocolate bars?
You can. They’ll work, but they may not melt as smoothly because they’re made to hold their shape. A little oil helps, and spreading the layers a bit thicker can hide small texture issues.
Is this peppermint bark gluten-free?
Usually yes, but check the labels on your candy canes and chocolate. Most are gluten-free, but it’s always good to be sure if you’re serving guests with allergies.
How do I keep the candy cane pieces from getting sticky?
Store the bark in an airtight container in a cool, dry spot. Humidity makes the candy canes tacky. Keeping it in the fridge helps if your kitchen runs warm.
Can I make this with only white chocolate?
Absolutely. You’ll have a simple white chocolate bark with candy cane—just double the white chocolate and skip the dark layer. It’s a bit sweeter but still a lovely holiday candy.
What’s the best way to package this for gifts?
Place pieces in cellophane bags or tins lined with parchment. For extra charm, tie with a red ribbon and include a little tag with the name “Candy Cane Bark Recipe” and a note to store in a cool place.
Can I add other mix-ins like cookies or pretzels?
Yes, just keep your total toppings reasonable so the bark still holds together. Crushed chocolate sandwich cookies, pretzel bits, or toasted nuts all pair beautifully with peppermint chocolate bark.
Conclusion
This simple Candy Cane Bark Recipe brings together creamy white chocolate bark, rich dark chocolate bark, and nostalgic candy cane crunch into one easy Christmas dessert. It’s the kind of holiday candy that feels special but doesn’t keep you chained to the kitchen.
If you make this festive chocolate bark, let me know how it goes—leave a comment, share your favorite variations, or tell me whether you’re #TeamDarkChocolate or #TeamAllWhite. And if you’re building a whole holiday treats tray, you might also enjoy pairing this with classic peanut butter fudge or sugar cookies for a full Christmas baking moment.
Candy Cane Bark
Ingredients
- 8 ounces dark or semi-sweet chocolate chopped; use good-quality bar chocolate or baking wafers
- 8 ounces white chocolate chopped; use real white chocolate made with cocoa butter
- 1 teaspoon neutral oil divided; optional, for smoother melting (such as canola, avocado, or vegetable oil)
- 1/2 teaspoon peppermint extract divided or mostly in the white chocolate layer; use pure peppermint extract
- 5-6 pieces candy canes regular size, crushed (about 1/2 cup); classic red-and-white peppermint preferred
- pinch fine sea salt optional; a tiny pinch in the dark chocolate layer
- 1 8x8-inch baking pan or similar size
- parchment paper
- microwave-safe bowls or a double boiler, for melting chocolate
- small spatula or offset spatula for spreading chocolate layers
- zip-top bag and rolling pin or meat mallet / saucepan bottom, for crushing candy canes
Instructions
- Line an 8x8-inch baking pan with parchment paper, leaving some overhang on the sides to lift the bark out later. Smooth the parchment into the corners so the chocolate can spread evenly.1 8x8-inch baking pan, parchment paper
- Place the candy canes in a zip-top bag, press out excess air, and seal. Use a rolling pin, meat mallet, or the bottom of a saucepan to crush them into small pieces, aiming for a mix of tiny shards and slightly larger bits for texture. Set aside.5-6 pieces candy canes, zip-top bag and rolling pin
- Add the chopped dark or semi-sweet chocolate to a microwave-safe bowl. Microwave in 20–30 second bursts, stirring well between each, until almost melted. When just a few small pieces remain, stir until completely smooth. If the chocolate seems thick or grainy, stir in up to 1/2 teaspoon neutral oil.8 ounces dark or semi-sweet chocolate, 1 teaspoon neutral oil, microwave-safe bowls
- Stir a tiny pinch of fine sea salt and about 1/8 teaspoon peppermint extract into the melted dark chocolate if you want peppermint flavor in both layers. Taste before adding more—peppermint is strong, and more will be added to the white chocolate layer.1/2 teaspoon peppermint extract, pinch fine sea salt
- Pour the melted dark chocolate into the prepared pan. Use a spatula to spread it evenly into the corners, then gently tap the pan on the counter a few times to knock out air bubbles and smooth the surface.8 ounces dark or semi-sweet chocolate, 1 8x8-inch baking pan, small spatula or offset spatula
- Place the pan in the refrigerator for 10–15 minutes, just until the dark chocolate is mostly set but not rock hard. It should feel slightly tacky but not transfer onto your finger when lightly touched. This helps the layers adhere.
- While the dark layer chills, place the chopped white chocolate in a clean microwave-safe bowl. Microwave in 20–30 second bursts, stirring well between each, until smooth and melted. White chocolate burns quickly, so use short bursts and do not overheat. If needed, stir in about 1/2 teaspoon neutral oil for a smoother consistency.8 ounces white chocolate, 1 teaspoon neutral oil, microwave-safe bowls
- Stir 1/4–3/8 teaspoon peppermint extract into the melted white chocolate. Start with the smaller amount, taste, and add a tiny bit more if you prefer a stronger peppermint flavor.8 ounces white chocolate, 1/2 teaspoon peppermint extract
- Remove the pan from the refrigerator. Gently pour the peppermint white chocolate over the set dark chocolate layer. Work quickly, as the white chocolate will begin to firm when it hits the cooler layer. Use a spatula to spread it evenly without pressing too hard, so the dark chocolate underneath stays in place.8 ounces dark or semi-sweet chocolate, 8 ounces white chocolate, 1 8x8-inch baking pan, small spatula or offset spatula
- Immediately sprinkle the crushed candy canes evenly over the warm white chocolate layer. Press very lightly with your fingertips so the pieces adhere without sinking too deeply.5-6 pieces candy canes
- Return the pan to the refrigerator and chill for 30–40 minutes, or until the bark is firm all the way through. Alternatively, let it set at cool room temperature for 1–2 hours.
- Once fully set, use the parchment overhang to lift the bark out of the pan and onto a cutting board. Cut into squares with a sharp knife, or break it into rustic shards by hand. Slightly uneven pieces are part of the charm.parchment paper
- Serve the candy cane bark on a platter, tuck pieces into gift tins or bags, or store in an airtight container. Keep at cool room temperature for up to 1 week, in the refrigerator for 2–3 weeks, or freeze for up to 2 months (with parchment between layers).