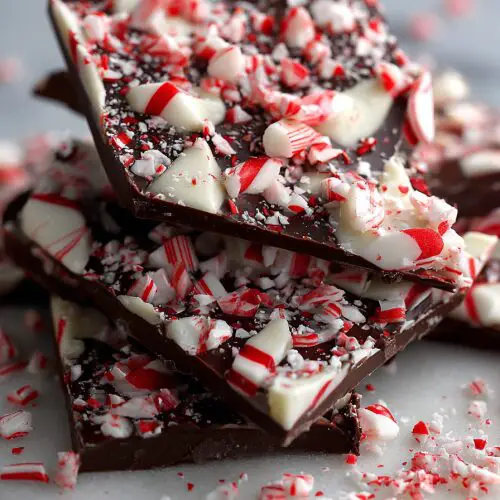
Candy Cane Bark
This Candy Cane Bark is a no-bake, layered chocolate and peppermint treat: a base of dark or semi-sweet chocolate topped with creamy white chocolate and crunchy crushed candy canes. It’s festive, quick to make, and perfect for gifting, cookie trays, or last-minute holiday desserts.
Ingredients
- 8 ounces dark or semi-sweet chocolate chopped; use good-quality bar chocolate or baking wafers
- 8 ounces white chocolate chopped; use real white chocolate made with cocoa butter
- 1 teaspoon neutral oil divided; optional, for smoother melting (such as canola, avocado, or vegetable oil)
- 1/2 teaspoon peppermint extract divided or mostly in the white chocolate layer; use pure peppermint extract
- 5-6 pieces candy canes regular size, crushed (about 1/2 cup); classic red-and-white peppermint preferred
- pinch fine sea salt optional; a tiny pinch in the dark chocolate layer
- 1 8x8-inch baking pan or similar size
- parchment paper
- microwave-safe bowls or a double boiler, for melting chocolate
- small spatula or offset spatula for spreading chocolate layers
- zip-top bag and rolling pin or meat mallet / saucepan bottom, for crushing candy canes
Instructions
- Line an 8x8-inch baking pan with parchment paper, leaving some overhang on the sides to lift the bark out later. Smooth the parchment into the corners so the chocolate can spread evenly.1 8x8-inch baking pan, parchment paper
- Place the candy canes in a zip-top bag, press out excess air, and seal. Use a rolling pin, meat mallet, or the bottom of a saucepan to crush them into small pieces, aiming for a mix of tiny shards and slightly larger bits for texture. Set aside.5-6 pieces candy canes, zip-top bag and rolling pin
- Add the chopped dark or semi-sweet chocolate to a microwave-safe bowl. Microwave in 20–30 second bursts, stirring well between each, until almost melted. When just a few small pieces remain, stir until completely smooth. If the chocolate seems thick or grainy, stir in up to 1/2 teaspoon neutral oil.8 ounces dark or semi-sweet chocolate, 1 teaspoon neutral oil, microwave-safe bowls
- Stir a tiny pinch of fine sea salt and about 1/8 teaspoon peppermint extract into the melted dark chocolate if you want peppermint flavor in both layers. Taste before adding more—peppermint is strong, and more will be added to the white chocolate layer.1/2 teaspoon peppermint extract, pinch fine sea salt
- Pour the melted dark chocolate into the prepared pan. Use a spatula to spread it evenly into the corners, then gently tap the pan on the counter a few times to knock out air bubbles and smooth the surface.8 ounces dark or semi-sweet chocolate, 1 8x8-inch baking pan, small spatula or offset spatula
- Place the pan in the refrigerator for 10–15 minutes, just until the dark chocolate is mostly set but not rock hard. It should feel slightly tacky but not transfer onto your finger when lightly touched. This helps the layers adhere.
- While the dark layer chills, place the chopped white chocolate in a clean microwave-safe bowl. Microwave in 20–30 second bursts, stirring well between each, until smooth and melted. White chocolate burns quickly, so use short bursts and do not overheat. If needed, stir in about 1/2 teaspoon neutral oil for a smoother consistency.8 ounces white chocolate, 1 teaspoon neutral oil, microwave-safe bowls
- Stir 1/4–3/8 teaspoon peppermint extract into the melted white chocolate. Start with the smaller amount, taste, and add a tiny bit more if you prefer a stronger peppermint flavor.8 ounces white chocolate, 1/2 teaspoon peppermint extract
- Remove the pan from the refrigerator. Gently pour the peppermint white chocolate over the set dark chocolate layer. Work quickly, as the white chocolate will begin to firm when it hits the cooler layer. Use a spatula to spread it evenly without pressing too hard, so the dark chocolate underneath stays in place.8 ounces dark or semi-sweet chocolate, 8 ounces white chocolate, 1 8x8-inch baking pan, small spatula or offset spatula
- Immediately sprinkle the crushed candy canes evenly over the warm white chocolate layer. Press very lightly with your fingertips so the pieces adhere without sinking too deeply.5-6 pieces candy canes
- Return the pan to the refrigerator and chill for 30–40 minutes, or until the bark is firm all the way through. Alternatively, let it set at cool room temperature for 1–2 hours.
- Once fully set, use the parchment overhang to lift the bark out of the pan and onto a cutting board. Cut into squares with a sharp knife, or break it into rustic shards by hand. Slightly uneven pieces are part of the charm.parchment paper
- Serve the candy cane bark on a platter, tuck pieces into gift tins or bags, or store in an airtight container. Keep at cool room temperature for up to 1 week, in the refrigerator for 2–3 weeks, or freeze for up to 2 months (with parchment between layers).
Notes
Use the best chocolate you comfortably can; bar chocolate usually melts more smoothly than chips. White chocolate scorches easily—use short microwave bursts and stir often. For best layer adhesion, add the white chocolate when the dark layer is set but still slightly tacky; if the first layer is rock hard and very cold, the layers may separate a bit when broken. Crush candy canes shortly before sprinkling so the red color stays vibrant. For cleaner squares, let the bark sit at room temperature for 5–10 minutes before cutting and wipe the knife between cuts. Noise tip: crushing candy canes can be loud, so avoid doing it near sleeping kids.
Love this recipe?Follow us at @thenandnowspace for more