Tiger Butter Fudge Recipe
This Tiger Butter Fudge Recipe gives you rich, swirled chocolate and creamy peanut butter goodness with almost zero effort—and no baking, no thermometer, and no stress.
What Is Tiger Butter Fudge, Anyway?
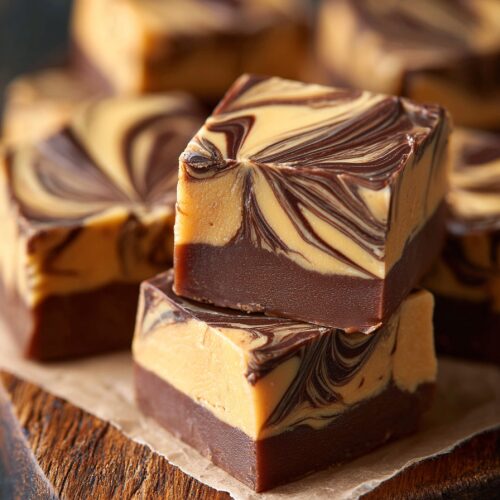
If you’ve never had tiger butter fudge, you’re in for such a treat. It’s a white chocolate peanut butter fudge base that’s topped with melted chocolate and swirled to look like tiger stripes—hence the name. Think of it as marble peanut butter fudge meets layered chocolate fudge, with the shortcut ease of a microwave fudge recipe.
I tend to make this around the holidays—December especially—because search trends always show a big spike for “easy fudge recipe” and “holiday fudge recipe” that time of year. But honestly, it’s just as welcome for summer potlucks, bake sales, or care packages for college kids.
What makes this one special?
- It’s no-bake and done almost entirely in the microwave.
- It holds its shape beautifully for gifting and cookie trays.
- It has that nostalgic peanut butter cup flavor, but in swirled chocolate fudge form.
As a 50‑year‑old mom and now very proud grandma, I love recipes that feel a little “wow” but don’t leave me washing dishes at midnight. This homemade tiger butter checks all those boxes—and then some.
Why You’ll Love This Tiger Butter Fudge Recipe
- No candy thermometer needed – This is not one of those fussy fudge recipes; if you can melt chocolate, you can make this.
- Microwave-friendly – The whole thing is a true microwave fudge recipe, with just a saucepan as a backup if you prefer.
- Fast enough for busy days – About 10 minutes of hands-on prep; the rest is chill time.
- Perfect for gifts and cookie trays – The tiger stripes look fancy, and the fudge slices cleanly for pretty boxes or tins.
- Kid- and crowd-approved – The flavor is classic: like peanut butter cups and white chocolate had a very delicious baby.
- No special tools – Just a microwave-safe bowl, spatula, and an 8×8-inch pan. No stand mixer, no special gadgets.
- Easy to customize – You can turn this into holiday fudge (red and green drizzle), a salty-sweet version, or even a nut-free version.
- Freezer-friendly – Make it weeks ahead and stash some away for “emergency dessert” moments.
Ingredients
Here’s everything you need to make this swirled chocolate fudge at home. Measurements are for an 8×8-inch pan.
- 2 cups (12 oz / 340 g) white chocolate chips
- Use good-quality white chocolate chips (Ghirardelli, Guittard, or Trader Joe’s) for a smooth, creamy base.
- 1 cup (260 g) creamy peanut butter
- Use a classic brand like Jif or Skippy; natural peanut butter that separates can make the fudge grainy.
- 1 tablespoon unsalted butter
- Adds a softer, fudge-like bite instead of a hard candy texture.
- 1 teaspoon pure vanilla extract
- Rounds out the flavor of the white chocolate peanut butter fudge base.
- ¼ teaspoon fine sea salt
- Just enough to balance the sweetness; if your peanut butter is very salty, you can reduce it a bit.
- 1 cup (6 oz / 170 g) semi-sweet or dark chocolate chips
- Semi-sweet gives a classic flavor; dark chocolate makes it a touch more grown-up.
- 2 teaspoons creamy peanut butter (for the chocolate swirl)
- This helps the dark chocolate swirl stay soft enough to slice and eat.
- 1–2 teaspoons neutral oil (canola, vegetable, or refined coconut), if needed
- Only if your chocolate swirl seems too thick to drizzle; it gives a glossy, easy-to-swipe texture.
You can add a sprinkle of flaky sea salt on top after swirling if you like that sweet-and-salty fun. I highly recommend it for adults; the kids usually like it plain.

Step-by-Step Directions
-
Prep your pan
Line an 8×8-inch baking pan with parchment paper, letting it hang over two sides like little handles. Lightly mist with nonstick spray if you want extra insurance. This makes it easy to lift out and slice neatly. -
Make the white chocolate peanut butter base
In a large microwave-safe bowl, add the white chocolate chips, 1 cup peanut butter, and 1 tablespoon butter. Microwave on 50% power for 60 seconds, then stir very well. Continue heating at 20–30 second intervals at 50% power, stirring each time, until smooth and fully melted. -
Flavor the base
Once the mixture is silky and lump-free, stir in the vanilla extract and sea salt. Taste a tiny bit (careful, it’s warm) and adjust the salt if you’d like a little more balance. The mixture should be pourable but thick. -
Pour and smooth the first layer
Scrape the white chocolate peanut butter fudge mixture into the prepared pan. Use a spatula to smooth it into an even layer, reaching all four corners. Give the pan a couple of gentle taps on the counter to release any air bubbles. -
Make the chocolate swirl topping
In a separate small microwave-safe bowl, combine the semi-sweet chocolate chips and 2 teaspoons peanut butter. Microwave at 50% power for 30 seconds, then stir. Continue using 15–20 second bursts until melted and glossy. If it feels too thick to drizzle, stir in 1 teaspoon neutral oil, adding a little more only if you truly need it. -
Create the tiger stripes
Quickly spoon or drizzle the melted chocolate over the white layer in thick lines or random patches. Using a butter knife or a skewer, drag through the layers in gentle curving motions to create tiger-like stripes. Don’t over-swirl; a few passes are enough, or the colors will blend into one muddy shade. -
Chill until firm
Cover the pan lightly with plastic wrap or foil and chill in the refrigerator for at least 1½–2 hours, or until fully set. If your fridge is crowded (story of my life during the holidays), set it on a flat baking sheet so you can move it easily. -
Slice into neat squares
Lift the fudge out using the parchment handles. Place it on a cutting board and use a sharp knife to cut it into 25–36 small squares, wiping the blade between cuts for clean edges. -
Serve and enjoy
Let the fudge sit at room temperature for about 5–10 minutes before serving so the texture is fudgy and creamy instead of hard. Arrange on a pretty plate or in small candy cups for a party tray.
Servings & Timing
- Yield: About 25–36 small squares of tiger butter fudge
- Prep Time: 10–15 minutes
- Chill Time: 1½–2 hours
- Total Time: About 2 hours, most of it hands-off
If you’re planning this Tiger Butter Fudge Recipe for a party, you can easily double it and use a 9×13-inch pan. The thickness stays similar, and you’ll have plenty for a crowd, plus some “cook’s samples” for yourself.
Fun Variations to Try
You know what? Once you’ve made this once, you’ll probably start thinking of your own twists. Here are some ideas:
- Peanut-Free Tiger Fudge – Use sunflower seed butter or soy nut butter in place of peanut butter for a nut-free school-friendly treat.
- Holiday Tiger Butter Fudge – Add crushed candy canes on top before chilling, or drizzle a little red and green candy melt over the top for a festive holiday fudge recipe.
- Salted Pretzel Crunch – Press crushed pretzels gently into the top before it sets for a salty, crunchy contrast.
- Mocha Tiger Butter – Add 1–2 teaspoons instant espresso powder to the chocolate swirl for a coffee-kissed grown-up version.
- Extra Nutty Marble Peanut Butter Fudge – Stir in ½ cup chopped roasted peanuts or mixed nuts to the base for added crunch.
- Chunky Tiger Swirl – Sprinkle mini peanut butter cups or chocolate chips on top right after swirling, then chill.
Storage & Reheating (If You Even Have Leftovers)
-
Room temperature:
If your kitchen is cool and not too humid, you can keep the fudge in an airtight container at room temperature for 3–4 days. Layer with parchment or wax paper so pieces don’t stick. -
Refrigerator:
For longer storage or warmer climates, store tiger butter fudge in the fridge. It keeps well for about 2 weeks in a tightly sealed container. Let it sit out for 5–10 minutes before serving for the best texture. -
Freezer:
This fudge freezes beautifully. Wrap slices in parchment and then foil, place in a freezer-safe bag or container, and freeze for up to 2–3 months. Thaw in the fridge overnight or on the counter for 30–45 minutes.
There’s no “reheating” needed, but if you like a softer, almost truffle-like bite, you can very gently warm a square in the microwave for 5 seconds. Not more, or you’ll have goo instead of fudge.
Notes From My Kitchen
-
Use the right peanut butter:
I tested this with both natural peanut butter and the regular shelf-stable kind. The natural version separated a bit and gave a slightly greasy top, while the classic Jif/Skippy style held together much better. -
Don’t rush the melting:
White chocolate can scorch fast. Using 50% power and short bursts in the microwave makes a huge difference in the texture of your white chocolate peanut butter fudge base. -
Be gentle with the swirl:
The prettiest homemade tiger butter I’ve made came from just 3–4 passes of the knife. When I got carried away, it lost the striped look and turned more like latte-colored fudge. Still good, just not as striking. -
Cut small pieces:
This is rich. Little bite-size squares are perfect for holiday platters or gift boxes, and people can always grab a second piece if they want more. -
Use a warm knife for ultra-clean edges:
If you’re making this for gifting or photos (I see you, fellow food bloggers and Instagram folks), run your knife under hot water, dry it, then slice. Wipe after each cut. It makes those layers and swirls really pop.
Tiger Butter Fudge Recipe FAQs
Can I use milk chocolate instead of semi-sweet chocolate for the swirl?
Yes, you can use milk chocolate chips, but the fudge will be a bit sweeter overall. If you go that route, you may want to keep the squares on the smaller side.
My white chocolate seized and got thick. Can I save it?
Sometimes you can. Stir in 1–2 teaspoons neutral oil and mix well. If it still looks grainy and stiff, it’s usually better to start over with fresh white chocolate and lower microwave power.
Can I make this on the stovetop instead of the microwave?
Absolutely. Melt the white chocolate, peanut butter, and butter together in a heatproof bowl set over a pot of barely simmering water (double boiler style), then repeat with the chocolate swirl mixture. Keep the heat low.
Is this tiger butter fudge gluten-free?
The base ingredients are usually gluten-free, but always check labels on your chocolate chips and peanut butter. Some brands process on shared equipment. If you add pretzels or cookies as a variation, choose gluten-free versions.
How far ahead can I make this for the holidays?
You can make this up to 2 weeks ahead and refrigerate, or up to 2–3 months ahead if you freeze it tightly wrapped. For gifting, I like to make it 1–3 days before so it’s perfectly fresh.
Why is my fudge soft or not setting?
Most of the time, it just needs more chill time. If your kitchen was warm or you added extra peanut butter, it might take closer to 3 hours in the fridge. Very soft fudge can also come from lower-quality white chocolate that doesn’t firm up as well.
Can I reduce the sweetness?
Yes. Use dark chocolate (60–70%) for the swirl and choose slightly less sweet white chocolate if you can find it. A finishing sprinkle of flaky sea salt also helps balance the sweetness.
Can I make this without peanut butter for allergies?
Yes. Use sunflower seed butter or another seed butter with a similar texture, and skip any nut toppings. The flavor will be a bit different, but still delicious and very fudge-like.
Wrapping It Up (And Packing It in Pretty Boxes)
This Tiger Butter Fudge Recipe checks all my boxes as a busy home cook: it’s fast, it’s gorgeous, it’s reliable, and it tastes like pure chocolate-peanut butter nostalgia in every bite. The marble effect looks fancy enough for holiday platters, but the method is simple enough for a weeknight craving.
Give it a try, play around with a variation or two, and let me know how it goes—leave a comment, share a photo, or send a batch with your kids to school and see how fast the container comes home empty. And if you love this, you’ll probably also enjoy exploring more easy fudge recipes and microwave desserts on your next baking afternoon.
Tiger Butter Fudge
Ingredients
- 2 cups white chocolate chips about 12 oz / 340 g; use good-quality chips
- 1 cup creamy peanut butter about 260 g; use shelf-stable peanut butter like Jif or Skippy
- 1 tablespoon unsalted butter
- 1 teaspoon pure vanilla extract
- 1/4 teaspoon fine sea salt reduce slightly if peanut butter is very salty
- 1 cup semi-sweet or dark chocolate chips about 6 oz / 170 g; semi-sweet or 60–70% dark
- 2 teaspoons creamy peanut butter for the chocolate swirl
- 1-2 teaspoons neutral oil canola, vegetable, or refined coconut; only if needed to thin chocolate
- Flaky sea salt optional, for sprinkling on top
Instructions
- Line an 8x8-inch baking pan with parchment paper, leaving overhang on two opposite sides to create handles. Lightly mist with nonstick spray if desired for easier release.
- In a large microwave-safe bowl, combine the white chocolate chips, 1 cup peanut butter, and 1 tablespoon unsalted butter. Microwave on 50% power for 60 seconds, then stir very well. Continue microwaving at 50% power in 20–30 second intervals, stirring after each burst, until the mixture is smooth and fully melted.2 cups white chocolate chips, 1 cup creamy peanut butter, 1 tablespoon unsalted butter
- Once the mixture is silky and lump-free, stir in the vanilla extract and fine sea salt. Taste a tiny bit carefully and adjust the salt if needed. The mixture should be thick but pourable.1 teaspoon pure vanilla extract, 1/4 teaspoon fine sea salt
- Scrape the white chocolate peanut butter mixture into the prepared pan. Use a spatula to spread it into an even layer all the way to the corners. Tap the pan gently on the counter to release any air bubbles.
- In a small microwave-safe bowl, combine the semi-sweet or dark chocolate chips and 2 teaspoons peanut butter. Microwave at 50% power for 30 seconds, then stir. Continue microwaving in 15–20 second bursts, stirring between each, until melted and glossy. If the mixture is too thick to drizzle, stir in 1 teaspoon neutral oil, adding up to 1 teaspoon more only if needed to reach a smooth, drizzleable consistency.1 cup semi-sweet or dark chocolate chips, 2 teaspoons creamy peanut butter, 1-2 teaspoons neutral oil
- Quickly spoon or drizzle the melted chocolate mixture over the white fudge layer in thick lines or random patches. Using a butter knife or skewer, gently drag through both layers in curving motions to create tiger-like stripes. Make just a few passes so the colors stay distinct and don’t blend into one muddy shade.
- If you like a sweet-and-salty finish, sprinkle a light pinch of flaky sea salt evenly over the top of the swirled fudge.Flaky sea salt
- Cover the pan lightly with plastic wrap or foil and refrigerate for 1½–2 hours, or until the fudge is fully set and firm to the touch.
- Use the parchment handles to lift the fudge slab out of the pan and place it on a cutting board. With a sharp knife, cut into 25–36 small squares, wiping the blade clean between cuts for neat edges.
- Let the fudge sit at room temperature for 5–10 minutes before serving so the texture is creamy and fudgy rather than hard. Arrange on a serving plate, platter, or in candy cups.