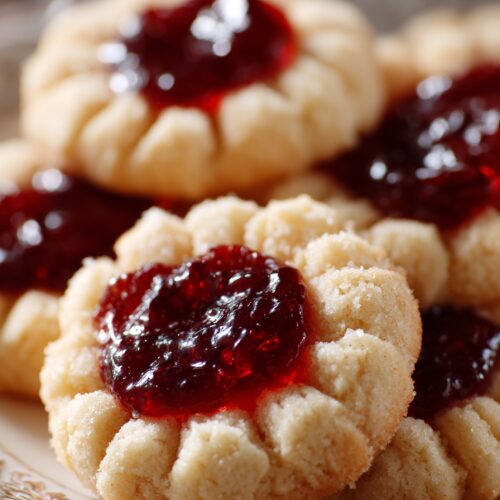
Thumbprint Cookies with Jam Recipe
If you’re craving a classic, cozy bake, this Thumbprint Cookies with Jam Recipe gives you soft, buttery cookies with jewel-bright jam centers that feel like pure holiday magic—any time of year.
These classic thumbprint cookies are tender, slightly crisp on the edges, and filled with sweet-tart jam that melts into little pools of flavor. I’ve been making cookies with jam for more than 25 years now—for school parties, cookie exchanges, and now for my grandkids—and this is the version my family asks for every single December (and honestly, again around Valentine’s Day).
They’re simple enough for a weeknight, pretty enough for a gift box, and forgiving enough that even brand‑new bakers can pull off bakery‑style jam thumbprint cookies on the first try. We’ll walk through each step together, with lots of tips from a very well‑used cookie sheet.
Why You’ll Love This Recipe
- Classic, bakery-style texture – These classic thumbprint cookies are buttery, tender, and just crisp enough around the edges.
- Use any jam you love – Raspberry, strawberry, apricot, blackberry… this recipe works with almost any fruit spread.
- Perfect for holidays and gifting – These holiday thumbprint cookies look like little stained-glass ornaments in a cookie box.
- Beginner-friendly – No special tools, no tricky techniques—just one bowl, a spoon, and your hands.
- Family- and freezer-friendly – The dough freezes well, so you can bake a few at a time when a sweet craving hits.
- Customizable – Make them nutty, citrusy, gluten-free, or even filled with lemon curd or chocolate.
- Short ingredient list – Just pantry staples and a jar of jam; you might already have everything you need.
- Great make‑ahead dessert – The flavor of these jam filled cookies actually improves a bit on day two.
About These Thumbprint Cookies with Jam
Thumbprint cookies (sometimes called jam thumbprint cookies or thumbprint jam cookies) are a classic shortbread-style cookie that you press with your thumb—literally—to create a little well, then fill with jam and bake.
They likely came to the U.S. from European baking traditions, and you’ll see versions with nuts, spices, or even chocolate centers. My version leans into simple, buttery thumbprint cookies with lots of vanilla and a generous spoonful of jam in every bite.
A few things that make this Thumbprint Cookies with Jam Recipe special:
- The dough is soft but not sticky, so it’s easy to roll.
- A quick chill keeps the cookies from spreading too much, so your jam stays put.
- We bake the cookies twice (a very short second bake) for those neat, full centers.
From a health point of view, these homemade thumbprint cookies are still a treat, of course, but you’re skipping the preservatives and artificial flavors you’ll often find in store-bought cookies with jam. You can choose a lower-sugar or fruit-only jam, or even use your own homemade preserves.
You know what? The real “health” boost here is emotional. There’s something about standing at the counter, rolling little balls of dough, that slows the day down. It’s the kind of recipe that invites kids, partners, or grandkids to jump in and help—sticky fingers and all.
Ingredients
For the best buttery thumbprint cookies, use room‑temperature ingredients. That’s one of the small details that makes a big difference.
- 1 cup (2 sticks / 226 g) unsalted butter, softened
- Soft, cool butter (think: easily dented, not greasy) gives you tender, rich cookies.
- ⅔ cup (135 g) granulated sugar
- Regular white sugar keeps the flavor clean and lets the jam shine.
- 1 large egg, separated
- The yolk goes into the dough for richness; the white is optional if you want to roll in nuts.
- 1 ½ teaspoons pure vanilla extract
- Use real vanilla if you can—it really stands out in a simple cookie.
- ¼ teaspoon almond extract (optional but lovely)
- This gives that classic bakery-cookie flavor; skip it if you prefer plain vanilla.
- 2 cups + 2 tablespoons (260 g) all-purpose flour, spooned and leveled
- Too much flour makes dry cookies, so measure lightly (or use a scale).
- ¼ teaspoon fine sea salt
- A little salt wakes up all the flavors and balances the sweetness.
- ½ cup (about 160 g) jam or preserves
- Raspberry, strawberry, apricot, or mixed berry jam all work well; thicker jams hold their shape better.
- Optional: ¾ cup very finely chopped nuts (pecans or walnuts)
- Roll the dough balls in egg white then nuts for a crunchy, old‑fashioned twist.
If you bake gluten-free, a good 1:1 gluten-free flour blend that includes xanthan gum usually works in this thumbprint cookies recipe—just expect slightly more delicate cookies.

Directions
-
Cream the butter and sugar
In a large mixing bowl, beat the softened butter and sugar together with a hand mixer (or stand mixer with paddle attachment) on medium speed for about 2–3 minutes, until light and fluffy.
If it still looks dense or grainy, keep going—this step adds air, which keeps the cookies tender. -
Add egg yolk and flavorings
Separate the egg, setting the white aside in a small bowl if you’ll be using nuts.
Beat the egg yolk, vanilla extract, and almond extract (if using) into the butter mixture until smooth and creamy. -
Mix in the dry ingredients
In a separate bowl, whisk together the flour and salt.
Add the dry mixture to the butter mixture in two parts, mixing on low speed just until no streaks of flour remain.
The dough should look soft and slightly crumbly but hold together when you squeeze it. -
Chill the dough briefly
Scrape the dough into a mound, cover the bowl, and chill in the fridge for 20–30 minutes.
This helps prevent spreading and makes rolling easier—especially if your kitchen is warm. -
Preheat and prep your pans
Preheat your oven to 350°F (175°C).
Line two baking sheets with parchment paper or silicone baking mats; this helps cookies bake evenly and release cleanly. -
Shape the cookies
Scoop about 1 tablespoon of dough at a time (a small cookie scoop works well) and roll into smooth balls between your palms.
If using nuts, whisk the reserved egg white with 1 teaspoon of water, dip each ball in the egg white, then roll in the chopped nuts.
Place the balls on the prepared baking sheets, spacing them about 2 inches apart. -
Create the “thumbprints”
Using your thumb, the back of a ½‑teaspoon measuring spoon, or the end of a wooden spoon, gently press a deep indent into the center of each dough ball.
Press most of the way down, but don’t go all the way through. If edges crack, just press them back together—no need for perfection here. -
Fill with jam
Stir your jam so it’s smooth.
Using a small spoon or piping bag, fill each indentation with about ½ teaspoon of jam.
Don’t mound it too high; you want the jam level with or just below the edges so it doesn’t spill over in the oven. -
Bake the cookies
Bake one sheet at a time for 11–13 minutes, until the bottoms are lightly golden and the tops are set but still pale.
If your oven runs hot, start checking at 10 minutes—these can go from perfect to too dry quickly. -
Top off the jam (optional but recommended)
If the jam has sunk a bit, add a tiny dab more jam to the warm cookies while they’re still on the baking sheet.
Return them to the oven for 1 more minute to let the jam settle. This gives you those pretty, full centers you see in bakery jam thumbprint cookies. -
Cool and enjoy
Let the cookies cool on the baking sheet for 5 minutes, then transfer to a wire rack to cool completely.
The texture improves as they cool—so try to give them at least 15–20 minutes before that “quality control taste test.”
Servings & Timing
- Yield: About 24–28 thumbprint cookies, depending on size
- Prep Time: 20–25 minutes
- Chill Time: 20–30 minutes
- Bake Time: 12–14 minutes per tray
- Total Time: About 1 hour, including chilling and cooling
If you’re baking for a cookie exchange or holiday party, I usually double this Thumbprint Cookies with Jam Recipe. They disappear fast.
Variations
You can switch up this base recipe in lots of fun ways, depending on who you’re baking for and what you have on hand.
- Nutty Thumbprint Cookies – Roll the dough balls in egg white and finely chopped pecans or walnuts for a crunchy, old‑school finish.
- Chocolate Kiss Twist – Skip the jam and press a chocolate kiss into the center right after baking for a hybrid thumbprint/chocolate drop cookie.
- Citrus Zest Burst – Add 1–2 teaspoons of fresh lemon or orange zest to the dough for bright, fragrant cookies with jam.
- Gluten-Free Jam Thumbprint Cookies – Use a 1:1 gluten-free flour blend and chill the dough a bit longer; bake from cold.
- Spiced Holiday Thumbprint Cookies – Add ½ teaspoon ground cinnamon and a pinch of nutmeg for cozy, holiday-flavored cookies.
- Lemon Curd or Caramel Filling – Swap jam for lemon curd, dulce de leche, or salted caramel, and shorten the second bake so the filling doesn’t bubble over.
Storage & Reheating
One of the nice things about these homemade thumbprint cookies is that they store very well.
-
Room Temperature:
Store cooled cookies in an airtight container at room temp for 4–5 days. Place parchment between layers so the jam doesn’t stick. -
Refrigerator:
If your kitchen is warm or you used a very soft filling, you can refrigerate them for up to 7 days. Bring to room temperature before serving so the texture softens. -
Freezer – Baked Cookies:
Freeze baked cookies in a single layer on a tray; once firm, transfer to a freezer bag or container. They keep well for up to 2 months. Thaw at room temperature—no reheating needed. -
Freezer – Cookie Dough:
Roll the dough into balls, freeze on a tray, then store in a bag. When ready to bake, let them sit at room temp for about 10 minutes, make the indent, fill with jam, and bake. You may need to add 1–2 minutes to the bake time.
If you’re planning ahead for the holidays, you can bake these jam filled cookies a week in advance, freeze them, and thaw the night before your gathering. The flavor actually settles and deepens a little.
Notes
- Jam choice matters: Thicker jams and preserves work better than very loose ones. If your jam is thin, heat it in a small saucepan for a few minutes to cook off a bit of moisture, then cool before using.
- Fixing cracks: A few cracks around the edges are normal. I just nudge them back together with my fingers right after pressing the indent—once baked, you’ll barely notice them.
- Size consistency: Using a small cookie scoop helps all your cookies bake evenly. If some are much larger, the smaller ones may dry out while the bigger ones are still baking.
- Don’t overbake: These are meant to stay pale on top. If you wait for deep golden color, they’ll end up hard. Look for just‑golden bottoms.
- Cooling time: I know it’s tempting to eat them straight off the pan (ask me how I know), but letting them cool lets the jam set and the crumb firm up.
- Kids in the kitchen: Little fingers are great for making thumbprints. Give each child a different jam color so they can “claim” their own batch—it turns into a sweet little baking memory.
FAQs
Can I use different types of jam in one batch?
Yes, absolutely. I often use two or three jams at once—raspberry, apricot, and strawberry—so one tray looks colorful and fun.
Why did my thumbprint cookies spread too much?
Usually this happens from warm dough or very soft butter. Make sure the dough chills for at least 20 minutes and that your baking sheets are cool, not warm from a previous batch.
My jam boiled over. What went wrong?
There was probably a bit too much jam, or the jam was very thin. Fill the indent just to the top, not heaping, and choose a thicker jam or cook it down slightly.
Can I make these cookies without eggs?
Yes. Use 2 tablespoons of milk or cream instead of the egg yolk; skip the nut coating or use a plant-based milk instead of egg white.
How do I make these cookies softer or crisper?
For softer cookies, bake on the shorter side of the time range. For slightly crisper edges, leave them in 1–2 minutes longer, watching closely so they don’t overbake.
Can I use margarine or salted butter?
Salted butter works; just reduce the added salt to a tiny pinch. Margarine will change the texture and flavor, giving softer, less rich cookies.
Do these travel well for shipping?
Yes. Place a layer of crumpled parchment on the bottom of a tin, pack the cookies in snug layers with parchment between, and ship quickly. They hold up better with thicker jams like raspberry or apricot.
Can I double this Thumbprint Cookies with Jam Recipe?
Yes, it doubles very well. Use a large mixing bowl and rotate your baking sheets halfway through baking if your oven has hot spots.
Conclusion
These classic, buttery thumbprint cookies with jam are the kind of recipe that anchors a holiday cookie tray, but they’re simple enough for a Sunday afternoon baking session with coffee nearby and music playing in the background. With their tender crumb, bright jam centers, and easy make‑ahead flexibility, they’re a sweet little gift—for neighbors, teachers, or your own cookie jar.
If you bake this Thumbprint Cookies with Jam Recipe, I’d love to hear how it goes—tell me what jam you used, or what your family thought, in the comments. And if you’re building a cookie platter, you might also enjoy pairing these with my favorite sugar cookies and chocolate crinkle cookies for a mix of flavors and textures.
Thumbprint Cookies with Jam
Ingredients
- 1 cup unsalted butter 2 sticks / 226 g, softened to cool room temperature
- 2/3 cup granulated sugar 135 g
- 1 large egg separated; use yolk in dough, white optional for nut coating
- 1 1/2 teaspoons pure vanilla extract
- 1/4 teaspoon almond extract optional but recommended for classic bakery flavor
- 2 cups + 2 tablespoons all-purpose flour 260 g, spooned and leveled
- 1/4 teaspoon fine sea salt
- 1/2 cup jam or preserves about 160 g; raspberry, strawberry, apricot, or mixed berry; thicker jams work best
- 3/4 cup finely chopped nuts pecans or walnuts, optional, for coating
- 1 teaspoon water to loosen egg white for nut coating, optional
Instructions
- In a large mixing bowl, beat the softened butter and granulated sugar together with a hand mixer or stand mixer fitted with the paddle attachment on medium speed for 2–3 minutes, until light and fluffy. If the mixture still looks dense or grainy, continue beating; incorporating air here helps keep the cookies tender.1 cup unsalted butter, 2/3 cup granulated sugar
- Separate the egg, placing the white in a small bowl if you plan to roll the cookies in nuts. Add the egg yolk, vanilla extract, and almond extract (if using) to the creamed butter mixture and beat until smooth and creamy.1 large egg, 1 1/2 teaspoons pure vanilla extract, 1/4 teaspoon almond extract
- In a separate bowl, whisk together the all-purpose flour and fine sea salt. Add the dry mixture to the butter mixture in two additions, mixing on low speed just until no streaks of flour remain. The dough will look soft and slightly crumbly but should hold together when gently squeezed.2 cups + 2 tablespoons all-purpose flour, 1/4 teaspoon fine sea salt
- Gather the dough into a mound in the bowl, cover, and chill in the refrigerator for 20–30 minutes. This firms the dough slightly, helps prevent spreading, and makes rolling easier.
- Preheat the oven to 350°F (175°C). Line two baking sheets with parchment paper or silicone baking mats to promote even baking and easy release.
- Scoop about 1 tablespoon of dough per cookie (a small cookie scoop works well) and roll between your palms into smooth balls. If using nuts, whisk the reserved egg white with 1 teaspoon of water. Dip each dough ball into the egg white, letting excess drip off, then roll in the finely chopped nuts to coat. Arrange the dough balls on the prepared baking sheets, spacing them about 2 inches apart.1 large egg, 3/4 cup finely chopped nuts, 1 teaspoon water
- Using your thumb, the back of a 1/2-teaspoon measuring spoon, or the end of a wooden spoon, gently press a deep indent into the center of each dough ball. Press most of the way down without going all the way through. If the edges crack, simply nudge them back together with your fingers.
- Stir the jam or preserves until smooth. Using a small spoon or a piping bag, fill each indentation with about 1/2 teaspoon of jam, keeping it level with or just below the rim so it does not overflow during baking.1/2 cup jam or preserves
- Bake one sheet at a time for 11–13 minutes, or until the bottoms are lightly golden and the tops are set but still pale. If your oven runs hot, begin checking around 10 minutes, as these cookies can overbake quickly.
- If the jam centers have sunk slightly, add a tiny dab more jam to the hot cookies while they are still on the baking sheet. Return the tray to the oven for about 1 minute to let the jam settle, creating neat, full centers.1/2 cup jam or preserves
- Allow the cookies to cool on the baking sheet for 5 minutes, then transfer to a wire rack to cool completely. The texture improves as they cool, so let them rest 15–20 minutes before serving.