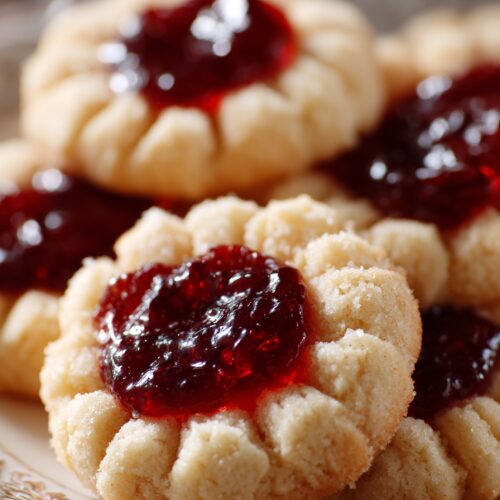
Thumbprint Cookies with Jam
Classic, buttery thumbprint cookies with soft centers, crisp edges, and jewel-like jam filling. Beginner-friendly, freezer-friendly, and perfect for holidays or gifting.
Ingredients
- 1 cup unsalted butter 2 sticks / 226 g, softened to cool room temperature
- 2/3 cup granulated sugar 135 g
- 1 large egg separated; use yolk in dough, white optional for nut coating
- 1 1/2 teaspoons pure vanilla extract
- 1/4 teaspoon almond extract optional but recommended for classic bakery flavor
- 2 cups + 2 tablespoons all-purpose flour 260 g, spooned and leveled
- 1/4 teaspoon fine sea salt
- 1/2 cup jam or preserves about 160 g; raspberry, strawberry, apricot, or mixed berry; thicker jams work best
- 3/4 cup finely chopped nuts pecans or walnuts, optional, for coating
- 1 teaspoon water to loosen egg white for nut coating, optional
Instructions
- In a large mixing bowl, beat the softened butter and granulated sugar together with a hand mixer or stand mixer fitted with the paddle attachment on medium speed for 2–3 minutes, until light and fluffy. If the mixture still looks dense or grainy, continue beating; incorporating air here helps keep the cookies tender.1 cup unsalted butter, 2/3 cup granulated sugar
- Separate the egg, placing the white in a small bowl if you plan to roll the cookies in nuts. Add the egg yolk, vanilla extract, and almond extract (if using) to the creamed butter mixture and beat until smooth and creamy.1 large egg, 1 1/2 teaspoons pure vanilla extract, 1/4 teaspoon almond extract
- In a separate bowl, whisk together the all-purpose flour and fine sea salt. Add the dry mixture to the butter mixture in two additions, mixing on low speed just until no streaks of flour remain. The dough will look soft and slightly crumbly but should hold together when gently squeezed.2 cups + 2 tablespoons all-purpose flour, 1/4 teaspoon fine sea salt
- Gather the dough into a mound in the bowl, cover, and chill in the refrigerator for 20–30 minutes. This firms the dough slightly, helps prevent spreading, and makes rolling easier.
- Preheat the oven to 350°F (175°C). Line two baking sheets with parchment paper or silicone baking mats to promote even baking and easy release.
- Scoop about 1 tablespoon of dough per cookie (a small cookie scoop works well) and roll between your palms into smooth balls. If using nuts, whisk the reserved egg white with 1 teaspoon of water. Dip each dough ball into the egg white, letting excess drip off, then roll in the finely chopped nuts to coat. Arrange the dough balls on the prepared baking sheets, spacing them about 2 inches apart.1 large egg, 3/4 cup finely chopped nuts, 1 teaspoon water
- Using your thumb, the back of a 1/2-teaspoon measuring spoon, or the end of a wooden spoon, gently press a deep indent into the center of each dough ball. Press most of the way down without going all the way through. If the edges crack, simply nudge them back together with your fingers.
- Stir the jam or preserves until smooth. Using a small spoon or a piping bag, fill each indentation with about 1/2 teaspoon of jam, keeping it level with or just below the rim so it does not overflow during baking.1/2 cup jam or preserves
- Bake one sheet at a time for 11–13 minutes, or until the bottoms are lightly golden and the tops are set but still pale. If your oven runs hot, begin checking around 10 minutes, as these cookies can overbake quickly.
- If the jam centers have sunk slightly, add a tiny dab more jam to the hot cookies while they are still on the baking sheet. Return the tray to the oven for about 1 minute to let the jam settle, creating neat, full centers.1/2 cup jam or preserves
- Allow the cookies to cool on the baking sheet for 5 minutes, then transfer to a wire rack to cool completely. The texture improves as they cool, so let them rest 15–20 minutes before serving.
Notes
Yield: about 24–28 thumbprint cookies, depending on size.
Storage: Store cooled cookies in an airtight container at room temperature for 4–5 days, layering with parchment so the jam doesn’t stick. Refrigerate up to 7 days if your kitchen is warm or if you used very soft fillings; bring to room temperature before serving. For longer storage, freeze baked cookies in a single layer, then transfer to a container; they keep up to 2 months and can be thawed at room temperature.
Freezing dough: Shape dough into balls and freeze on a tray. Once firm, transfer to a freezer bag or container. When ready to bake, let sit at room temperature about 10 minutes, make the indent, fill with jam, and bake, adding 1–2 minutes to the bake time if needed.
Tips: Thicker jams or preserves are less likely to boil over. If your jam is very thin, gently simmer it for a few minutes to cook off excess moisture and cool before using. Do not overbake; the cookies should remain pale on top with just-golden bottoms for a tender texture.
Gluten-free: A good 1:1 gluten-free flour blend that includes xanthan gum usually works well, though the cookies will be slightly more delicate.
Nutrition
Calories: 110kcal
Love this recipe?Follow us at @thenandnowspace for more