Sopapilla Cheesecake Recipe
If you love cinnamon sugar, creamy cheesecake, and easy desserts that always get recipe requests, this Sopapilla Cheesecake Recipe is about to become your new party favorite.
There’s something magical about this classic Mexican dessert twist. You get layers of buttery crescent roll dough, a sweet cream cheese filling, and a golden cinnamon sugar topping that caramelizes in the oven. It’s part baked cheesecake bars, part layered cheesecake pastry, and honestly, part childhood nostalgia.
I’ve been making some version of this sopapilla cheesecake for years for church potlucks, family birthday parties, and those “Mom, we need to bring a dessert to school tomorrow” surprises. It’s an easy dessert recipe that feels special but doesn’t chain you to the kitchen. You can assemble it in about 15 minutes, pop it in the oven, and let that cinnamon dessert fragrance do all the heavy lifting.
My version leans a bit less sweet than some traditional recipes, with a creamier filling and just the right amount of cinnamon sugar topping so it’s rich but not cloying. The crescent roll dough bakes into a buttery crescent crust that holds together beautifully—perfect for party dessert bars that you can cut and serve without stress.
Why You’ll Love This Sopapilla Cheesecake Recipe
- It uses simple grocery store ingredients (hello, refrigerated crescent roll dough and cream cheese filling).
- Easy to assemble in about 15 minutes—perfect for busy weeknights or last‑minute potluck dessert ideas.
- Tastes like a mash‑up of churros, sopapillas, and classic baked cheesecake bars.
- Slices cleanly into neat squares, so it’s ideal for parties, school events, and holiday dessert tables.
- Make‑ahead friendly—actually tastes even better after chilling.
- Family dessert favorite that both kids and adults devour (expect zero leftovers).
- Easily customizable with different flavor variations (think pumpkin, chocolate swirl, or fruity fillings).
- No springform pan drama—just a regular 9×13 pan and you’re set.
Ingredients
Here’s everything you’ll need for this Sopapilla Cheesecake Recipe. I’m including a few little notes I’ve learned over years of making it.
For the buttery crescent crust and top layer:
- 2 cans (8 oz each) refrigerated crescent roll dough
- (I like Pillsbury, but any brand works; use “crescent sheets” if you can find them for easier rolling.)
- 1/2 cup (1 stick / 113 g) unsalted butter, melted
- (Salted butter works too—just reduce added salt slightly.)
For the sweet cream cheese filling:
- 2 packages (8 oz each) cream cheese, softened to room temperature
- (Use full‑fat for the creamiest texture; low‑fat works but won’t be as rich.)
- 1 cup granulated sugar
- 1 1/2 teaspoons pure vanilla extract
- 1/8 teaspoon fine sea salt
- (Just a pinch to balance the sweetness; don’t skip it.)
For the cinnamon sugar topping:
- 3/4 cup granulated sugar
- 2 teaspoons ground cinnamon
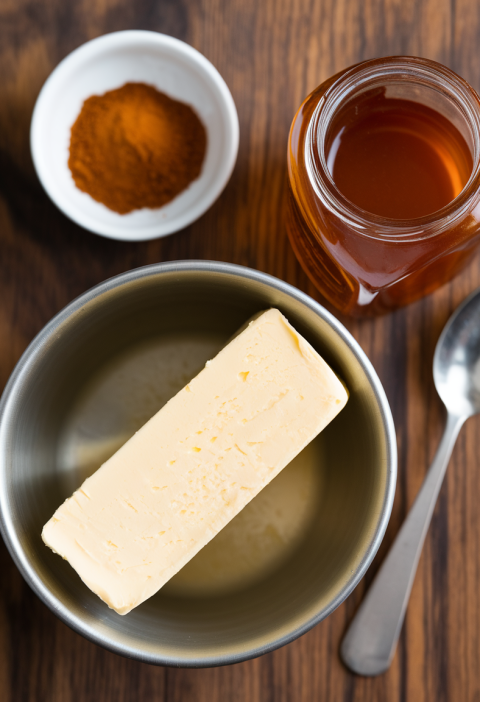
- Optional: 1–2 tablespoons honey for drizzling after baking
- Optional garnish: powdered sugar, whipped cream, or fresh berries for serving
Ingredient Tips
- Cream cheese: Let it sit on the counter for at least 30–45 minutes. Soft cream cheese blends smoother and avoids lumps in your cheesecake layer.
- Crescent roll dough: If it tears, just pinch seams together with your fingers. No one will see the patchwork once it bakes.
- Cinnamon: Use a fresh, fragrant cinnamon. If yours has been in the pantry since your kids were in preschool, it’s time for a fresh jar.
- Butter: Melt gently and let it cool just a bit so it doesn’t melt the dough when you brush it on top.

Step‑By‑Step Directions
-
Preheat the oven and prep your pan
Preheat your oven to 350°F (175°C). Lightly grease a 9×13‑inch baking dish with butter or nonstick spray. You can also line it with parchment for easier lifting and slicing later (leave an overhang on the long sides). -
Make the cinnamon sugar mixture
In a small bowl, stir together 3/4 cup sugar and 2 teaspoons cinnamon until well combined. Set this aside—this is your cinnamon sugar topping that gives that signature sopapilla vibe. -
Blend the cream cheese filling
In a medium mixing bowl, beat the softened cream cheese with an electric mixer until completely smooth and creamy, about 1–2 minutes. Add 1 cup sugar, vanilla extract, and salt. Beat again until the mixture is silky, fluffy, and no lumps remain. Scrape the bowl as needed; this helps get that sweet cream cheese filling perfectly uniform. -
Lay down the bottom crescent crust
Open one can of crescent roll dough and unroll it onto a clean surface. If using standard triangles, pinch the perforated seams together to form one solid sheet. Gently transfer the dough to the bottom of your prepared baking dish, pressing it into the corners and edges. It doesn’t have to look perfect—think quilt, not fitted sheet. -
Spread the cream cheese layer
Scoop the cream cheese filling onto the crescent dough base. Using an offset spatula or the back of a spoon, spread it out into an even layer from edge to edge. Try not to disturb the bottom crust too much; a light touch works best here. -
Add the top crescent layer
Unroll the second can of crescent roll dough. Just like before, pinch seams to create one sheet if needed. Carefully place this dough over the cream cheese filling. I usually start at one end and gently roll it out over the top. Patch any gaps with extra dough—it’s very forgiving. -
Brush with melted butter
Pour or brush the melted butter evenly over the top layer of crescent dough. Don’t be shy; that butter helps the cinnamon sugar topping stick and creates that crisp, golden finish we love in a Mexican dessert like this. -
Shower with cinnamon sugar
Sprinkle the cinnamon sugar mixture evenly over the buttery top crust. Make sure you get all the way to the edges so every bite has that sweet, lightly crunchy cinnamon topping. -
Bake until golden and bubbly
Place the pan in your preheated oven and bake for 25–30 minutes, or until the top is puffed, lightly browned, and the edges are bubbling a bit with butter and sugar. The crescent crust should look set, not doughy. Every oven runs a little differently, so start checking around 23 minutes. -
Cool, drizzle, and chill (if you can wait)
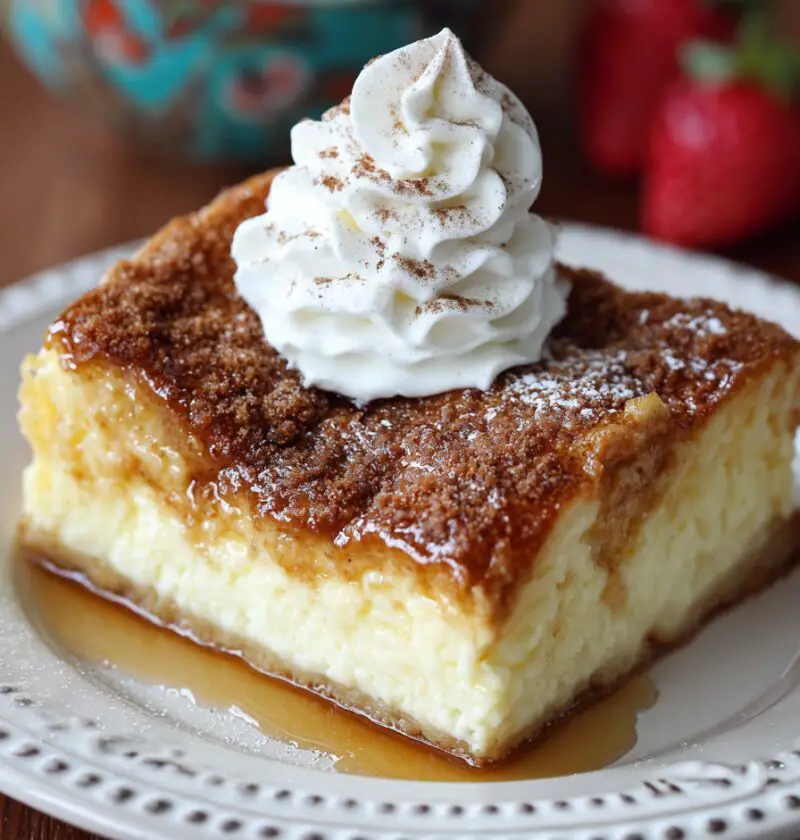
Remove the pan from the oven and let it cool on a wire rack for at least 30 minutes. If you like, drizzle 1–2 tablespoons of honey over the top while it’s still slightly warm for that classic sopapilla touch. For clean bars and the best cheesecake texture, cover and chill for at least 2 hours (or overnight) before slicing. If you’re serving warm, let it cool enough to set so it doesn’t completely ooze when cut. -
Slice and serve
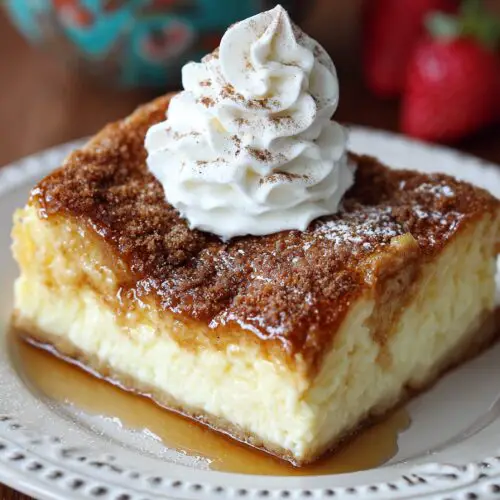
Use a sharp knife to cut into squares or rectangles. Wipe the knife between cuts for neat edges. Serve plain, dusted with powdered sugar, or with whipped cream and berries if you’re feeling fancy.
Servings & Timing
- Yield: About 16–20 bars, depending on how you slice them
- Prep Time: 15–20 minutes
- Bake Time: 25–30 minutes
- Cooling/Chill Time: 30 minutes to cool, plus 2 hours to chill for neat slices (optional but recommended)
- Total Time: About 3 hours (mostly unattended—your oven and fridge do the work)
If you’re serving to a crowd, I like to cut slightly smaller squares so people can try a piece along with other desserts. These go fast at potlucks, so I usually plan on 1–2 pieces per person.
Fun Variations to Try
You know what? Once you’ve made this classic version, it’s hard not to start playing with flavors. Here are a few ideas:
- Apple Cinnamon Sopapilla Cheesecake – Spread a thin layer of canned apple pie filling over the cream cheese before adding the top dough; sprinkle with extra cinnamon.
- Pumpkin Sopapilla Cheesecake – Beat 1 cup canned pumpkin puree and 1 teaspoon pumpkin pie spice into the cream cheese filling for a fall‑ready twist.
- Chocolate Swirl Sopapilla Cheesecake – Drizzle melted semi‑sweet chocolate over the cream cheese layer and swirl with a knife before topping with dough.
- Strawberry Sopapilla Cheesecake Bars – Add a layer of strawberry jam or chopped fresh strawberries on top of the cream cheese for a fruity finish.
- Nutty Pecan Crunch – Sprinkle 1/2 cup chopped pecans over the cinnamon sugar topping before baking for extra texture.
- Lighter Version – Use reduced‑fat cream cheese and cut the sugar in the filling to 3/4 cup; it’s still delicious, just a bit less rich.
Storage & Reheating
One of my favorite things about this sopapilla cheesecake recipe is how well it keeps.
-
Fridge:
Store cooled bars in an airtight container in the refrigerator for up to 4–5 days. Layer with parchment or wax paper if you’re stacking them. -
Freezer:
Wrap individual bars tightly in plastic wrap, then place in a freezer bag or freezer‑safe container. Freeze for up to 2 months. Thaw overnight in the fridge or at room temperature for about 30–45 minutes. -
Reheating (if you want them warm):
- Microwave: Heat a single bar for 10–15 seconds for a just‑warm, slightly gooey center.
- Oven: Place bars on a parchment‑lined baking sheet and warm at 300°F for 8–10 minutes if you want to restore a bit of crispness to the crescent crust.
-
Make‑Ahead Tips:
You can bake the whole pan a day ahead, cool completely, cover tightly, and refrigerate. Slice just before serving. For a party, I often bake it the night before and chill overnight; the texture is dreamy the next day.
Notes from My Kitchen
- Let it chill for best texture. You can serve this warm, and there’s something very comforting about that. But if you want it to really behave like neat cheesecake bars, give it time in the fridge. The cream cheese layer firms up and the cinnamon sugar topping settles into this slightly crackly, buttery lid.
- Don’t overbake. If you bake too long, the top can get a little hard. As soon as the top is golden and the edges look done, pull it out. Residual heat will finish the job.
- Seams are not your enemy. Crescent dough can look messy before it bakes; that’s okay. Pinch seams together as best as you can, but don’t stress. The cinnamon sugar topping covers a multitude of sins.
- Adjust the sweetness. If you’re someone who prefers less sweet desserts, you can cut the sugar in the filling down to 3/4 cup and the topping sugar to 2/3 cup. I tested it this way and it’s still very satisfying.
- Serving a crowd? Double the recipe and bake in two 9×13 pans, or use a rimmed half sheet pan (watch bake time more closely). This is one of those family dessert favorites that always vanishes.
Sometimes I’ll set up a little “cheesecake bar” station—serve the plain sopapilla cheesecake bars with bowls of berries, caramel sauce, and whipped cream. Let people dress up their own slice. It’s fun and makes an easy dessert feel like an event.
FAQs
1. What is sopapilla cheesecake, exactly?
It’s a layered dessert with crescent roll dough on the bottom and top, a sweet cream cheese filling in the middle, and a cinnamon sugar topping—kind of like a cross between sopapillas, churros, and cheesecake.
2. Can I make this Sopapilla Cheesecake Recipe without crescent roll dough?
Yes. You can use puff pastry (thaw first and roll slightly) or a simple homemade yeast dough, but crescent roll dough gives the most classic taste and texture with the least effort.
3. Do I have to chill it before serving?
Not strictly, but chilling for at least 2 hours helps the cheesecake layer firm up and gives you cleaner, more defined bars. If you cut it warm, it will be softer and a little messy—but still delicious.
4. Can I reduce the sugar?
You can safely reduce the sugar in the cream cheese filling to 3/4 cup and the topping to 2/3 cup without hurting the texture. Keep in mind it’s meant to be a sweet Mexican‑style dessert, so you don’t want to cut it too far.
5. My cream cheese filling looks lumpy—what went wrong?
Usually, that means the cream cheese was still too cold. Let it soften longer next time, and beat it well before adding sugar. You can also warm the bowl very briefly over hot water and mix again to smooth it out.
6. Can I use low‑fat or Neufchâtel cream cheese?
Yes, you can. The bars will be slightly less rich and a bit softer, but still very good. I wouldn’t use fat‑free cream cheese; it tends to be watery and less creamy.
7. How do I keep the bottom crust from getting soggy?
Make sure the bars cool completely before covering and refrigerating, so condensation doesn’t gather under the crust. You can also pre‑bake the bottom crescent layer for 5–7 minutes before adding the filling if you want a firmer base.
8. Is this Sopapilla Cheesecake Recipe good for potlucks?
Absolutely. It travels well, serves a crowd, and can be eaten with fingers if you cut it into small squares. It’s one of my go‑to potluck dessert ideas because it always disappears.
Conclusion
This Sopapilla Cheesecake Recipe brings together everything I love in a dessert—simple ingredients, cozy cinnamon sugar flavor, and a creamy sweet center that feels like a hug on a plate. It’s the kind of easy dessert recipe that fits just as well on a casual Tuesday night table as it does on a holiday buffet.
If you make this, I’d love to hear how it went—tell me in the comments what variation you tried, or whether your family has made something similar. And if you’re in the mood for more cinnamon‑kissed treats or easy baked cheesecake bars, don’t be shy about exploring more recipes; your next family dessert favorite might be just one pan away.
Sopapilla Cheesecake
Ingredients
- 2 cans refrigerated crescent roll dough 8 oz each; crescent sheets if available
- 1/2 cup unsalted butter melted (1 stick / 113 g)
- 16 oz cream cheese softened to room temperature; full-fat preferred
- 1 cup granulated sugar for the cream cheese filling
- 1 1/2 teaspoons pure vanilla extract
- 1/8 teaspoon fine sea salt just a pinch to balance sweetness
- 3/4 cup granulated sugar for the cinnamon sugar topping
- 2 teaspoons ground cinnamon
- 1 tablespoon honey optional, for drizzling after baking (use up to 2 tbsp)
- powdered sugar optional, for dusting before serving
- whipped cream optional, for serving
- fresh berries optional, for serving
Instructions
- Preheat your oven to 350°F (175°C). Lightly grease a 9×13-inch baking dish with butter or nonstick spray. Optionally, line with parchment paper, leaving an overhang on the long sides for easier lifting and slicing.
- In a small bowl, stir together 3/4 cup granulated sugar and 2 teaspoons ground cinnamon until well combined. Set aside for the topping.3/4 cup granulated sugar, 2 teaspoons ground cinnamon
- In a medium mixing bowl, beat the softened cream cheese with an electric mixer until completely smooth and creamy, about 1–2 minutes. Add 1 cup granulated sugar, vanilla extract, and sea salt. Beat again until the mixture is silky, fluffy, and no lumps remain, scraping down the bowl as needed.16 oz cream cheese, 1 cup granulated sugar, 1 1/2 teaspoons pure vanilla extract, 1/8 teaspoon fine sea salt
- Open one can of crescent roll dough and unroll it. If using perforated triangles, pinch the seams together to form one solid sheet. Transfer the dough to the prepared baking dish, pressing it into the bottom and corners to form an even layer.2 cans refrigerated crescent roll dough
- Scoop the cream cheese filling onto the crescent dough base. Using an offset spatula or the back of a spoon, spread it into an even layer from edge to edge, taking care not to disturb the bottom crust too much.16 oz cream cheese
- Unroll the second can of crescent roll dough and pinch seams together if needed to create a sheet. Carefully place it over the cream cheese filling, covering it completely. Patch any gaps with extra dough as needed.2 cans refrigerated crescent roll dough
- Pour or brush the melted butter evenly over the top crescent dough layer, coating it thoroughly to help the cinnamon sugar topping adhere and brown.1/2 cup unsalted butter
- Sprinkle the cinnamon sugar mixture evenly over the buttery top crust, making sure to cover all the way to the edges so every bite has cinnamon sugar flavor.3/4 cup granulated sugar, 2 teaspoons ground cinnamon
- Bake in the preheated oven for 25–30 minutes, or until the top is puffed, lightly golden brown, and the edges are bubbling slightly. The crescent dough should look set and baked through, not doughy. Start checking around 23 minutes as ovens vary.
- Remove the pan from the oven and let cool on a wire rack for at least 30 minutes. If desired, drizzle 1–2 tablespoons of honey over the warm top for a classic sopapilla touch. For the cleanest slices and best cheesecake texture, cover and refrigerate for at least 2 hours or overnight.1 tablespoon honey
- Use the parchment overhang (if used) to lift the chilled bars from the pan. Cut into squares or rectangles with a sharp knife, wiping the blade between cuts for neat edges. Serve plain or topped with a dusting of powdered sugar, whipped cream, and fresh berries if desired.powdered sugar, whipped cream, fresh berries