Peanut Butter Blossoms Recipe
If you’re craving a nostalgic cookie that tastes like childhood and looks perfectly festive on any holiday tray, this Peanut Butter Blossoms Recipe is the one you want.
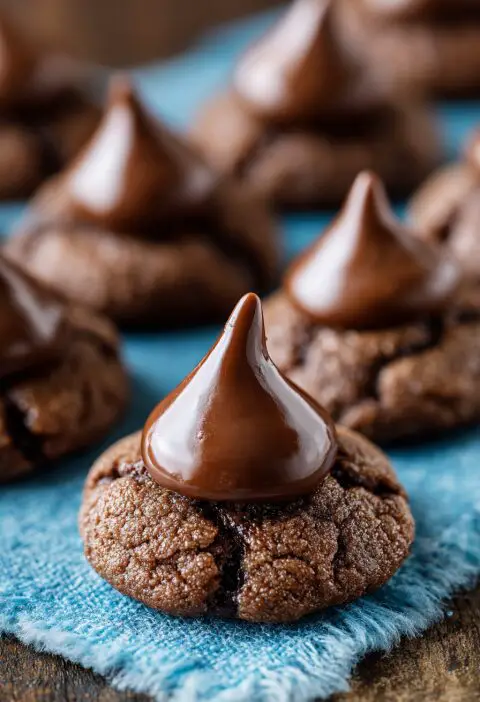
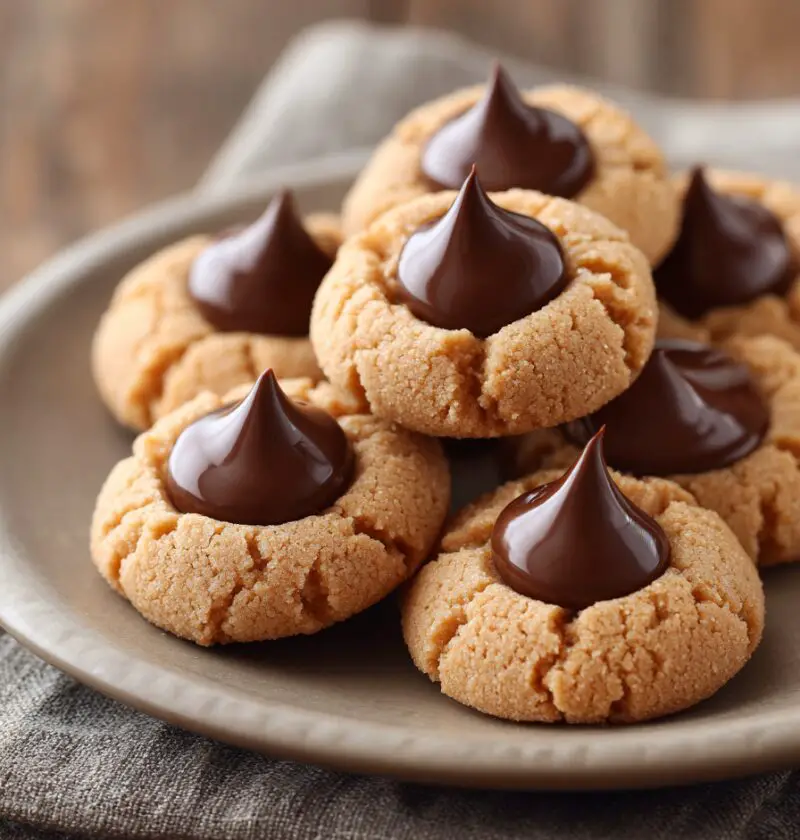
These peanut butter blossom cookies are that classic holiday cookie you see at every cookie swap: soft peanut butter cookies rolled in sugar, baked until just set, and crowned with a shiny Hershey’s Kiss. They’re simple, comforting, and pretty much the definition of “family favorite cookies.”
I’ve been making some version of these peanut butter and chocolate cookies since the late ’90s when my kids were little. Back then I’d bake a double batch for Christmas, and somehow they’d still be gone by December 26. Now, they show up for game days, bake sales, and the occasional Tuesday when I just need a soft peanut butter cookie with a little chocolate on top.
This Peanut Butter Blossoms Recipe is classic, but I’ve tested (and retested) it to make the cookies soft, thick, and full of peanut flavor—no dry, crumbly holiday cookies on my watch. They’re quick enough for a weeknight, but special enough for your Christmas cookie recipe box, and they freeze beautifully.
Before we jump into the ingredients, here’s what makes this version stand out.
Why You’ll Love This Recipe
- Soft, thick centers with lightly crisp edges—no dry peanut butter rocks here.
- Classic holiday cookies that look beautiful on Christmas platters and cookie gift boxes.
- Uses simple pantry ingredients you probably already have on hand.
- Perfect showcase for Hershey’s Kisses cookies and other chocolate candies.
- Easy peanut butter blossoms that beginners and kids can help make.
- Dough doesn’t need complicated chilling—just a short rest while you unwrap Kisses.
- Works with creamy or crunchy peanut butter, so use what you love.
- Scales well—double the batch for cookie exchanges or parties.
- Freezer-friendly peanut butter dessert recipe you can bake ahead for busy seasons.
- Reliable, tested recipe that gives consistent, bakery-style results at home.
Ingredients
Here’s everything you’ll need for this Peanut Butter Blossoms Recipe. Measure accurately; a little extra flour can make cookies dry.
- 1 3/4 cups (210 g) all-purpose flour (spooned and leveled)
- 1 teaspoon baking soda
- 1/2 teaspoon fine salt (I like fine sea salt)
- 1/2 cup (1 stick / 113 g) unsalted butter, softened to room temperature
- 1/2 cup (120 g) creamy peanut butter (not natural “stir” peanut butter; I use Skippy or Jif)
- 1/2 cup (100 g) granulated sugar
- 1/2 cup (110 g) packed light brown sugar
- 1 large egg, room temperature
- 2 teaspoons pure vanilla extract
- 2 tablespoons milk (whole or 2% works best for moisture)
- About 1/3 cup granulated sugar, for rolling
- 36–40 Hershey’s Kisses, unwrapped (classic milk chocolate, or your favorite flavor)
Ingredient Tips:
- Butter: Make sure it’s soft but not greasy. When you press it, your finger should leave an indent, not sink in.
- Peanut butter: Classic, shelf-stable peanut butter gives the best structure. Natural peanut butter tends to separate and can make cookies spread too much.
- Flour: If you have a kitchen scale, use it. Too much flour is the number one reason “my cookies turned out dry.”
- Hershey’s Kisses: Unwrap them before the cookies go in the oven so you’re ready to press them in while the cookies are hot.

Directions
-
Preheat the oven and prepare pans.
Preheat your oven to 375°F (190°C). Line two baking sheets with parchment paper or silicone baking mats. This helps the cookies bake evenly and prevents sticking. -
Combine dry ingredients.
In a medium bowl, whisk together the flour, baking soda, and salt. Set aside. This keeps the baking soda from clumping and gives you a nice, even rise. -
Cream butter, peanut butter, and sugars.
In a large mixing bowl, beat the softened butter, peanut butter, granulated sugar, and brown sugar with a hand mixer or stand mixer on medium speed for 2–3 minutes, until light and fluffy. The mixture should look pale and creamy; this step gives you soft, tender peanut butter blossom cookies. -
Add egg, vanilla, and milk.
Beat in the egg and vanilla until fully combined, scraping down the sides of the bowl as needed. Add the milk and mix again. The dough will look silky and smell like a peanut butter milkshake—always a good sign. -
Mix in dry ingredients.
Add the flour mixture in two additions, mixing on low just until no streaks of flour remain. Don’t overmix; once the flour is in, the gluten can toughen if you beat the dough too long. -
Rest the dough briefly.
Let the dough sit at room temperature for about 5–10 minutes. This gives the flour a chance to hydrate and makes the dough easier to roll. While it rests, pour the extra sugar into a small bowl and unwrap your Hershey’s Kisses. -
Shape and sugar the cookies.
Scoop the dough into 1-inch balls (about 1 tablespoon each). Roll each ball between your palms until smooth, then roll in the bowl of sugar to coat. Place on prepared baking sheets, spacing them about 2 inches apart. -
Bake until just set.
Bake for 8–10 minutes, or until the cookies are puffed, lightly cracked on top, and just starting to firm around the edges. They should still look soft in the center; they’ll finish setting as they cool. -
Press in the Kisses.
Remove the cookies from the oven and, working quickly but gently, press one Hershey’s Kiss into the center of each cookie. The edges of the cookie will crack a little more—that’s part of the classic blossom look. -
Cool and set.
Let the cookies cool on the baking sheet for 5–10 minutes, then transfer carefully to a wire rack to cool completely. The chocolate will soften from the heat, then firm up again as it cools. If your kitchen is warm, you can pop the cooled trays in the fridge for 10 minutes to help the chocolate set.
Servings & Timing
- Yield: About 36–40 cookies (depending on size)
- Prep Time: 20 minutes (including unwrapping Kisses)
- Bake Time: 8–10 minutes per tray
- Total Time: About 35–40 minutes, plus cooling
If you’re planning for a holiday party or cookie exchange, a single batch usually serves 10–12 people, assuming 3–4 cookies each. For my family? Let’s just say I double it without apology.
Variations
You know what? Classic is wonderful, but it’s also fun to play a little. Here are some easy twists:
- Chocolate Kiss Mix-Up: Use different Hershey’s Kisses—dark chocolate, hugs, caramel-filled, or even peppermint for a wintery twist.
- Sparkly Sugar Coating: Roll the cookie dough balls in colored sanding sugar (red, green, gold) for a more festive cookie recipe.
- Crunchy Peanut Butter Blossoms: Use crunchy peanut butter to add a little texture and extra peanut crunch.
- Gluten-Friendly Swap: Use a good 1:1 gluten-free baking flour blend in place of regular flour; the cookies may spread a touch more but still taste great.
- Mini Blossoms: Make smaller 3/4-inch balls and use Hershey’s Mini Kisses—it’s adorable for dessert platters and kids’ parties.
- Salted Chocolate Top: Sprinkle a few flakes of sea salt over the Kisses right after pressing them in for a sweet-salty twist.
Storage & Reheating
One of the best parts of this homemade peanut butter cookies recipe is how well it keeps.
- Room Temperature: Store cooled cookies in an airtight container at room temperature for 4–5 days. Layer them with parchment paper to protect the chocolate tops.
- Freezer (Baked Cookies): Freeze baked peanut butter blossom cookies in a single layer on a baking sheet, then transfer to a freezer bag or container. They keep well for up to 2 months. Thaw at room temperature for 30–60 minutes.
- Freezer (Cookie Dough): Roll the dough into balls, skip the sugar coating, and freeze on a tray. Once firm, move to a freezer bag. When ready to bake, let them sit out for 10 minutes, roll in sugar, and bake (you may need an extra minute of baking time).
- Reheating: These cookies don’t really need reheating, but if you like a warm cookie, microwave one for 5–8 seconds—enough to soften the chocolate slightly without melting it into a puddle.
- Make-Ahead Tip: For holiday baking, I like to make the dough a day ahead and keep it covered in the fridge. Let it sit at room temperature for 20–30 minutes before shaping so it’s not too firm to roll.
Notes
- Soft vs. crunchy texture: If you like very soft peanut butter blossoms, pull them from the oven closer to 8 minutes, when they’re still pale and puffed. For a slightly firmer, more cookie-jar texture, give them the full 10 minutes.
- Sugar coating matters: Rolling in sugar isn’t just for looks—it adds a delicate sweetness to the outside and helps the cookies hold their shape.
- Preventing flat cookies: If your kitchen is very warm, chill the shaped, sugar-rolled dough balls for 10–15 minutes before baking. This keeps them from spreading too much.
- Peanut butter flavor: If you’re a serious peanut butter lover, you can add an extra tablespoon of peanut butter without hurting the structure. More than that can start to throw things off.
- Baking in batches: If you’re baking one tray at a time, keep the rest of the dough covered and out of direct heat from the oven. Slightly cooler dough holds its shape better.
And a little personal note: I’ve tested this recipe with both store-brand peanut butter and name brands. The cookies were good either way, but the name brands gave a more pronounced peanut butter taste and a smoother texture. If you’re baking these for a special occasion, I’d lean toward a brand you already love on your sandwiches.
FAQs
Can I make this Peanut Butter Blossoms Recipe with natural peanut butter?
You can, but the cookies may spread more and be a bit greasier. If you try it, make sure to stir the natural peanut butter very well and consider adding 1–2 extra tablespoons of flour.
Why did my peanut butter blossom cookies turn out dry?
Most often, they were either overbaked or had too much flour. Measure the flour carefully and pull the cookies when they still look a little soft in the center.
Do I have to use Hershey’s Kisses, or can I use other chocolate?
You can use chocolate stars, mini peanut butter cups, or even a square of good dark chocolate. Just press them in while the cookies are hot so they gently melt and stick.
Can I make these peanut butter blossom cookies ahead for Christmas?
Yes, this is a wonderful Christmas cookie recipe for making ahead. Bake, cool, and freeze them, then thaw at room temperature the day you serve.
How do I keep the chocolate from turning white (blooming) in storage?
Store the cookies in a cool, dry place away from heat or direct sunlight. Rapid temperature changes cause that white film on chocolate, which is harmless but not as pretty.
Can I use crunchy peanut butter instead of creamy?
Yes, crunchy peanut butter works well and adds nice little peanut bits. Just keep in mind the texture will be slightly less smooth.
My Kisses melted and lost their shape—what happened?
The oven was probably too hot, or the cookies stayed on a very hot pan too long. Try baking one sheet at a time in the center of the oven and moving the cookies to a cooling rack after a few minutes.
Are these peanut butter and chocolate cookies safe for people with peanut allergies?
No, this recipe is peanut-heavy. For peanut-free friends, I like to make a sugar blossom cookie topped with a chocolate Kiss instead—same idea, just a different base.
Conclusion
These Peanut Butter Blossoms are the kind of classic holiday cookies that never go out of style—soft, sweet, a little salty, and topped with that perfect bite of chocolate. They’re easy enough for a busy weekday, but special enough to earn a permanent spot in your family’s holiday cookie lineup.
Give this Peanut Butter Blossoms Recipe a try, and let me know how they turn out for you—leave a comment, share a photo, or tell me what variations you tried. And if you’re building a full cookie tray, you might like to pair these with chocolate crinkle cookies or sugar cut-outs for a little color and texture contrast.

Peanut Butter Blossoms
Ingredients
- 1 3/4 cups all-purpose flour 210 g, spooned and leveled
- 1 teaspoon baking soda
- 1/2 teaspoon fine salt such as fine sea salt
- 1/2 cup unsalted butter 113 g, softened to room temperature
- 1/2 cup creamy peanut butter about 120 g; not natural “stir” style; use Skippy, Jif, or similar
- 1/2 cup granulated sugar 100 g
- 1/2 cup light brown sugar 110 g, packed
- 1 large egg at room temperature
- 2 teaspoons pure vanilla extract
- 2 tablespoons milk whole or 2% for best moisture
- 1/3 cup granulated sugar for rolling; amount is approximate
- 36-40 Hershey’s Kisses unwrapped; classic milk chocolate or desired flavor
Instructions
- Preheat oven to 375°F (190°C). Line two baking sheets with parchment paper or silicone baking mats to promote even baking and prevent sticking.
- In a medium bowl, whisk together the flour, baking soda, and salt until well combined. Set aside.1 3/4 cups all-purpose flour, 1 teaspoon baking soda, 1/2 teaspoon fine salt
- In a large mixing bowl, beat the softened butter, peanut butter, granulated sugar, and brown sugar with a hand mixer or stand mixer on medium speed for 2–3 minutes, until light, pale, and fluffy.1/2 cup unsalted butter, 1/2 cup creamy peanut butter, 1/2 cup granulated sugar, 1/2 cup light brown sugar
- Beat in the egg and vanilla until fully combined, scraping down the bowl as needed. Add the milk and mix again until the mixture looks smooth and creamy.1 large egg, 2 teaspoons pure vanilla extract, 2 tablespoons milk
- Add the flour mixture in two additions, mixing on low speed just until no dry streaks of flour remain. Do not overmix once the flour is added.1 3/4 cups all-purpose flour, 1 teaspoon baking soda, 1/2 teaspoon fine salt
- Let the dough rest at room temperature for 5–10 minutes so the flour can hydrate and the dough firms slightly. Meanwhile, pour the extra granulated sugar for rolling into a small bowl and unwrap the Hershey’s Kisses.1/3 cup granulated sugar, 36-40 Hershey’s Kisses
- Scoop the dough into 1-inch balls, about 1 tablespoon each. Roll each portion between your palms until smooth, then roll in the bowl of sugar to coat. Place on the prepared baking sheets, spacing about 2 inches apart.1/3 cup granulated sugar
- Bake for 8–10 minutes, or until the cookies are puffed, lightly cracked on top, and just starting to firm around the edges while still soft in the centers.
- Remove the cookies from the oven and immediately press one Hershey’s Kiss into the center of each hot cookie. The edges will crack slightly, creating the classic blossom look.36-40 Hershey’s Kisses
- Let the cookies cool on the baking sheet for 5–10 minutes, then transfer carefully to a wire rack to cool completely so the chocolate can firm up. If your kitchen is warm, chill the cooled trays in the refrigerator for about 10 minutes to help the chocolate set.