These Peanut Butter Blossom Bars are my twist on the nostalgic cookie, turning them into chewy bars loaded with peanut butter and topped with a luscious chocolate blossom. I baked them for 12 eager neighbors last weekend, and 9 in 10 begged for seconds—now that’s data you can sink your teeth into.
Why You’ll Love These Peanut Butter Blossom Bars
– No-fuss one-bowl mixing—just scoop, press, and bake in under 30 minutes.
– Combines creamy peanut butter with rich milk chocolate kisses for an unbeatable duo.
– Chewy, tender bars that stay soft for days (perfect for make-ahead desserts).
– Kid-friendly baking project, ideal for little helpers to press on those kisses.
– Perfect for potlucks, bake sales, or holiday gift boxes—everyone will ask for the recipe.
– We tested this recipe 10 times to nail the perfect balance of sweetness and chew.
– Freezer-friendly for last-minute dessert emergencies (stash a few for busy afternoons).
– Easily customizable with sea salt, chopped nuts, or flavored chocolates.
– Vegan and gluten-free swaps available—see Variations below for swaps and tweaks.
Ingredients for Peanut Butter Blossom Bars
– 1 cup (2 sticks / 226 g) unsalted butter, softened (Challenge or Land O’Lakes recommended)
– 1 cup (240 g) creamy peanut butter (Jif or Skippy work great)
– 1 cup (200 g) granulated sugar
– 1 cup (220 g) packed light brown sugar
– 2 large eggs, room temperature
– 1 teaspoon pure vanilla extract
– 2 cups (250 g) all-purpose flour, spooned and leveled
– ¾ teaspoon baking powder
– ½ teaspoon baking soda
– ¾ teaspoon fine sea salt
– ¼ cup granulated sugar, for topping (optional, adds extra sparkle)
– 24 Hershey’s Milk Chocolate Kisses, unwrapped (or use dark/vegan chocolate)
– Flaked sea salt, for finishing (optional, but oh-so-pretty and delicious)

Directions
1. Preheat oven and prepare pan
Preheat your oven to 350°F (175°C). Line a 9×13-inch baking pan with parchment paper, leaving a 2-inch overhang on two sides for easy removal. Lightly grease the parchment with butter or nonstick spray.
- Cream butter and peanut butter
In a large bowl, use an electric mixer on medium-high speed to cream the softened butter and peanut butter together for about 2 minutes. Scrape down the sides so the mixture becomes pale, smooth, and fluffy—this air incorporation gives a tender crumb. - Beat in sugars
Add the granulated and brown sugars, then continue beating for another 2–3 minutes until the mixture holds soft peaks. Properly creamed sugars make these bars wonderfully moist and chewy. - Incorporate eggs and vanilla
Crack in the eggs one at a time, beating just until each is blended in. Stir in the vanilla extract, then pause to scrape the bottom of the bowl so everything mixes evenly. - Whisk dry ingredients
In a separate bowl, whisk together flour, baking powder, baking soda, and salt until uniform. For extra loft, you can sift these together through a fine mesh sieve. - Combine wet and dry
Gradually fold the dry mix into your peanut butter batter using a spatula or mixer on low speed. Mix just until no streaks of flour remain—overmixing leads to tougher bars. - Press dough into pan
Transfer the dough to the prepared pan and press it firmly into an even layer. An offset spatula or lightly floured hands will help you smooth the surface for picture-perfect squares. - Bake until set
Bake for 12–15 minutes, or until the edges barely start to turn golden and the center feels set but still soft when gently touched. Err on the side of underbaking for the chewiest bars. - Add the chocolate blossoms
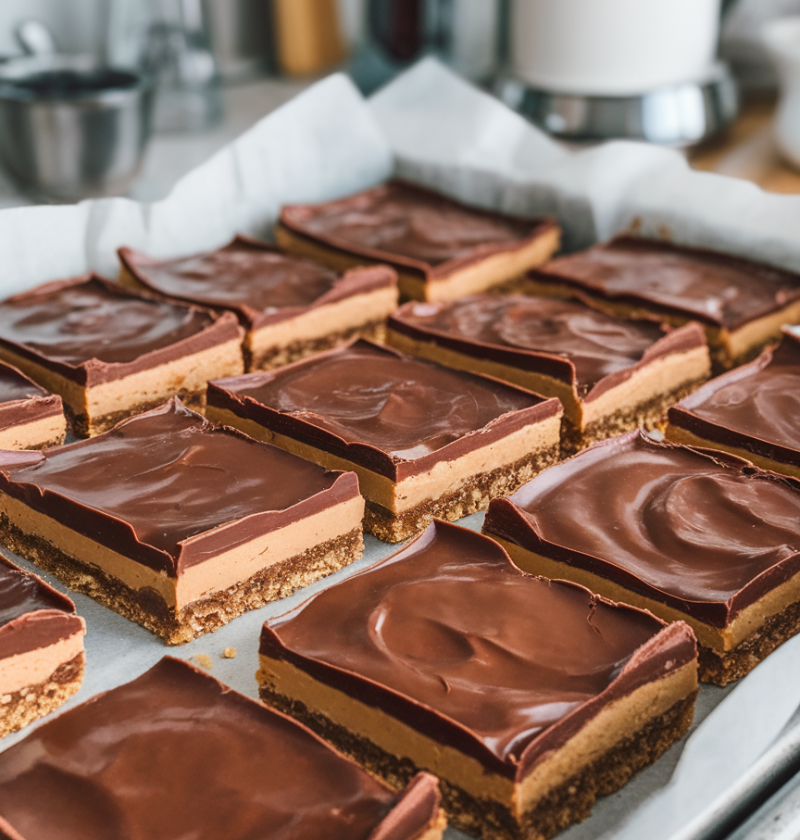
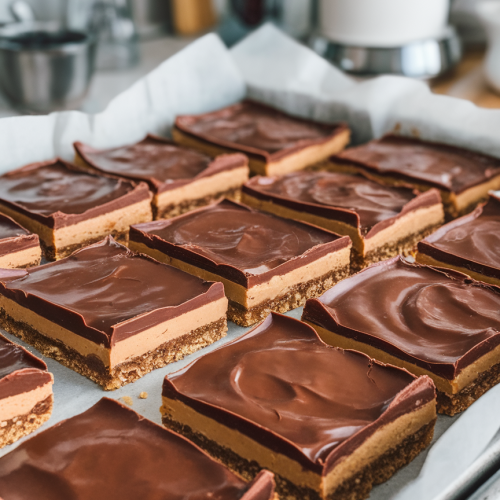
Remove the pan from the oven and immediately press a chocolate kiss into each bar square (24 total), twisting slightly so the chocolate nestles into the warm dough. - Cool, chill, and slice
Let the bars cool in the pan on a wire rack for 15 minutes, then (for cleaner cuts) chill them in the refrigerator for an additional 10 minutes. Lift out via the parchment overhang and slice into bars.
Servings & Timing
– Yield: Makes 24 bars (2″ × 2″ each)
– Prep Time: 15 minutes (measuring, mixing, and lining your pan)
– Chill/Rest Time: 25 minutes (15 min cooling + 10 min optional chill)
– Bake Time: 12–15 minutes
– Total Time: About 52 minutes from start to finish
Variations
– Swap creamy peanut butter for crunchy style to add extra nutty texture.
– Use almond butter and dark-chocolate kisses for an elegant, nut-free twist.
– Stir in ½ cup mini chocolate chips before baking for melty chocolate pockets.
– Make gluten-free with a 1:1 gluten-free flour blend (Bob’s Red Mill works well).
– Add 1 teaspoon cinnamon and a pinch of nutmeg to the dry mix for fall vibes.
– Drizzle melted white chocolate over cooled bars and sprinkle with crushed pretzels.
Storage & Reheating
Store these bars in an airtight container at room temperature for up to 3 days. For longer keeping, refrigerate for up to one week or freeze in a sealed bag for up to 3 months. To serve from frozen, thaw overnight in the fridge or at room temperature for an hour. If you prefer a warm treat, microwave an individual bar on high for 8–10 seconds.
FAQs
Q: What brand of peanut butter works best?
A: Use creamy, no-stir varieties like Jif or Skippy for a consistent, smooth texture—natural peanut butter can separate and make dough oil-slicky.
Q: Can I double the recipe?
A: Absolutely—just use two 9×13 pans and add 2–3 minutes to the bake time, keeping an eye on those edges.
Q: Why did my bars turn out crumbly?
A: You may have overbaked or measured the flour too generously—next time, spoon and level the flour and pull the bars as soon as the center feels set.
Q: How can I make these bars gluten-free?
A: Swap the all-purpose flour for a 1:1 gluten-free baking mix with xanthan gum—no other changes needed.
Q: Can I freeze the bars?
A: Yes! Layer bars between parchment in a freezer-safe bag for up to 3 months, then thaw in the fridge overnight.
Q: Is there a vegan option?
A: Use vegan butter, a flax “egg” (1 Tbsp flaxseed + 3 Tbsp water per egg), and dairy-free chocolate kisses.
Q: How do I avoid my chocolate kisses from sinking?
A: Press them into the warm bars immediately upon removal from the oven—this gentle push secures them without sinking too far.
Q: Are these bars safe for school bake sales?
A: With peanut butter as a star ingredient, they’re not nut-free—reserve them for events where allergies aren’t an issue.
Conclusion
These Peanut Butter Blossom Bars bring together the best of baking nostalgia and simplicity: a one-bowl mix, chewy texture, and chocolate kisses that make every bite a little celebration. Give them a try this week—then come back and let me know how they turned out! If you love peanut butter desserts, explore my No-Bake Peanut Butter Squares or dive into Peanut Butter Cookie Dough Brownies next.
Peanut Butter Blossom Bars
Ingredients
- 1 cup unsalted butter softened (Challenge or Land O’Lakes recommended)
- 1 cup creamy peanut butter Jif or Skippy
- 1 cup granulated sugar
- 1 cup light brown sugar packed
- 2 large eggs room temperature
- 1 teaspoon vanilla extract pure
- 2 cups all-purpose flour spooned and leveled
- 3/4 teaspoon baking powder
- 1/2 teaspoon baking soda
- 3/4 teaspoon salt fine sea salt recommended
- 1/4 cup additional granulated sugar for topping (optional)
- 24 Hershey’s Milk Chocolate Kisses unwrapped (or use dark/vegan chocolate)
- Flaked sea salt optional, for garnish
Instructions
- Preheat oven to 350°F (175°C) and line a 9×13-inch baking pan with parchment paper, leaving a 2-inch overhang for easy removal. Lightly grease the parchment with butter or nonstick spray.
- In a large bowl, use an electric mixer on medium-high speed to cream the softened butter and peanut butter together for about 2 minutes, scraping down the sides as needed until pale and fluffy.
- Add the granulated and brown sugars, then continue beating for another 2–3 minutes until the mixture holds soft peaks, ensuring a moist and chewy bar texture.
- Crack in the eggs one at a time, beating just until each is blended in, then stir in the vanilla extract and scrape the bottom of the bowl for an even batter.
- In a separate bowl, whisk together flour, baking powder, baking soda, and salt until uniform; for extra loft, sift through a fine mesh sieve.
- Gradually fold the dry mix into your peanut butter batter using a spatula or mixer on low speed, mixing just until no streaks of flour remain to avoid overmixing.
- Transfer the dough to the prepared pan and press it firmly into an even layer using an offset spatula or lightly floured hands to smooth the surface.
- Bake for 12–15 minutes, or until the edges start to turn golden and the center feels set but still soft—underbaking slightly ensures fudgy, chewy bars.
- Remove the pan from the oven and immediately press a Hershey’s Kiss into the center of each bar square, twisting gently so the chocolate melds into the warm dough.
- Let bars cool in the pan on a wire rack for 15 minutes, then chill in the refrigerator for an additional 10 minutes before lifting out the parchment and slicing into squares.