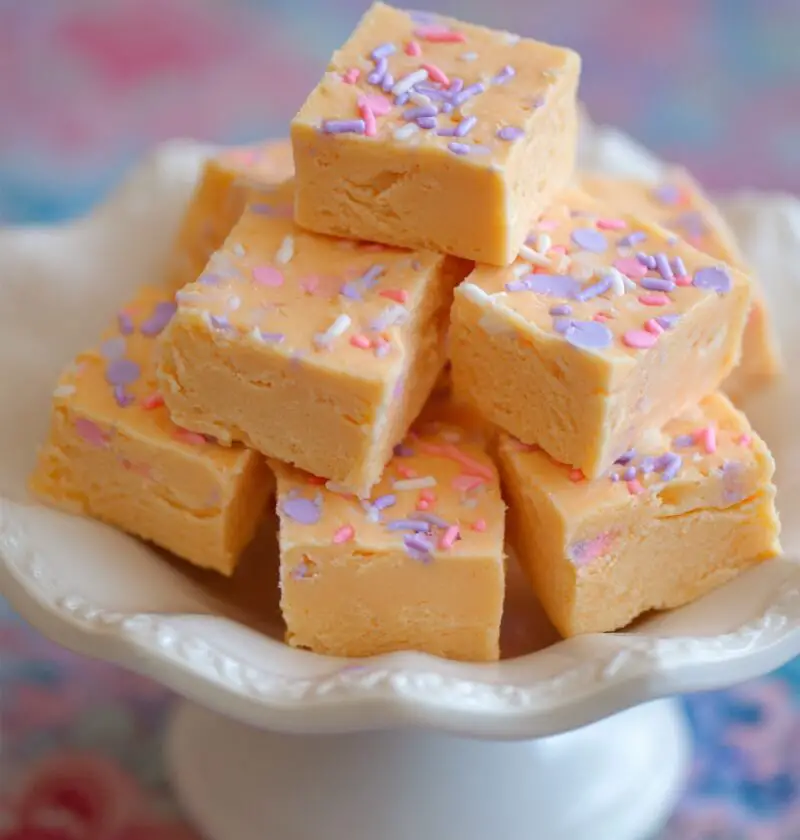
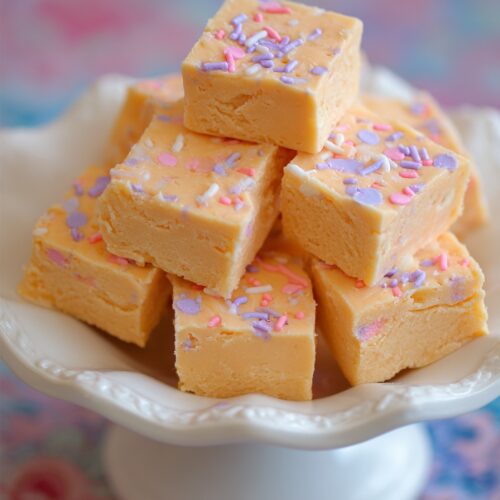
Orange Creamsicle Fudge Recipe
If you love those nostalgic orange creamsicle pops from childhood, this Orange Creamsicle Fudge Recipe gives you all that creamy, citrusy magic in a soft, melt-in-your-mouth square—no baking, no fuss, just a bright and creamy orange dessert that feels like pure summer.
This orange creamsicle fudge is a simple stovetop fudge recipe made with sweetened condensed milk and white chocolate, swirled with sunny orange flavor and vanilla. It’s a fun, no bake fudge recipe that I pull out every year once the weather warms up—or honestly, anytime I need a little taste of sunshine in the middle of February. The layered orange fudge effect looks fancy but it’s completely beginner-friendly.
If you grew up chasing the ice cream truck like I did in the 80s, that first bite of orange vanilla fudge will probably take you right back to sticky fingers and grass-stained knees. That’s what I love most about recipes like this: they’re simple, a little nostalgic, and easy to share.
Why You’ll Love This Recipe
- No oven needed—this is a true no bake fudge recipe.
- Only a handful of ingredients you can find in any grocery store.
- Quick stovetop fudge recipe—about 10 minutes of hands-on time.
- Gorgeous layered orange fudge swirls that look bakery-worthy.
- Creamy, soft texture thanks to sweetened condensed milk and white chocolate.
- Perfect summer fudge dessert for cookouts, baby showers, or school events.
- Great for gifting—pack these fruity fudge squares in cute little boxes or bags.
- Easy to customize with other citrus flavors or fun toppings.
- Kid-friendly and grandparent-approved (ask me how I know!).
Ingredients
Here’s everything you’ll need to make this orange creamsicle fudge recipe. It looks like a lot written out, but most of it you probably already have in your pantry.
- 3 cups (about 540 g) white chocolate chips
- Use a good-quality brand like Ghirardelli or Guittard for the smoothest white chocolate orange fudge.
- 1 can (14 oz / 396 g) sweetened condensed milk
- This is the base of our condensed milk fudge; make sure it’s not evaporated milk.
- 4 tbsp unsalted butter, cut into pieces
- 1 tsp pure vanilla extract
- 1 ½ tsp orange extract (or 1 tsp orange extract + ½ tsp pure orange oil, if you have it)
- ½ tsp fine sea salt (or ¼ tsp table salt)
- 2–3 tsp orange zest, finely grated (from 1 large orange)
- 4–6 drops orange gel food coloring (or a mix of yellow and red gel to get a soft creamsicle orange)
- Optional garnish:
- Extra orange zest for sprinkling on top
- White sanding sugar or sprinkles for a little sparkle
A few quick notes before we get cooking:
- White chocolate: Chips are easiest, but you can chop white chocolate bars if that’s what you have. Just keep the pieces small and even so they melt smoothly.
- Orange flavor: Using both orange extract and fresh zest gives this citrus fudge recipe a brighter, more natural flavor, a bit like orange creamsicle candy.
- Food coloring: Gel color works best here because it doesn’t thin the fudge. Liquid color can make the mixture a bit looser, so go easy if that’s what you’re using.

Directions
-
Prep your pan.
Line an 8×8-inch (20×20 cm) baking pan with parchment paper, leaving some overhang on two sides so you can lift the fudge out later. Lightly spray the parchment with nonstick spray if your paper tends to stick. -
Set up a simple double boiler.
Add about 1 inch of water to a medium saucepan, bring it to a gentle simmer, then reduce the heat to low. Place a heat-safe bowl over the pan, making sure the bottom of the bowl doesn’t touch the water. This helps melt the chocolate gently and keeps it from seizing. -
Melt the base.
To the bowl, add the white chocolate chips, sweetened condensed milk, and butter. Stir slowly and constantly with a heatproof spatula as everything melts together. You want a smooth, glossy mixture with no lumps; this usually takes 3–5 minutes. If it looks like it’s thickening too fast, pull the bowl off the heat for a minute, then return it. -
Flavor the fudge.
Once smooth, remove the bowl from the heat. Stir in the vanilla, orange extract, salt, and orange zest. Mix well so every bite has that creamy orange vanilla flavor. At this point, the mixture should be thick but pourable. -
Create your orange and vanilla layers.
Pour about ⅓ of the mixture into a separate small bowl—this will be your “vanilla cream” layer. Set it aside. To the remaining ⅔ of the mixture, add your orange gel food coloring a drop at a time, stirring between each addition until you have a soft creamsicle orange color. You don’t need it neon; gentle color looks more appetizing. -
Layer the fudge.
Pour half of the orange mixture into your prepared pan and spread it into an even layer with your spatula. It will start to set quickly, so don’t walk away now. Spoon dollops of the white vanilla mixture across the top, then spoon the remaining orange mixture over and around it. -
Swirl for that creamsicle look.
Using a butter knife or a skewer, gently pull through the layers in a figure-8 motion to create an orange swirl fudge pattern. Don’t over-swirl or you’ll lose the pretty contrast—four to six passes is usually enough. If you’d like, sprinkle a bit of extra orange zest or white sanding sugar over the top. -
Chill until firm.
Transfer the pan to the refrigerator and chill for at least 2 hours, or until the fudge is firm to the touch in the center. For cleaner cuts, you can let it chill 3–4 hours or even overnight. -
Slice and serve.
Use the parchment overhang to lift the fudge out of the pan and set it on a cutting board. With a sharp knife, cut into 1 to 1 ½-inch squares. Wipe the knife between cuts for nice, tidy edges. Serve chilled or at cool room temperature.
You now have a tray of creamy orange dessert squares that taste like frozen treats from childhood, but dressed up for the grown-ups.
Servings & Timing
- Yield: About 36 small squares (or 25 larger squares)
- Prep Time: 10–15 minutes
- Chill Time: 2–4 hours
- Total Time: About 2 ½–4 ½ hours (mostly hands-off chilling time—perfect for getting the rest of dinner ready or putting your feet up with a book)
Variations
You know what? Once you nail this base orange creamsicle fudge recipe, you can spin it off in so many directions. Here are a few of my favorites:
- Orange Cranberry Fudge: Fold in ½ cup finely chopped dried cranberries for a tart, chewy contrast to the creamy orange.
- Chocolate Orange Swirl: Swirl in ½ cup melted semi-sweet chocolate over the top before chilling for a tuxedo-style citrus fudge recipe.
- Lemon Creamsicle Fudge: Swap the orange extract and zest for lemon extract and zest for a bright, sunshiney twist.
- Low-Sugar Version: Use sugar-free white chocolate and a sugar-free condensed milk substitute (like some keto brands) for a lighter fruity fudge square—texture will be slightly softer.
- Candy Shop Crunch: Stir in ½ cup crushed vanilla wafer cookies or shortbread for a little crunch in your orange flavored confection.
- Extra-Creamy Orange Vanilla Fudge: Swirl in 2 tbsp marshmallow creme with the white portion for a fluffier, softer finish.
Storage & Reheating
Fudge doesn’t really need reheating, but it does appreciate a good rest and proper storage.
- Room Temperature: In a cool kitchen (under about 70°F), this easy homemade fudge can sit at room temperature in an airtight container for up to 3–4 days. I like to separate layers with parchment.
- Refrigerator: For longer storage, keep the fudge in a lidded container in the fridge for up to 2 weeks. This keeps the orange creamsicle candy firm and fresh.
- Freezer: To freeze, place squares in a single layer on a baking sheet, freeze until solid, then transfer to a zip-top freezer bag or container. They’ll keep well for about 2–3 months.
- Thawing: Let frozen fudge thaw in the fridge overnight or on the counter for 30–45 minutes. The texture is best once it’s not icy cold.
- Make-Ahead Tip: This summer fudge dessert is actually better the next day, once the flavors have settled, so it’s perfect to make ahead for parties and potlucks.
Notes
A few things I’ve learned after making this orange vanilla fudge more times than I can count:
- Don’t rush the melting. If you crank the heat, the white chocolate can get grainy. Gentle heat, a little patience, and steady stirring give you that silky finish.
- Adjust the orange flavor to taste. Some people like a subtle creamsicle vibe, others want a bold citrus punch. Start with the amounts listed, taste a tiny spoonful, then add a few more drops of extract if needed.
- Zest carefully. Use a microplane and avoid the white pith—that part is bitter and can throw off your creamy orange dessert.
- Color last. Always add food coloring after everything is fully melted and mixed. Color can accentuate streaks and make it harder to smooth things out if the mixture isn’t ready.
- Cut small. This is a rich condensed milk fudge, so smaller squares make it easier for folks to enjoy a piece without feeling overwhelmed. Guests can always go back for seconds (and they usually do).
- Serving trick: On hot summer days, I keep the pan in the fridge and only bring out a small plate at a time. It keeps your pretty layered orange fudge from getting too soft on a buffet table.
And a little personal note: I used to pack these orange swirl fudge squares into small tins for my kids’ teachers each May. A simple ribbon, a handwritten tag, and you’ve got a thoughtful gift that feels special but doesn’t keep you chained to the kitchen all day.
FAQs
Can I make this orange creamsicle fudge recipe in the microwave instead of a double boiler?
Yes—combine the white chocolate, sweetened condensed milk, and butter in a microwave-safe bowl, heat in 20–30 second bursts at 50% power, stirring well between each, until smooth.
My fudge didn’t set—what went wrong?
Most of the time, it either didn’t chill long enough or the chocolate wasn’t fully melted and combined; chill it several more hours, and if it’s still soft, you can freeze it and serve as “creamsicle fudge bites” in mini cups.
Can I use evaporated milk instead of sweetened condensed milk?
No, evaporated milk doesn’t have the sugar or thickness this recipe needs; stick with sweetened condensed milk for the right texture.
Do I have to use food coloring?
Not at all—the fudge will still taste like orange creamsicle candy without it, but the color won’t be as distinctly orange and white.
Can I use milk or dark chocolate instead of white chocolate?
You can, but it won’t taste like a classic orange creamsicle; you’ll get more of a chocolate orange fudge, which is delicious but different.
Is this recipe gluten-free?
Yes, as long as your white chocolate chips and extracts are gluten-free (most are, but always check labels if you’re serving someone with celiac or strong sensitivity).
How small should I cut the fruity fudge squares?
For parties, I usually cut them about 1-inch; for gifting or family snacking, 1 ½-inch squares are a nice size.
Can I double this for a 9×13 pan?
Yes, you can double all the ingredients and use a 9×13-inch pan—the thickness will be similar and the chilling time will be about the same.
Conclusion
This Orange Creamsicle Fudge Recipe brings together creamy vanilla and bright citrus in one cheerful little square—an easy homemade fudge that looks impressive but takes only a few minutes on the stovetop. It’s the kind of treat that fits just as well at a summer cookout as it does in a holiday candy box, which is probably why my family keeps asking for “that orange fudge” year-round.
Give it a try, and let me know how it turns out for you—leave a comment with your tweaks, or snap a photo and share your orange swirl fudge with friends and family. And if you’re in a citrus mood, you might like to explore my lemon bar recipes or other creamy orange desserts next time you’re planning a sweet treat.
Orange Creamsicle Fudge
Ingredients
- 3 cups white chocolate chips about 540 g; use good-quality chips for best texture
- 1 can sweetened condensed milk 14 oz / 396 g; do not use evaporated milk
- 4 tablespoons unsalted butter cut into pieces
- 1 teaspoon pure vanilla extract
- 1 1/2 teaspoons orange extract or 1 tsp orange extract + 1/2 tsp pure orange oil
- 1/2 teaspoon fine sea salt or 1/4 teaspoon table salt
- 2-3 teaspoons orange zest finely grated, from 1 large orange
- 4-6 drops orange gel food coloring or a mix of yellow and red gel to reach a soft orange color
- extra orange zest optional, for sprinkling on top
- white sanding sugar or sprinkles optional, for garnish
Instructions
- Line an 8x8-inch (20x20 cm) baking pan with parchment paper, leaving some overhang on two sides to lift the fudge out later. Lightly spray the parchment with nonstick spray if needed.
- Add about 1 inch of water to a medium saucepan and bring it to a gentle simmer, then reduce the heat to low. Place a heat-safe bowl over the pan, ensuring the bottom of the bowl does not touch the water.
- To the bowl, add the white chocolate chips, sweetened condensed milk, and butter. Stir slowly and constantly with a heatproof spatula as the mixture melts. Continue until completely smooth and glossy with no lumps, about 3–5 minutes. If it thickens too fast, briefly remove the bowl from the heat, then return it.3 cups white chocolate chips, 1 can sweetened condensed milk, 4 tablespoons unsalted butter
- Remove the bowl from the heat. Stir in the vanilla extract, orange extract, salt, and orange zest until evenly combined. The mixture should be thick but pourable.1 teaspoon pure vanilla extract, 1 1/2 teaspoons orange extract, 1/2 teaspoon fine sea salt, 2-3 teaspoons orange zest
- Pour about one-third of the fudge mixture into a separate small bowl to create the vanilla cream portion and set aside. To the remaining two-thirds in the main bowl, add orange gel food coloring a drop at a time, stirring between additions until you achieve a soft creamsicle orange color.4-6 drops orange gel food coloring
- Pour half of the orange-colored mixture into the prepared pan and spread it into an even layer. Quickly spoon dollops of the reserved white vanilla mixture across the top, then spoon the remaining orange mixture over and around the white dollops.
- Using a butter knife or skewer, gently pull through the layers in a figure-8 motion to create swirls. Make four to six passes so you keep good contrast between orange and white. If desired, sprinkle extra orange zest and/or white sanding sugar or sprinkles over the top.extra orange zest, white sanding sugar or sprinkles
- Transfer the pan to the refrigerator and chill for at least 2 hours, or until the center is firm to the touch. For neater slices, chill 3–4 hours or overnight.
- Use the parchment overhang to lift the fudge from the pan onto a cutting board. With a sharp knife, cut into 1- to 1 1/2-inch squares, wiping the knife between cuts for clean edges. Serve chilled or at cool room temperature.