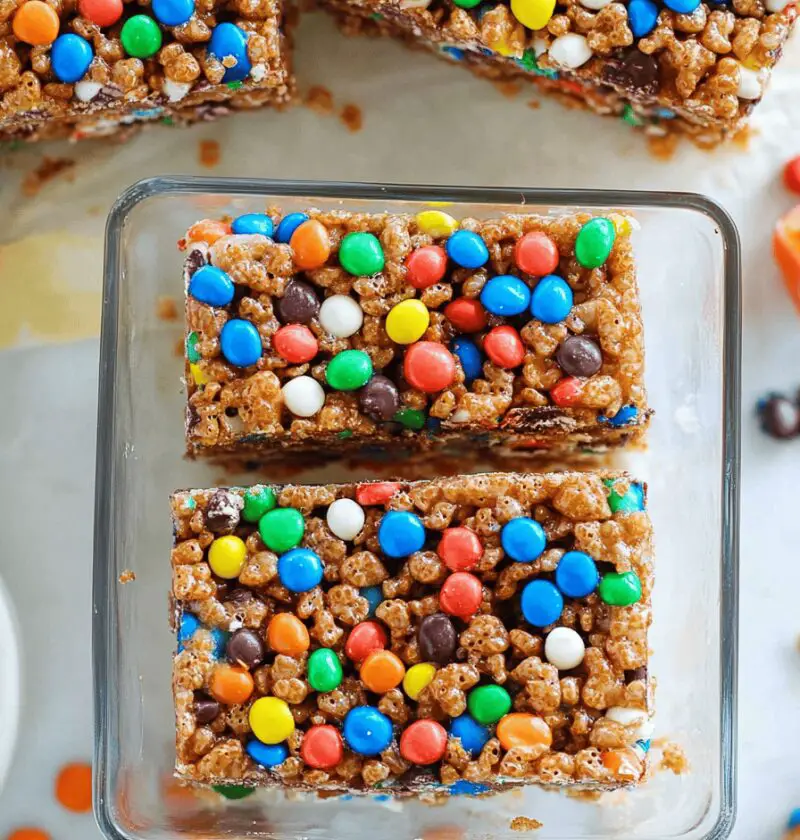
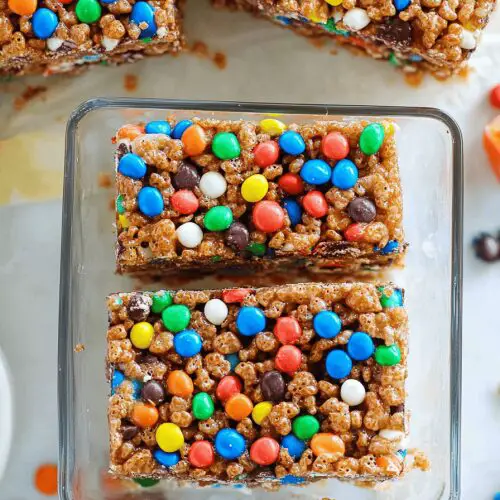
Mm Rice Krispies Treats
You know those afternoons when you’re rummaging through your pantry, half daydreaming about something sweet and suddenly—bam—a box of Rice Krispies winks at you? That was me last week, standing in my kitchen in cozy socks, craving something nostalgic yet just a little bit extra. I swear, the second I spotted those colorful M&Ms peeking out from the cereal shelf, I knew we were about to have a gooey, messy, totally craveable reunion with our childhood selves.
These no-bake Mm Rice Krispies Treats are the kind of snack that feels like a warm hug—you get that classic marshmallow-chewy bite we all grew up loving, but with playful pops of candy that make every mouthful a mini celebration. They come together in under 20 minutes (yes, really!), require just one pan on the stovetop, and set up in the fridge faster than you can binge-watch your favorite show. Perfect for after-school snacks, block parties, or when you need a little sprinkle of joy on an ordinary day.

Why You’ll Love This
- No oven needed—one-pan, stovetop magic (just butter, marshmallows, and cereal!)
- Ready in under 20 minutes (including a quick chill—your kids will applaud you)
- Uses pantry staples—Rice Krispies, mini marshmallows, butter, and a handful of candy
- Colorful candy bits turn a family favorite into a party on your taste buds
- Easily doubled or tripled for potlucks, bake sales, or gift boxes
- Kid-approved assembly (sticky fingers and big smiles encouraged!)
- Completely customizable—go nuts (literally) with seeds, nuts, or drizzles
Ingredient Notes & Casual Tips
- Rice Krispies cereal: Grab about a 7.5-ounce box (6 cups). Don’t pack it down when you measure—lighter cereal means fluffier bars.
- Mini marshmallows: 4 cups, plus extra for topping. Store-brand works just fine if you’re saving pennies.
- Unsalted butter: 3 tablespoons, room temperature. I’m partial to Land O’Lakes, but use what you have. Salted is OK—just skip the extra pinch of salt later.
- Vanilla extract: 1 teaspoon. Totally optional, but it brings depth and makes everything smell heavenly (trust me).
- M&Ms: ½ cup plain or peanut—your choice! You can swap in Reese’s Pieces or allergy-friendly candies if needed.
- Pinch of salt: It balances all that sweetness. Don’t skip it!
Pro Tip: For a slightly healthier twist, swap in whole-grain marshmallows (they’re a thing!). If someone in your crew is nut-free, sub in sunflower seed butter and allergy-safe chocolate bits. Just roll with what you have—there’s zero judgment here.
Directions: Step-by-Step (Don’t Skip These!)
- Line your pan: Grab an 8×8-inch baking pan and line it with parchment paper, leaving a little overhang on two sides. This makes it a breeze to lift out the whole slab later. (Spritz lightly with cooking spray if you want extra insurance.)
- Melt the butter: In a large, heavy-bottomed saucepan set over low heat, melt the butter until it’s just starting to bubble—about 1 minute. Keep the flame low so nothing scorches. You want golden, not brown, butter here.
- Add the marshmallows: Toss in 4 cups of mini marshmallows and that pinch of salt. Stir continuously with a heatproof spatula until everything is smooth and glossy—roughly 2–3 minutes. Seriously, keep stirring. Nobody likes burnt marshmallows.
- Vanilla moment: Remove the pot from heat, then stir in the vanilla extract. Inhale deeply—you deserve a gourmet cooking break.
- Mix in cereal & candy: Quickly fold in the Rice Krispies until every flake is coated in that dreamy marshmallow mixture. Then, gently stir in your ½ cup of M&Ms (chill, don’t crush!). Do this fast before the mix starts to set.
- Press into pan: Transfer everything to your prepared pan. Use your parchment overhang or a silicone spatula to press it down evenly—light touch only! Think “gentle hug,” not “mortar block.” This tip keeps the treats chewy, not rock hard.
- Top it off: Scatter some extra minis and a few more M&Ms on top, pressing lightly so they stick. Bonus points if you swoon over how darn cute they look.
- Chill & slice: Let the pan sit at room temperature for about 10 minutes, then pop it in the fridge for 20–30 minutes until firm. Lift out with the parchment edges and slice into 12–16 squares using a sharp knife (warm the knife under hot water, then dry it—hello, clean cuts!).
Variations & Flavor Twists
- Peanut Butter Party: Swirl in ¼ cup creamy peanut butter with the marshmallows for a nutty layer of love.
- Chocolate Drizzle: Melt ½ cup dark chocolate chips and drizzle over the cooled bars. Hello, chocolate therapy.
- Tropical Twist: Fold in ⅓ cup freeze-dried pineapple bits and a handful of toasted coconut for instant beach vibes.
- Vegan Version: Swap in vegan butter, dairy-free marshmallows, and allergy-friendly candies—still super gooey!
- Nutty Crunch: Stir in ½ cup chopped almonds, pecans, or walnuts for extra texture (and crunch, of course!).
- Protein Boost: Mix in ¼ cup of your favorite vanilla whey or plant protein powder. Bars will be a bit denser but still chewy and satisfying.
Storage & Reheating Tips
These treats are best stored in an airtight container at room temperature for up to 3 days. Separate the layers with parchment so nothing sticks. If you want to keep them longer, freeze individual squares in zip-top bags for up to a month—just thaw at room temp for about 30 minutes. No microwave needed, though a 5-second zap works if you’re impatient (we’ve all been there!).
Little tip: If your bars cool too quickly and get a bit stiff, pop them back in a warm saucepan for 20 seconds and gently stir—just enough to loosen them up. Then re-press into the pan for maximum chewiness.
Let’s Chat!
And there you have it—a no-fuss, color-spangled twist on those childhood Rice Krispies Treats we all adore. I hope you give these Mm Rice Krispies Treats a whirl this week, whether you’re feeding hungry kiddos, hosting a bake sale, or just craving a quick pick-me-up with your afternoon coffee. If you try a variation or have a secret add-in that’s next-level, please drop a comment below. I love hearing your stories, tips, and kitchen wins (and fails—no shame in the sticky-fingered game!).
Happy snacking, friends. Keep those cozy vibes coming, and I’ll see you with another comforting recipe soon!
M&M Rice Krispies Treats
Ingredients
- 6 cups Rice Krispies cereal about 7.5 oz box
- 4 cups mini marshmallows plus extra for topping (store-brand saves money)
- 3 Tbsp unsalted butter (room temp, not melted—Land O'Lakes is my fave)
- 1 tsp pure vanilla extract (boosts flavor depth)
- 1/2 cup M&M candies (plain or peanut; swap for Reese's Pieces if you like)
- Pinch salt (balances sweetness perfectly)
Instructions
- Line an 8x8-inch baking pan with parchment, leaving an overhang on two sides for easy lifting. (Spritz lightly with nonstick spray if needed.)
- In a large, heavy-bottomed saucepan over low heat, melt butter until it just bubbles—about 1 minute—stirring gently.
- Toss in 4 cups of mini marshmallows and a pinch of salt. Stir continuously until the mixture is smooth and glossy, about 2–3 minutes. Keeping the spatula moving prevents scorching.
- Remove from heat, stir in vanilla extract, and savor that sweet aroma.
- Quickly fold in Rice Krispies until coated, then gently mix in M&Ms before the marshmallow sets.
- Transfer to the prepared pan, using parchment or a silicone spatula to press evenly but not too hard—you want chew, not brick.
- Scatter extra marshmallows and M&Ms on top, pressing lightly so they stick.
- Let sit 10 minutes at room temp, then refrigerate 20–30 minutes until firm. Lift out with the overhang and slice into 12–16 squares using a sharp knife.