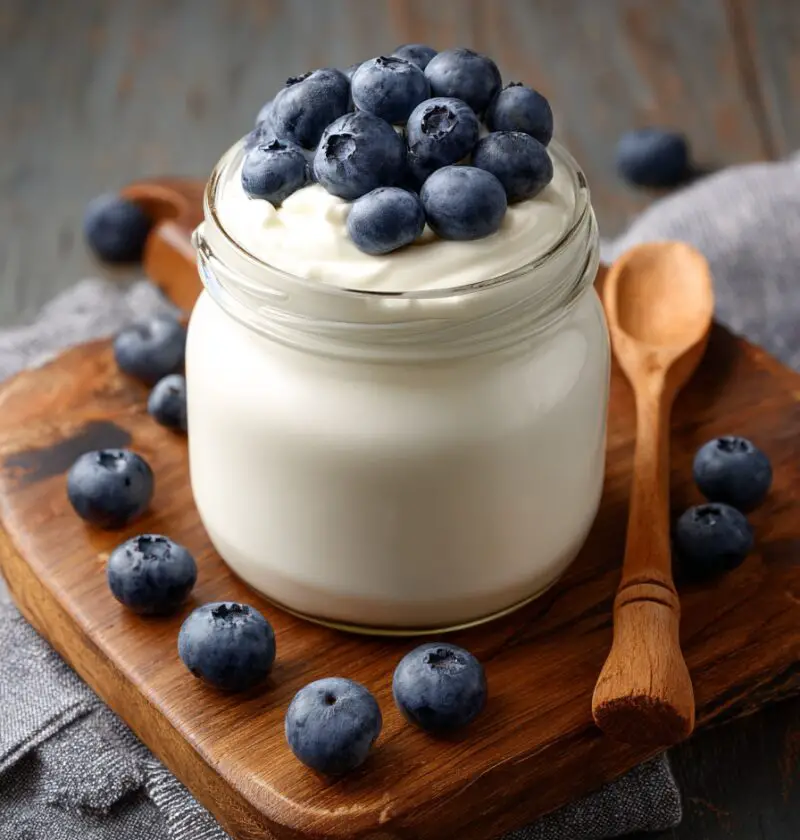
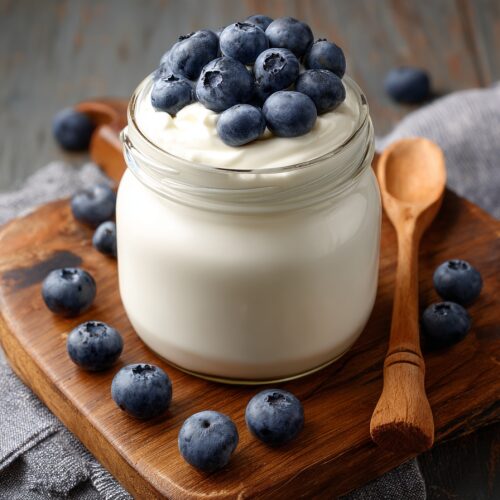
Instant Pot Yogurt Recipe (Thick, Creamy, and Surprisingly Easy)
If you’ve ever dreamed of a big bowl of creamy, tangy yogurt that you made yourself, this Instant Pot Yogurt Recipe is about to become your new favorite kitchen ritual—no fancy equipment, just your electric pressure cooker and a little patience.
I’ve been making homemade yogurt on and off since my kids were little, and let me tell you, the Instant Pot changed the game. This method takes the guesswork out of homemade yogurt, keeps the temperature steady for perfect fermentation, and gives you a silky, spoonable yogurt that tastes so much fresher than store-bought. It’s a cozy little project, but still simple enough for a busy Tuesday.
You’ll use just two main ingredients—milk and a yogurt starter culture—and let the Instant Pot do the work. Whether you’re new to Instant Pot yogurt, or you’ve tried pressure cooker yogurt before with mixed results, this guide will walk you through every step, with all my “50-year-old mom in her kitchen” notes baked right in.
Why You’ll Love This Instant Pot Yogurt Recipe
- Hands-off cooking – The Instant Pot handles the heating and fermentation, so you’re not hovering over the stove with a thermometer.
- Budget-friendly – A gallon of milk turns into a week’s worth of creamy yogurt homemade for a fraction of the store price.
- Customizable texture – Strain it for Greek-style yogurt or keep it softer and lighter; you’re in charge.
- Fewer additives – No mystery sweeteners or thickeners—just milk and live cultures.
- Great for meal prep – Portion it into jars and you’ve got instant pot breakfast recipes ready for busy mornings.
- Family-friendly – Mild, creamy flavor that kids love, and you can swirl in their favorites: fruit, jam, granola, or honey.
- Perfect for gut health – Fermentation encourages live cultures that may support digestion.
- Reliable results – The Instant Pot yogurt setting keeps a steady temp, which takes a lot of the “is this going to work?” fear away.
Ingredients
For this Instant Pot Yogurt Recipe, you only need a few simple ingredients, but the quality really does make a difference.
-
1 gallon (3.8 L) whole milk
- Whole milk gives you the creamiest yogurt. You can use 2% milk, but the yogurt will be lighter and a bit less rich.
- Use regular dairy milk, not ultra-filtered or flavored. Both pasteurized and ultra-pasteurized can work for this recipe.
-
2–3 tablespoons plain yogurt with live active cultures (this is your yogurt starter culture)
- Pick a plain yogurt you actually like to eat—its flavor and tang will carry into your homemade yogurt.
- Look for “live and active cultures” on the label. Greek or regular yogurt both work; just avoid flavored or sweetened.
-
Optional: 2–4 tablespoons sugar or honey (for lightly sweetened yogurt)
- I usually keep my yogurt unsweetened and add honey or maple syrup at serving time, but a spoon or two in the milk is nice if you prefer a gentle sweetness.
-
Optional: 1–2 teaspoons vanilla extract
- Stir this in after incubation, once the yogurt is chilled, for a lovely vanilla yogurt.
Little tip from my kitchen: When I find a store-bought yogurt that makes especially good Instant Pot yogurt, I freeze a few tablespoons in an ice cube tray. Those become my ready-to-go starters for future batches.

Step-by-Step Directions (So It Actually Works Every Time)
-
Clean and prep your Instant Pot
Make sure your Instant Pot insert, lid, and whisk or spatula are very clean. Any leftover food or soap residue can interfere with fermentation. I usually rinse everything with very hot water and dry it well before starting. -
Add the milk to the pot
Pour the gallon of milk into the Instant Pot inner pot. Secure the lid. (You don’t need to seal the valve; for yogurt the steam release setting doesn’t matter much, especially on newer models.) -
Heat the milk (“Boil” setting)
Press the “Yogurt” button until it says “Boil” or shows “More” (depending on your model). This cycle heats the milk to around 180°F, which helps denature the milk proteins and gives you thicker yogurt.- When it’s done, the Instant Pot will beep. This may take 30–45 minutes.
-
Check the temperature
Open the lid carefully. Give the milk a gentle stir with a clean whisk, then check with an instant-read thermometer. You want 180°F–185°F (82°C–85°C).- If it’s not quite there, use the Sauté function on Low, whisking frequently, until it hits that range.
-
Cool the milk to about 110°F
Turn off the Instant Pot. Remove the inner pot and set it on a trivet or a folded dish towel to cool.- Stir occasionally to prevent a skin from forming on top (or just skim it off if you don’t like it—my husband actually eats that part).
- You’re aiming for around 105°F–115°F (40°C–46°C). This can take 30–45 minutes at room temperature.
- To speed it up, you can place the pot in a cold water bath in the sink, making sure no water splashes in.
-
Temper the yogurt starter
In a small bowl, add 2–3 tablespoons of your plain yogurt starter.
Ladle in about 1 cup of the warm milk and whisk until smooth. This warms the starter gently so the cultures aren’t shocked by hot or cold extremes.- Once smooth, pour that mixture back into the main pot of milk and whisk gently to combine.
-
Ferment in the Instant Pot
Place the inner pot back into the Instant Pot base and secure the lid. Press “Yogurt” again and set the time anywhere from 8 to 12 hours.- For milder, less tangy yogurt: 7–8 hours.
- For tangier yogurt (my personal favorite): 10–12 hours.
The Instant Pot will keep the temperature steady around 110°F, which is ideal for instant pot fermentation.
-
Check for doneness
When the time is up, open the lid and jiggle the pot very gently. The yogurt should look set, almost like a soft custard, and you might see some clear whey around the edges.- Don’t stir yet—stirring too early can make it runny. Just peek.
- If it still seems very liquid, you can add 1–2 extra hours by resetting the yogurt function.
-
Chill to set the texture
Cover the inner pot with plastic wrap or the Instant Pot lid and place it in the refrigerator. Chill for at least 4 hours, but overnight is even better.
This chilling step thickens the yogurt and improves the flavor. -
Strain for Greek-style yogurt (optional)
If you want thick, Greek-style yogurt:- Line a colander with cheesecloth, a nut milk bag, or coffee filters and set it over a large bowl.
- Gently spoon the cold yogurt into the lined colander.
- Let it strain in the fridge for 1–4 hours, depending on how thick you’d like it.
- The liquid that drains off is whey—save it for smoothies, bread, or pancakes if you’d like.
-
Flavor and store
Once strained (or not, if you like it unstrained), whisk the yogurt gently until smooth. This is when you can stir in vanilla extract or a bit of sweetener.
Transfer to individual jars or containers for easy breakfasts. Label with the date so you know how long it’s been in the fridge.
Servings & Timing
- Yield: About 3–3.5 quarts of yogurt (depending on how much you strain it)
- Prep Time: 15 minutes active (measuring, whisking, setting up)
- Heat Time: 30–45 minutes to bring the milk up to temperature
- Cooling Time: 30–45 minutes to reach 110°F
- Fermentation Time: 8–12 hours
- Chill Time: 4–8 hours in the fridge
- Total Time (mostly hands-off): About 13–18 hours from start to eat
It sounds long when you see all the numbers, but most of that time, you’re sleeping or doing other things—this is a perfect “start it in the afternoon, enjoy it tomorrow” project.
Fun Variations for Your Homemade Yogurt
- Vanilla Bean Yogurt: Stir in 1–2 teaspoons vanilla extract (or scrape in a vanilla bean) after fermentation and chilling.
- Honey Lavender Yogurt: Add 2–3 tablespoons honey and ½ teaspoon culinary lavender (finely ground or steeped, then strained) for a gentle floral flavor.
- Strawberry Swirl Yogurt: Fold in cooled strawberry compote or sugar-free strawberry sauce right before serving.
- High-Protein Greek Yogurt: Strain an extra 3–4 hours and use 2% or whole milk for extra thick, spoon-standing yogurt.
- Low-Lactose Yogurt: Use lactose-free milk; the process is the same, and long fermentation often makes it easier to digest.
- Instant Pot Breakfast Parfaits: Layer your pressure cooker yogurt in small jars with granola, chia seeds, and seasonal fruit for grab-and-go breakfasts.
Storage & Make-Ahead Tips
- Fridge storage: Store your instant pot yogurt in airtight containers in the refrigerator for 7–10 days.
- Freezing starter: Scoop 2–3 tablespoons of this batch into an ice cube tray, freeze, then store in a freezer bag. You can use these “starter cubes” for your next instant pot dairy recipe for up to 1–2 months.
- Freezing yogurt to eat: Yogurt can be frozen for 1–2 months for smoothies, but the texture will change once thawed (it gets grainy).
- Make-ahead breakfasts: Portion yogurt into small jars on Sunday. Add toppings like granola or nuts just before eating to keep them crunchy.
- Reheating (sort of): Yogurt isn’t reheated like soup, but if you like it warmer, let it sit on the counter for 15–20 minutes before serving—this brings out the creaminess and flavor.
Notes From My Kitchen (Little Things That Make a Big Difference)
- Starter matters. The flavor and thickness of your yogurt starter culture really shape your final yogurt. A mild, creamy store brand might give you a softer yogurt, while a tangy Greek yogurt starter tends to yield thicker, more tart results.
- Don’t rush the chilling. The yogurt can look a bit wobbly or even disappointing right after fermenting. Once it chills overnight, it thickens beautifully. I’ve rushed it before, and it always seems thinner.
- Skip stirring during incubation. I know it’s tempting to check and stir like a pot of soup, but resist. Stirring breaks the structure while it’s forming.
- Save starter from each batch. Use a few tablespoons of your homemade yogurt as the starter for your next Instant Pot Yogurt Recipe. After about 4–5 generations, I like to “refresh” and go back to a fresh store-bought starter.
- If you like it very thick, strain longer. I sometimes strain half the batch and leave half unstrained. That way, I have a light yogurt for smoothies and a thick one for bowls.
- Don’t panic over a bit of whey. Liquid on top is normal. You can stir it back in or pour it off. If the yogurt tastes fine and smells pleasantly tangy—not sour or funky—you’re good.
FAQs About Instant Pot Yogurt
1. Can I make this Instant Pot Yogurt Recipe with less than a gallon of milk?
Yes, absolutely. You can use half a gallon or even a quart—keep the process the same and just reduce the yogurt starter to about 1 tablespoon per quart of milk.
2. Do I have to use the “Yogurt” button?
For the most reliable results, yes. The yogurt setting keeps a steady low temperature perfect for fermentation, which is hard to reproduce with other modes.
3. My yogurt turned out runny. What went wrong?
Common reasons: the milk didn’t heat high enough, the starter wasn’t active, or the incubation time was too short. You can still strain runny yogurt to thicken it, and next time, check temps with a thermometer and ferment a little longer.
4. How do I know if my yogurt went bad?
Trust your nose and eyes. If it smells strongly sour or “off,” has mold spots, or looks separated in a strange way, toss it. Proper yogurt should smell tangy and fresh, like mild sour cream.
5. Can I use homemade yogurt as a starter forever?
Not forever. Over time, the cultures can weaken or change. I recommend refreshing with a new store-bought starter every 4–5 batches for consistent results.
6. Can I make non-dairy yogurt in the Instant Pot?
Yes, but you’ll need a different approach and usually some sort of thickener, like agar or tapioca starch. This specific recipe is for dairy milk, but the general instant pot fermentation concept is similar.
7. Why did a skin form on top of my milk?
That’s completely normal as hot milk cools. You can whisk it in if you don’t mind, or gently lift it off and discard it before adding the starter.
8. Is this yogurt safe for kids?
Yes—assuming they can eat dairy. You might want a shorter incubation (7–8 hours) for a milder flavor that little ones usually prefer, and keep it unsweetened so you can control what you add.
Conclusion: Bring Homemade Comfort to Your Breakfast Bowl
This Instant Pot Yogurt Recipe brings together everything I love about home cooking: simple ingredients, a little science, and a big reward—a bowl of creamy, homemade yogurt that tastes like something you’d get at a cozy café, but made in your own kitchen. Once you try it a couple of times, it’ll become part of your weekly rhythm, like brewing coffee or baking a quick loaf of banana bread.
Give it a try, play around with flavors, and see how it fits your family’s routine. When you make it, I’d love to hear how it turned out—leave a comment with your favorite variations, or check out my other Instant Pot recipes for more easy, comforting ideas.
Instant Pot Yogurt (Thick, Creamy, and Surprisingly Easy)
Ingredients
- 1 gallon whole milk regular dairy milk; pasteurized or ultra-pasteurized; 2% milk can be used for lighter yogurt
- 2-3 tablespoons plain yogurt with live active cultures Greek or regular; unsweetened and unflavored; this is the starter culture
- 2-4 tablespoons sugar or honey optional, for lightly sweetened yogurt; added with the milk
- 1-2 teaspoons vanilla extract optional; stir in after chilling
- Water and ice optional, for a cold-water bath to cool the milk faster
- Cheesecloth, nut milk bag, or coffee filters optional, for straining to make Greek-style yogurt
Instructions
- Make sure the Instant Pot insert, lid, and whisk or spatula are very clean. Rinse with very hot water and dry well to avoid any residue that could interfere with fermentation.
- Pour the gallon of whole milk into the Instant Pot inner pot. If using sugar or honey, whisk it in now. Secure the lid. The steam release setting does not matter for the yogurt function.1 gallon whole milk, 2-4 tablespoons sugar or honey
- Press the “Yogurt” button until the display shows “Boil” or “More” (depending on your model). Let the cycle run until the Instant Pot beeps, heating the milk to around 180°F (82°C). This usually takes 30–45 minutes.
- Carefully remove the lid. Gently stir the milk with a clean whisk and check the temperature with an instant-read thermometer. It should be 180°F–185°F (82°C–85°C). If it is not hot enough, use the Sauté function on Low, whisking frequently, until the milk reaches this range.
- Turn off the Instant Pot and remove the inner pot to a trivet or folded dish towel. Let the milk cool to 105°F–115°F (40°C–46°C), stirring occasionally to prevent a skin from forming (or skim off the skin if desired). This can take 30–45 minutes at room temperature. To speed up cooling, set the pot in a cold water bath in the sink, being careful not to splash water into the milk.
- Place 2–3 tablespoons of plain yogurt with live active cultures in a small bowl. Ladle about 1 cup of the warm (110°F) milk into the bowl and whisk until completely smooth. This gently warms the starter so the cultures are not shocked.2-3 tablespoons plain yogurt with live active cultures
- Pour the tempered yogurt mixture back into the main pot of warm milk. Whisk gently until evenly combined.1 gallon whole milk, 2-3 tablespoons plain yogurt with live active cultures
- Place the inner pot back into the Instant Pot base and secure the lid. Press the “Yogurt” button again and set the time for 8–12 hours. Incubate 7–8 hours for a milder, less tangy yogurt, or 10–12 hours for a tangier flavor. The Instant Pot will keep the temperature around 110°F (43°C) during fermentation.
- When the incubation time is complete, open the lid and gently jiggle the pot without stirring. The yogurt should look set like a soft custard with some clear whey around the edges. If it still appears very liquid, run the yogurt cycle for an additional 1–2 hours.
- Cover the inner pot with the Instant Pot lid or plastic wrap and transfer it to the refrigerator. Chill for at least 4 hours, or preferably overnight, to thicken and develop the flavor. Do not stir until after chilling.
- For thicker Greek-style yogurt, line a colander with cheesecloth, a nut milk bag, or coffee filters and set it over a large bowl. Gently spoon the chilled yogurt into the lined colander and refrigerate to strain for 1–4 hours, depending on how thick you want it. Reserve the strained liquid (whey) for smoothies, baking, or pancakes if desired.Cheesecloth, nut milk bag, or coffee filters
- Transfer the yogurt (strained or unstrained) to a large bowl and whisk gently until smooth. Stir in vanilla extract and additional sweetener if desired. Portion into jars or containers, label with the date, and refrigerate for up to 7–10 days.2-4 tablespoons sugar or honey, 1-2 teaspoons vanilla extract
Notes
- Prep Time: ~15 minutes active (measuring, whisking, setup)
- Heating Time to 180°F: 30–45 minutes
- Cooling Time to 110°F: 30–45 minutes
- Fermentation Time: 8–12 hours
- Chill Time: 4–8 hours Tips:
- Starter quality matters: choose a plain yogurt you like with live active cultures; tangy Greek yogurt starters often make thicker, tangier yogurt.
- Do not stir during incubation; stirring can break the structure and make the yogurt runny.
- Don’t rush chilling; the yogurt thickens significantly after several hours in the fridge.
- A bit of whey on top is normal. You can stir it back in or pour it off.
- Save 2–3 tablespoons of this batch as starter for your next batch. After about 4–5 generations, refresh with a new store-bought starter.
- For very thick yogurt, strain longer (3–4 hours). You can strain only part of the batch to have both regular and Greek-style textures. Storage:
- Yogurt keeps in the fridge for 7–10 days.
- Freeze 2–3 tablespoon portions of yogurt in an ice cube tray to use as starter for 1–2 months.
- Yogurt can be frozen for smoothies for 1–2 months, but texture becomes grainy after thawing. Variations:
- Vanilla Bean Yogurt: Stir in 1–2 teaspoons vanilla extract (or seeds from 1 vanilla bean) after chilling.
- Honey Lavender Yogurt: Stir in 2–3 tablespoons honey and about 1/2 teaspoon finely ground or strained culinary lavender.
- Strawberry Swirl Yogurt: Fold in cooled strawberry compote or sauce just before serving.
- High-Protein Greek Yogurt: Use whole or 2% milk and strain an extra 3–4 hours.
- Low-Lactose: Use lactose-free milk and incubate on the longer side (10–12 hours), which can make it easier to digest. Troubleshooting:
- Runny yogurt often means the milk did not reach 180°F, the starter was weak/inactive, or the incubation time was too short. You can still strain runny yogurt to thicken it.
- If yogurt smells strongly sour or “off,” shows mold, or looks strangely separated, discard it. Serving ideas:
- Serve plain or topped with fruit, jam, granola, nuts, seeds, honey, or maple syrup.
- Use for parfaits: layer yogurt, granola, and seasonal fruit in jars for grab-and-go breakfasts.