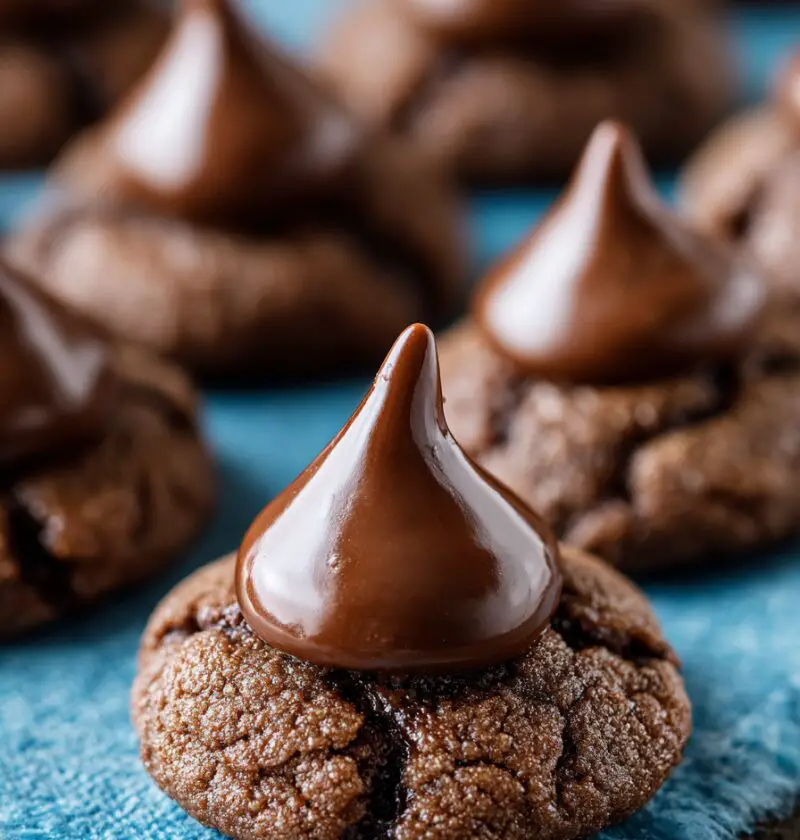
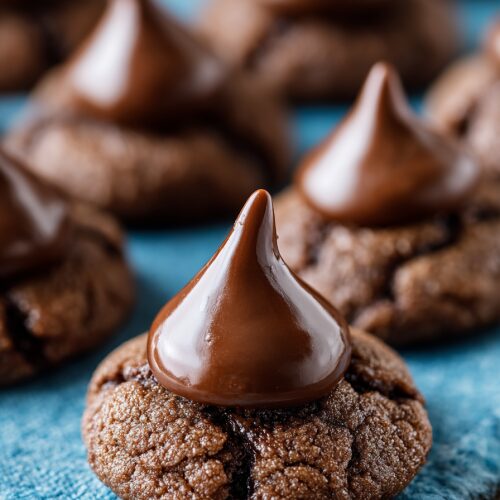
Hershey Kiss Cookies Recipe
This Hershey Kiss Cookies Recipe bakes up soft peanut butter cookies with melty chocolate centers—cozy, kid-friendly, and perfect for any holiday cookie platter.
If you grew up in the States, there’s a good chance a plate of Hershey’s kiss cookies—also called peanut butter blossom cookies—showed up at every Christmas party, church bake sale, and school event. This classic cookie recipe has that nostalgic combo of creamy peanut butter and chocolate kiss candies that still makes my grown kids linger around the cooling rack “just to check” if they’re ready.
This version keeps things simple and reliable, with a tender, soft peanut butter cookie base and that signature chocolate kiss right in the middle. It’s my go-to holiday cookie recipe, but I make it all year long because it’s an easy cookie recipe that always turns out and always disappears. If you’ve been hunting for a foolproof Hershey Kiss cookies recipe that gives you soft, chewy, bakery-style cookies every time—this is it.
Why You’ll Love This Recipe
- Classic, nostalgic flavor – Tastes exactly like the peanut butter blossom cookies many of us grew up with, but a little softer and fresher.
- Soft and chewy texture – No dry, crumbly peanut butter cookies here; these stay tender even the next day.
- Simple pantry ingredients – You probably have almost everything already sitting in your kitchen.
- Kid-friendly and fun to make – Little hands love unwrapping the chocolate kiss candies and pressing them into the warm cookies.
- Perfect holiday cookie recipe – Ideal for Christmas cookie swaps, gift boxes, and office trays.
- Easy to double for a crowd – The dough scales up beautifully when you need a big family cookie recipe.
- Freezer-friendly – You can freeze both the dough balls and the baked cookies, which makes this a great make-ahead dessert.
- Reliable every time – Clear steps, simple tools, and lots of little tips baked right into the directions.
Ingredients
Let’s walk through what you’ll need for these chocolate kiss cookies. Nothing fancy—just the good, basic stuff that lets the peanut butter and chocolate shine.
- 1 1/2 cups (195 g) all-purpose flour
- 1 teaspoon baking soda
- 1/2 teaspoon baking powder
- 1/4 teaspoon fine salt (use kosher salt if you have it)
- 1/2 cup (1 stick / 113 g) unsalted butter, softened (room temperature; not melted)
- 1/2 cup (100 g) granulated sugar
- 1/2 cup (100 g) packed light brown sugar
- 3/4 cup (190 g) creamy peanut butter (a classic like Jif or Skippy works best; avoid natural peanut butter that separates)
- 1 large egg, room temperature
- 2 teaspoons pure vanilla extract
- 2–3 tablespoons milk (whole or 2%—just enough to soften the dough if needed)
- About 1/2 cup granulated sugar, for rolling
- 36–40 Hershey’s Kisses, unwrapped (regular milk chocolate; you can use dark or flavored for variations)
Ingredient tips:
- Soft peanut butter cookies start with room temperature butter; if it’s too cold, your dough won’t cream properly.
- Using both granulated sugar and brown sugar gives that perfect mix of chew and structure.
- If your dough seems a bit dry (this can happen in cooler or drier climates), the milk brings it right back to a soft, scoopable texture.

Directions
-
Preheat and prep your pan.
Preheat your oven to 375°F (190°C). Line two baking sheets with parchment paper or silicone baking mats for easy cleanup and even baking. -
Combine dry ingredients.
In a medium bowl, whisk together the flour, baking soda, baking powder, and salt. Set aside—this keeps your leavening evenly distributed and prevents any salty pockets. -
Cream the butter and sugars.
In a large mixing bowl (or the bowl of a stand mixer with the paddle attachment), beat the softened butter, granulated sugar, and brown sugar on medium speed for about 2–3 minutes, until light and fluffy. Scrape down the sides once or twice so everything mixes evenly. -
Add the peanut butter, egg, and vanilla.
Beat in the peanut butter until smooth. Then add the egg and vanilla and mix until fully combined. The mixture should look creamy and a bit thick. -
Mix in the dry ingredients.
Add the flour mixture in two batches, mixing on low speed just until combined. If the dough seems crumbly or stiff, add 1–2 tablespoons of milk, mixing briefly after each addition. You’re aiming for a soft dough that holds together when rolled. -
Chill (optional, but helpful).
For the softest, thickest thumbprint kiss cookies, cover the bowl and chill the dough for 20–30 minutes. If you’re in a hurry, you can skip this, but chilling helps the cookies stay puffier and not spread too much. -
Shape the dough balls.
Pour the rolling sugar into a shallow bowl. Scoop the dough into 1-inch balls (about 1 tablespoon each) and roll between your palms to smooth. Roll each ball in sugar and place on the prepared baking sheets, spacing them about 2 inches apart. -
Bake the cookies.
Bake for 8–10 minutes, or until the edges are set and the tops look slightly cracked. The cookies should still be soft and pale; they’ll continue to cook a bit on the hot pan. Try not to overbake—soft peanut butter cookies firm up as they cool. -
Press in the Hershey’s Kisses.
While the cookies bake, unwrap your Hershey’s Kisses—this is a great job for kids or anyone wandering through the kitchen. As soon as the cookies come out of the oven, quickly press one chocolate kiss into the center of each cookie, pushing down gently so the edges “blossom” up around the chocolate. -
Cool and set.
Let the cookies cool on the baking sheet for 5 minutes, then transfer them to a wire rack to cool completely. The chocolate kisses will look a little melty and shiny at first but will firm back up as the cookies fully cool.
Servings & Timing
- Yield: About 36–40 cookies
- Prep Time: 20 minutes
- Chill Time (optional): 20–30 minutes
- Bake Time: 8–10 minutes per sheet
- Total Time: About 1 hour (including chilling and cooling enough to handle)
If you’re baking for a big crowd or holiday party, this Hershey Kiss cookies recipe doubles beautifully—just use two mixing bowls or a stand mixer with a big capacity.
Variations
You know what? Half the fun of a classic like this is playing with it a little. Here are some easy twists:
- Chocolate lovers’ version: Use chocolate peanut butter and dark chocolate kiss candies for extra rich chocolate peanut butter cookies.
- Sugar cookie blossoms: Replace the peanut butter with softened cream cheese and a splash of almond extract for a soft sugar-cookie-style base with a kiss on top.
- Holiday sprinkle cookies: After rolling the dough in sugar, roll again in red and green sprinkles for a festive Christmas cookie recipe.
- Gluten-friendly swap: Use a 1:1 gluten-free all-purpose flour blend; bake one test cookie first to adjust bake time by a minute if needed.
- Peanut-free option: Substitute a creamy sunflower seed butter for a nut-free, school-safe version—just note the flavor will be slightly different but still delicious.
- Double chocolate kiss cookies: Stir in 1/4 cup mini chocolate chips to the dough for even more chocolate in every bite.
Storage & Reheating
One of the reasons I love this as a family cookie recipe is how well it keeps.
- Room temperature: Store cooled cookies in an airtight container at room temperature for 4–5 days. Place parchment between layers to protect the chocolate kisses.
- Freezer (baked cookies): Freeze in a single layer on a baking sheet, then transfer to a freezer bag or container. They keep well for about 2 months. Thaw at room temperature for 20–30 minutes.
- Freezer (cookie dough): Roll the dough into balls (without the sugar), freeze on a tray, then bag them. When you’re ready to bake, let them sit at room temperature for 10 minutes, roll in sugar, and bake—add 1–2 extra minutes to the bake time.
No real “reheating” needed, but if you like your chocolate a bit softer, you can microwave one cookie for 5–7 seconds. It’s a tiny, cozy dessert trick when you just need something sweet after dinner.
Notes
- Use creamy, not natural peanut butter. Natural peanut butter (the kind with oil on top) can make the dough oily and cause the cookies to spread too much. Classic shelf-stable peanut butter gives you neat, thick cookies.
- Don’t overbake. If the cookies look fully browned, they’re probably overdone. Pull them when they’re just set and lightly cracked; they’ll finish on the pan.
- Press the kisses right away. The chocolate needs that hot cookie to soften and “stick.” If you wait too long, the kiss can sit on top and fall off more easily.
- Rotate pans for even baking. If you bake two sheets at once, swap their positions halfway through so every cookie bakes evenly.
- Chilling is your friend. I tested these with and without chilling—chilled dough gave thicker, puffier thumbprint kiss cookies, while un-chilled dough spread a little more. Both tasted great, but chilling won for looks and texture.
Honestly, after making these for decades, my biggest lesson is this: keep it simple, and don’t stress about perfection. A slightly uneven cookie still tastes like peanut butter and chocolate, and nobody complains.
FAQs
Can I use natural peanut butter in this Hershey Kiss Cookies Recipe?
You can, but I don’t recommend it; natural peanut butter often makes the cookies spread too much and turn out oily. A standard creamy peanut butter works best.
Why are my cookies dry or crumbly?
Most of the time, dry cookies come from too much flour or overbaking. Spoon and level your flour (don’t pack it), and pull the cookies when they’re just set—not hard.
My chocolate kisses melted flat. What happened?
That usually means the cookies were too hot or they baked too long. Try shortening the bake time by a minute and let the cookies cool on the pan for only 3–4 minutes before moving.
Can I make the dough ahead of time?
Yes, you can refrigerate the dough (well-covered) for up to 2 days. Let it sit at room temperature for 10–15 minutes before rolling so it’s easier to handle.
Can I use different types of Hershey’s Kisses?
Absolutely. This Hershey’s kiss dessert works with milk chocolate, dark, hugs (swirled), caramel-filled, and seasonal flavors—just keep an eye on bake time so the centers don’t get too soft.
Can I make these as mini cookies?
Yes! Roll slightly smaller dough balls (about 2 teaspoons each), bake for 7–8 minutes, and use mini chocolate kisses if you can find them—or press in half a regular kiss.
How do I keep the bottoms from getting too brown?
Use light-colored baking sheets and parchment paper, and bake in the center of the oven. Dark pans tend to brown the bottoms faster, so shorten the bake time if that’s what you have.
Are these good for mailing in holiday cookie boxes?
They’re fantastic for that. Just let the chocolate set completely, then pack in snug layers with parchment in between to keep the chocolate kiss cookies from bumping around.
Conclusion
This Hershey Kiss Cookies Recipe brings together everything I love about home baking: simple ingredients, easy steps, and that warm, peanut-butter-and-chocolate smell drifting through the house. Whether you’re filling a Christmas cookie tin, baking with kids on a Saturday, or just sneaking a treat with your afternoon coffee, these chocolate peanut butter cookies never disappoint.
If you make this recipe, tell me how it went in the comments—what kind of kisses did you use, and did any even make it to the cookie jar? And if you’re still in a baking mood, look around the blog for more kid-friendly cookies and classic cookie recipes to add to your holiday (or everyday) rotation.
Hershey Kiss Cookies
Ingredients
- 1 1/2 cups all-purpose flour 195 g
- 1 teaspoon baking soda
- 1/2 teaspoon baking powder
- 1/4 teaspoon fine salt use kosher salt if you have it
- 1/2 cup unsalted butter 1 stick / 113 g, softened to room temperature
- 1/2 cup granulated sugar 100 g
- 1/2 cup light brown sugar 100 g, packed
- 3/4 cup creamy peanut butter about 190 g; use classic shelf-stable peanut butter (not natural)
- 1 large egg room temperature
- 2 teaspoons pure vanilla extract
- 2–3 tablespoons milk whole or 2%; use as needed to soften dough
- 1/2 cup granulated sugar for rolling the dough balls
- 36–40 Hershey’s Kisses unwrapped; regular milk chocolate or any preferred flavor
Instructions
- Preheat your oven to 375°F (190°C). Line two baking sheets with parchment paper or silicone baking mats for easy cleanup and even baking.
- In a medium bowl, whisk together the flour, baking soda, baking powder, and salt until well combined. Set aside.1 1/2 cups all-purpose flour, 1 teaspoon baking soda, 1/2 teaspoon baking powder, 1/4 teaspoon fine salt
- In a large mixing bowl or the bowl of a stand mixer fitted with the paddle attachment, beat the softened butter, granulated sugar, and brown sugar on medium speed for 2–3 minutes, until light and fluffy. Scrape down the sides of the bowl as needed.1/2 cup unsalted butter, 1/2 cup granulated sugar, 1/2 cup light brown sugar
- Beat in the creamy peanut butter until smooth and fully incorporated. Add the egg and vanilla extract and mix until the mixture is creamy and well combined.3/4 cup creamy peanut butter, 1 large egg, 2 teaspoons pure vanilla extract
- Add the dry ingredient mixture in two batches, mixing on low speed just until combined after each addition. If the dough seems crumbly or stiff, add 1–2 tablespoons of milk, mixing briefly after each addition, until you have a soft dough that holds together when rolled.1 1/2 cups all-purpose flour, 1 teaspoon baking soda, 1/2 teaspoon baking powder, 1/4 teaspoon fine salt, 2–3 tablespoons milk
- For thicker, softer cookies, cover the bowl and chill the dough in the refrigerator for 20–30 minutes. This helps prevent the cookies from spreading too much, but you can skip this step if you’re short on time.
- Place the rolling sugar in a shallow bowl. Scoop the dough into 1-inch balls (about 1 tablespoon each), roll between your palms until smooth, then roll each ball in the sugar to coat. Arrange on the prepared baking sheets, spacing the balls about 2 inches apart.1/2 cup granulated sugar
- Bake one sheet at a time for 8–10 minutes, or until the edges are set and the tops are just beginning to crack. The cookies should still look soft and pale; they will continue to cook on the hot pan. Avoid overbaking for the softest texture.
- While the cookies are baking, unwrap the Hershey’s Kisses. As soon as the cookies come out of the oven, immediately press one chocolate kiss into the center of each cookie, pressing down gently so the cookie edges “blossom” up around the candy.36–40 Hershey’s Kisses
- Let the cookies cool on the baking sheet for about 5 minutes, then transfer them to a wire rack to cool completely. The chocolate kisses will look soft and shiny at first but will firm up as the cookies cool.