There’s something magical about a plate of golden, crispy fried chicken. It’s more than just a meal—it’s a nostalgic reminder of family gatherings, sunny Sunday afternoons, and the warm comfort of home. Today, I’m excited to share a cherished recipe from my Nana’s kitchen: her famous Fried Chicken. This isn’t just any fried chicken; it’s the kind that warms your soul with every bite, perfect for those days when you need a little extra comfort or want to impress at a family dinner.
The secret to Nana’s perfectly crispy, tender fried chicken? Buttermilk. Soaking the chicken in buttermilk before frying does wonders. It tenderizes the meat, adds a subtle tang, and helps the flour coating stick better, resulting in a beautifully crispy crust. Trust me, once you try this method, there’s no going back.
Let’s dive into the recipe and create some delicious memories in your kitchen.
Ingredients: What You’ll Need
Here’s everything you need to make Nana’s Fried Chicken, which serves about four people:
1 whole chicken, cut into pieces: Or about 3-4 pounds of your favorite cuts (thighs, drumsticks, breasts—whatever you prefer).
2 cups buttermilk: Essential for tenderizing the chicken and adding that tangy flavor.
2 cups all-purpose flour: The base for the crispy coating.
1 tablespoon paprika: Adds a touch of warmth and color.
1 tablespoon garlic powder: For a subtle, savory flavor.
1 teaspoon cayenne pepper: Adjust based on your spice preference for a little kick.
Salt and black pepper to taste: Simple seasonings that bring out all the flavors.
Vegetable oil for frying: Enough to fill your pan about an inch deep.
Step-by-Step Instructions: Making Grandma’s Fried Chicken
Ready to cook up some comfort? Follow these steps to create the perfect fried chicken:
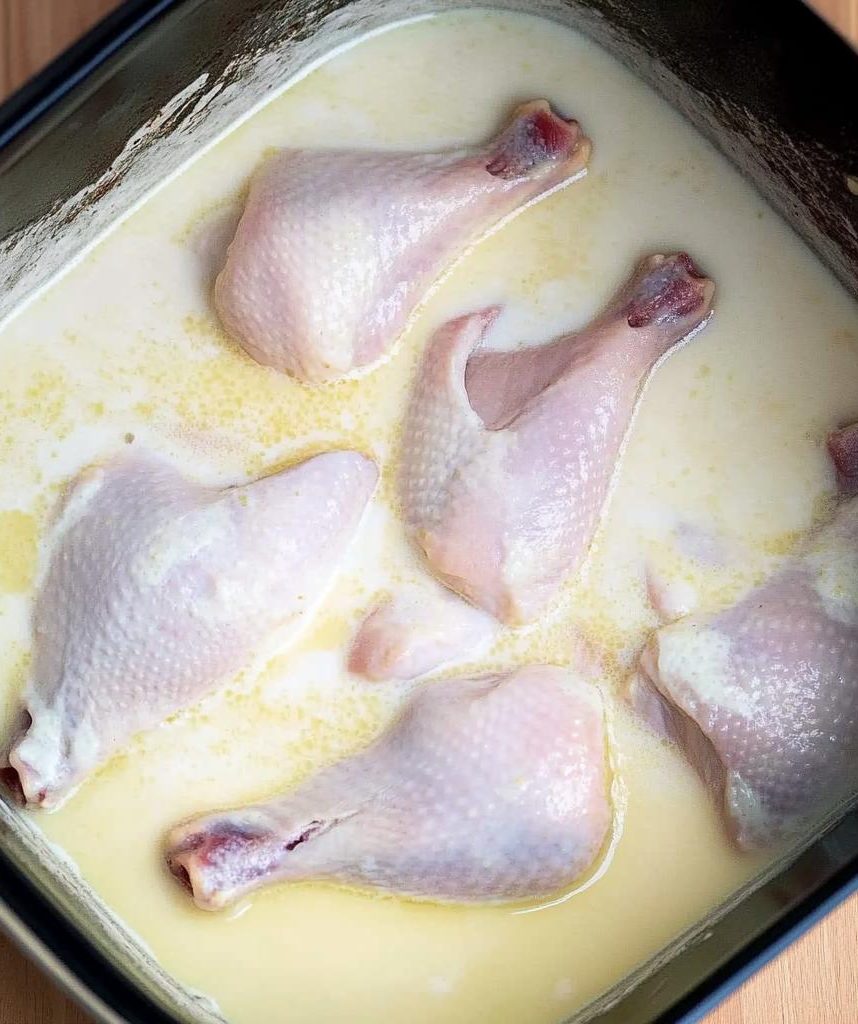
Step 1: Soak the Chicken
Prepare the buttermilk bath: In a large bowl, soak the chicken pieces in 2 cups of buttermilk. Cover the bowl and refrigerate for at least 2 hours, but overnight is even better. This allows the buttermilk to work its magic, tenderizing the meat and infusing it with flavor.
Step 2: Season and Dredge the Chicken
Season the chicken: When you’re ready to cook, remove the chicken from the buttermilk and let the excess drip off. Season the chicken with a little salt and pepper.
Prepare the seasoned flour: In a separate bowl, combine 2 cups of all-purpose flour, 1 tablespoon of paprika, 1 tablespoon of garlic powder, 1 teaspoon of cayenne pepper, and salt and black pepper to taste. Mix it well to ensure an even distribution of flavors.
Dredge the chicken: Take each piece of chicken and dredge it in the seasoned flour, making sure it’s fully coated on all sides. Shake off any excess flour, but make sure there’s enough to create that crispy crust.
Step 3: Fry the Chicken
Heat the oil: In a large skillet or frying pan, heat about an inch of vegetable oil over medium heat. You want the oil to reach around 350°F (use a thermometer to be sure). Proper oil temperature is key to achieving that perfect crispy exterior.
Fry the chicken: Carefully place the dredged chicken pieces into the hot oil. Be sure not to overcrowd the pan—work in batches if needed. Fry each piece for about 8-10 minutes per side, or until the chicken is golden brown, crispy, and cooked through (internal temperature should reach 165°F).
Drain the chicken: Once fried, remove the chicken from the oil and let it drain on a wire rack over a baking sheet, or on a paper towel-lined plate. This keeps the chicken crispy by allowing the excess oil to drip off.
Step 4: Serve and Enjoy
Serve hot: Arrange your beautifully crispy fried chicken on a serving platter and dig in while it’s still hot and crunchy. Pair it with your favorite sides and enjoy the taste of home.
Variations & Tips: Customize Your Fried Chicken
Nana’s Fried Chicken is fantastic as-is, but here are some ways to make it your own:
Spice It Up
Smoked Paprika: Swap the regular paprika for smoked paprika to add a rich, smoky flavor that pairs wonderfully with the crispy chicken.
Herb Infusion: Add dried herbs like oregano, thyme, or rosemary to the flour mixture for an herby twist.
Double Dredge for Extra Crispiness
Double coating: For an extra crispy crust, you can double dredge the chicken. After the first coat of flour, dip the chicken back into the buttermilk, then dredge it in the flour mixture again before frying. This double layer adds more crunch.
Make It Gluten-Free
Gluten-free option: Substitute the all-purpose flour with your favorite gluten-free flour blend. The results will be just as delicious and crispy, making the dish accessible to everyone.
Serving Suggestions: Perfect Sides for Fried Chicken
Nana’s Fried Chicken pairs perfectly with classic sides that complement its rich, savory flavors:
Creamy Mashed Potatoes: The smooth, buttery texture of mashed potatoes is a match made in heaven with crispy fried chicken.
Buttery Corn on the Cob: Sweet, juicy corn is a delightful contrast to the salty, crispy chicken.
Tangy Coleslaw: The crunch and tang of coleslaw cut through the richness of the fried chicken, balancing the meal.
Fluffy Buttermilk Biscuits: These are perfect for sopping up any leftover flavors on your plate.
Crisp Garden Salad: For a lighter touch, serve a fresh salad with a simple vinaigrette to add brightness to the meal.
Final Thoughts
Nana’s Fried Chicken is more than just a recipe—it’s a way to bring the warmth and comfort of home to your table. With its perfectly crispy crust and tender, juicy interior, this dish is sure to become a favorite in your household. Whether you’re cooking for a big family gathering, a casual dinner, or just because you’re craving some comfort food, this fried chicken delivers every time.
So, gather your ingredients, take a page out of Nana’s cookbook, and treat yourself and your loved ones to a meal that’s as heartwarming as it is delicious. Happy cooking!
Grandma's Fried Chicken
Ingredients
- 1 whole chicken cut into pieces (or 3-4 pounds of your favorite cuts)
- 2 cups buttermilk
- 2 cups all-purpose flour
- 1 tablespoon paprika
- 1 tablespoon garlic powder
- 1 teaspoon cayenne pepper adjust for spice preference
- Salt and black pepper to taste
- Vegetable oil for frying
Instructions
- Soak the Chicken: In a large bowl, soak the chicken pieces in buttermilk. Cover and refrigerate for at least 2 hours, preferably overnight.
- Season and Dredge the Chicken: Remove chicken from buttermilk, letting excess drip off. Season with salt and pepper. In a separate bowl, mix flour, paprika, garlic powder, cayenne pepper, salt, and black pepper. Dredge each piece in the flour mixture, coating well.
- Heat the Oil: In a large skillet or frying pan, heat about 1 inch of vegetable oil over medium heat to 350°F (175°C).
- Fry the Chicken: Place chicken pieces in hot oil without overcrowding the pan. Fry each piece for 8-10 minutes per side, or until golden brown and cooked through (internal temperature should reach 165°F).
- Drain and Serve: Remove chicken from oil and drain on a wire rack or paper towels. Serve hot with your favorite sides.