Whenever I slide a spoonful of silky butterscotch into my mouth, I’m hit by a wave of nostalgia. It clings to your tongue like a warm memory—all caramel whispers and soft sighs.
My grandmother showed me how to work magic with brown sugar when I was ten, standing on a stool beside her stove with my trusty Oxo Good Grips whisk in hand. We fended off runaway sugar more times than I can count, but every hiccup turned into giggles—and occasionally an impromptu midnight snack.

Why You’ll Love It
Picture a dessert that dances on your tongue—smooth, sweet, and just a hint of salt. This butterscotch pie is pure comfort in a crust. You’ll feel fancy enough to serve company, yet relaxed enough to whip it up on a Tuesday evening. The filling’s golden hue practically glows under the lights, making it an instant eye-catcher. And with a make-ahead setup, you’re free to flirt with your phone, catch the latest episode of your favorite show, or simply sit back and sip something cold while it chills.
You know what really seals the deal? A quick sprinkle of flaky sea salt right before serving. It brightens the flavor, balances the sweetness, and—honestly—makes you look like a dessert wizard.
Timing and Servings
- Prep Time: 20 minutes
- Active Cooking: 10 minutes
- Chill Time: Minimum 4 hours (overnight is dreamy)
- Total Time: About 4½ hours
- Yield: 8 generous slices (easily doubled or halved)
Ingredients
- 1½ cups graham cracker crumbs
- ¼ cup granulated sugar
- ½ cup unsalted butter, melted
- 1 cup packed dark brown sugar
- ¼ cup cornstarch
- ½ teaspoon fine sea salt
- 2¾ cups whole milk
- 4 large egg yolks, room temperature
- 2 tablespoons unsalted butter
- 1 teaspoon pure vanilla extract
- 1 cup heavy cream
- 2 tablespoons powdered sugar
- ½ teaspoon vanilla extract
- Optional garnish: flaky sea salt or toasted nuts
Directions
- Combine graham crumbs, granulated sugar, and melted butter in a bowl. Press this mix firmly into a 9-inch pie dish. Chill until set—about 10 minutes.
- In a medium saucepan, whisk dark brown sugar, cornstarch, and salt. Gradually pour in milk, whisking to keep everything silky.
- Heat over medium, stirring constantly. Once it bubbles and coats a spoon like pudding, remove from heat.
- Whisk egg yolks in a separate bowl. Slowly add about ½ cup of the hot mixture to the yolks, whisking to temper. This stops them from scrambling.
- Return everything to the pan. Cook 1–2 more minutes, stirring, until glossy and smooth.
- Off the heat, stir in butter and vanilla. Pause. Inhale that warm caramel aroma.
- Tap the pan lightly on the counter to pop any bubbles. Pour the filling into your chilled crust and smooth the top.
- Press plastic wrap against the surface to prevent a skin. Refrigerate at least 4 hours, ideally overnight.
- Before serving, whip heavy cream, powdered sugar, and vanilla to stiff peaks. Dollop or pipe onto each slice.
- For tidy cuts, run a sharp knife under hot water, dry it off, then slice—and repeat between cuts.
Variations
- Chocolate Drizzle: Melt ⅓ cup mini chocolate chips and drizzle over the set pie.
- Nutty Twist: Top with toasted pecans or walnuts for a crunchy counterpoint.
- Gluten-Free Crust: Swap almond flour or gluten-free crumbs—you won’t lose flavor.
- Dairy-Free Version: Use canned coconut milk and vegan butter. Almost identical taste.
- Spiked Whip: Stir a tablespoon of bourbon or coffee liqueur into your whipped cream.
- Maple Swirl: Add a tablespoon of pure maple syrup to the filling before chilling.
- Seasonal Spice: Mix in ½ teaspoon cinnamon and a pinch of nutmeg for autumn vibes.
Storage & Reheating Tips
Keep slices covered in the fridge for up to 4 days. If the top firms too much, let it rest at room temperature for 15 minutes before serving. You can freeze the pie (skip the whipped topping). Thaw overnight in the fridge, then heat slices for 8–10 minutes at 300°F to revive that crisp crust. Wrap individual slices so they don’t absorb fridge smells.
FAQs
Can I bake the crust?
Yes—bake at 350°F for 8–10 minutes, then cool completely before filling. It stays crisp longer.
Why is my filling grainy?
Cornstarch clumps can cause grit. Next time, whisk the dry ingredients well before adding milk and stir constantly during cooking.
Can I use light brown sugar?
Sure—your pie will be a shade lighter but just as tasty. Dark brown sugar lends more depth, though.
What if I don’t have whole milk?
Half-and-half works, but the set will be a bit softer. Avoid skim—it can make the filling too loose.
My filling split when I added eggs—what happened?
Thermal shock is the usual culprit. Temper your yolks with small amounts of hot base and whisk steadily.
Can I prep parts ahead?
Definitely. Make the crust and filling separately, then assemble a few hours before serving.
Can I use a sugar substitute?
Yes, but expect a thinner filling and paler color. Sugar alternatives behave differently under heat.
Why did my crust shrink?
Probably not pressed firmly or chilled long enough before filling. Next time, press well and let it set for at least 10 minutes.
Conclusion
There’s something rare about a dessert that feels both special and effortless—and this butterscotch pie hits that sweet spot. It’s part chemistry experiment, part sweet memory, and all heart. Whip it up for your next gathering, and watch people savor each silky bite while swapping stories of their own kitchen mishaps. Serve alongside strong coffee or vanilla ice cream, and you’ll have happy faces—and requests for seconds—in no time.
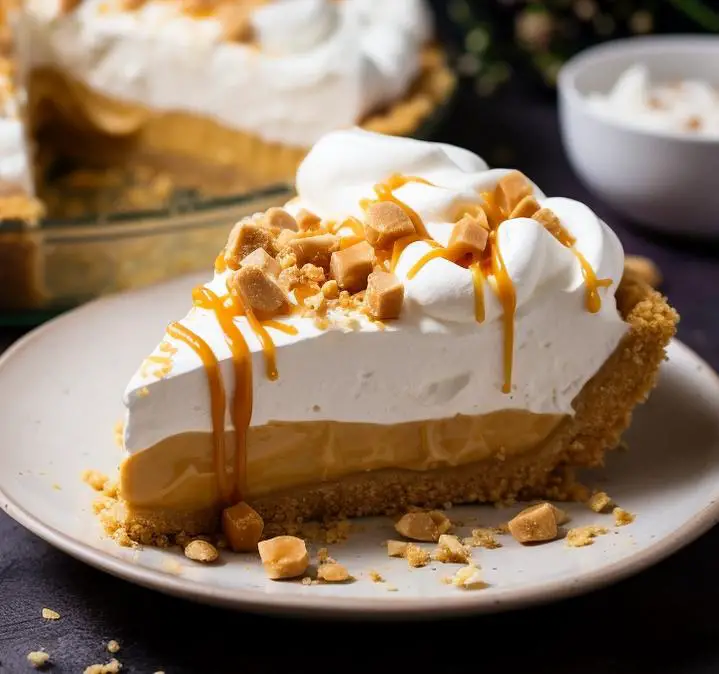
Butterscotch Pie
Ingredients
- 1½ cups Graham cracker crumbs
- 1 cup packed Dark brown sugar
- 2¾ cups Whole milk
- 4 large Egg yolks room temperature
- 2 tablespoons Unsalted butter
- 1 teaspoon Pure vanilla extract
Instructions
- Press graham cracker crumbs, dark brown sugar, and melted butter into a 9-inch pie dish to create a firm yet gentle crust.
- Whisk dark brown sugar, cornstarch, and salt in a saucepan, gradually pouring in whole milk while whisking to avoid clumps. Stir constantly until the mixture thickens.
- Mix a half-cup of hot filling into egg yolks, whisking vigorously, before reintroducing the mixture back into the pot to achieve silky, smooth consistency.
- Off the heat, swirl in unsalted butter and pure vanilla extract to enhance the aroma and flavor of the filling.
- Cover the filling with plastic wrap to prevent skin formation. Chill for a minimum of four hours or overnight for best results.