Cake Pop Recipe
Bright, bite-sized chocolate and vanilla cake pops that you can decorate in minutes—no oven required, and oh-so-fun for kids’ parties!
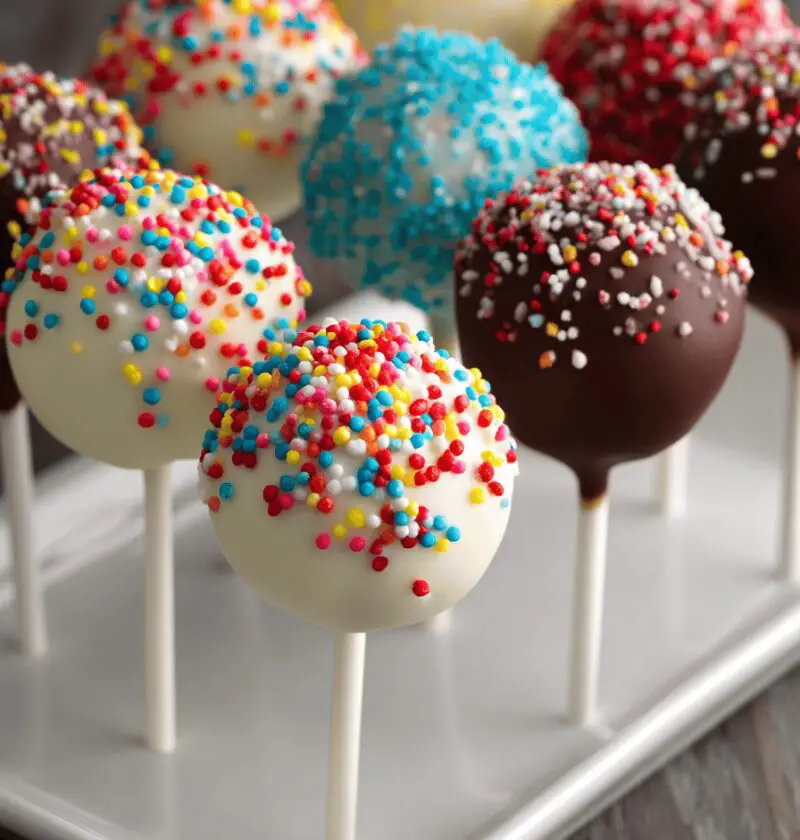
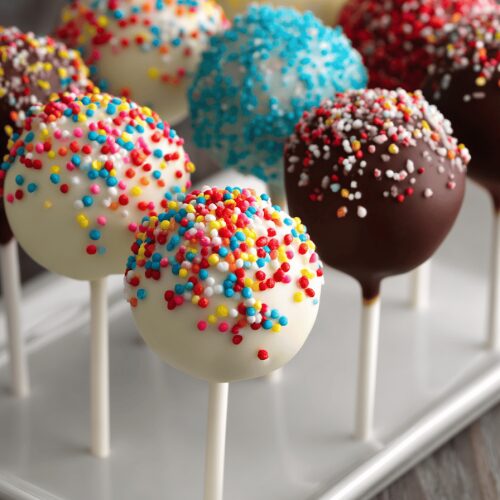
These adorable cake pops are little balls of cake mixed with frosting, dipped in creamy candy melts, then sprinkled or drizzled to perfection. They’re the ultimate no-bake, festive dessert you can whip up in under an hour. I first discovered this Cake Pop Recipe at my granddaughter’s carnival-themed birthday, and I’ve been tweaking it ever since. Imagine soft, moist cake crumbs meeting smooth frosting, coated in vibrant chocolate and decorated any way you like—sprinkles, edible glitter, crushed cookies—you name it. Plus, they’re unbelievably easy and versatile: swap vanilla for chocolate, skip the sugar coating for a healthier twist, or turn them into ice cream pops in summer.
Here’s the thing—cake pops feel fancy, but they’re actually budget-friendly. A box of cake mix, a tub of frosting, and some candy melts (I love using Wilton candy melts or Ghirardelli white chocolate chips) are all you need. According to a 2024 Pinterest Trend Report, “cake pop ideas” searches jumped 35% over the last year—families are craving entertaining desserts that double as party décor. So let’s get mixing, dipping, and decorating!
Why You’ll Love This Recipe
- No oven needed—perfect when your kitchen heats up in summer.
- Ready in under an hour—quick prep, fast chill, instant smiles.
- Kid-approved—little hands adore rolling and sticking those lollipop sticks.
- Party-ready—colorful dessert and décor in one sweet package.
- Customizable—chocolate, vanilla, red velvet, or even gluten-free cake.
- Make-ahead friendly—prepped pops freeze beautifully for later treats.
- Minimal cleanup—just a bowl, a mixer, and a baking sheet.
- Budget savvy—uses pantry staples and one standard cake mix.
Ingredients
• 1 (15.25-ounce) box vanilla cake mix (or chocolate, any brand you prefer)
• 1 cup vanilla frosting (about 8 ounces; cream cheese frosting works great too)
• 12 ounces candy melts in assorted colors (Wilton brand recommended)
• 2 tablespoons vegetable oil (helps candy melts flow smoothly)
• 18–20 lollipop sticks or cake pop sticks
• Sprinkles, mini candies, crushed nuts, or edible glitter for decoration
Tip: For extra rich flavor, whisk a teaspoon of vanilla extract into the frosting. If you prefer a moister crumb, swap ¼ cup of frosting for Greek yogurt (full-fat works best).

Directions
- Crumble the cake
Bake the cake mix according to package directions, then let it cool completely (about 30 minutes). Break it into crumbs in a large mixing bowl—no big chunks, please! Use your hands or a food processor for uniform bits. - Add frosting
Dollop in the frosting a little at a time, stirring until the mixture holds together like play-dough. If it’s too dry, add a teaspoon more frosting; too wet, sprinkle in a bit more crumbs. - Shape the pops
Scoop roughly 2 tablespoons of cake mixture and roll into a smooth ball. Place on a parchment-lined baking sheet. Repeat until you have 18–20 balls. Pop the tray in the fridge for 15 minutes to firm up. - Prep your dipping station
Microwave candy melts and oil in a microwave-safe bowl in 30-second bursts, stirring between until silky—around 1½ minutes total. A drizzle-ready consistency is key. - Insert sticks
Dip each stick into the melted candy (about ¼-inch) then gently push into a chilled cake ball, about halfway through. Return to the fridge for 10 minutes—this “glue” step keeps pops secure. - Dip and decorate
Holding the stick, dip the cake pop into the candy, tapping off excess. While still wet, sprinkle or drizzle with contrasting melts using a fork or piping bag. For neat stripes, transfer melts to a zip-top bag, snip a corner. - Set and serve
Stand sticks upright in a Styrofoam block or a cake pop stand (I hacked mine from a block of floral foam wrapped in festive paper). Let them set at room temperature—no fridge needed—or speed things up with a 5-minute chill.
Servings & Timing
Makes 18–20 cake pops
Prep Time: 20 minutes (plus 40 minutes chilling and cooling)
Total Time: about 1 hour
Variations
• Chocolate Lovers: Use chocolate cake mix and dark chocolate frosting for ultra-decadence.
• Red Velvet Twist: Red velvet cake crumbs with cream cheese frosting, dipped in white candy melts.
• Gluten-Free: Swap in a GF cake mix and GF candy melts—same process, allergy-friendly fun.
• Peanut Butter Cup: Mix mini peanut butter chips into the cake-frosting blend before rolling.
• Ice Cream Pops: Press cake balls around a mini ice cream scoop, refreeze, then dip in candy melts.
• Autumn Spice: Add a teaspoon of cinnamon and nutmeg to vanilla cake crumbs for fall flair.
Storage & Reheating
Store cake pops in an airtight container at room temperature for up to 3 days—just don’t crowd them or the decorations stick. For longer life, freeze pops on a baking sheet, then transfer to a zip-top bag; they last up to 1 month. To enjoy, thaw in the fridge for 30 minutes, then sit at room temperature for 10 minutes before serving. No microwave reheating needed!
Notes
• Cake Temperature: Always cool the cake completely—warm crumbs equal gooey pops that fall apart.
• Consistency Check: If your candy melts seize, add a drop of vegetable oil and stir vigorously.
• Decorating Tip: Use parchment-lined trays to catch stray sprinkles—easy cleanup!
• Testing Skewer Strength: If sticks wobble, dunk them twice into candy melts, chilling between dips.
• Flavor Balance: Taste your frosting before mixing; if it’s too sweet, swirl in a teaspoon of lemon juice or espresso powder for depth.
FAQs
-
How can I prevent cracks in my cake pop coating?
Make sure cake balls are chilled solid before dipping—warm interiors can crack the candy shell. -
Can I use homemade cake instead of mix?
Absolutely—just bake, cool, and crumble about 3 cups of homemade cake in place of the boxed mix. -
Why are my cake pops dry inside?
You may need a bit more frosting—add it slowly until the crumbs bind without crumbling. -
What’s the best candy melt alternative?
Melt high-quality chocolate chips (Ghirardelli or Guittard) with a teaspoon of coconut oil for shine. -
How do I store partially decorated pops?
Chill undecorated pops on parchment, then finish decorations just before serving for crisp designs. -
Can I make these vegan?
Yes—use vegan cake mix, dairy-free frosting, and vegan candy melts (like Merckens brand). -
Why do my cake pops keep falling off sticks?
Ensure the frosting-crumb mixture isn’t too wet; also, chill pops thoroughly before dipping. -
Any tips for uniform size?
Use a small cookie scoop (1½ tablespoons) for perfectly consistent balls every time.
Conclusion
A delightful Cake Pop Recipe that’s as fun to make as it is to eat—perfect for parties, school events, or an afternoon treat with the grandkids. Try these no-bake wonders and tweak the flavors to suit your crowd; then drop me a comment or star rating below! If you loved this, explore my Easy Vanilla Cupcakes or Fun Party Brownies next—you’ll thank me later.
Cake Pop Recipe
Ingredients
- 1 (15.25-ounce) box vanilla cake mix (or chocolate, any brand you prefer)
- 1 cup vanilla frosting (about 8 ounces; cream cheese frosting works great too)
- 12 ounces candy melts in assorted colors (Wilton brand recommended)
- 2 tablespoons vegetable oil (helps candy melts flow smoothly)
- 18–20 lollipop sticks or cake pop sticks
- Sprinkles, mini candies, crushed nuts, or edible glitter for decoration
Instructions
- Bake the cake mix according to package directions, then let it cool completely (about 30 minutes). Break it into crumbs in a large mixing bowl—no big chunks, please! Use your hands or a food processor for uniform bits.
- Dollop in the frosting a little at a time, stirring until the mixture holds together like play-dough. If it’s too dry, add a teaspoon more frosting; too wet, sprinkle in a bit more crumbs.
- Scoop roughly 2 tablespoons of cake mixture and roll into a smooth ball. Place on a parchment-lined baking sheet. Repeat until you have 18–20 balls. Pop the tray in the fridge for 15 minutes to firm up.
- Microwave candy melts and oil in a microwave-safe bowl in 30-second bursts, stirring between until silky—around 1½ minutes total. A drizzle-ready consistency is key.
- Dip each stick into the melted candy (about ¼-inch) then gently push into a chilled cake ball, about halfway through. Return to the fridge for 10 minutes—this “glue” step keeps pops secure.
- Holding the stick, dip the cake pop into the candy, tapping off excess. While still wet, sprinkle or drizzle with contrasting melts using a fork or piping bag. For neat stripes, transfer melts to a zip-top bag, snip a corner.
- Stand sticks upright in a Styrofoam block or a cake pop stand. Let them set at room temperature—no fridge needed—or speed things up with a 5-minute chill.
Notes
• Consistency Check: If your candy melts seize, add a drop of vegetable oil and stir vigorously.
• Decorating Tip: Use parchment-lined trays to catch stray sprinkles—easy cleanup!
• Testing Skewer Strength: If sticks wobble, dunk them twice into candy melts, chilling between dips.
• Flavor Balance: Taste your frosting before mixing; if it’s too sweet, swirl in a teaspoon of lemon juice or espresso powder for depth.