Woof Pupsicle Recipe (Dog-Safe Frozen Treats Your Pup Will Love!)
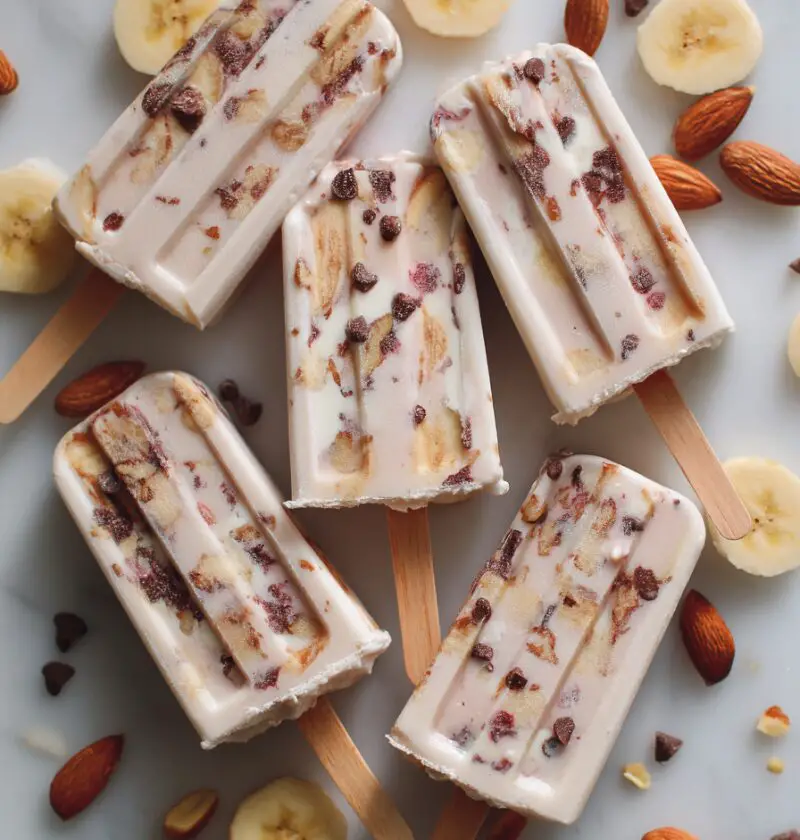
This Woof Pupsicle Recipe is a simple, no-bake, pet-safe popsicle recipe made with real yogurt, banana, and peanut butter—perfect as a healthy frozen dog snack on hot summer afternoons.
As a 50-year-old dog mom who’s survived many sticky summers with a Labrador that basically runs hot year-round, I’ve tested more than my fair share of frozen dog treats. This Woof Pupsicle Recipe has become our go‑to dog popsicle recipe: it’s creamy, just sweet enough from banana, and made with ingredients I feel good about. These homemade pupsicle treats double as a fun summer dog snack recipe and a way to sneak in a little extra hydration when the temps climb.
Think of these as peanut butter dog popsicles meets banana yogurt dog treats—cool, lickable, and easy on sensitive tummies when you use the right yogurt. They’re budget-friendly, use pantry staples, and come together faster than you can wrangle your dog away from the freezer door.
Why You’ll Love This Woof Pupsicle Recipe
Let me explain why these healthy frozen dog snacks have become a regular in our freezer—and why I think your pup will be equally obsessed:
- Just 4 everyday ingredients – No weird additives, no mystery “meat flavors,” just simple fridge and pantry staples.
- No cooking or baking required – If you can stir, you can make these diy dog ice pops.
- Gentle on most dog tummies – Made with plain yogurt, banana, and natural peanut butter (no xylitol), so they’re dog-safe in moderation.
- Perfect for hot weather – These frozen dog treats recipe are a cooling reward after walks, hikes, or backyard zoomies.
- Customizable flavors – Easy to adjust for picky pups or dietary needs with simple swaps and add‑ins.
- Freezer-friendly for weeks – Make a big batch once and you’ve got cool treats for dogs all summer long.
- Budget-conscious – Way cheaper than store-bought frozen dog desserts, and you know exactly what’s in them.
- Fun for kids to help with – A great “cooking” project that lets kids feel part of caring for the family dog.
Ingredients
Here’s what you’ll need to make this Woof Pupsicle Recipe. I’ve added a few notes to help you pick dog-friendly options.
-
1 cup plain unsweetened Greek yogurt
- Look for plain (no sugar, no vanilla, no artificial sweeteners). Greek yogurt adds extra creaminess and protein. If your dog is dairy-sensitive, see the variations section for a non-dairy option.
-
1 medium ripe banana, mashed (about ½ cup)
- Spotty bananas are perfect here; they’re sweeter and mash easily. Banana adds natural sweetness, fiber, and that classic “banana yogurt dog treats” flavor combo.
-
¼ cup natural unsalted peanut butter
- Crucial: check the label to ensure it does not contain xylitol (also listed as “birch sugar”), which is toxic to dogs. A simple peanut-only or peanut-and-salt brand like Smucker’s Natural or Trader Joe’s brand works well.
-
¼–⅓ cup water or low-sodium bone broth
- This helps thin the mixture for easier pouring into molds and adds a little hydration. Use plain water, or a pet-safe low-sodium bone broth with no onion or garlic. Start with ¼ cup and add more if needed.
-
Optional add-ins (pick 1–2, total about 2–3 tablespoons):
- 1 tablespoon plain unsweetened pumpkin purée (not pumpkin pie mix) – soothing for tummies.
- 1 tablespoon finely chopped blueberries or strawberries – extra antioxidants and color.
- 1 teaspoon ground flaxseed – a little healthy fat and fiber.
If you’re ever unsure about an ingredient—especially if your pup has allergies—check with your vet before adding it to your frozen dog treats recipe.

Step-by-Step Directions
You know what? This is one of those recipes where the “hardest” part is waiting for them to freeze. Here’s how to make these homemade pupsicle treats:
-
Prep your molds
Set out silicone treat molds, ice cube trays, or small paper cups on a small baking sheet (this makes transferring them to the freezer much easier). If you want a “popsicle stick” your dog can chew, have some small dog biscuits or carrot sticks ready to use as handles. -
Mash the banana
Peel the banana, break it into chunks, and mash it in a medium bowl with a fork until mostly smooth. A few tiny lumps are fine; your dog won’t complain. The riper the banana, the easier this step is. -
Whisk the wet ingredients
Add the Greek yogurt and peanut butter to the bowl with the banana. Pour in ¼ cup of water or low-sodium bone broth. Whisk until the mixture is smooth, thick, and creamy. If it feels too thick to pour, add another tablespoon or two of liquid until it has a pourable, smoothie-like consistency. -
Fold in any extras
If you’re using pumpkin, berries, or ground flaxseed, gently stir them in now. Keep mix-ins small so they freeze evenly and don’t create big chunks that are hard for smaller dogs to chew. -
Fill the molds
Carefully spoon or pour the mixture into your molds, ice cube tray compartments, or paper cups. Leave a little room at the top; the mixture expands just a touch when frozen. A small measuring cup with a spout or a squeeze bottle works nicely for tidy pouring. -
Add dog-friendly “sticks” (optional)
If using, gently press a small dog biscuit or carrot stick into the center of each pupsicle. The mixture should be thick enough to hold them upright, but if they tip over, don’t stress—your dog will still love them. -
Freeze until solid
Transfer the tray to the freezer and freeze for about 3–4 hours, or until the Woof Pupsicles are completely solid. For larger molds or cups, plan on closer to 5–6 hours or overnight. -
Unmold and serve
Pop the frozen dog treats out of the silicone molds or ice cube trays. For paper cups, just peel away the paper. Serve your pup a single pupsicle and watch that tail go into helicopter mode.
Tip: If your pupsicles are stubborn in the mold, let them sit at room temperature for 3–5 minutes, or briefly run the bottom of the mold under lukewarm water to loosen.
Servings & Timing
- Yield: About 12–16 small pupsicles, depending on mold size (or around one standard ice cube tray).
- Prep Time: 10–15 minutes hands-on.
- Freeze Time: 3–4 hours for small molds; 5–6 hours for larger cups.
- Total Time: Around 3½–6 hours, mostly unattended freezer time.
For big dogs, you may serve 1–2 small pupsicles at a time; for tiny pups, start with half of a small cube and see how they handle it.
Fun Variations for Different Pups
Here’s the thing: just like people, dogs have distinct preferences. Some adore peanut butter, others lean toward fruity flavors. These variations let you tailor this Woof Pupsicle Recipe to your pup’s taste and dietary needs.
- Berry Blast Pupsicles – Swap half the banana for ¼ cup finely chopped blueberries or strawberries for a tart, fruity twist.
- Pumpkin Tummy Soothers – Add 2 tablespoons plain pumpkin purée and skip the berries; great for sensitive stomachs (in small amounts).
- Dairy-Free Coconut Pupsicles – Replace Greek yogurt with unsweetened coconut milk yogurt or plain canned pumpkin plus extra water for dogs who can’t tolerate dairy.
- Extra-Savory Broth Pops – Use all low-sodium bone broth instead of water and stir in 1 tablespoon finely shredded cooked chicken for meat-loving pups.
- Minty Fresh Breath Treats – Stir in 1–2 teaspoons finely chopped fresh parsley or mint (dog-safe amounts) for a little breath-freshening boost.
- Tiny Training Bites – Freeze the mixture in mini silicone candy molds so you can pop out very small frozen dog snacks as occasional rewards.
Always introduce new ingredients slowly, and keep portion sizes small when trying a new variation.
Storage & Thawing Tips
One of my favorite things about this recipe is how well these diy dog ice pops keep in the freezer.
-
How to store:
Once the Woof Pupsicles are fully frozen, transfer them to a labeled, airtight freezer-safe bag or container. This saves space and keeps them from picking up freezer odors. -
Freezer life:
For best quality and flavor, enjoy within 1–2 months. They’re still safe longer, but texture and taste can fade a bit after that. -
Thawing & serving:
Serve straight from the freezer as a cool treat for dogs. For small pups or seniors with sensitive teeth, let a pupsicle rest at room temperature for 3–5 minutes to soften slightly before serving. -
Make-ahead advice:
Double the recipe, use two ice cube trays or multiple molds, and you’ll have a stash of homemade pupsicle treats ready for heatwaves, grooming days, or just-because moments.
Notes from My Kitchen (and My Dog’s Taste Tests)
- Start slow the first time. When you introduce any new frozen dog treats recipe—even a simple one like this—start with a half portion and see how your dog’s tummy reacts.
- Watch the sugar and salt. Avoid flavored yogurts, honey-sweetened yogurts, and salted peanut butter with added sugar. Dogs don’t need the extra sugar and salt that humans often crave.
- Xylitol check, every time. Even if you “know” your peanut butter brand, get in the habit of glancing at the label. Formulas change, and xylitol is non-negotiably off-limits for dogs.
- Size matters. For small breeds, use mini molds or only fill molds halfway; for large breeds, you can use full-size cubes or small cups. It’s kind of like handing a toddler a whole cake vs. a cupcake.
- Mess management. These can get a bit drippy as they melt. I like to serve them outside on the grass, on a washable mat, or on a tile floor for easy cleanup.
- Heat-safety reminder. Frozen treats are fun, but they’re not a replacement for shade, fresh water, and avoiding extreme heat. Think of Woof Pupsicles as a bonus, not the whole cooling plan.
FAQs About Woof Pupsicle Recipe
1. Are these Woof Pupsicles safe for all dogs?
Most healthy adult dogs can enjoy this Woof Pupsicle Recipe in moderation, but if your pup has food allergies, pancreatitis, diabetes, or is on a special diet, check with your vet first.
2. Can I use regular (non-Greek) yogurt?
Yes, plain unsweetened regular yogurt works fine; it’ll be a bit less creamy and slightly icier, but still delicious for dogs.
3. My dog can’t handle dairy—what can I use instead of yogurt?
Use unsweetened coconut yogurt, lactose-free plain yogurt, or skip yogurt and use a mix of pumpkin purée and extra water or low-sodium broth to keep the texture scoopable.
4. How many pupsicles can my dog have per day?
For most dogs, 1 small pupsicle per day is plenty; for larger breeds, up to 2 small pupsicles may be okay, but treat these as occasional snacks, not meals.
5. Can I make these without peanut butter?
Absolutely—just omit peanut butter and add a little extra banana or use pumpkin purée; you may need a touch less liquid, so adjust the water or broth gradually.
6. How do I keep the popsicle sticks (biscuits or carrots) from falling over?
Make the mixture a bit thicker (use less water), pour it in, then freeze for 20–30 minutes until it’s slushy before inserting the biscuit or carrot so it stands up better.
7. Are these okay for puppies?
For puppies over 12 weeks old who’ve already tried the individual ingredients without issues, small portions are usually fine; still, keep them tiny and check with your vet if you’re unsure.
8. Can I share these with my human kids too?
The ingredients are people-safe, but the flavor is very gently sweet and more “dog-oriented.” If you want a shared treat, split the base and add a drizzle of honey and vanilla only to the human portion.
Conclusion: A Simple Summer Treat Your Dog Will Remember
This Woof Pupsicle Recipe checks all my boxes as a long-time dog mom: simple ingredients, quick prep, freezer-friendly, and most importantly, dog-approved. With creamy yogurt, ripe banana, and smooth peanut butter, these homemade pupsicle treats are the kind of healthy frozen dog snacks you’ll feel good handing over again and again.
If you give these a try, I’d love to hear how your pup liked them—leave a comment with your dog’s name, favorite variation, or any fun serving ideas. And if your furry friend loved these, you might also enjoy experimenting with other frozen dog treats recipes and cool treats for dogs using similar ingredients.
Woof Pupsicle Recipe (Dog-Safe Frozen Treats)
Ingredients
- 1 cup plain unsweetened Greek yogurt no sugar, no vanilla, no artificial sweeteners
- 1 medium ripe banana mashed (about 1/2 cup); spotty and soft is best
- 1/4 cup natural unsalted peanut butter must be xylitol-free; check label
- 1/4-1/3 cup water or low-sodium bone broth bone broth must be pet-safe with no onion or garlic
- Optional add-ins (2–3 tablespoons total, pick 1–2):
- 1 tablespoon plain unsweetened pumpkin purée not pumpkin pie mix; soothing for tummies
- 1 tablespoon finely chopped blueberries or strawberries for extra antioxidants and color
- 1 teaspoon ground flaxseed adds healthy fat and fiber
- Optional “sticks”: small dog biscuits or carrot sticks to use as popsicle handles
Instructions
- Set out silicone treat molds, ice cube trays, or small paper cups on a small baking sheet to make transferring them to the freezer easier. If you plan to use dog biscuits or carrot sticks as popsicle handles, have them ready.
- Peel the banana, break it into chunks, and mash it in a medium bowl with a fork until mostly smooth. A few small lumps are fine.
- Add the Greek yogurt and peanut butter to the bowl with the mashed banana. Pour in 1/4 cup of water or low-sodium bone broth. Whisk until the mixture is smooth, thick, and creamy. If it is too thick to pour, add more water or broth a tablespoon at a time until it reaches a pourable, smoothie-like consistency.
- If using pumpkin purée, chopped berries, or ground flaxseed, gently stir them into the mixture. Keep mix-ins finely chopped so they freeze evenly and are easy for smaller dogs to chew.
- Carefully spoon or pour the mixture into the molds, ice cube tray compartments, or paper cups, leaving a little room at the top for expansion as they freeze. A small measuring cup with a spout or a squeeze bottle helps with tidy pouring.
- If desired, gently press a small dog biscuit or carrot stick into the center of each pupsicle to act as a handle. The mixture should be thick enough to help hold them upright; if they lean or fall over, it’s fine—dogs will still enjoy them.
- Transfer the baking sheet with filled molds to the freezer. Freeze for 3–4 hours, or until the pupsicles are completely solid. For larger molds or paper cups, allow 5–6 hours or freeze overnight.
- Remove from the freezer and pop the frozen treats out of silicone molds or ice cube trays. For paper cups, peel away the paper. Serve 1 small pupsicle per dog (or half for tiny dogs) and supervise while they enjoy. If the pupsicles are hard to remove, let them sit at room temperature for 3–5 minutes or briefly run the bottom of the mold under lukewarm water.