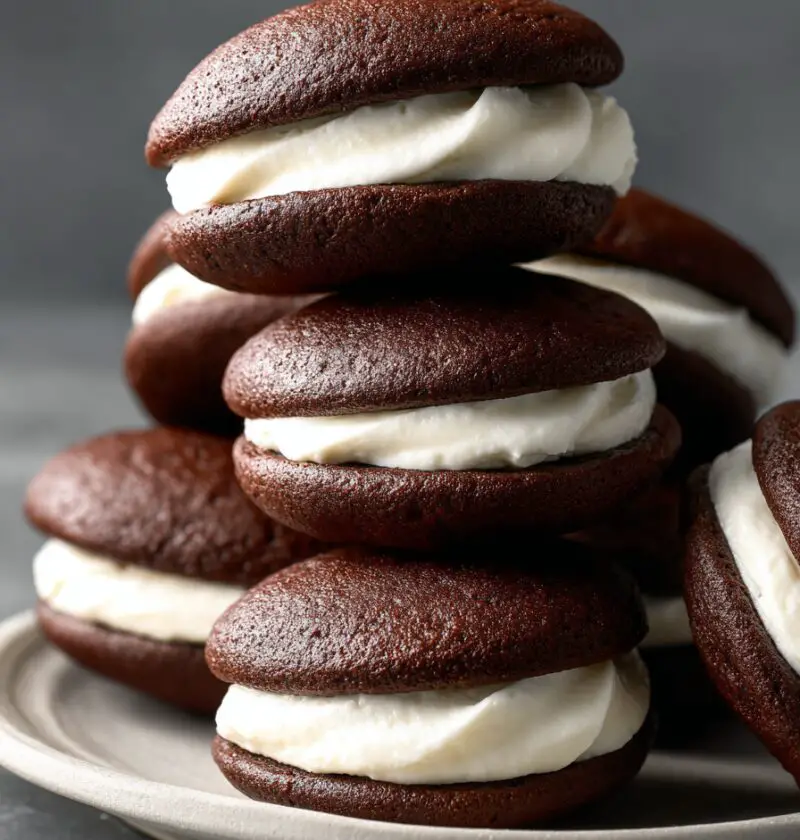
Whoopie Pies Recipe
A soft chocolate cookie hugging a fluffy marshmallow cream filling—this Whoopie Pies Recipe is pure nostalgia baked into a handheld sandwich dessert.
I grew up in Pennsylvania, so classic whoopie pies feel a bit like home to me. These chocolate sandwich cakes are tender, cake-like cookies filled with a cloud of marshmallow cream. They’re the kind of old fashioned whoopie pies you’ll see at church bake sales, school fairs, and tucked into lunch boxes “for a surprise.” This homemade whoopie pies recipe is simple, dependable, and uses basic pantry ingredients—but still tastes like something you picked up from a country bakery.
Honestly, I like to pull this recipe out when the weather turns cooler, or when I’ve got kids (or grandkids!) hanging around the kitchen. There’s something so fun about baking whoopie pies, lining up those soft chocolate cookies, and sandwiching them with a big dollop of whoopie pie filling. It’s a baking project that feels special, without being fussy.
Why You’ll Love This Whoopie Pies Recipe
- Classic bakery taste at home – These taste like the traditional whoopie pies you’d find at an Amish market or old-school bakery.
- Soft, cake-like cookies – Think little chocolate cakes instead of crisp cookies; they’re tender, moist, and not dry at all.
- Fluffy marshmallow cream filling – The filling is made with marshmallow creme and butter, so it’s stable yet light and not cloyingly sweet.
- Great make-ahead dessert – Both the cookies and the filling keep well, so you can assemble these chocolate whoopie pies the day you need them.
- Kid-friendly and lunchbox-ready – Easy to hold, no fork needed; they’re the ultimate sandwich cookie dessert.
- Uses simple pantry ingredients – No fancy tools, no specialty items—just cocoa powder, butter, sugar, and marshmallow creme.
- Freezer-friendly treat – You can freeze assembled whoopie pies or just the cookies for fast desserts later.
- Flexible flavors – Once you try this easy whoopie pies recipe, you can swap fillings (peppermint, peanut butter, or salted caramel) without changing the base.
Ingredients
Here’s everything you need for these homemade whoopie pies from scratch. I’m including a few little notes I’ve learned over the years.
Soft Chocolate Cookies
- 2 cups (240 g) all-purpose flour – Spoon and level the flour so the cookies stay tender, not dense.
- ½ cup (40 g) unsweetened cocoa powder – Natural cocoa works perfectly; use a good brand like Hershey’s or Ghirardelli for rich chocolate whoopie pies.
- 1 ¼ teaspoons baking soda – Helps the cookies rise and stay soft.
- ½ teaspoon baking powder – Adds just a little extra lift so they’re cake-like.
- ½ teaspoon fine sea salt – Balances the sweetness and the chocolate.
- ½ cup (113 g) unsalted butter, softened – Room temperature butter creams better and gives a smooth batter.
- ½ cup (120 ml) neutral oil – Canola, vegetable, or sunflower; this combo of butter + oil keeps the cookies soft for days.
- 1 cup (200 g) packed light brown sugar – Adds moisture and a caramel note.
- ½ cup (100 g) granulated sugar – Balances the sweetness and helps with structure.
- 2 large eggs, room temperature – Room temp eggs blend better and give a fluffier texture.
- 2 teaspoons pure vanilla extract – Use real vanilla; the flavor really shines in classic whoopie pies.
- 1 cup (240 ml) buttermilk, room temperature – Gives that tender crumb and a little tang; if you don’t have it, mix 1 cup milk with 1 tablespoon vinegar and let sit 5 minutes.
Marshmallow Cream Filling
- ¾ cup (170 g) unsalted butter, softened – Soft, but not greasy or melted. This makes the filling silky, not greasy.
- 1 ½ cups (180 g) powdered sugar, sifted – Sifting prevents lumps, so the whoopie pie filling stays smooth.
- 1 (7 oz) jar marshmallow creme or Marshmallow Fluff – This is the heart of that classic marshmallow cream filling.
- 1 teaspoon pure vanilla extract – Adds warmth and depth to the sweetness.
- Pinch of fine sea salt – Just enough to keep the filling from tasting flat.
- 1–2 tablespoons heavy cream or milk (as needed) – For thinning the filling to a spreadable, fluffy consistency.

If you’re gluten-free, you can try a good 1:1 gluten-free baking flour for the cookies—just make sure it includes xanthan gum for structure.
Directions
Let’s walk through this step-by-step. I promise, these old fashioned whoopie pies look fancier than the work they actually take.
-
Preheat and prep the pans.
Preheat your oven to 350°F (175°C). Line two large baking sheets with parchment paper or silicone baking mats. This keeps the soft chocolate cookies from sticking and helps them bake evenly. -
Whisk the dry ingredients.
In a medium bowl, whisk together the flour, cocoa powder, baking soda, baking powder, and salt. Set aside. Whisking helps break up any cocoa lumps and keeps the texture light. -
Cream the butter, oil, and sugars.
In a large mixing bowl (or the bowl of a stand mixer), beat the softened butter, oil, brown sugar, and granulated sugar on medium speed for about 2–3 minutes, until light and fluffy. Scrape down the sides once or twice. You want a creamy, almost whipped texture here. -
Add the eggs and vanilla.
Beat in the eggs, one at a time, mixing well after each addition. Add the vanilla extract. The batter may look a little looser, and that’s fine. -
Alternate dry ingredients and buttermilk.
With the mixer on low, add half of the dry mixture, then half of the buttermilk. Repeat with the remaining dry mixture and buttermilk. Mix just until combined. The batter will be thick but scoopable—like a soft cake batter. If it seems very runny, let it rest 5 minutes; the flour will hydrate and thicken it a bit. -
Scoop the cookies.
Using a small cookie scoop (about 1 ½ tablespoons) or a rounded tablespoon, drop mounds of batter onto the prepared baking sheets, spacing them about 2 inches apart. Try to keep them similar in size so the sandwich cookies match up nicely later. -
Bake until set.
Bake one sheet at a time for 9–11 minutes, or until the tops are set, look slightly rounded, and spring back lightly when touched. They should not look wet in the center, but don’t bake until they’re dry—remember, we want soft chocolate cookies. -
Cool completely.
Let the cookies cool on the baking sheet for 5 minutes, then transfer them to a wire rack to cool completely. Don’t rush this—if the cookies are even a little warm, the marshmallow filling will melt and slide out. -
Make the marshmallow cream filling.
In a clean bowl, beat the softened butter on medium speed for about 2 minutes, until smooth and creamy. Add the powdered sugar, vanilla, and salt. Beat on low at first (so the sugar doesn’t puff everywhere), then increase to medium until fluffy. Add the marshmallow creme and beat again for 1–2 minutes, until the filling is thick, smooth, and airy. If it seems too thick, beat in 1–2 tablespoons of cream or milk, a little at a time. -
Assemble the whoopie pies.
Pair up the cooled cookies by size. Using a piping bag or small offset spatula, spread about 1–2 tablespoons of filling on the flat side of one cookie, then top with its partner and gently press until the filling just reaches the edges. Repeat with all the cookies.
You know what? This is a great point to recruit kids or friends. Someone pipes, someone sandwiches, someone “taste tests.” Highly efficient team.
Servings & Timing
- Yield: About 16–18 whoopie pies (depending on size)
- Prep Time: 25 minutes
- Bake Time: 10–11 minutes per sheet, about 20–25 minutes total
- Cooling & Assembly Time: 25–30 minutes
- Total Time: About 1 hour 15 minutes
These make a generous batch, perfect for parties, potlucks, or filling a cookie tin for neighbors.
Variations
Once you’ve got this classic whoopie pies recipe down, it’s so easy to play:
- Peanut Butter Filling – Beat ½ cup peanut butter into the filling and reduce the marshmallow creme slightly.
- Peppermint Chocolate Whoopie Pies – Add ½ teaspoon peppermint extract to the filling and roll the edges in crushed candy canes for a holiday twist.
- Salted Caramel Filling – Swirl in a few tablespoons of thick caramel sauce and a pinch of flaky sea salt.
- Mocha Whoopie Pies – Add 1 teaspoon instant espresso powder to the cookie batter for a coffee-kissed chocolate flavor.
- Birthday Cake Version – Fold rainbow sprinkles into the filling and add a few on the edges for a funfetti look.
- Mini Whoopie Pies – Use a teaspoon-sized scoop and reduce baking time by a couple of minutes for bite-sized treats.
Storage & Reheating
-
Room Temperature:
Store assembled whoopie pies in an airtight container at cool room temperature for up to 2 days. If your kitchen runs warm or it’s summertime, I’d lean toward the fridge. -
Refrigerator:
In the fridge, they’ll keep for 4–5 days. Let them sit at room temperature for 15–20 minutes before serving so the cookies soften back up and the filling relaxes. -
Freezer:
You can freeze assembled whoopie pies individually wrapped in plastic, then placed in a freezer bag, for up to 2 months. Thaw overnight in the fridge, then bring to room temperature before serving.
You can also freeze just the cookies (unfilled) and make the filling fresh when you’re ready. -
Make-Ahead Tip:
Bake the cookies a day ahead and keep them tightly covered. Make the filling the day you plan to serve, or up to 24 hours ahead and refrigerate, then re-whip briefly before spreading.
Notes
- Size matters. Smaller scoops give you more whoopie pies, but they can bake quicker, so keep an eye on that first tray as your “test batch.”
- Don’t overbake. This is the number one thing that affects texture. Pull them when they’re just set and springy; dry cookies mean less delightful sandwich cookie dessert.
- Match your pairs. I always line cooled cookies up by size before filling. It makes the final whoopie pies look neat and gives you that bakery-style look.
- Use fresh baking soda and baking powder. If they’re old, your cookies won’t puff nicely. I refresh mine every few months since I bake a lot.
- Chilling helps. If your batter seems very loose, you can chill it for 10–15 minutes before scooping. This helps the cookies spread less and hold a rounder shape.
- Piping bag shortcut. For very even, pretty cookies, you can pipe the batter in circles instead of scooping. That said, I think the slightly rustic look is part of the charm of traditional whoopie pies.
FAQs
1. Can I make this Whoopie Pies Recipe without buttermilk?
Yes. Mix 1 cup milk with 1 tablespoon white vinegar or lemon juice, let it sit 5 minutes, and use it as a buttermilk substitute.
2. Why did my whoopie pies turn out flat?
Usually, it’s either overmixing, warm batter, or old baking soda/powder. Try chilling the batter briefly and make sure your leaveners are fresh.
3. Can I use a cream cheese filling instead of marshmallow?
Absolutely. Swap part of the butter in the filling for cream cheese and skip the marshmallow creme for a tangier, less sweet filling.
4. How do I keep whoopie pies from sticking together in the container?
Layer them with parchment or wax paper between layers, and don’t stack too many high—two layers is usually safe.
5. Are whoopie pies supposed to be cake-like or chewy?
Classic whoopie pies are more like soft chocolate cakes than chewy cookies. If yours are chewy, you may have added too much flour or baked them too long.
6. Can I make these whoopie pies gluten-free?
Yes, use a cup-for-cup gluten-free baking flour that includes xanthan gum, and keep an eye on the texture—some blends may need a spoon or two less flour.
7. Can I double this recipe for a party?
Yes, this recipe doubles very well. Just use a large mixing bowl and stir the final batter gently so it doesn’t deflate too much.
8. What’s the best way to transport whoopie pies?
Lay them flat in a single layer in a shallow container with a lid, or place parchment between layers. Chill them first so the filling firms up before you travel.
Conclusion
These classic chocolate whoopie pies are everything I love in a dessert: simple ingredients, big flavor, and a generous dose of nostalgia. With soft chocolate cookies and a fluffy marshmallow cream filling, this Whoopie Pies Recipe is a keeper for bake sales, birthdays, holidays—or just a cozy Saturday at home.
If you make this recipe, I’d love to hear how it went—leave a comment with your tweaks, or share which variation you tried. And if you enjoy sandwich-style treats, you might like exploring my other frosted sandwich cookies and chocolate desserts next. Happy baking!

Classic Chocolate Whoopie Pies with Marshmallow Cream Filling
Ingredients
- 2 cups all-purpose flour spooned and leveled
- 1/2 cup unsweetened cocoa powder
- 1 1/4 teaspoons baking soda
- 1/2 teaspoon baking powder
- 1/2 teaspoon fine sea salt
- 1/2 cup unsalted butter softened
- 1/2 cup neutral oil such as canola, vegetable, or sunflower
- 1 cup light brown sugar packed
- 1/2 cup granulated sugar
- 2 large eggs room temperature
- 2 teaspoons pure vanilla extract
- 1 cup buttermilk room temperature; or milk mixed with 1 tablespoon vinegar and rested 5 minutes
- 3/4 cup unsalted butter softened, for filling
- 1 1/2 cups powdered sugar sifted
- 7 oz marshmallow creme or Marshmallow Fluff
- 1 teaspoon pure vanilla extract for filling
- pinch fine sea salt for filling
- 1-2 tablespoons heavy cream or milk as needed, to thin filling
Instructions
- Preheat your oven to 350°F (175°C). Line two large baking sheets with parchment paper or silicone baking mats to prevent sticking and help the cookies bake evenly.
- In a medium bowl, whisk together the all-purpose flour, unsweetened cocoa powder, baking soda, baking powder, and fine sea salt until well combined and free of lumps. Set aside.
- In a large mixing bowl or stand mixer, beat the softened butter, neutral oil, packed light brown sugar, and granulated sugar on medium speed for 2–3 minutes, until light and fluffy. Scrape down the sides of the bowl as needed.
- Beat in the eggs one at a time, mixing well after each addition. Add the vanilla extract and mix until combined. The batter will look looser at this stage.
- With the mixer on low speed, add half of the dry ingredient mixture, then half of the buttermilk. Repeat with the remaining dry mixture and buttermilk, mixing just until combined. The batter should be thick and scoopable, like a soft cake batter. If it seems very runny, let it rest for 5 minutes to thicken.
- Using a small cookie scoop (about 1 1/2 tablespoons) or a rounded tablespoon, drop mounds of batter onto the prepared baking sheets, spacing them about 2 inches apart. Try to keep the mounds similar in size so the whoopie pies pair up evenly.
- Bake one sheet at a time for 9–11 minutes, or until the tops are set, slightly rounded, and spring back lightly when touched. They should not look wet in the center, but do not bake until dry so they stay soft and cake-like.
- Let the cookies cool on the baking sheet for 5 minutes, then transfer them to a wire rack to cool completely. Make sure the cookies are fully cool before filling, or the marshmallow cream will melt and slide out.
- In a clean bowl, beat the softened butter for the filling on medium speed for about 2 minutes, until smooth and creamy. Add the sifted powdered sugar, vanilla extract, and a pinch of fine sea salt. Beat on low speed at first, then increase to medium until light and fluffy. Add the marshmallow creme and beat for 1–2 minutes more, until the filling is thick, smooth, and airy. If the filling is too thick, beat in 1–2 tablespoons of heavy cream or milk, a little at a time, until spreadable.
- Pair up the cooled cookies by size. Using a piping bag or a small offset spatula, spread about 1–2 tablespoons of marshmallow filling onto the flat side of one cookie. Top with a second cookie, flat side down, and gently press until the filling just reaches the edges. Repeat with the remaining cookies and filling.