Sushi Rice Recipe
Nothing like a homemade Sushi Rice Recipe to bring Japanese flavor to your kitchen! This simple guide shows you how to make perfectly seasoned, sticky rice for all your sushi rolls.
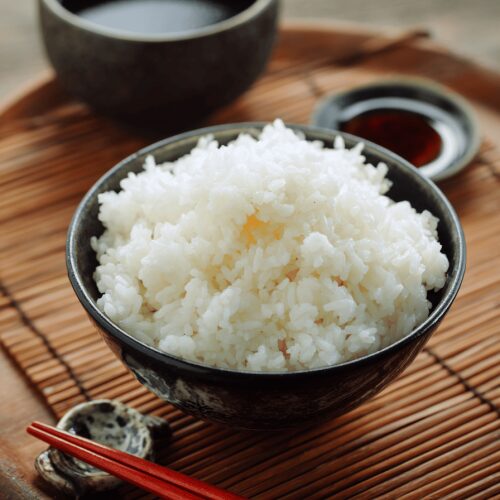
Let me explain why this rice is the heart of any good roll. Sushi rice is short-grain Japanese rice that we season with vinegar, sugar and salt to give it that shiny, slightly tangy taste. It’s naturally gluten-free, low-fat and surprisingly easy to whip up on a weeknight or for a festive gathering. You can taste the care in each bite, whether you’re wrapping nori around tender fish or rolling veggies for a colorful maki. Honestly, my grandkids say this rice is almost better than the fillings—I take that as a win!
You know what? I first learned this recipe in a tiny sushi bar during cherry blossom season. The chef showed me how a good rice can make or break your roll—springtime blooms outside, pink petals drifting down. Now, I serve this for birthdays, weekend lunches and every Sunday sushi night at our house. It warms my heart to see everyone gathered around, picking up their own rolls and dipping them in soy sauce.
Why You’ll Love This Recipe
* No oven needed—just a pot or rice cooker and a few simple ingredients.
* Perfectly glossy, slightly sticky rice that holds together without clumping.
* Ready in about an hour, with most of that time spent soaking and resting.
* Naturally gluten-free, low-fat and vegan-friendly if you skip mirin.
* Versatile base: use it for hand rolls, nigiri, maki or rice bowls.
* Budget-friendly—short-grain rice and pantry staples keep costs low.
* Kid-approved: mild sweetness plus tangy flavor even picky eaters love.
* Makes enough rice for 8–10 rolls or 20–25 rice balls.
* Customizable seasoning—yuzu, sesame seeds or umeboshi vinegar add flair.
Ingredients
* 2 cups sushi rice (short-grain Japanese rice like Nishiki or Kokuho Rose; rinse until water runs almost clear)
* 2½ cups cold water (filtered if you have hard tap water; adjust by a tablespoon if needed)
* ¼ cup rice vinegar (unseasoned; if you use seasoned rice vinegar, cut sugar by half)
* 2 tablespoons granulated sugar (light brown sugar or honey works too)
* 1 teaspoon fine sea salt (kosher salt fine-ground is fine; avoid large crystals)
* 1 tablespoon mirin (optional sweet rice wine; substitute 1 tbsp sake + 1 tsp sugar if preferred)
* Nori sheets and fillings (e.g., tuna, avocado, cucumber) for rolling
Tip: Always level off your rice cup—accuracy makes a big texture difference.

Directions
1. Rinse the rice: Place 2 cups of sushi rice in a fine-mesh sieve. Hold under cool running water and stir gently until the water runs almost clear—usually 2–3 minutes. This removes excess starch and prevents gummy clumps.
2. Soak the rice: Transfer rinsed rice to your rice cooker bowl or a heavy-bottom pot. Add 2½ cups cold water and let it rest for 30 minutes. This step helps each grain absorb moisture for a tender, glutinous bite.
3. Cook the rice: Start your rice cooker on the “sushi” or “white rice” setting. If you’re on stovetop, cover, bring to a gentle boil over medium-high heat, then reduce to low and simmer 15 minutes. Turn off heat and let it steam, covered, for 10 more minutes.
4. Make the seasoning: In a small saucepan, gently warm ¼ cup rice vinegar, 2 tablespoons sugar, 1 teaspoon salt and 1 tablespoon mirin. Stir until sugar dissolves—no need to boil or risk losing that vinegar zing.
5. Transfer and fluff: Scoop rice into a hangiri (wooden sushi tub) or wide bowl. Use a damp rice paddle or spatula to gently spread rice into an even layer.
6. Season the rice: Drizzle vinegar mixture evenly over the rice. Starting at the edges, fold rice with a cutting motion—lift and turn, don’t mash. This keeps grains intact and glossy.
7. Fan and cool: As you fold, fan the rice with a paper fan, magazine page or even a plate. Cooling quickly gives sushi rice its signature sheen and prevents sogginess.
8. Let it rest: Spread rice until it’s just above room temperature. For hand rolls, scoop while gently warm; for nigiri, wait a few more minutes so it shapes cleanly.
Tip: No hangiri? A large glass or metal bowl works too—just avoid plastic that holds odors.
Servings & Timing
* Yield: about 4 cups seasoned rice (makes 8–10 rolls or roughly 20 nigiri pieces)
* Prep Time: 5 minutes active rinsing + 30 minutes soaking
* Cook & Rest Time: 15 minutes cooking + 10 minutes steaming
* Total Time: around 1 hour and 5 minutes
Variations
* Brown Sushi Rice: Swap in short-grain brown rice, soak 45 minutes, then cook with 3 cups water for a nuttier bite.
* Yuzu Twist: Add 1 teaspoon fresh yuzu juice to the seasoning for a bright citrus note.
* Low-Sodium: Use ½ teaspoon salt and boost vinegar by 1 tablespoon to keep the tang alive.
* Sesame Crunch: Stir in 1 tablespoon toasted sesame seeds just before the final fanning step.
* Plum Punch: Replace half the rice vinegar with umeboshi vinegar for a subtle tangy-sweet plum flavor.
Storage & Reheating
Store leftover rice in an airtight container in the fridge up to 24 hours—beyond that it dries out. For longer life, spread rice thin on parchment, freeze 1 hour, then bag for up to one month. To reheat, sprinkle a few drops of water per cup, cover with a damp paper towel and microwave 30–45 seconds; fluff gently. Make-ahead: cook and season rice in the morning, keep covered at room temperature (up to 4 hours), then roll just before serving.
Notes
* Soaking makes a real difference—skip it and grains may turn out too firm.
* If you’re tight on time, rinse rice then cover in hot tap water for 10 minutes as a quick hack.
* Keep your paddle wet so rice slides off instead of sticking.
* Wooden tools like a hangiri help absorb extra moisture and flavor—rinse them right away after use.
* Vinegars vary in sweetness and acidity; taste your seasoning and tweak sugar or salt as needed.
FAQs
Q: Can I use medium-grain rice instead of sushi rice?
A: You can, but medium-grain won’t be as sticky or glossy—short-grain Japanese rice is ideal for sushi rolls and nigiri.
Q: Why does my rice turn out mushy?
A: Too much water or overcooking usually causes mushiness; try reducing water by 1–2 tablespoons and stick closely to cooking times.
Q: Is it okay to skip sugar?
A: Sugar balances the vinegar’s sharpness; reducing it slightly is fine, but skipping entirely will leave the rice overly tangy.
Q: How can I keep rice from sticking to my paddle?
A: Keep your paddle lightly damp and avoid pressing down hard—lift and fold instead of smashing.
Q: What’s the point of fanning sushi rice?
A: Fanning cools the rice quickly, sets the shine and lets excess moisture evaporate for the perfect texture.
Q: Can I make this rice ahead of time?
A: Yes—keep at room temperature up to 4 hours or in the fridge for 24, though it’s best fresh.
Q: My vinegar mix is too sharp—what now?
A: Stir in a pinch more sugar or a tablespoon of mirin to soften the tang.
Conclusion
This Sushi Rice Recipe brings the true taste of Japanese sushi right into your home kitchen with simple steps and pantry-friendly staples. It’s the perfect foundation for rolls, nigiri or colorful sushi bowls. Give it a try this weekend, then leave a comment or tag me on Instagram—I love seeing your creations and sharing tips to make each roll a little brighter!
Sushi Rice Recipe
Ingredients
- 2 cups sushi rice short-grain Japanese rice like Nishiki or Kokuho Rose; rinse until water runs almost clear
- 2.5 cups cold water filtered if you have hard tap water; adjust by a tablespoon if needed
- 0.25 cup rice vinegar unseasoned; if you use seasoned rice vinegar, cut sugar by half
- 2 tablespoons granulated sugar light brown sugar or honey works too
- 1 teaspoon fine sea salt kosher salt fine-ground is fine; avoid large crystals
- 1 tablespoon mirin optional sweet rice wine; substitute 1 tbsp sake + 1 tsp sugar if preferred
- Nori sheets and fillings (e.g., tuna, avocado, cucumber) for rolling
Instructions
- Place sushi rice in a fine-mesh sieve. Rinse under cool running water until water runs almost clear—usually 2–3 minutes to remove excess starch.
- Transfer rinsed rice to a rice cooker bowl or a heavy-bottom pot. Add cold water and let it rest for 30 minutes to absorb moisture.
- Start rice cooker on the “sushi” or “white rice” setting. If cooking on stovetop, cover, bring to a gentle boil, then simmer for 15 minutes. Let it steam covered for 10 more minutes.
- Warm rice vinegar, sugar, salt, and mirin in a small saucepan. Stir until sugar dissolves—no need to boil.
- Scoop rice into a hangiri or wide bowl. Gently spread rice into an even layer with a damp rice paddle or spatula.
- Drizzle vinegar mixture evenly over the rice. Fold rice with a cutting motion, starting at the edges to keep grains intact.
- As you fold, fan the rice with a paper fan to cool quickly and give it a signature sheen.
- Spread rice until just above room temperature. For hand rolls, scoop while gently warm; for nigiri, wait a few more minutes for clean shaping.