My Cozy Discovery of Sugar Cookie Balls
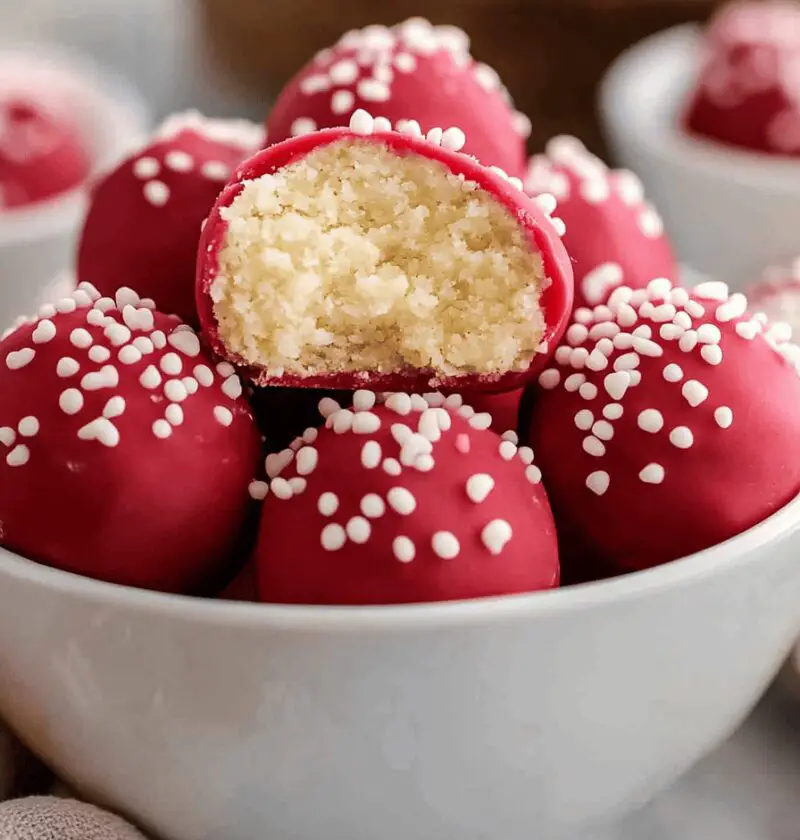
I have a confession: I’m a sugar-cookie junkie. There’s something about that buttery, vanilla-scented dough that just wraps you in a warm hug—especially when the weather’s chilly and you’re craving a cozy little treat. A couple of winters ago, I found myself elbow-deep in holiday baking chaos (kids banging pots, the dog underfoot, and my oven acting like it was auditioning for a steam bath). I needed a no-fuss dessert that still felt special. Enter sugar cookie balls. Imagine all the nostalgia of your favorite sugar cookies, rolled into truffle-like bites, then dipped in glossy chocolate. No rolling pins. No flour explosions. Just pure, creamy-crumb bliss.
It took one taste to seal the deal. They’re crunchy, they’re soft, and they’ve got that melt-in-your-mouth center that makes you go, “Oh yeah.” Plus, they travel great—ideal for cookie exchanges, neighbor gifts, or that moment when the babysitter deserves a little treat. And trust me, you’ll want to make a double batch. (Yes, really!)

Why You’ll Love This Recipe
- No oven required—your kitchen stays cool (goodbye, holiday sweat!).
- Quick assembly—ready in under an hour, even with chill time.
- Totally customizable: sprinkles, nuts, extracts—you name it.
- Kid-approved activity—let the little ones roll and top their favorites.
- Gluten- and dairy-free swaps keep everyone happy.
- Perfect for gifting—works great in pretty boxes or festive tins.
- Craveable texture combo: slightly crisp shell, soft center, shiny chocolate finish.
Ingredient Notes
- 2 cups finely crushed sugar cookies (about 12 standard cookies):
Leftover store-bought or homemade both work. Tip: pop them in a food processor for even crumbs, or toss in a sealed bag and roll with a rolling pin if you’re feeling old-school. - 4 oz (½ cup) cream cheese, softened:
Full-fat is my jam—it gives you that dreamy, luscious center. Mascarpone is a fun sub for extra richness (hello, indulgence!). - 1 tsp pure vanilla extract:
Don’t skimp here. Madagascar vanilla brings a warm, deep flavor, but whatever you have on hand is fine. Just no imitation stuff, please—your taste buds deserve better. - ¼ tsp fine sea salt:
Balances all the sweetness. It’s a small pinch with a big job. - 1½ cups semi-sweet chocolate chips or melting wafers:
I trust brands like Ghirardelli, Guittard, or Callebaut. If you’re dairy-free, look for vegan chips—melting wafers can be a godsend here. - 1 tbsp coconut oil or unsalted butter:
A little fat helps that chocolate harden with a gorgeous shine. Coconut oil makes it super smooth, but butter adds a lovely richness. - Optional toppings:
Festive sprinkles, crushed peppermint, mini M&Ms, chopped nuts—get creative! Just sprinkle while the chocolate is still wet.
Directions
-
Make the cookie-cream cheese dough.
In a medium bowl, stir the cookie crumbs, softened cream cheese, vanilla extract, and salt until the mixture comes together like a dough. You’ll know it’s just right when it holds its shape without squishing through your fingers. -
Scoop and roll.
Use a small cookie scoop (about 1½ tablespoons) or two teaspoons to portion the dough. Roll each mound between your palms into a smooth little ball. If the dough gets sticky, pop it in the fridge for 10 minutes or dust your hands lightly with sugar. This part is oddly therapeutic—go ahead, embrace it! -
Chill the balls.
Arrange your cookie balls on a parchment-lined tray, making sure they’re not touching. Freeze for 20–25 minutes. You want them rock-solid so the chocolate doesn’t slip right off. (Don’t skip this step if you want that flawless coating!) -
Melt the chocolate glaze.
In a microwave-safe bowl, combine the chocolate chips and coconut oil (or butter). Microwave in 20-second bursts, stirring each time, until silky smooth. No microwave? Use a double boiler—just be patient and stir gently so it doesn’t seize. -
Dip those beauties.
One at a time, lower a frozen ball into the melted chocolate with a fork. Swirl it around until it’s fully coated. Lift, let excess drip off (give it a little tap on the bowl’s edge), then place back on the parchment. Quickly add your choice of toppings while the chocolate is wet—you’ll want to work in batches of about 5–6. -
Set and store.
Pop the tray back into the freezer or fridge for 10–15 minutes, until the chocolate is firm and glossy. Then transfer to an airtight container. Seriously, that gloss—it’s like jewelry for your dessert table.
Variations & Flavor Twists
- Peppermint Bark: Stir crushed candy canes into your melted chocolate for a festive crunch.
- Nut-Butter Core: Drop a dollop of peanut or almond butter in the center before rolling—hello, surprise middle!
- Gluten-Free: Swap in certified gluten-free sugar cookies so everyone can indulge.
- Lemon Zest: Mix in a teaspoon of fresh lemon zest for a bright, citrusy pop that’s unexpectedly addictive.
- White Chocolate Drizzle: Use white chocolate coating and top with red and green sprinkles—so cheerful!
- Mocha Magic: Stir a teaspoon of instant espresso powder into the melted chocolate for a subtle coffee kick.
Storage & Reheating Tips
- Refrigerator: Store in a single layer (or separate layers with parchment) in an airtight container for up to one week. They’ll stay firm but still soft inside.
- Freezer: Freeze on a tray until solid, then transfer to a zip-top bag or container. They’ll keep beautifully for up to three months. To serve, thaw in the fridge for 10–15 minutes. Pro tip: For a warm-chocolate surprise, zap one on low power for 5 seconds—enough to soften the center without melting the shell.
Final Thoughts
Thanks for hanging out with me in my cozy little kitchen corner today! I can’t wait for you to make these sugar cookie balls and see the smiles they bring—whether you’re gifting them to neighbors, sharing at your next holiday bash, or sneaking a few when nobody’s looking. Let me know which variation you tried (lemon zest or mocha, anyone?), and drop any questions or funny mishaps in the comments. We’re all here to learn, share tips, and, of course, snack our way through life. Happy dipping, friends!

Sugar Cookie Balls
Ingredients
- 2 cups finely crushed sugar cookies about 12 standard cookies; leftover store-bought or homemade
- 4 oz cream cheese softened use full-fat for best texture
- 1 tsp pure vanilla extract Madagascar vanilla gives depth
- 1/4 tsp fine sea salt balances sweetness
- Optional toppings: festive sprinkles, crushed peppermint, mini M&Ms
Instructions
- Stir cookie crumbs, softened cream cheese, vanilla extract, and sea salt in a medium bowl until a dough forms.
- Use a small cookie scoop to portion dough and roll into balls. Chill if needed.
- Place cookie balls on a tray and freeze to firm up.
- Combine chocolate chips and coconut oil, melt until silky.
- Dip frozen balls in melted chocolate, twirl to coat, sprinkle with toppings.
- Pop coated balls back in the freezer or fridge until chocolate sets.