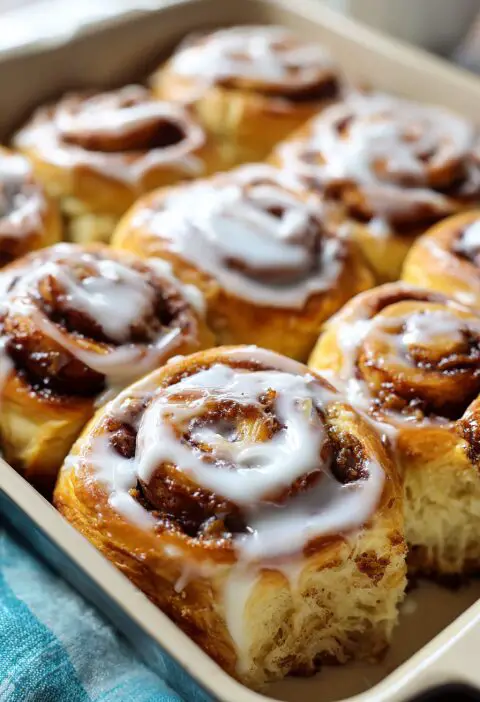
Red Velvet Stuffed Cookies Recipe
If you love soft bakery-style cookies and creamy cheesecake desserts, this Red Velvet Stuffed Cookies Recipe is going to be your new party trick—deep red cookies with a tangy cream cheese filling that stays soft and gooey in the center.
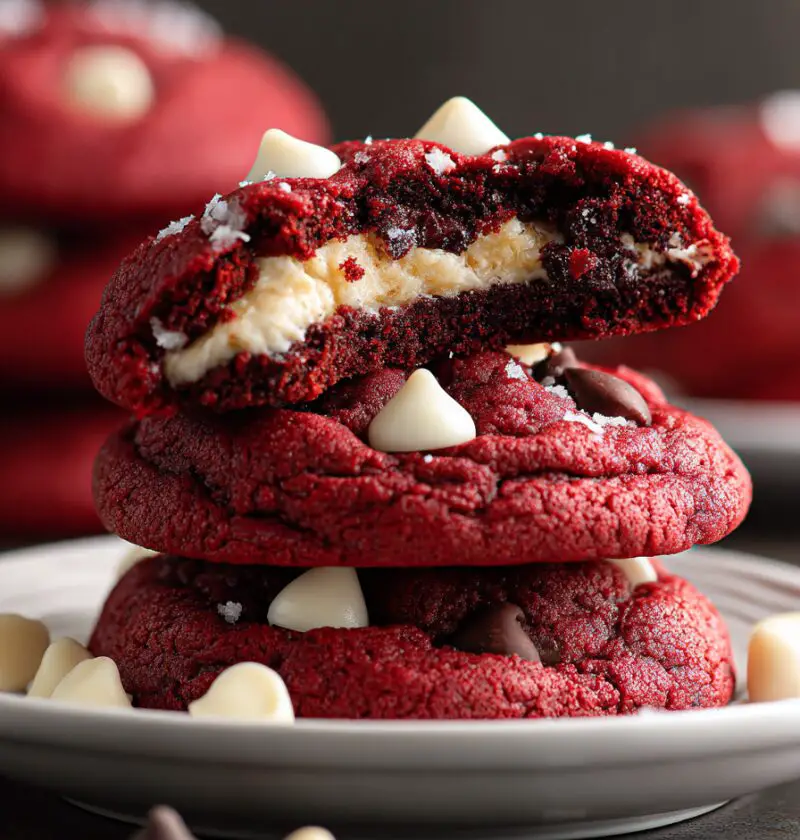
Red velvet cookies already feel special, but when you tuck a sweet cream cheese filling inside, they turn into something that tastes like a cookie and a slice of red velvet cake had the best little baby. These stuffed cookies are gorgeous on a holiday tray, perfect for Valentine’s Day or Christmas, and honestly? I’ve seen them disappear just as quickly at a random Tuesday game night.
I’m a 50-year-old mom who’s baked her way through more potlucks and school fundraisers than I can count, and these homemade red velvet cookies are the ones my grown kids still request when they come home. They’re soft, thick, and slightly chewy around the edges, with a rich cocoa flavor and that classic red velvet tang. The surprise cream cheese filling tastes like a little cheesecake center—no fork required.
I’ve also made a few thoughtful tweaks: a mix of brown and white sugar for extra moisture, a chill time that keeps them thick and soft, and enough cocoa to balance the sweetness. They look like fancy stuffed dessert cookies you’d see behind a glass bakery case, but they’re simple enough for a weekend bake.
You can keep them traditional, roll them in sugar for sparkle, or add chocolate chips if you like things over the top (no judgment from me—I do it too). However you customize them, this red velvet stuffed cookies recipe is one you’ll come back to every holiday season…and in between.

Why You’ll Love This Recipe
- Bakery-style texture at home – Thick, soft stuffed cookies with chewy edges and a tender center, no fancy equipment needed.
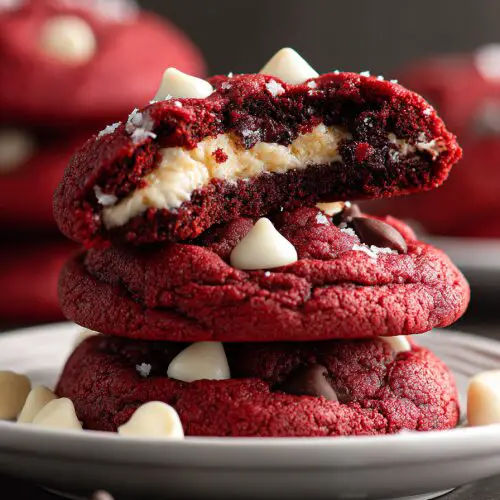
- That cheesecake surprise – A creamy, tangy cream cheese filling that tastes like a tiny cheesecake tucked inside each red velvet cookie.
- Perfect for holidays and gifting – Dramatic red color, pretty cracks on top, and they look amazing in cookie boxes or on dessert platters.
- Freezer-friendly – Both the unbaked dough balls and baked cookies freeze well, so you can bake a few at a time for fresh treats.
- Crowd-pleasing flavor – The combo of cocoa, vanilla, and cream cheese feels nostalgic, like classic red velvet dessert but in handheld form.
- Simple ingredients – Mostly pantry staples: flour, butter, sugar, cream cheese—nothing you have to hunt for.
- Kid-friendly project – Little hands love rolling the dough and “hiding” the filling inside. It’s a fun weekend baking activity.
- Customizable – Add chocolate chips, roll in sugar, or make them mini; this red velvet cookie recipe is flexible and forgiving.
Ingredients
Let’s break this Red Velvet Stuffed Cookies Recipe into two parts: the red velvet cookies themselves and the cream cheese filling.
For the Red Velvet Cookies
- 2 ½ cups (300 g) all-purpose flour, spooned and leveled
- 3 tbsp unsweetened cocoa powder (natural, not Dutch-processed)
- 1 tsp baking soda
- ½ tsp fine sea salt (or table salt)
- ½ cup (1 stick / 113 g) unsalted butter, softened to room temperature
- ½ cup (120 ml) neutral oil (canola or vegetable oil)
- 1 cup (200 g) granulated sugar
- ½ cup (100 g) packed light brown sugar
- 2 large eggs, room temperature
- 2 tsp pure vanilla extract
- 1–1 ½ tbsp red liquid food coloring (use gel if you want a deeper color; start with less and add)
- 2 tsp distilled white vinegar or apple cider vinegar (for that classic red velvet tang)
For the Cream Cheese Filling
- 8 oz (225 g) full-fat cream cheese, softened
- ¼ cup (50 g) granulated sugar
- 2 tbsp powdered sugar (helps keep the filling smooth)
- ½ tsp vanilla extract
- Pinch of salt
Optional Add-Ins & Finishers
- ½ cup white chocolate chips or mini chocolate chips (fold into the cookie dough)
- ¼ cup granulated sugar for rolling (for a sparkly finish)
- Extra cocoa powder for dusting (purely decorative)
Ingredient Tips
- Cream cheese – Use brick-style cream cheese, not the whipped tub; it firms up better in the center.
- Butter – Room temperature means it should give slightly when pressed but not look glossy or melted.
- Food coloring – Gel delivers a deeper red velvet dessert color with less liquid; if you use gel, you may need just 1 teaspoon.
- Flour – Measure carefully; too much flour makes dense cookies. If you have a scale, use it.
Directions
1. Make the cream cheese filling.
In a medium bowl, beat the softened cream cheese with a hand mixer until smooth and fluffy. Add the granulated sugar, powdered sugar, vanilla, and a pinch of salt. Beat again until creamy with no lumps.
2. Chill the filling.
Scoop small teaspoons of the cream cheese mixture onto a parchment-lined plate or tray (you’ll want about 18–20 mounds). Freeze for 20–30 minutes, until firm enough to handle. This step keeps the filling from leaking out of your stuffed cookies.
3. Whisk the dry ingredients.
In a large bowl, whisk together the flour, cocoa powder, baking soda, and salt. Set aside.
4. Cream the butter, oil, and sugars.
In another large mixing bowl (or the bowl of a stand mixer fitted with the paddle), beat the softened butter, oil, granulated sugar, and brown sugar until light and fluffy—about 2–3 minutes. Scrape down the bowl once for even mixing.
5. Add eggs, vanilla, food coloring, and vinegar.
Beat in the eggs one at a time, mixing well after each. Add the vanilla, then the red food coloring and vinegar. Start with 1 tablespoon of liquid food coloring (or 1 teaspoon gel), then add more if you want a deeper red. The batter should look like thick cake batter at this point.
6. Add the dry ingredients.
Switch to low speed and slowly add the flour mixture to the wet ingredients, mixing just until combined. Don’t overmix; stop as soon as no streaks of flour remain. If you’re using chocolate chips, gently fold them in now. The dough will be soft and slightly sticky.
7. Chill the dough.
Cover the bowl and refrigerate the dough for at least 45–60 minutes. This helps the dough firm up, makes stuffing easier, and keeps your red velvet cookies thick and soft instead of spreading too much.
8. Prep your baking sheets.
Preheat your oven to 350°F (175°C). Line two baking sheets with parchment paper or silicone baking mats. If you like a sparkly exterior, pour a little extra sugar into a small bowl for rolling.
9. Assemble the stuffed cookies.
Scoop about 2 tablespoons of cookie dough (a medium cookie scoop works well) and flatten it slightly in your hand. Place one frozen cream cheese mound in the center. Gently wrap the dough around the filling, sealing the edges so no cream cheese peeks out. Roll into a smooth ball. If desired, roll the ball lightly in granulated sugar. Place on the baking sheet, spacing 2 inches apart. Repeat, working in batches so the filling stays cold.
10. Bake to soft perfection.
Bake for 11–13 minutes, just until the cookies are set around the edges but still soft and slightly puffy in the center. They’ll continue to cook on the hot baking sheet. Let them cool on the pan for 10 minutes before transferring to a wire rack. The centers should stay soft and creamy.
Baker’s cue: If a cookie bakes a little lopsided, you can gently scoot the edges into a neater circle with a round cookie cutter or the back of a spoon while they’re still hot. It’s a tiny trick professionals use for those perfect bakery-style cookies.
Servings & Timing
- Yield: About 18–20 stuffed cookies
- Prep Time: 25 minutes (plus assembly time)
- Chill Time (dough + filling): 1 hour–1 hour 15 minutes total
- Bake Time: 11–13 minutes per batch
- Total Time: About 2 hours, mostly hands-off chilling and baking time
If you’re baking for a party, you can make the dough and filling earlier in the day, assemble later, and bake right before guests arrive. Fresh warm red velvet stuffed cookies are always a showstopper.
Variations
- Chocolate chip red velvet stuffed cookies – Fold ½ cup mini chocolate chips into the dough for extra richness.
- Valentine’s sprinkle version – Roll the stuffed cookies in heart-shaped sprinkles instead of sugar for a cute holiday twist.
- Gluten-free version – Use a cup-for-cup gluten-free flour blend designed for baking; chill the dough well so it holds shape.
- Red velvet brownie-style cookies – Add an extra tablespoon of cocoa and reduce flour by 2 tablespoons for a more fudgy texture.
- Smaller “two-bite” cookies – Use 1 tablespoon of dough and ½ teaspoon of filling for mini stuffed cookies; bake a minute less.
- Extra tangy cheesecake center – Add an extra teaspoon of vinegar or lemon juice to the filling for a brighter flavor.
Storage & Reheating
Room Temperature:
- Store the baked red velvet cookies in an airtight container in the fridge, not on the counter, because of the cream cheese filling. They’ll stay fresh for 4–5 days.
Refrigerator & Reheating:
- If you like them slightly warm and soft, microwave a chilled cookie for 8–10 seconds. It gently warms the cream cheese center without making it runny.
Freezer:
- Unbaked stuffed cookies: Place stuffed dough balls on a baking sheet to freeze until solid, then transfer to a freezer bag. Bake from frozen, adding 2–3 extra minutes to the bake time.
- Baked cookies: Freeze in a single layer, then place in a container with parchment between layers. Thaw in the fridge or at room temperature.
Make-Ahead Tip:
You can prepare the cream cheese centers and cookie dough up to 2 days ahead. Keep the dough covered in the fridge and the filling mounds frozen. Assemble and bake when you’re ready, which makes holiday baking a lot less stressful.
Notes
- Don’t skip chilling. I know, waiting is hard. But chilling turns this from just a red velvet cookie recipe into a truly bakery-style cookie—thick, soft, and not flat as a pancake.
- Color control. Red velvet desserts can easily swing from pretty to “whoa, that’s bright.” Start with less food coloring and add more if needed; the dough will deepen a bit as it rests.
- Watch your bake time. These stuffed cookies should look slightly underbaked in the center when you pull them out. If you wait until they look fully done, they’ll dry out as they cool.
- Size matters. Larger stuffed cookies hold more filling and give you that creamy middle, but if you make them too big, the edges may get too crisp before the center sets. Stick to about 2 tablespoons of dough per cookie for a good balance.
- Test batch. When I test new stuffed cookies, I often bake just two or three first. If they spread too much, I chill the dough more. If they don’t spread at all, I flatten the next batch slightly before baking. A tiny test run can save a whole tray.
FAQs
Can I use boxed red velvet cake mix for this recipe?
You can’t get the same thick, bakery-style stuffed cookies with cake mix alone; this recipe is built to be sturdy enough to hold the cream cheese filling.
Do I have to use vinegar in the dough?
The vinegar adds a little tang and helps give that classic red velvet flavor, but if you really don’t want it, you can skip it or replace it with lemon juice.
Why is my cookie dough so sticky?
Red velvet cookie dough is naturally softer because of the oil and moisture. Chilling the dough and lightly flouring your hands will make it much easier to work with.
My cream cheese filling leaked out—what went wrong?
Most often, the filling wasn’t fully frozen or the dough didn’t completely cover it. Next time, make sure to seal all the seams and freeze those filling mounds until firm.
Can I make these red velvet stuffed cookies without a mixer?
Yes, but you’ll need some elbow grease. Whisk the dry ingredients by hand and use a sturdy wooden spoon to cream the butter and sugars thoroughly.
Can I use gel food coloring instead of liquid?
Yes, gel works beautifully. You’ll need less—start with about 1 teaspoon and adjust gradually until you get the shade you want.
Are these cookies very sweet?
They’re sweet, but the cream cheese filling and cocoa both add balance. If you’re sensitive to sweetness, you can reduce the granulated sugar in the dough by 2 tablespoons.
Can I double this recipe?
Absolutely. Just be sure to chill the dough well, and consider baking one sheet at a time for even results.
Conclusion
This Red Velvet Stuffed Cookies Recipe brings together everything we love about red velvet dessert and classic cream cheese frosting, all wrapped into one soft, handheld treat. They’re pretty enough for special occasions, but simple enough to bake on a cozy weekend at home.
If you try these red velvet stuffed cookies, let me know how they turn out—leave a comment, share a photo, or tell me what twist you tried. And if you’re in the mood for more cookies, you might also enjoy a batch of classic chocolate chip or snickerdoodles next. Happy baking, friend.
Red Velvet Stuffed Cookies
Ingredients
- 2 1/2 cups all-purpose flour 300 g, spooned and leveled
- 3 tablespoons unsweetened cocoa powder natural, not Dutch-processed
- 1 teaspoon baking soda
- 1/2 teaspoon fine sea salt or table salt
- 1/2 cup unsalted butter 1 stick / 113 g, softened to room temperature
- 1/2 cup neutral oil 120 ml, such as canola or vegetable oil
- 1 cup granulated sugar 200 g
- 1/2 cup light brown sugar 100 g, packed
- 2 large eggs room temperature
- 2 teaspoons pure vanilla extract
- 1-1 1/2 tablespoons red liquid food coloring or about 1 teaspoon gel; start with less and add to taste
- 2 teaspoons distilled white vinegar or apple cider vinegar, for classic red velvet tang
- 8 ounces cream cheese 225 g, full-fat brick style, softened
- 1/4 cup granulated sugar 50 g, for filling
- 2 tablespoons powdered sugar for a smooth filling
- 1/2 teaspoon vanilla extract for filling
- 1 pinch salt for filling
- 1/2 cup white chocolate chips or mini chocolate chips optional, to fold into dough
- 1/4 cup granulated sugar optional, for rolling cookies
Instructions
- In a medium bowl, beat the softened cream cheese with a hand mixer until smooth and fluffy. Add the 1/4 cup granulated sugar, powdered sugar, vanilla, and a pinch of salt. Beat again until creamy with no lumps.8 ounces cream cheese, 1/4 cup granulated sugar, 2 tablespoons powdered sugar, 1/2 teaspoon vanilla extract, 1 pinch salt
- Scoop small teaspoons of the cream cheese mixture onto a parchment-lined plate or tray, aiming for about 18–20 small mounds. Freeze for 20–30 minutes, until firm enough to handle.
- In a large bowl, whisk together the flour, cocoa powder, baking soda, and salt. Set aside.2 1/2 cups all-purpose flour, 3 tablespoons unsweetened cocoa powder, 1 teaspoon baking soda, 1/2 teaspoon fine sea salt
- In another large mixing bowl or the bowl of a stand mixer fitted with the paddle attachment, beat the softened butter, oil, 1 cup granulated sugar, and brown sugar until light and fluffy, about 2–3 minutes. Scrape down the bowl once for even mixing.1/2 cup unsalted butter, 1/2 cup neutral oil, 1 cup granulated sugar, 1/2 cup light brown sugar
- Beat in the eggs one at a time, mixing well after each addition. Add the vanilla, then the red food coloring and vinegar. Start with the lower amount of coloring and add more if you want a deeper red. The mixture will resemble thick cake batter.2 large eggs, 2 teaspoons pure vanilla extract, 1-1 1/2 tablespoons red liquid food coloring, 2 teaspoons distilled white vinegar
- On low speed, gradually add the flour mixture to the wet ingredients, mixing just until no dry streaks remain. If using chocolate chips, gently fold them in. The dough will be soft and slightly sticky.2 1/2 cups all-purpose flour, 3 tablespoons unsweetened cocoa powder, 1 teaspoon baking soda, 1/2 teaspoon fine sea salt, 1/2 cup white chocolate chips or mini chocolate chips
- Cover the bowl and refrigerate the dough for at least 45–60 minutes, until noticeably firmer. This makes stuffing easier and helps the cookies bake up thick and soft.
- Preheat the oven to 350°F (175°C). Line two baking sheets with parchment paper or silicone baking mats. If you plan to roll the cookies in sugar, pour the extra 1/4 cup granulated sugar into a small bowl.1/4 cup granulated sugar
- Scoop about 2 tablespoons of cookie dough and flatten it slightly in your hand. Place one frozen cream cheese mound in the center. Gently wrap the dough around the filling, sealing all seams so no cream cheese is exposed, and roll into a smooth ball. If desired, roll the ball lightly in granulated sugar. Place on the baking sheet, spacing cookies about 2 inches apart. Repeat, working in batches so the filling stays cold.
- Bake each tray for 11–13 minutes, until the cookies are set around the edges but still soft and slightly puffy in the center. They should look just slightly underbaked in the middle. Let the cookies cool on the baking sheet for 10 minutes, then transfer to a wire rack to cool completely. The centers will stay soft and creamy.
- If any cookies bake a little lopsided, immediately after removing from the oven you can gently nudge the edges into a neater circle with a round cookie cutter or the back of a spoon for a bakery-style look.