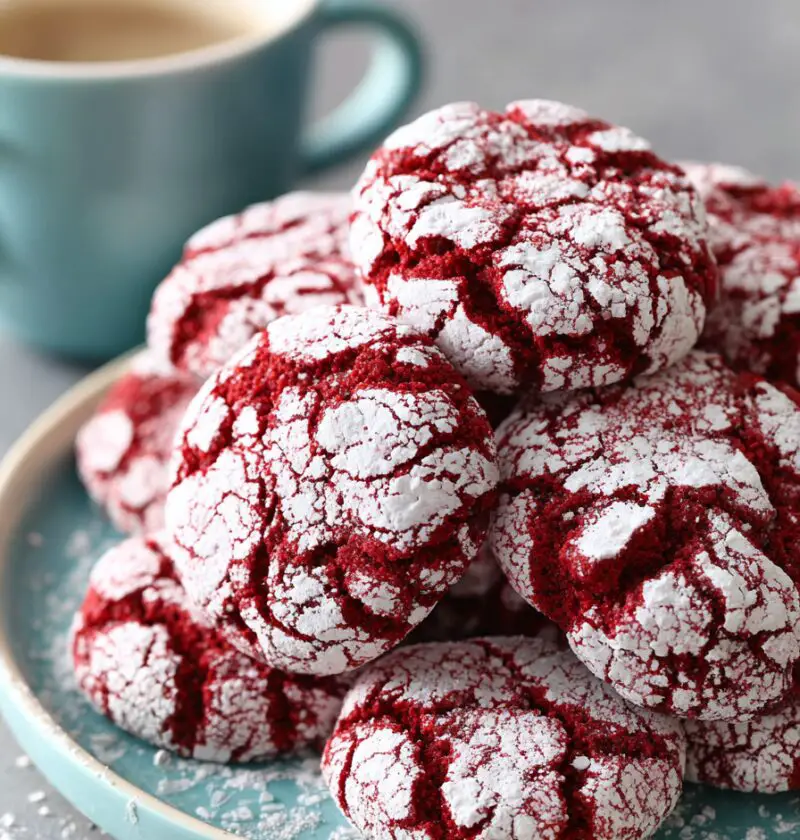
Red Velvet Crinkle Cookies Recipe
Soft, chewy, and dusted in snowy powdered sugar, this Red Velvet Crinkle Cookies Recipe makes the prettiest little bites for the holidays—or any time you need something a bit special.
Red velvet crinkles are like a cross between fudgy cocoa crinkle cookies and classic red velvet cake: rich cocoa flavor, a hint of tang, and that gorgeous red color peeking through all the crackles. I bake these every December for neighbors, cookie swaps, and honestly, any excuse I can find. They’re a festive red velvet dessert recipe that feels bakery-fancy but comes together with simple pantry ingredients.
Over the years—fifty birthdays and a whole lot of cookie trays later—I’ve learned that people reach for the bright, pretty cookies first. These chewy red velvet crinkle cookies always disappear before the chocolate chip or sugar cookies. They’re soft inside, slightly crisp around the edges, and they stay that way for days, which makes them a dream Christmas cookie recipe for gifting and mailing.
If you’re craving a red velvet cookies recipe that gives you reliable crackles, deep color, and no dry, cakey texture, you’re in the right kitchen.
Why You’ll Love This Red Velvet Crinkle Cookies Recipe
- Soft and chewy, not cakey – These soft red velvet cookies stay fudgy in the middle with a light, tender bite.
- Perfect for Christmas cookie trays – The red and white contrast looks so festive on holiday platters and in gift boxes.
- Simple ingredients – All-purpose flour, cocoa, butter, sugar—nothing fancy or hard to find.
- Make-ahead friendly – The dough chills well, and you can freeze the scooped balls for fresh-baked cookies any time.
- Beautiful crackle effect – A double sugar coating keeps that powdered sugar bright and defined instead of melting away.
- Kid- and crowd-approved – They taste like a mash-up of brownies and red velvet cake, so everyone finds a reason to go back for “just one more.”
- Great for new bakers – Clear steps, no mixer drama, and visual cues help you know exactly when the dough is ready.
- Versatile for other celebrations – Change the sprinkles or color depth and you’ve got a year-round red velvet baking recipe, not just a holiday one.
Ingredients for the Best Red Velvet Crinkle Cookies
This recipe makes about 26–30 medium cookies, depending on the size of your scoop. Use standard US measuring cups and spoons, and if you have a kitchen scale, even better for consistent results.
Dry Ingredients
- 2 1/4 cups (280 g) all-purpose flour
(Spoon and level so you don’t pack it; too much flour makes dry cookies.) - 1/4 cup (25 g) unsweetened cocoa powder
(Natural cocoa is classic; Dutch-process will give deeper color and flavor.) - 1 1/2 teaspoons baking powder
- 1/2 teaspoon fine sea salt
Wet Ingredients
- 1/2 cup (113 g) unsalted butter, softened to room temperature
(Soft but not greasy—press with your finger, it should give easily.) - 3/4 cup (150 g) granulated sugar
- 1/2 cup (100 g) packed light brown sugar
(Adds moisture and that chewy cookie texture.) - 2 large eggs, at room temperature
- 1 1/2 teaspoons pure vanilla extract
- 1 teaspoon white vinegar
(This gives that classic red velvet tang and helps brighten the color.) - 1 1/2 tablespoons red liquid food coloring
(Or 1–1 1/2 teaspoons gel food color—start small and add more if needed.)
For Rolling
- 1/2 cup (100 g) granulated sugar
- 3/4 cup (90 g) powdered sugar
(Also called confectioners’ sugar—sift if it’s lumpy.)
You can use any mainstream brand here—King Arthur or Gold Medal flour, Hershey’s cocoa, and McCormick food color all work well. If you prefer natural coloring, be aware that those tend to give more muted shades and may not hold the bright red as well once baked.

How to Make Red Velvet Crinkle Cookies (Step-by-Step)
Let’s walk through the process so your red velvet crinkles come out soft, chewy, and nicely crackled on top.
-
Whisk the dry ingredients
In a medium bowl, whisk together the flour, cocoa powder, baking powder, and salt until the cocoa is evenly blended and there are no streaks. Set aside. This keeps the cookies from getting random pockets of cocoa. -
Cream the butter and sugars
In a large mixing bowl, beat the softened butter, granulated sugar, and brown sugar together with a hand mixer (or stand mixer with paddle) on medium speed for 2–3 minutes, until lighter in color and fluffy. Scrape down the bowl once or twice; this step helps build that tender, bakery-style texture. -
Add eggs, vanilla, vinegar, and color
Beat in the eggs one at a time, mixing on low until each is just combined. Add the vanilla and white vinegar, then the red food coloring. Start the mixer on low so the color doesn’t splash, and beat until the mixture is evenly red. If the shade looks dull, add another few drops and mix again. -
Combine wet and dry ingredients
Add the dry ingredients to the red mixture in two additions, mixing on low until just combined. The dough will be fairly thick and a bit sticky, like a soft brownie batter meets cookie dough. Don’t overmix—once you don’t see dry flour, you’re done. -
Cover and chill the dough
Cover the bowl tightly with plastic wrap or a reusable lid and chill for at least 2 hours, or up to 24 hours. This step helps the dough firm up, deepens the red velvet flavor, and gives you better crinkles. If you skip the chill, the cookies will spread too much and lose that puffy, crackled look. -
Preheat and prep the rolling station
When you’re ready to bake, preheat your oven to 350°F (175°C). Line two baking sheets with parchment paper or silicone baking mats. Put the 1/2 cup granulated sugar in one shallow bowl and the powdered sugar in another. -
Scoop and roll the dough
Using a small cookie scoop (about 1 1/2 tablespoons each) or a spoon, scoop out portions of dough. Roll each into a ball with your hands. If the dough feels too sticky, chill it a bit longer or lightly dust your hands with powdered sugar. -
Coat in sugar—twice
Roll each ball first in the granulated sugar, coating it fully. Then roll it in the powdered sugar, pressing gently so it sticks and forms a thick, even layer. This double coating helps the powdered sugar stay bright and gives you beautiful contrast. -
Arrange and bake
Place the coated dough balls on the prepared baking sheets, spacing them about 2 inches apart. Bake for 10–12 minutes, until the tops are crackled and the edges look just set. The centers will still look a bit soft—that’s what you want for chewy red velvet crinkle cookies. -
Cool on the pan, then on a rack
Let the cookies cool on the baking sheet for 5 minutes (they’ll continue to set), then transfer them carefully to a wire rack to cool completely. They’ll puff in the oven and settle slightly as they cool, giving that classic crinkle cookie look.
If you’re baking both trays at once, rotate the pans halfway through so they bake evenly—especially helpful if your oven has hot spots, and most do.
Servings & Timing
- Yield: About 26–30 cookies
- Prep Time: 20 minutes active prep
- Chill Time: 2 hours (or up to 24 hours)
- Bake Time: 10–12 minutes per batch
- Total Time: About 2 hours 45 minutes (including chilling and cooling)
Realistically, for holiday baking days when I’m juggling multiple recipes, I often mix the dough in the evening, chill overnight, and bake the cookies fresh in the morning. That schedule works especially well if you’re prepping a big holiday cookie recipe lineup.
Variations on This Red Velvet Crinkle Cookies Recipe
Want to play a bit? Here are some easy twists that still respect that red velvet magic.
- Cream cheese swirl crinkles – Gently fold in small chunks of cold cream cheese right before chilling for pockets of tangy richness.
- Chocolate chip red velvet crinkles – Stir in 1 cup mini chocolate chips for extra cocoa crinkle cookies energy.
- Sprinkle-topped Christmas version – After rolling in powdered sugar, press a few red, white, or green sprinkles into the tops before baking for a super festive Christmas cookie recipe.
- Gluten-free red velvet crinkles – Use a 1:1 gluten-free baking flour blend and chill closer to 3 hours so the dough holds its shape.
- Extra-dark red velvet cookies – Swap half the cocoa for Dutch-process cocoa and use slightly less food coloring for a deeper, sophisticated color and flavor.
- Mini ice cream sandwiches – Sandwich a small scoop of vanilla or cream cheese ice cream between two chilled cookies for a fun red velvet dessert recipe twist.
Storage, Freezing & Make-Ahead Tips
These red velvet crinkle cookies are very forgiving, which is exactly what you need during busy holiday weeks.
Room temperature storage
- Store completely cooled cookies in an airtight container at room temperature for 3–4 days.
- Layer with parchment paper to protect the powdered sugar coating.
Freezing baked cookies
- Place cooled cookies on a baking sheet and freeze until solid, then transfer to a freezer bag or container.
- They keep well for about 2–3 months.
- Let them thaw at room temperature for 20–30 minutes before serving; the texture comes back beautifully.
Freezing cookie dough
- After chilling the dough, scoop and roll into balls, but don’t coat in sugar yet.
- Freeze the dough balls on a tray until firm, then store in a freezer-safe bag.
- When ready to bake, let them sit at room temperature about 15 minutes, roll in both sugars, and bake as directed, adding 1–2 minutes to the bake time if needed.
Reheating (if you like them warm)
- For a just-baked feel, warm a cookie in the microwave for about 8–10 seconds.
- Don’t overdo it or the powdered sugar can melt a bit; a short burst is plenty.
Notes from My Kitchen Tests
I tested this Red Velvet Crinkle Cookies Recipe several different ways—because once you start tweaking a red velvet baking recipe, it’s hard to stop.
- On chilling the dough: Two hours is the sweet spot for most fridges. Less than an hour and the dough stays sticky and spreads more. Overnight gives the most flavor, but the dough will be quite firm, so let it sit 10 minutes before scooping.
- On the sugar coating: That first roll in granulated sugar really does help the powdered sugar stay put. Skipping it gave me thinner, patchy tops.
- On texture: If you like slightly thicker, puffier cookies, increase the flour by 2 tablespoons and bake on the shorter end of the time range.
- On cocoa flavor: A little cocoa goes a long way with red velvet. More cocoa makes the cookies taste more like straight chocolate, and it can muddy the red color. This balance keeps them “red velvet” rather than straight cocoa crinkle cookies.
- On color: Different brands of red food coloring behave differently. Gel gives more intense color with less liquid, which helps keep the dough thick. If your first batch looks a bit brownish, you can add a touch more color next time.
And you know what? Even the “not perfect” batches still got eaten. So give yourself some grace while you find your favorite version.
Red Velvet Crinkle Cookies Recipe FAQs
1. Can I make these without red food coloring?
Yes—skip the color for cocoa crinkle cookies with the same soft, chewy texture. They won’t be “red velvet,” but they’ll still taste wonderful.
2. My powdered sugar melted—what happened?
Usually that means the dough was too warm or the coating was too thin. Chill the dough longer and make sure you roll each ball in a generous layer of powdered sugar after the granulated sugar.
3. Can I use oil instead of butter?
You can replace up to half the butter with neutral oil for an even softer cookie, but keep some butter for flavor. Fully oil-based versions spread more and lose a bit of that classic cookie taste.
4. Do I have to use vinegar?
Vinegar adds a subtle tang that makes red velvet taste “right” and helps brighten the red color. If you don’t have vinegar, lemon juice works as a backup, or you can leave it out for a milder flavor.
5. How do I keep the cookies from getting dry?
Measure the flour carefully, don’t overbake, and store them in an airtight container. Pull them from the oven when the centers still look slightly soft; they’ll finish setting on the pan.
6. Can I make these as larger bakery-style cookies?
Yes—use a 2-tablespoon scoop, space them farther apart, and bake 1–2 minutes longer. Just watch the first batch and adjust based on how your oven behaves.
7. Are these good for mailing in holiday cookie boxes?
They are. The cookies are sturdy enough to stack if cooled fully, and the texture holds for several days. Pack them snugly with parchment between layers so they don’t bump around too much.
8. Can I add cream cheese frosting?
If you’re serving them at home, absolutely—pipe or spread a little cream cheese frosting on top of cooled cookies or sandwich two together. For gifting or shipping, I usually skip frosting so they travel better.
Final Thoughts
These Red Velvet Crinkle Cookies bring together everything I love about holiday baking: bright color, cozy cocoa flavor, and a soft, chewy bite that makes people pause mid-conversation and say, “Who made these?” They’re a reliable holiday cookie recipe that also fits birthdays, Valentine’s Day, or any potluck that needs a splash of red.
If you try this Red Velvet Crinkle Cookies Recipe, let me know how it goes—leave a comment with how many disappeared before they even cooled, or what fun twist you tried. And if you’re planning a full cookie spread, you might also enjoy classic cocoa crinkle cookies, peppermint bark cookies, or a simple sugar cookie you can decorate with the kids.
Red Velvet Crinkle Cookies
Ingredients
- 2 1/4 cups all-purpose flour about 280 g; spoon and level to avoid packing
- 1/4 cup unsweetened cocoa powder about 25 g; natural cocoa is classic, Dutch-process for deeper flavor and color
- 1 1/2 teaspoons baking powder
- 1/2 teaspoon fine sea salt
- 1/2 cup unsalted butter about 113 g; softened to room temperature
- 3/4 cup granulated sugar about 150 g
- 1/2 cup light brown sugar about 100 g; packed
- 2 large eggs at room temperature
- 1 1/2 teaspoons pure vanilla extract
- 1 teaspoon white vinegar for classic red velvet tang and brighter color
- 1 1/2 tablespoons red liquid food coloring or 1–1 1/2 teaspoons gel food color; add to desired shade
- 1/2 cup granulated sugar about 100 g; for rolling
- 3/4 cup powdered sugar about 90 g; for rolling, sift if lumpy
Instructions
- In a medium bowl, whisk together the flour, cocoa powder, baking powder, and salt until the cocoa is evenly blended and there are no streaks. Set aside.2 1/4 cups all-purpose flour, 1/4 cup unsweetened cocoa powder, 1 1/2 teaspoons baking powder, 1/2 teaspoon fine sea salt
- In a large mixing bowl, beat the softened butter, granulated sugar, and brown sugar together with a hand mixer or stand mixer fitted with the paddle attachment on medium speed for 2–3 minutes, until lighter in color and fluffy. Scrape down the bowl once or twice.1/2 cup unsalted butter, 3/4 cup granulated sugar, 1/2 cup light brown sugar
- Beat in the eggs one at a time on low speed, mixing just until combined after each addition. Add the vanilla extract and white vinegar, then add the red food coloring. Start the mixer on low so the color doesn’t splash, and beat until the mixture is evenly red, adding a few more drops of color if needed.2 large eggs, 1 1/2 teaspoons pure vanilla extract, 1 teaspoon white vinegar, 1 1/2 tablespoons red liquid food coloring
- Add the dry ingredients to the red mixture in two additions, mixing on low speed until just combined after each. The dough will be fairly thick and a bit sticky, like a soft brownie batter. Do not overmix; stop as soon as no dry flour remains.2 1/4 cups all-purpose flour, 1/4 cup unsweetened cocoa powder, 1 1/2 teaspoons baking powder, 1/2 teaspoon fine sea salt
- Cover the bowl tightly with plastic wrap or a reusable lid and chill the dough for at least 2 hours and up to 24 hours, until firm enough to roll. This helps the dough firm up, deepens the flavor, and improves the crinkle effect.
- When ready to bake, preheat the oven to 350°F (175°C). Line two baking sheets with parchment paper or silicone baking mats. Place 1/2 cup granulated sugar in one shallow bowl and the powdered sugar in another.1/2 cup granulated sugar, 3/4 cup powdered sugar
- Using a small cookie scoop (about 1 1/2 tablespoons of dough) or a spoon, scoop portions of chilled dough and roll each into a smooth ball with your hands. If the dough is too sticky, chill it longer or lightly dust your hands with powdered sugar.
- Roll each dough ball first in the granulated sugar, coating it fully, then roll it in the powdered sugar, pressing gently so a thick, even layer adheres. The double coating helps the powdered sugar stay bright and defined.1/2 cup granulated sugar, 3/4 cup powdered sugar
- Place the coated dough balls on the prepared baking sheets, spacing them about 2 inches apart. Bake for 10–12 minutes, or until the tops are crackled and the edges look just set. The centers should still appear slightly soft for a chewy texture.
- Let the cookies cool on the baking sheet for 5 minutes to finish setting, then transfer carefully to a wire rack to cool completely. If baking two trays at once, rotate the pans halfway through baking for even results.