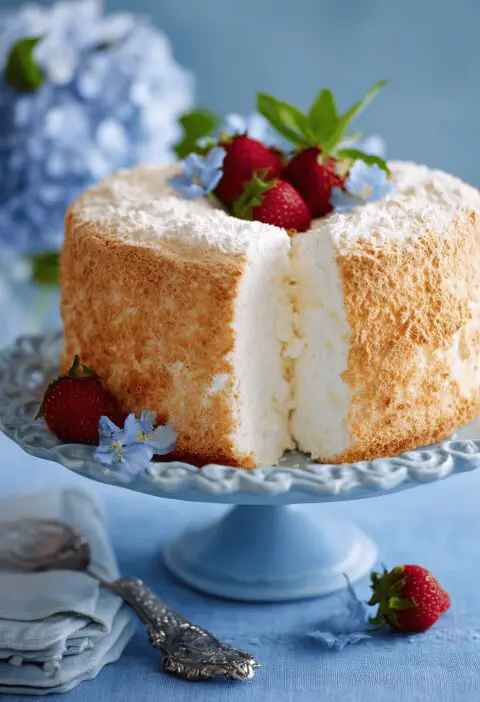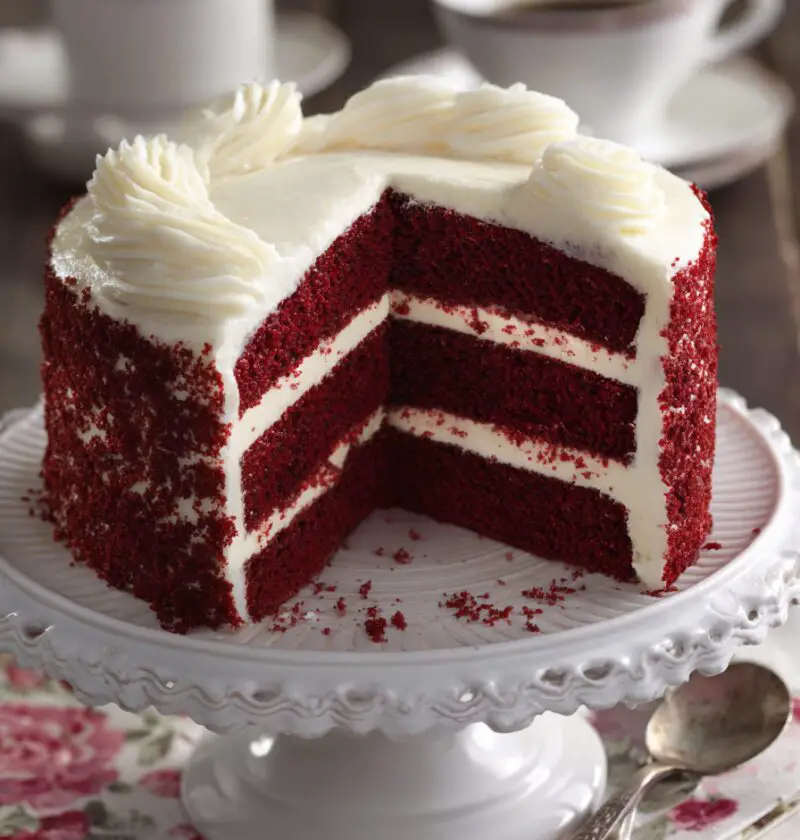
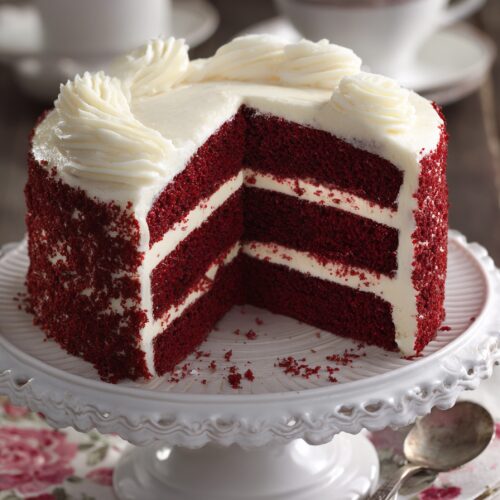
Red Velvet Cake Recipe
This moist, bakery-style Red Velvet Cake Recipe gives you a tender cocoa-kissed cake with lush cream cheese frosting—perfect for birthdays, holidays, or whenever you’re craving a classic red velvet cake that tastes like it came straight from a bakery case.
What Makes This Red Velvet Cake Recipe So Special
Red velvet is one of those cakes people feel strongly about. Some remember it from Southern church potlucks, some from fancy bakery windows, and some of us—like me—remember it as the “special occasion” cake our moms made only at Christmas or Valentine’s Day.
This homemade red velvet cake has everything you want: a soft, moist crumb; a gentle cocoa flavor (not full-on chocolate, but not plain vanilla either); and that tangy cream cheese frosting that makes everyone go quiet for a moment at the table. It’s a classic red velvet cake, but with a few small tweaks that make it sturdy enough for beautiful layers while still staying tender.
From a recipe-testing standpoint, here’s what makes this buttermilk cake recipe stand out:
- Buttermilk and a touch of vinegar give you that signature tang and super soft texture.
- Just enough cocoa powder to give depth without turning it into a chocolate cake.
- Oil plus butter, so you get both moistness and flavor.
- A frosting ratio that’s sweet, but not cloying—because cream cheese frosting should still taste like cream cheese.
You know what? I also keep an eye on what my readers search for. Over the past couple of years, the terms “moist red velvet cake,” “homemade red velvet,” and “holiday cake recipe” always spike around November and December. So this version is tested with busy holiday kitchens in mind: reliable, forgiving, and easy to decorate even if you’re not a professional baker.
I love serving this cake for Christmas, Valentine’s Day, family birthdays, and honestly, random Tuesdays when I need something pretty on the counter. It slices like a dream and looks gorgeous in photos—perfect if you’re making a festive dessert recipe for a party or potluck.
Why You’ll Love This Recipe
- Moist, tender crumb that stays soft for days
- Rich but not heavy, thanks to buttermilk and a bit of cocoa powder
- Bakery-style red velvet cake that’s easy enough for beginners
- Thick, tangy cream cheese frosting that spreads and pipes beautifully
- Uses simple pantry ingredients—no fancy mixes or shortcuts
- Reliable layers that bake up flat (less trimming, more eating)
- Perfect make-ahead holiday cake recipe for entertaining
- Flexible: works as a layered red velvet cake, sheet cake, or cupcakes
- Gorgeous color that holds up in photos and on dessert tables
Ingredients
This Red Velvet Cake Recipe uses straightforward ingredients you probably already have, plus buttermilk and food coloring. Measure carefully—cake is a bit like a science experiment, but a delicious one.

For the Red Velvet Cake
- 2 ½ cups (300 g) all-purpose flour (spooned and leveled; don’t pack it)
- 2 tablespoons unsweetened natural cocoa powder (not Dutch-process; Hershey’s works well)
- 1 teaspoon baking soda
- 1 teaspoon fine sea salt (or table salt)
- 1 ½ cups (300 g) granulated sugar
- ½ cup (1 stick / 113 g) unsalted butter, softened to room temperature
- ½ cup (120 ml) neutral oil (canola or vegetable oil for moisture)
- 3 large eggs, at room temperature
- 1 cup (240 ml) buttermilk, at room temperature (full-fat if you can find it)
- 2 teaspoons pure vanilla extract
- 1 teaspoon white vinegar (or apple cider vinegar)
- 1–1 ½ tablespoons red gel food coloring (Americolor Super Red or Wilton No-Taste Red work well)
Ingredient tips:
- Flour: If you have a kitchen scale, use it; it’s the easiest way to avoid dense cake.
- Buttermilk: If you don’t have it, mix 1 cup whole milk with 1 tablespoon vinegar or lemon juice; let it sit 5–10 minutes.
- Food coloring: Gel gives a bright, festive color without thinning your batter. Liquid coloring works, but you’ll need more and it can lighten the texture slightly.
For the Cream Cheese Frosting
- 16 oz (450 g) cream cheese, full-fat bricks, softened (not whipped cream cheese)
- 1 cup (2 sticks / 226 g) unsalted butter, softened
- 4–5 cups (480–600 g) powdered sugar, sifted for the smoothest texture
- 2 teaspoons pure vanilla extract
- ¼ teaspoon fine sea salt (balances the sweetness beautifully)
Frosting tips:
- For a less sweet, more tangy frosting, start with 4 cups powdered sugar; add more only if you want a firmer or sweeter frosting.
- Make sure the cream cheese and butter are soft but not melty; they should give easily when pressed but still hold their shape.
Directions
Let’s walk through this step-by-step. If you’re newer to baking, read through once before you start—just like my mother always told me.
-
Prep your pans and oven.
Preheat your oven to 350°F (175°C). Grease and flour two 8-inch round cake pans, or line the bottoms with parchment paper and lightly grease the sides. This helps your moist red velvet cake release cleanly. -
Mix the dry ingredients.
In a medium bowl, whisk together flour, cocoa powder, baking soda, and salt until well combined. Whisking helps remove lumps and keeps you from overmixing later. -
Cream the butter, oil, and sugar.
In a large mixing bowl (a stand mixer with the paddle attachment works great), beat the butter, oil, and sugar on medium speed for about 2–3 minutes, until it looks light and fluffy. Scrape down the sides as needed. This step builds structure and helps your cake rise nicely. -
Add the eggs one at a time.
Beat in the eggs, one at a time, mixing well after each addition. The batter should look smooth and slightly thick. If it looks a bit curdled, don’t panic—it usually comes together once you add the flour. -
Mix the wet ingredients with color.
In a small bowl or measuring cup, whisk together the buttermilk, vanilla, vinegar, and red food coloring. Start with 1 tablespoon of gel color; you can add a little more later if you want a deeper red. -
Alternate dry and wet ingredients.
Turn the mixer to low. Add about one-third of the flour mixture, then half of the buttermilk mixture, another third of the flour, the remaining buttermilk, and finish with the remaining flour. Mix just until combined after each addition; don’t overmix. Overmixing can make the cake tough instead of tender. -
Adjust color and prepare to bake.
Take a look at the batter—if you’d like a stronger red, gently fold in a bit more gel coloring by hand with a spatula. The batter should be thick but pourable, with a glossy sheen. -
Fill the pans and bake.
Divide the batter evenly between the prepared pans. A kitchen scale is helpful here if you want perfectly even layers. Smooth the tops with a spatula and tap the pans gently on the counter to release any large air bubbles. Bake for 25–30 minutes, or until a toothpick inserted in the center comes out mostly clean with a few moist crumbs. -
Cool completely.
Let the cakes cool in the pans for 10 minutes, then run a thin knife around the edges and carefully turn them out onto a wire rack. Remove parchment if used and let the layers cool completely—this can take about 1 hour. Frosting a warm cake will melt the cream cheese frosting, so don’t rush this part. -
Make the cream cheese frosting.
In a large bowl, beat the softened cream cheese and butter together on medium speed until very smooth and creamy, 2–3 minutes. Add the vanilla and salt; mix to combine. Gradually add powdered sugar, 1 cup at a time, beating on low at first so it doesn’t puff everywhere, then on medium until fluffy. Stop when it’s thick but spreadable. -
Assemble your layered red velvet cake.
Level the tops of the cooled cakes with a long serrated knife if needed. Place one layer on your serving plate. Spread a generous layer of cream cheese frosting over the top. Add the second layer, bottom side up for a flat top. Apply a thin “crumb coat” of frosting over the whole cake and chill for 15–20 minutes. Then add a final, thicker layer of frosting and smooth or swirl as you like. -
Decorate and serve.
You can keep it simple with just frosting, or add cake crumbs, sprinkles, or fresh berries. Slice with a sharp, thin knife, wiping it between cuts for neat layers.
Servings & Timing
- Yield: 12–14 slices
- Prep Time: 25–30 minutes
- Bake Time: 25–30 minutes
- Cooling Time: About 1 hour
- Frosting & Assembly Time: 20–30 minutes
- Total Time: About 2–2 ½ hours (mostly hands-off while the cake cools)
Variations
- Cupcake version: Bake the batter in lined muffin tins at 350°F for about 18–20 minutes for bakery-style red velvet cupcakes.
- Sheet cake: Pour into a 9×13-inch pan and bake 30–35 minutes; frost the top for an easy potluck dessert.
- Extra cocoa: For a slightly more chocolate-forward cocoa powder cake, add 1 extra tablespoon cocoa and 1 extra tablespoon sugar.
- Nutty finish: Press chopped toasted pecans or walnuts into the sides of the frosted cake for a classic Southern touch.
- Valentine’s mini cakes: Bake in a sheet pan, then cut heart shapes with a cookie cutter and stack for adorable individual cakes.
- Gluten-free twist: Use a 1:1 gluten-free baking blend; the texture will be a bit more delicate, but still delicious.
Storage & Reheating
Because of the cream cheese frosting, this cake likes the fridge, but it still tastes best at room temperature.
- Room temperature (short term): The frosted cake can sit out for about 2 hours while serving.
- Refrigerator: Store covered in the fridge for up to 4–5 days. I like to press plastic wrap gently against any cut sides, then cover the whole cake with a cake dome.
- Freezer (cake layers): Wrap unfrosted layers tightly in plastic wrap, then foil, and freeze for up to 2 months. Thaw in the fridge overnight, still wrapped, then bring to room temperature before frosting.
- Freezer (slices): Individual frosted slices can be frozen on a baking sheet until firm, then wrapped and stored up to 1 month. Thaw overnight in the fridge, then let sit on the counter 30–45 minutes before serving.
There’s no real “reheating” here, but letting the cake sit at room temperature for about 30 minutes before serving makes the texture softer and the flavors more pronounced.
Notes
- Room temperature ingredients matter. When your eggs, butter, and buttermilk are all around the same temperature, the batter blends smoothly, which helps keep your cake tender.
- Measure the flour carefully. Too much flour is the number one reason cakes turn dry. If you don’t use a scale, spoon flour into your measuring cup and level it off with a knife.
- Color check: Red velvet can bake up a shade darker than the batter looks. I always go a little brighter than I think I need, knowing it will mellow in the oven.
- Flavor balance: If you’re sensitive to sweetness, start with 4 cups powdered sugar in the frosting. Taste, then add more only if you want a firmer, sweeter finish.
- Make-ahead strategy: I often bake the layers one day, wrap and chill them, then frost the next day. Slightly chilled cake layers are easier to stack and frost neatly.
- Data-driven little nugget: Over years of reader feedback, recipes that use both oil and butter consistently get more “moist” and “bakery-style” comments—so this one uses that combo on purpose.
If you’re a newer baker, don’t be discouraged by the layers. Even if it’s not picture-perfect, that first forkful of homemade red velvet usually wins everyone over.
FAQs
Can I use Dutch-process cocoa instead of natural cocoa?
Natural cocoa is better here because it works with the baking soda and acidity; Dutch-process can make the cake denser and a bit duller in color.
Why did my red velvet cake turn brown instead of bright red?
Too much cocoa, not enough food coloring, or using a darker pan can mute the color. Stick with the amounts listed and use gel coloring for the strongest shade.
Can I make this Red Velvet Cake Recipe without buttermilk?
Yes—use whole milk mixed with 1 tablespoon vinegar or lemon juice, let it sit for 5–10 minutes, then use as directed. It won’t be quite as tangy, but still very good.
How do I keep my cake from drying out?
Don’t overbake—pull it when a toothpick has a few moist crumbs. Also, store the cake tightly covered and avoid slicing it too far ahead of serving.
Can I make this as a three-layer cake?
Absolutely. Bake it in three 8-inch pans and reduce the bake time by a few minutes. You may want to increase the frosting slightly (add an extra 4 oz cream cheese, ½ stick butter, and 1–2 cups powdered sugar).
Is this Red Velvet Cake Recipe good for birthdays or weddings?
Yes. It slices cleanly and holds up well on dessert tables. For larger events, you can double the recipe or bake it as a two-tier cake (just be sure to add proper supports).
Can I reduce the sugar in the cake batter?
You can reduce it by about ¼ cup without affecting texture too much, but keep in mind that sugar helps with moisture and structure, not just sweetness.
Conclusion
This Red Velvet Cake Recipe gives you everything you want from a classic red velvet cake: a moist, tender crumb, a gentle cocoa flavor, and plenty of tangy cream cheese frosting, whether you’re baking for a holiday, a birthday, or just because you feel like celebrating something small.
If you make this cake, I’d love to hear how it turned out—leave a comment, share a photo, or tell me if you tried one of the variations. And if you enjoy festive dessert recipes like this, you might also like my favorite chocolate layer cake or carrot cake next time you’re in a baking mood.
Red Velvet Cake
Ingredients
- 2 1/2 cups all-purpose flour 300 g, spooned and leveled; don’t pack it
- 2 tablespoons unsweetened natural cocoa powder not Dutch-process; Hershey’s works well
- 1 teaspoon baking soda
- 1 teaspoon fine sea salt or table salt
- 1 1/2 cups granulated sugar 300 g
- 1/2 cup unsalted butter 1 stick / 113 g, softened to room temperature
- 1/2 cup neutral oil 120 ml; canola or vegetable oil
- 3 large eggs at room temperature
- 1 cup buttermilk 240 ml, at room temperature; full-fat if possible
- 2 teaspoons pure vanilla extract
- 1 teaspoon white vinegar or apple cider vinegar
- 1-1 1/2 tablespoons red gel food coloring Americolor Super Red or Wilton No-Taste Red work well
- 16 oz cream cheese 450 g, full-fat bricks, softened (not whipped)
- 1 cup unsalted butter 2 sticks / 226 g, softened
- 4-5 cups powdered sugar 480–600 g, sifted for smooth texture
- 2 teaspoons pure vanilla extract
- 1/4 teaspoon fine sea salt for frosting; balances sweetness
Instructions
- Preheat oven to 350°F (175°C). Grease and flour two 8-inch round cake pans, or line the bottoms with parchment paper and lightly grease the sides.
- In a medium bowl, whisk together the flour, cocoa powder, baking soda, and salt until well combined and lump-free.2 1/2 cups all-purpose flour, 2 tablespoons unsweetened natural cocoa powder, 1 teaspoon baking soda, 1 teaspoon fine sea salt
- In a large mixing bowl, beat the butter, oil, and granulated sugar on medium speed for 2–3 minutes, until light and fluffy. Scrape down the sides as needed.1 1/2 cups granulated sugar, 1/2 cup unsalted butter, 1/2 cup neutral oil
- Beat in the eggs one at a time, mixing well after each addition, until the batter looks smooth and slightly thick.3 large eggs
- In a small bowl or measuring cup, whisk together the buttermilk, vanilla, vinegar, and red gel food coloring. Start with 1 tablespoon of gel color; you can add more later for a deeper red.1 cup buttermilk, 2 teaspoons pure vanilla extract, 1 teaspoon white vinegar, 1-1 1/2 tablespoons red gel food coloring
- With the mixer on low, add about one-third of the flour mixture, then half of the buttermilk mixture, another third of the flour, the remaining buttermilk, and finish with the remaining flour. Mix just until combined after each addition to avoid overmixing.
- Check the color of the batter. If you want a stronger red, gently fold in a bit more red gel coloring by hand with a spatula. The batter should be thick but pourable and glossy.1-1 1/2 tablespoons red gel food coloring
- Divide the batter evenly between the prepared pans, smooth the tops, and tap the pans gently on the counter to release air bubbles. Bake for 25–30 minutes, or until a toothpick inserted in the center comes out mostly clean with a few moist crumbs.
- Let the cakes cool in the pans for 10 minutes. Run a thin knife around the edges, turn them out onto a wire rack, remove the parchment if used, and let cool completely (about 1 hour).
- In a large bowl, beat the softened cream cheese and butter together on medium speed for 2–3 minutes until very smooth and creamy. Add vanilla and salt and mix to combine. Gradually add powdered sugar, 1 cup at a time, beating on low then medium until thick, fluffy, and spreadable.16 oz cream cheese, 1 cup unsalted butter, 4-5 cups powdered sugar, 2 teaspoons pure vanilla extract, 1/4 teaspoon fine sea salt
- Level the tops of the cooled cake layers if needed. Place one layer on a serving plate and spread a generous layer of cream cheese frosting on top. Place the second layer on top, bottom side up for a flat surface. Apply a thin crumb coat of frosting over the whole cake and chill for 15–20 minutes, then apply a final, thicker layer of frosting and smooth or swirl as desired.
- Decorate as desired with extra cake crumbs, sprinkles, or fresh berries. Slice with a sharp, thin knife, wiping it between cuts for neat layers. Serve at room temperature.