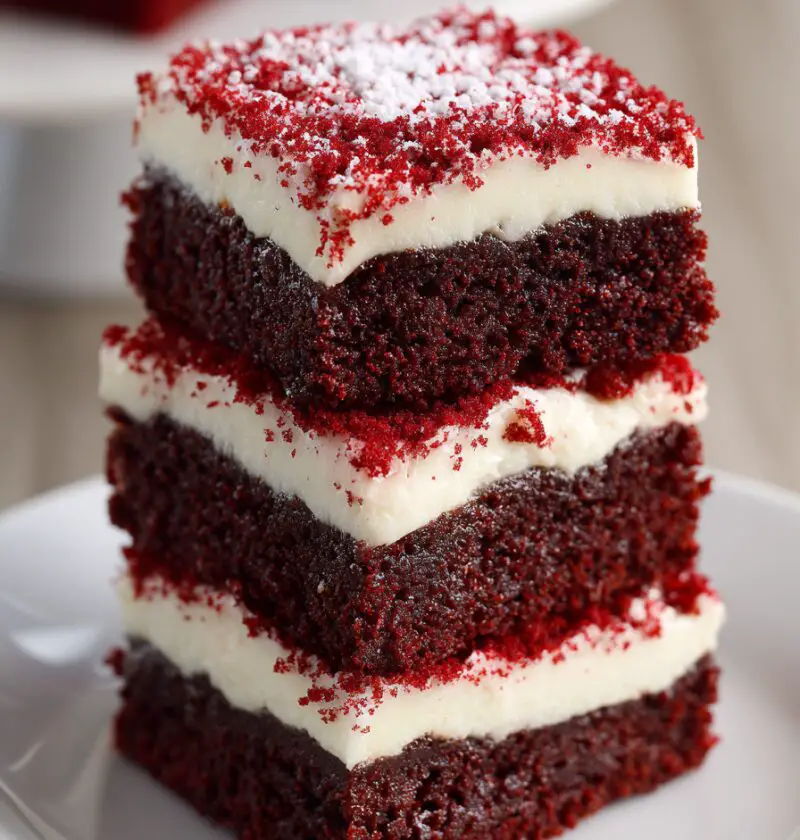
Red Velvet Brownie Bars Recipe
This Red Velvet Brownie Bars Recipe gives you rich, fudgy, ruby-red brownie bars with a kiss of chocolate and a silky cream cheese topping—just the kind of red velvet dessert bars that steal the show on any dessert table.
If you love red velvet cake and classic chewy brownies, these red velvet chocolate bars sit right in that sweet spot between the two. You get the slightly tangy, cocoa-kissed flavor you expect from homemade red velvet brownies, but with the dense, fudgy texture of your favorite brownie bars recipe. Around the holidays—especially Christmas and Valentine’s Day—searches for red velvet brownies skyrocket, and there’s a good reason. They’re festive without being fussy, familiar but still special.
As a 50-year-old mom who has baked her way through more school events, birthday parties, and church potlucks than I can count, I reach for recipes like this when I want something reliable, pretty, and easy to slice and share. These red velvet cake bars hold up beautifully on a cookie tray, pack well into gift boxes, and look like you spent much more time on them than you really did. You know what? Those are my favorite kinds of desserts.
You can serve these fudgy red velvet brownies plain, with a simple dusting of powdered sugar, or with the quick cream cheese frosting I’ll share below. The frosting adds that classic red velvet vibe, but the bars are strong enough to stand on their own too.
Why You’ll Love This Red Velvet Brownie Bars Recipe
- Fudgy, not cakey – These chewy red velvet brownies bake up dense and moist, not dry or crumbly.
- One bowl, no mixer needed – Melted butter and simple whisking keep the process quick and low-stress.
- Perfect for holidays and parties – The deep red color and cream cheese topping look so festive on a dessert platter.
- Easy to slice and transport – Brownie bars are sturdier than cake, so they travel well to potlucks and bake sales.
- Everyday ingredients – No buttermilk or fancy chocolate required; just pantry staples and a bit of red food coloring.
- Customizable sweetness – You can keep them dark and chocolaty or add extra white chocolate or chocolate chips.
- Freezer-friendly – Make a pan now, freeze in bars, and you’re party-ready in minutes later.
- Great for beginning bakers – Clear visual cues (like “edges set, center slightly glossy”) make success easier, even if you’re new to red velvet baking recipes.
Ingredients
Here’s everything you need to bake a pan of these homemade red velvet brownies. I’ll include a few notes so you can tweak things to suit your kitchen and your taste.
For the Red Velvet Brownie Bars
- 1 cup (2 sticks / 226 g) unsalted butter, melted and slightly cooled
- Melted butter helps create that classic fudgy brownie texture.
- 1 ¾ cups (350 g) granulated sugar
- ¼ cup (50 g) light brown sugar, packed
- The brown sugar adds moisture and a hint of caramel depth.
- 3 large eggs + 1 egg yolk, at room temperature
- The extra yolk makes the bars richer and chewier.
- 2 teaspoons pure vanilla extract
- 2 tablespoons unsweetened cocoa powder (natural or Dutch-process)
- Dutch-process will give a slightly deeper chocolate flavor and color.
- 1 tablespoon liquid red food coloring
- Use gel if you prefer; start with 2–3 teaspoons and adjust for intensity.
- 1 teaspoon distilled white vinegar
- Classic in red velvet recipes; it brightens the color and balances sweetness.
- ½ teaspoon fine sea salt (or ¾ teaspoon kosher salt)
- 1 ⅓ cups (170 g) all-purpose flour, spooned and leveled
- ½ cup (85 g) mini semi-sweet chocolate chips (plus extra for sprinkling, optional)
For the Cream Cheese Frosting (Optional but Highly Recommended)
- 4 ounces (113 g) cream cheese, softened
- Use full-fat block cream cheese for the best thick, creamy texture.
- 2 tablespoons unsalted butter, softened
- 1 cup (120 g) powdered sugar, sifted
- ½ teaspoon pure vanilla extract
- 1–2 tablespoons milk or heavy cream, as needed for consistency
- Whole milk or cream gives a richer, smoother frosting.

Directions
-
Prep your pan and oven
Preheat your oven to 350°F (177°C). Line a 9×13-inch baking pan with parchment paper, leaving a little overhang on the long sides so you can lift the red velvet brownies out later. Lightly spray the parchment and exposed sides of the pan with nonstick spray. -
Melt the butter
In a large, microwave-safe bowl, melt the butter in 20–30 second bursts until just melted, then let it cool for about 5 minutes. You want it warm, not piping hot, so it doesn’t scramble the eggs. -
Whisk in sugars and wet ingredients
Add the granulated sugar and brown sugar to the warm butter and whisk until smooth and glossy. Add the eggs, egg yolk, and vanilla, whisking well after each addition. The mixture should look thick and shiny—this step helps create that chewy, brownie-like structure. -
Create the red velvet base
Whisk in the cocoa powder, red food coloring, vinegar, and salt until fully combined. The batter should turn a deep, even red. If it looks too pale for your liking, you can add another teaspoon or so of food coloring. -
Fold in the flour and chocolate chips
Sprinkle the flour over the top of the wet mixture and gently fold it in with a spatula just until no streaks remain. Stir in the mini chocolate chips. Be careful not to overmix; stop as soon as the flour disappears, or your red velvet dessert bars can turn a bit tough. -
Spread and smooth the batter
Pour the thick batter into your prepared pan and smooth the top with an offset spatula or the back of a spoon, nudging it all the way into the corners. If you’d like, sprinkle a few extra chocolate chips across the top for texture and some pretty speckles after baking. -
Bake the red velvet brownie bars
Bake on the center rack for 24–30 minutes. Every oven runs a little different, so start checking around 22–23 minutes. The edges should look set and slightly pull away from the sides, while the center should be puffed and just barely glossy. A toothpick inserted about 2 inches from the edge should come out with a few moist crumbs, not wet batter. -
Cool completely
Set the pan on a wire rack and let the red velvet brownies cool completely in the pan. This can take about 1 hour. Don’t rush this step—cutting too early can make the bars fall apart, and the texture finishes setting as they cool. -
Make the cream cheese frosting
While the bars cool, beat the softened cream cheese and butter together in a medium bowl until smooth and creamy. Add the powdered sugar and vanilla and beat again until thick and fluffy. If the frosting seems too stiff, add milk or cream 1 teaspoon at a time, mixing until you have a spreadable consistency. -
Frost and chill (optional but lovely)
Once the bars are completely cool, spread the cream cheese frosting over the top in an even layer. For clean slices and that bakery-style finish, chill the frosted pan in the fridge for 30–45 minutes before cutting. -
Slice and serve
Use the parchment overhang to lift the entire slab out of the pan. Place on a cutting board and use a long, sharp knife to cut into 16 large or 24 smaller red velvet brownie bars. Wipe the knife clean between cuts for those neat, photo-ready squares.
Servings & Timing
- Yield: 16 large bars or up to 24 smaller bars
- Prep Time: About 20 minutes
- Bake Time: 24–30 minutes
- Cooling & Chilling Time: 1–1½ hours (cooling plus optional frosting chill)
- Total Time: About 2 hours, with most of that hands-off
These homemade red velvet brownies are great to bake in the afternoon and frost in the evening, or make the night before a party so they’re ready and chilled the next day.
Variations
- Cheesecake Swirl Red Velvet Brownies – Skip the frosting and swirl 4 ounces of sweetened cream cheese mixture into the batter before baking for marbled red velvet bar recipe magic.
- White Chocolate Red Velvet Bars – Fold in white chocolate chips instead of (or along with) semi-sweet for a sweeter, bakery-style treat.
- Gluten-Free Red Velvet Brownie Bars – Use a 1:1 gluten-free baking flour blend; look for one with xanthan gum for the best chewy texture.
- Nutty Red Velvet Brownies – Add ½ cup chopped pecans or walnuts to the batter for crunch and a slightly nostalgic, old-fashioned flavor.
- Valentine’s Cut-Out Bars – Chill the baked slab, then use a heart-shaped cookie cutter to make adorable red velvet brownie dessert hearts.
- Red Velvet Ice Cream Sandwich Bars – Slice thinner rectangles and sandwich a layer of vanilla or cream cheese ice cream between two bars.
Storage & Reheating
-
Room Temperature:
If your kitchen is cool, unfrosted or very lightly frosted red velvet brownie bars can sit at room temperature in an airtight container for up to 2 days. -
Refrigerator:
For cream cheese-frosted bars, store them in a sealed container in the fridge for 4–5 days. I like to layer them with parchment if stacking so the frosting doesn’t stick. Let them sit at room temperature for 15–20 minutes before serving for the best texture and flavor. -
Freezer:
These red velvet cake bars freeze beautifully. Freeze bar-sized pieces (frosted or unfrosted) on a baking sheet until solid, then transfer to a freezer bag or airtight container. They’ll keep well for up to 2 months. Thaw overnight in the fridge, then bring to room temperature before serving. -
Reheating (If You Like Them Warm):
They’re meant to be enjoyed room temp or slightly chilled, but if you like a warm, gooey center, microwave a single bar for about 10–15 seconds. Just know the frosting will soften and get a bit melty—delicious, but a little messier. -
Make-Ahead Tip:
Bake the red velvet brownies a day ahead, cool completely, then cover and refrigerate. Frost them the next day, chill briefly, and slice right before serving.
Notes
- Don’t overbake – This is the number one way brownie bars go from fudgy to dry. When in doubt, pull them a little early; they continue to set as they cool.
- Color can change as they bake – The batter may look very intense, then soften slightly as the bars bake and cool. That’s normal for red velvet baking recipes.
- Use room temperature eggs – Cold eggs can cause the melted butter to seize and make the batter thicker and harder to spread. A quick trick: place eggs in a bowl of warm water for 5–7 minutes.
- Cut with a hot knife for clean edges – Run your knife under hot water, dry it, then cut. Wipe and repeat as needed. It makes a bigger difference than you’d think.
- Flavor improves the next day – Like many brownies, these chewy red velvet brownies taste even better after they’ve had a night to rest; the cocoa and vanilla flavors mingle and deepen.
- Pan size matters – A smaller pan (like 8×8) will make the bars too thick and change the bake time dramatically. Stick with the 9×13 for the texture and thickness tested here.
FAQs
Can I use a red velvet cake mix instead of making these from scratch?
You can, but the texture won’t be quite as fudgy. If you go that route, reduce the water slightly and add an extra egg yolk to nudge it closer to a brownie-bar texture.
Do I have to use food coloring?
No—without it, you’ll have delicious cocoa brownies with a hint of tang, just not classic red velvet brownies. You can also reduce the coloring for a more muted, natural-looking red.
Can I bake these in a glass pan?
Yes, but they may take a few minutes longer to bake. Glass holds heat differently, so start checking at 25 minutes and watch those edges.
My brownies sank a bit in the center—what happened?
Usually that means they were just slightly underbaked or the batter was overmixed. The good news: slightly sunken centers usually taste extra fudgy, so they’re still very much worth serving.
Can I make these red velvet brownies without the frosting?
Absolutely. They’re rich and flavorful on their own. You can simply dust the cooled bars with powdered sugar or drizzle a quick chocolate ganache.
How can I make them less sweet?
Use dark or bittersweet chocolate chips instead of semi-sweet, and you can reduce the granulated sugar by 2–3 tablespoons without hurting the texture. Skip or thin out the frosting for an even less sweet version.
Can I halve this recipe?
Yes, halve all ingredients and bake in an 8×8-inch pan. Start checking around 20–22 minutes, as the smaller pan can bake a touch faster.
Are these good for shipping in holiday boxes?
They are, especially unfrosted. Wrap each bar tightly in plastic wrap, then pack snugly in a tin or box. For longer shipping times, freeze before packing so they stay fresh longer.
Conclusion
These Red Velvet Brownie Bars Recipe bring together everything people love about red velvet and brownies: a deep red hue, just enough cocoa, a hint of tang, and that dense, chewy bite that makes you go back for “just one more” square. They’re simple enough for a lazy Sunday bake, festive enough for Christmas or Valentine’s dessert tables, and sturdy enough for school events and potlucks.
If you make these red velvet brownie bars, I’d love to hear how they turned out for you—tell me in the comments what occasion you baked them for and whether you went with frosting, a swirl, or kept them plain and fudgy. And if you enjoy bar desserts like this, be sure to explore my other brownie bars and cookie bar recipes next time you’re planning a dessert spread.
Red Velvet Brownie Bars
Ingredients
- 1 cup unsalted butter melted and slightly cooled (2 sticks / 226 g)
- 1 3/4 cups granulated sugar about 350 g
- 1/4 cup light brown sugar packed, about 50 g
- 3 large eggs at room temperature
- 1 large egg yolk at room temperature
- 2 teaspoons pure vanilla extract
- 2 tablespoons unsweetened cocoa powder natural or Dutch-process
- 1 tablespoon red food coloring liquid; or 2–3 teaspoons gel, adjusted to taste
- 1 teaspoon distilled white vinegar
- 1/2 teaspoon fine sea salt or 3/4 teaspoon kosher salt
- 1 1/3 cups all-purpose flour about 170 g, spooned and leveled
- 1/2 cup mini semi-sweet chocolate chips plus extra for sprinkling on top, optional (about 85 g)
- 4 ounces cream cheese softened; full-fat block, about 113 g
- 2 tablespoons unsalted butter softened, for frosting
- 1 cup powdered sugar sifted, about 120 g
- 1/2 teaspoon pure vanilla extract for frosting
- 1 tablespoon milk or heavy cream up to 2 tablespoons, as needed for consistency
- nonstick spray for greasing the pan
- parchment paper to line the baking pan
Instructions
- Preheat your oven to 350°F (177°C). Line a 9×13-inch baking pan with parchment paper, leaving an overhang on the long sides to lift the bars out later. Lightly spray the parchment and any exposed sides of the pan with nonstick spray.nonstick spray, parchment paper
- In a large microwave-safe bowl, melt the butter in 20–30 second bursts until just melted. Let it cool for about 5 minutes, until warm but not hot.1 cup unsalted butter
- Add the granulated sugar and brown sugar to the warm butter and whisk until smooth and glossy. Add the eggs, egg yolk, and vanilla, whisking well after each addition until the mixture is thick and shiny.1 3/4 cups granulated sugar, 1/4 cup light brown sugar, 3 large eggs, 1 large egg yolk, 2 teaspoons pure vanilla extract
- Whisk in the cocoa powder, red food coloring, vinegar, and salt until fully combined and evenly colored. If the batter looks too pale, add a bit more food coloring to taste.2 tablespoons unsweetened cocoa powder, 1 tablespoon red food coloring, 1 teaspoon distilled white vinegar, 1/2 teaspoon fine sea salt
- Sprinkle the flour over the wet mixture and gently fold it in with a spatula just until no dry streaks remain. Fold in the mini chocolate chips, being careful not to overmix.1 1/3 cups all-purpose flour, 1/2 cup mini semi-sweet chocolate chips
- Pour the thick batter into the prepared pan. Smooth the top with an offset spatula or the back of a spoon, nudging it into the corners. If desired, sprinkle extra chocolate chips over the top.1/2 cup mini semi-sweet chocolate chips
- Bake on the center rack for 24–30 minutes, starting to check around 22–23 minutes. The edges should look set and start to pull slightly from the sides, while the center should be puffed and just barely glossy. A toothpick inserted about 2 inches from the edge should come out with a few moist crumbs, not wet batter.
- Set the pan on a wire rack and let the brownies cool completely in the pan, about 1 hour. Do not cut while warm, as the texture finishes setting as they cool.
- In a medium bowl, beat the softened cream cheese and softened butter together until smooth and creamy. Add the powdered sugar and vanilla and beat until thick and fluffy. If the frosting is too stiff, add milk or cream 1 teaspoon at a time until it is easily spreadable.4 ounces cream cheese, 2 tablespoons unsalted butter, 1 cup powdered sugar, 1/2 teaspoon pure vanilla extract, 1 tablespoon milk or heavy cream
- Once the bars are completely cool, spread the cream cheese frosting over the top in an even layer. For the neatest slices, chill the frosted pan in the refrigerator for 30–45 minutes before cutting.4 ounces cream cheese, 2 tablespoons unsalted butter, 1 cup powdered sugar, 1/2 teaspoon pure vanilla extract, 1 tablespoon milk or heavy cream
- Use the parchment overhang to lift the slab out of the pan and transfer to a cutting board. Cut into 16 large or up to 24 smaller bars, wiping the knife clean between cuts for sharp edges.