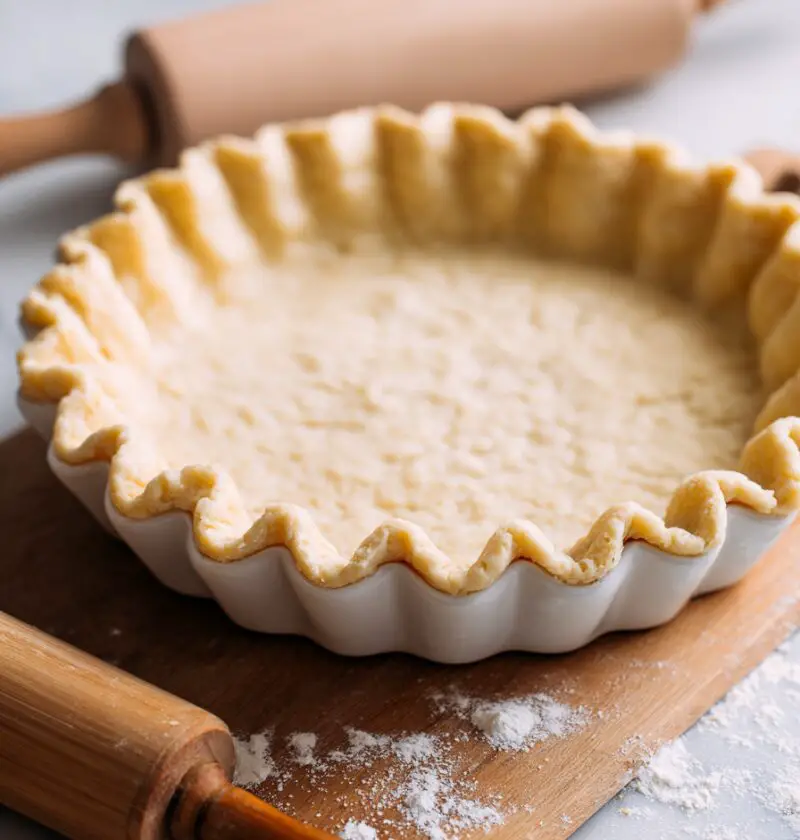
Pie Crust Recipe Without Shortening (All-Butter, Flaky, and Foolproof)
If you’ve been hunting for a Pie Crust Recipe Without Shortening that’s buttery, flaky, and easy enough for a Tuesday night, you’ve just found your new go-to.
I’ve been baking pies for more than 30 years now (yes, I’m that mom who shows up at Thanksgiving with “just one more pie”), and this all-butter, flaky pie crust without shortening is the one I come back to over and over again. It’s simple, it uses real ingredients you probably already have, and it gives you that classic, shattery, tender crust without a single spoonful of shortening. Just good old-fashioned butter, flour, water, and a couple of smart tricks.
This homemade pie crust no shortening works beautifully for fruit pies, custard pies, holiday pies, and even savory quiches. If you’ve ever felt nervous about making pie dough without shortening, stay with me—I’ll walk you through each step like we’re in the kitchen together, flour on our hands and a cup of coffee on the counter.
Why This Pie Crust Recipe Without Shortening Works
Let me explain what you’re getting here. This is a classic, all butter pie crust recipe that’s been gently modernized so it’s friendly for home bakers who might not have grown up watching their grandmother crimp edges by feel.
Instead of shortening, this recipe relies entirely on cold butter to create tender layers and rich flavor. A touch of acid (vinegar or lemon juice) and very cold water help keep the dough manageable and the gluten relaxed, which is the secret to a flaky pie crust without shortening that doesn’t shrink back in the pan.
I like to use this pie dough without shortening for:
- Thanksgiving pumpkin pie
- Summer peach and berry pies
- Chicken pot pie on chilly nights
- Quiches and savory tarts for brunch
You know what? Once you nail this, you can stop buying those cardboard-tasting store-bought crusts. You really can.
Why You’ll Love This Recipe
• All butter, no shortening
Rich flavor and a golden, bakery-style crust—no mystery fats, just real butter.
• Flaky, tender layers
Cold butter and gentle handling give you that perfect, shattery, flaky pie crust without shortening.
• Simple pantry ingredients
Flour, butter, salt, water, and a touch of vinegar or lemon juice—nothing fancy or hard to find.
• Beginner-friendly method
I include clear visual cues (how it should look and feel) so even first-time bakers can succeed.
• Versatile for sweet or savory pies
This easy pie crust without shortening works for fruit pies, custard pies, tarts, and quiche.
• Make-ahead and freezer-friendly
You can prep the dough days or even months in advance, which is a lifesaver during the holidays.
• No special equipment needed
You can make this by hand with a bowl and a pastry cutter or even just your fingers—food processor optional.
• Scales well
Need a double crust for a deep-dish apple pie? This simple pie crust recipe without shortening doubles like a dream.
Ingredients
For one 9-inch single crust (see Notes for double-crust amounts)
- 1 ¼ cups (150 g) all-purpose flour
- Spoon and level for accuracy; King Arthur or Gold Medal work well.
- ½ teaspoon fine sea salt
- If you use salted butter, reduce to a pinch.
- 1 tablespoon granulated sugar (optional, recommended for sweet pies)
- ½ cup (1 stick / 113 g) unsalted butter, very cold, cut into ½-inch cubes
- Use good-quality butter; European-style (like Kerrygold) adds extra flavor but any real butter works.
- 1 teaspoon apple cider vinegar or lemon juice
- Helps keep the crust tender and reduces shrinkage.
- 3–5 tablespoons ice water, plus more as needed
- Keep it in a cup with ice so it stays very cold.
For egg wash (optional but helpful for a golden finish)
- 1 egg
- 1 teaspoon milk or cream
- Pinch of salt
Ingredient Tips
- Flour: For a slightly more tender crust, you can swap 2–3 tablespoons of the all-purpose flour for cake flour.
- Butter: Make sure it’s cold straight from the fridge. If your kitchen is warm, you can even cut the butter then freeze the cubes for 10–15 minutes before starting.
- Water: Too much water makes dough tough; too little makes it crumbly. We’ll add it gradually so you hit the sweet spot.
Directions
-
Chill your ingredients and tools
Pop the butter cubes into the freezer for 10–15 minutes. If you have space, chill your mixing bowl too. Cold ingredients are your best friends for a flaky, all butter pie crust. -
Mix the dry ingredients
In a medium bowl, whisk together the flour, salt, and sugar (if using). You want everything evenly distributed so you don’t get salty or bland spots in your crust. -
Cut in the butter
Add the cold butter cubes to the flour mixture. Using a pastry cutter, two knives, or your fingertips, cut the butter into the flour until you have pea-sized pieces with some slightly larger, flat bits.- Tip: Those visible pieces of butter are what create lovely layers, so don’t work it until it looks like sand—some chunks are good.
-
Add vinegar and ice water gradually
Stir in the vinegar or lemon juice. Then drizzle in 3 tablespoons of ice water, tossing gently with a fork. The dough should start to clump together when squeezed. If it’s still too dry and floury, add more water 1 tablespoon at a time.- Sensory cue: When you squeeze a small handful, it should hold together but not feel sticky or wet.
-
Bring the dough together gently
Turn the shaggy dough out onto a lightly floured surface. With your hands, gently press and gather it into a rough disk. Use the “fractured stack” motion: press it together, fold it over itself once or twice, then press again.- Don’t knead like bread; that builds gluten and makes the crust tough. Think “gentle patting and pressing” instead.
-
Shape and chill the dough
Form the dough into a 1-inch-thick disk, wrap it tightly in plastic wrap or reusable beeswax wrap, and refrigerate for at least 1 hour, or up to 3 days.- This rest lets the flour hydrate and the gluten relax, crucial for a tender pie crust without shortening.
-
Roll out the crust
Lightly flour your work surface and rolling pin. Unwrap the chilled dough and let it sit at room temperature for 5 minutes if it’s very firm. Roll from the center outward, rotating the dough a quarter turn every few rolls, until it’s about 12 inches in diameter and roughly ⅛ inch thick.- If the edges crack, just pinch and press them back together; that’s normal.
-
Fit the crust into the pie dish
Carefully roll the dough around your rolling pin and unroll it over a 9-inch pie dish. Gently ease it into the corners without stretching. Let the excess hang over the edges for now.- Press lightly against the sides so it molds to the pan, but don’t mash it down aggressively.
-
Trim and crimp the edges
Using kitchen scissors or a small knife, trim the overhang so you have about ½–1 inch beyond the rim. Fold the excess under itself to create a thicker edge, then crimp with your fingers or press with a fork.- Put the shaped crust back in the fridge for at least 20–30 minutes before baking; cold dough holds its shape better.
-
Blind-bake (if needed)
For pies with liquid fillings (like custard or cream pies), preheat the oven to 400°F (200°C). Line the chilled crust with parchment paper or foil and fill with pie weights, dry beans, or rice.- Bake 15 minutes, remove the weights and lining, then bake another 8–12 minutes until lightly golden for a partially baked crust, or longer until fully golden for a fully baked crust.
-
Finish with egg wash (optional)
For double-crust pies, brush the top crust with egg wash right before baking. This gives a glossy, golden finish. For a single pre-baked shell, you can brush the edges before blind baking for extra color.
Servings & Timing
- Yield: One 9-inch single pie crust (enough for the bottom crust of most standard pies)
- Prep Time: 20 minutes hands-on
- Chill/Rest Time: 1–1½ hours (including post-shaping chill)
- Total Time: About 1 hour 30 minutes (not counting the time it takes to bake the filled pie)
For a double crust (top and bottom), simply double all ingredients and divide the dough into two disks before chilling.
Variations
Let’s have a little fun—this basic easy pie crust without shortening is a great base to play with:
- Savory Herb Crust: Add 1–2 teaspoons of finely chopped fresh rosemary, thyme, or sage to the flour for quiches or pot pies.
- Cheddar Pie Crust: Mix ½ cup finely shredded sharp cheddar into the flour for a cheesy crust that’s amazing with apple pie or savory fillings.
- Whole Wheat Blend: Replace ¼–⅓ cup of the all-purpose flour with whole wheat flour for a slightly nuttier, heartier crust.
- Citrus Zest Crust: Stir 1 teaspoon lemon or orange zest into the dry ingredients for bright, fragrant fruit pies.
- Cinnamon Sugar Sweet Crust: Add ½ teaspoon ground cinnamon and increase the sugar to 2 tablespoons for a sweet, aromatic crust.
- Gluten-Friendly Note: While this exact recipe uses wheat flour, you can swap in a 1:1 gluten-free baking blend and add an extra tablespoon or so of water as needed; crust will be a bit more delicate but still tasty.
Storage & Reheating
This is where this homemade pie crust no shortening really earns its keep during busy seasons.
-
Storing unbaked dough (short term):
Keep the wrapped dough disk in the refrigerator for up to 3 days. If it feels very firm coming out of the fridge, let it sit on the counter for 5–10 minutes before rolling. -
Freezing unbaked dough:
Wrap the dough disk tightly in plastic, then in a freezer bag. Freeze for up to 3 months. Thaw overnight in the refrigerator, then roll and use as directed. -
Freezing a shaped, unbaked crust:
Fit the dough into the pie plate, crimp the edges, and freeze uncovered until solid. Then wrap well and store up to 2 months. You can blind-bake it straight from frozen; just add a few extra minutes to the baking time. -
Storing pre-baked shells:
Once cooled, wrap well and store at room temperature for up to 24 hours, or refrigerate for up to 3 days. For longer storage, freeze for up to a month. -
Reheating:
If a baked crust or filled pie loses its crispness, warm it in a 350°F (175°C) oven for 10–15 minutes to refresh the texture.
Notes & Personal Tips
-
Don’t fear visible butter:
Those little specks of butter in your rolled-out dough are a good thing. They’re what give you that gorgeous flaky pie crust without shortening. If everything looks perfectly smooth, you might have overworked it. -
Temperature matters more than perfection:
Slightly uneven edges or a lopsided crimp won’t ruin your pie, but warm, melty butter will. If your kitchen is hot, work quickly and don’t hesitate to pop the dough back into the fridge whenever it starts to feel soft. -
Use your senses, not just the clock:
When adding water, pay attention to how the dough feels when you squeeze it. When baking, look for light golden edges and a set, dry-looking surface, not just the timer. -
Flour lightly but often:
Too much extra flour can dry out the dough, but too little means sticking and tearing. A light dusting on the counter and rolling pin, refreshed as needed, is usually enough. -
Practice on a “no-pressure” day:
If you’re new to homemade pie crust no shortening, try it first on a relaxed weekend. Your Thanksgiving pie will thank you later. -
Tools I love:
A simple metal pie plate browns crust more evenly than thick ceramic, and a French-style rolling pin (the tapered wooden kind) gives you great control.
FAQs
1. Can I make this pie crust recipe without shortening in a food processor?
Yes. Pulse the dry ingredients, then pulse in the cold butter until pea-sized pieces form, and add water a tablespoon at a time. Stop as soon as the dough just starts to clump—don’t let it turn into a solid ball in the processor.
2. Why is my pie dough cracking when I roll it out?
It’s usually a bit too cold or a touch too dry. Let it rest at room temperature for 5 minutes, then try again; if it’s still cracking badly, lightly sprinkle on a teaspoon of water and knead very gently just to bring it together.
3. My crust shrank in the oven. What went wrong?
Common culprits are overworking the dough, not letting it rest, or stretching it to fit the pan. Always chill the shaped crust before baking and gently ease it into the dish without pulling.
4. Can I use salted butter instead of unsalted?
You can. Just reduce the added salt to a pinch and be aware the overall flavor will be a little saltier, which is actually lovely with many fruit pies.
5. How do I keep the bottom crust from getting soggy?
Blind-bake the crust for wet fillings, let hot fillings cool slightly before adding, and bake on a lower oven rack so the bottom gets good heat. A metal pie pan helps, too.
6. Can I double this recipe for a two-crust pie?
Absolutely. Double all the ingredients and divide the dough into two disks before chilling—one for the bottom crust, one for the top.
7. Is this crust suitable for savory pies like quiche or chicken pot pie?
Yes. Just skip the sugar, or reduce it to a teaspoon, and you’ve got a perfect all butter pie crust for savory fillings.
8. How thick should I roll my pie dough?
Aim for about ⅛ inch thick. Too thin and it can tear and overbrown; too thick and it’ll taste heavy instead of flaky.
Conclusion
This Pie Crust Recipe Without Shortening gives you everything you want in a crust: buttery flavor, gorgeous flaky layers, and a method that actually feels doable on a busy day. Once you’ve made it a couple of times, it’ll feel as comforting and familiar as your favorite old mixing bowl.
If you try this all butter pie crust, I’d love to hear how it turns out—tell me what pie you made, what worked, and what you’d like help with next. And when you’re ready for more, pair this crust with a classic apple pie, a silky pumpkin filling, or a cozy chicken pot pie and make your kitchen smell like home.
Pie Crust Recipe Without Shortening (All-Butter, Flaky, and Foolproof)
Ingredients
- 1 1/4 cups all-purpose flour about 150 g; spoon and level for accuracy
- 1/2 teaspoon fine sea salt reduce to a pinch if using salted butter
- 1 tablespoon granulated sugar optional, recommended for sweet pies
- 1/2 cup unsalted butter 1 stick / 113 g; very cold, cut into 1/2-inch cubes
- 1 teaspoon apple cider vinegar or lemon juice helps keep the crust tender and reduces shrinkage
- 3–5 tablespoons ice water kept in a cup with ice; add gradually as needed
- 1 egg for optional egg wash
- 1 teaspoon milk or cream for optional egg wash
- 1 pinch salt for optional egg wash
Instructions
- Place the cubed butter in the freezer for 10–15 minutes. If possible, chill your mixing bowl as well. Keeping everything cold is key for a flaky, all-butter crust.1/2 cup unsalted butter
- In a medium bowl, whisk together the flour, salt, and sugar (if using) until evenly combined.1 1/4 cups all-purpose flour, 1/2 teaspoon fine sea salt, 1 tablespoon granulated sugar
- Add the cold butter cubes to the flour mixture. Using a pastry cutter, two knives, or your fingertips, cut the butter into the flour until you have pea-sized pieces with some slightly larger, flat bits. Visible pieces of butter are desirable for flakiness.1/2 cup unsalted butter
- Stir in the vinegar or lemon juice. Drizzle in about 3 tablespoons of ice water, tossing gently with a fork. If the dough is still dry and floury, add more ice water 1 tablespoon at a time until the dough starts to clump when squeezed. It should hold together but not feel sticky or wet.1 teaspoon apple cider vinegar or lemon juice, 3–5 tablespoons ice water
- Turn the shaggy dough out onto a lightly floured surface. Gently press and gather it into a rough disk. Use a gentle press-and-fold motion once or twice to help it come together. Do not knead like bread; avoid overworking to keep the crust tender.
- Shape the dough into a 1-inch-thick disk. Wrap tightly in plastic wrap or reusable wrap and refrigerate for at least 1 hour and up to 3 days to allow the flour to hydrate and the gluten to relax.
- Lightly flour your work surface and rolling pin. Unwrap the chilled dough and let it sit at room temperature for about 5 minutes if very firm. Roll from the center outward, rotating the dough a quarter turn every few rolls, until it is about 12 inches in diameter and roughly 1/8 inch thick. If edges crack, pinch and press them back together.
- Carefully roll the dough around your rolling pin and unroll it over a 9-inch pie dish. Gently ease the dough into the bottom and sides of the dish without stretching it. Let the excess hang over the rim.
- Using kitchen scissors or a small knife, trim the overhang so you have about 1/2–1 inch beyond the rim. Fold the excess under itself to create a thicker edge, then crimp with your fingers or press with a fork. Chill the shaped crust in the refrigerator for 20–30 minutes before baking to help it hold its shape.
- For pies with liquid or custard fillings, preheat the oven to 400°F (200°C). Line the chilled crust with parchment paper or foil and fill with pie weights, dry beans, or rice. Bake for about 15 minutes, then carefully remove the weights and lining. Bake 8–12 minutes more for a partially baked crust, or until fully golden for a fully baked crust.
- For a glossy, golden finish on a top crust or on the edges of a single crust, beat together the egg, milk or cream, and a pinch of salt. Brush lightly over the crust just before baking.1 egg, 1 teaspoon milk or cream, 1 pinch salt