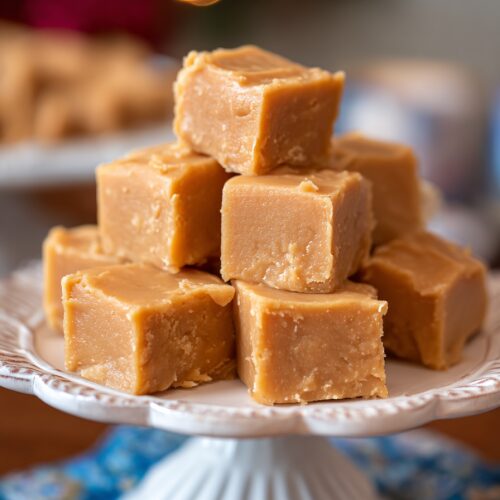
Peanut Butter Fudge Recipe
This Peanut Butter Fudge Recipe gives you rich, creamy, no-bake fudge that tastes like a cozy holiday gathering in every bite—and it comes together fast with just a few pantry ingredients.
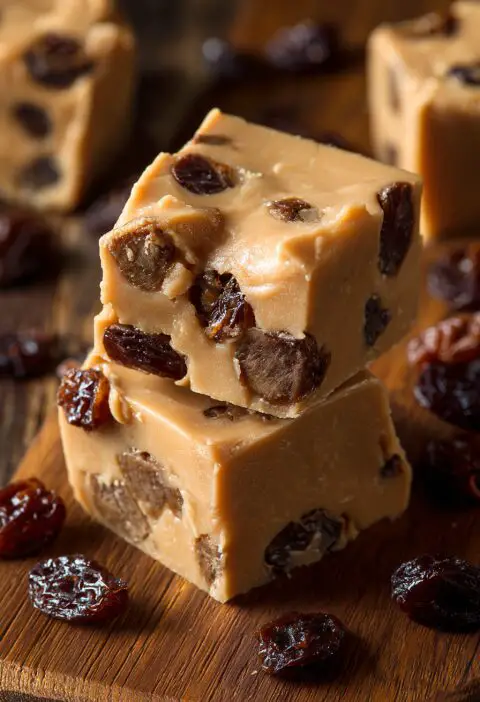
Peanut butter fudge is one of those old fashioned recipes that never goes out of style. It’s sweet, a little salty, and wonderfully dense and creamy. This version is an easy fudge recipe that doesn’t need a candy thermometer, no fancy equipment, and no oven—just a saucepan, a spatula, and a bit of patience while it chills. I love making this homemade peanut butter fudge for Christmas cookie trays, teacher gifts, and honestly, random Tuesdays when I need a quick peanut butter dessert recipe that feels special but doesn’t keep me in the kitchen all day.
Over the past few years, “peanut butter fudge recipe” has had big search spikes around November and December (thank you, holiday bakers!), but I’m here to tell you it works just as well for summer potlucks and back‑to‑school treats. It’s a simple fudge recipe with a short ingredient list, a creamy, melt-in-your-mouth texture, and a deeply nostalgic flavor—like something your grandma would have made, just a bit easier.
Why You’ll Love This Peanut Butter Fudge Recipe
- No candy thermometer needed – This is a no-fuss, no-stress creamy peanut butter fudge.
- Quick to make – About 10 minutes on the stove, then the fridge does the rest.
- Short, pantry-friendly ingredient list – You likely have everything on hand already.
- No-bake peanut butter fudge – Perfect when you don’t want to turn on the oven.
- Rich and creamy texture – Smooth, sliceable, and never dry or crumbly.
- Perfect for gifting – Holds up well in treat boxes and cookie platters.
- Easily customizable – Add chocolate, sea salt, or crunchy mix-ins.
- Naturally gluten-free – As long as your ingredients are certified gluten-free.
- Great make-ahead dessert – Stays delicious for days in the fridge or months in the freezer.
- Crowd-pleaser – Kids, grandparents, neighbors… this one rarely has leftovers.
Ingredients
This homemade peanut butter fudge leans on a classic “shortcut” combo: peanut butter + white chocolate + sweetened condensed milk. It gives you rich peanut butter fudge with consistent results and no guesswork.
For an 8×8-inch pan (about 36 small squares):
- 2 cups creamy peanut butter (16 oz; a standard jar, such as Jif or Skippy)
Avoid very oily natural peanut butter, which can make the fudge too soft. - 1 can (14 oz) sweetened condensed milk
Not evaporated milk—check the label carefully. - 3 cups white chocolate chips (about 18 oz)
Good brands melt smoother; Ghirardelli or Guittard work nicely. - 1 teaspoon pure vanilla extract
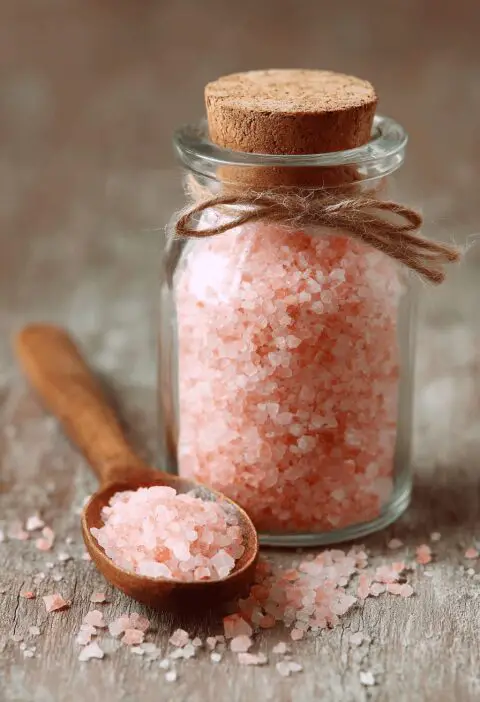
- 1/4 teaspoon fine sea salt
If using salted peanut butter, you can reduce this to a pinch. - Optional, for serving: flaky sea salt or chopped peanuts for the top
You’ll also need:
- 1 8×8-inch baking pan
- Parchment paper or foil (for easy removal)
- A medium saucepan and a heat-safe spatula
You know what? This is one of those recipes where ingredient temperature matters a bit less than usual. Cold peanut butter, room temperature peanut butter—they all melt together in the pan.

Directions
Follow these simple steps and you’ll have smooth, rich peanut butter fudge in the fridge in no time.
-
Prepare the pan
Line an 8×8-inch baking pan with parchment paper, leaving some overhang on two sides to create “handles.” Lightly mist with nonstick spray or rub with a tiny bit of butter. This makes it much easier to remove and slice the fudge later. -
Melt the white chocolate and condensed milk
In a medium, heavy-bottomed saucepan, pour in the sweetened condensed milk and add the white chocolate chips. Set the pan over low heat and stir constantly with a heat-safe spatula until the chips are almost melted and the mixture is smooth and glossy. Keep the heat low—white chocolate scorches faster than you think. -
Stir in the peanut butter
Add the creamy peanut butter to the warm mixture. Continue stirring over low heat until everything is fully combined. The mixture will thicken and look like a very smooth, shiny peanut butter frosting. If you see a few streaks at first, just keep stirring; it will come together. -
Flavor and season
Remove the pan from the heat. Stir in the vanilla extract and fine sea salt. Taste a tiny bit (careful, it’s hot) and adjust the salt if you like a slightly saltier balance—remember, the chill time will mellow flavors a bit. -
Pour and smooth
Immediately scrape the warm fudge mixture into your lined pan. Use an offset spatula or the back of a spoon to spread it evenly, pressing it into the corners. Work fairly quickly; as the fudge cools, it starts to set. -
Add toppings (optional)
While the fudge is still soft on top, sprinkle with flaky sea salt, chopped peanuts, or festive sprinkles if you’re making a holiday peanut butter dessert recipe. Gently press toppings in so they adhere. -
Chill until firm
Transfer the pan to the refrigerator and chill for at least 2 hours, or until the fudge is firm enough to slice cleanly. For the neatest squares, 3–4 hours is ideal, or even overnight. -
Slice and serve
Use the parchment handles to lift the fudge out of the pan and place it on a cutting board. Run a sharp knife under hot water, dry it, then cut the fudge into 1-inch squares. Wipe and rewarm the knife every few cuts for perfect, tidy edges.
Servings & Timing
- Yield: About 36 small squares (or 25 larger squares)
- Prep Time: 10 minutes
- Cook Time: 5–7 minutes on the stovetop
- Chill Time: 2–4 hours
- Total Time: About 2 hours 20 minutes (mostly hands-off while it chills)
For holiday platters, I like smaller pieces—people can always go back for seconds. For backyard gatherings, I’ll cut bigger, “snack bar” sized blocks. Different crowd, different appetite.
Variations
Once you’ve made this basic creamy peanut butter fudge a time or two, try one of these twists:
- Chocolate Swirl Peanut Butter Fudge – Reserve 1/2 cup of the warm fudge, mix in 2 tablespoons melted semi-sweet chocolate, and swirl it over the top before chilling.
- Crunchy Peanut Butter Fudge – Stir 1/2–3/4 cup chopped roasted peanuts into the mixture right before you pour it into the pan.
- Salted Peanut Butter Fudge – Finish with a generous sprinkle of flaky sea salt for that sweet-salty bakery-style bite.
- Vegan Peanut Butter Fudge – Use dairy-free white chocolate chips and a sweetened condensed coconut milk; make sure your peanut butter and chocolate are vegan.
- Maple Peanut Butter Fudge – Add 1–2 tablespoons pure maple syrup (reduce the peanut butter very slightly) for a fall flavor.
- Holiday Sprinkle Fudge – Press red and green sprinkles or mini chocolate chips on top while it’s warm for a festive Christmas look.
Storage & Reheating
“Reheating” isn’t really necessary for fudge, but how you store it makes a big difference in texture.
-
Room Temperature:
In a cool kitchen, you can store this homemade peanut butter fudge in an airtight container at room temperature for up to 3 days. Layer the pieces with parchment paper so they don’t stick. -
Refrigerator:
For best freshness, keep the fudge in a sealed container in the fridge for up to 1 week. It firms up when cold, so let it sit at room temperature for 10–15 minutes before serving for the creamiest bite. -
Freezer:
Yes, this freezes beautifully. Wrap the slab or individual squares in plastic wrap, then place in a freezer bag or airtight container. Freeze for up to 2–3 months. Thaw in the fridge overnight, then bring to room temp before serving. -
Make-Ahead Tip:
If you’re planning holiday baking, you can make this rich peanut butter fudge weeks ahead and freeze it, then thaw as needed and add it to your cookie trays.
Notes
A few personal tips from a woman who has made more pans of fudge than she’ll admit:
-
Use “regular” peanut butter for best results.
Natural peanut butter that separates in the jar can make the fudge greasy or too soft. If you really want that style, stir it extremely well and be prepared for a slightly different texture. -
Keep the heat low and steady.
White chocolate chips burn and seize fast. If your mixture looks grainy or thick, it probably got too hot—take it off the heat, whisk firmly, and you can usually bring it back. -
Slice small.
This is a rich peanut butter fudge. People often say “just a small piece,” so I cut tiny squares. They look pretty on a plate, and folks can always grab another. -
Play with the salt.
A small bump in salt can make this peanut butter dessert recipe taste more grown-up and “bakery-style.” Start with the 1/4 teaspoon, then sprinkle flaky sea salt on top if you like that flavor contrast. -
Thickness matters.
An 8×8 pan gives a classic, thick fudge. A 9×9 makes slightly thinner pieces that chill faster and are great for large parties.
On the nutrition side, this is a treat—no pretending otherwise. But peanut butter does bring a bit of protein and healthy fats along for the ride, so a little square with a cup of coffee feels like a satisfying, indulgent snack.
FAQs
Can I use natural peanut butter in this fudge?
You can, but the texture will be softer and sometimes a bit oily. Make sure it’s very well stirred and consider adding 1–2 extra tablespoons of white chocolate chips to help it set.
Why didn’t my fudge set properly?
Most of the time, it’s because the mixture wasn’t heated long enough to fully melt the white chocolate or the ratio of peanut butter to chocolate changed. Gently rewarm the whole batch over low heat, add a small handful of white chocolate chips, stir until smooth, and re-chill.
Do I need a candy thermometer?
No, this is a no-thermometer, simple fudge recipe. The sweetened condensed milk and white chocolate give structure without any precise temperature stages.
Is this peanut butter fudge gluten-free?
Yes, it’s naturally gluten-free as long as your brands of white chocolate, vanilla, and peanut butter are certified gluten-free. Always check labels if serving someone with celiac disease.
Can I double this recipe?
Absolutely. Double all ingredients and use a 9×13-inch pan. The chill time may be slightly longer because the slab is thicker.
Can I make this without white chocolate chips?
You can swap the white chocolate for an equal weight of peanut butter chips for a more intense peanut flavor, but the texture will be slightly different—still delicious, just a little softer.
How do I get clean, bakery-style squares?
Chill the fudge fully, use a sharp knife, and rinse the blade under hot water, then dry between cuts. Patience here really pays off.
Can I add chocolate on top?
Yes—melt 1 cup semi-sweet chocolate chips with 1 tablespoon butter, spread over the chilled fudge, and chill again until firm before slicing for a layered peanut butter chocolate fudge.
Conclusion
This Peanut Butter Fudge Recipe checks every box: it’s fast, it’s no-bake, and it delivers that rich, creamy, old fashioned peanut butter fudge flavor that keeps people hovering near the dessert table. Whether you’re filling holiday tins, spoiling your kids’ teachers, or just treating yourself on a quiet afternoon, a little square goes a long way.
If you make this, I’d love to hear how it turned out—tell me in the comments what variation you tried, or whether you like it plain and classic. And if you’re in a peanut mood, take a look around my site for more quick peanut butter dessert ideas, like no-bake bars and peanut butter cookies that pair perfectly with this fudge on any sweet tray.
Peanut Butter Fudge
Ingredients
- 2 cups creamy peanut butter about 16 oz; avoid very oily natural peanut butter
- 1 can (14 oz) sweetened condensed milk do not use evaporated milk
- 3 cups white chocolate chips about 18 oz; good-quality chips melt more smoothly
- 1 teaspoon pure vanilla extract
- 1/4 teaspoon fine sea salt reduce to a pinch if using salted peanut butter
- flaky sea salt or chopped peanuts optional, for topping
- 1 8x8-inch baking pan for pouring and chilling the fudge
- parchment paper or foil to line the pan for easy removal
- 1 medium saucepan heavy-bottomed, for melting
- 1 heat-safe spatula for stirring
Instructions
- Line an 8x8-inch baking pan with parchment paper, leaving some overhang on two sides to create handles. Lightly mist with nonstick spray or rub with a tiny bit of butter to make removal and slicing easier.
- In a medium, heavy-bottomed saucepan, combine the sweetened condensed milk and white chocolate chips. Set over low heat and stir constantly with a heat-safe spatula until the chips are almost fully melted and the mixture is smooth and glossy. Keep the heat low to avoid scorching the white chocolate.
- Add the creamy peanut butter to the warm mixture. Continue stirring over low heat until everything is fully combined and the mixture is thick, smooth, and shiny, like a soft peanut butter frosting.
- Remove the pan from the heat. Stir in the vanilla extract and fine sea salt until evenly distributed. Taste a tiny bit carefully and adjust the salt to your liking.
- Immediately scrape the warm fudge mixture into the prepared pan. Use an offset spatula or the back of a spoon to spread it into an even layer, pressing it into the corners. Work fairly quickly, as the fudge begins to set as it cools.
- While the surface is still soft, sprinkle flaky sea salt, chopped peanuts, or festive sprinkles over the top, gently pressing them in so they adhere.
- Transfer the pan to the refrigerator and chill for at least 2 hours, or until the fudge is firm enough to slice cleanly. For the neatest squares, chill 3–4 hours or overnight.
- Use the parchment handles to lift the fudge from the pan onto a cutting board. Run a sharp knife under hot water, dry it, then cut the fudge into about 1-inch squares, reheating and wiping the knife between cuts for clean edges.