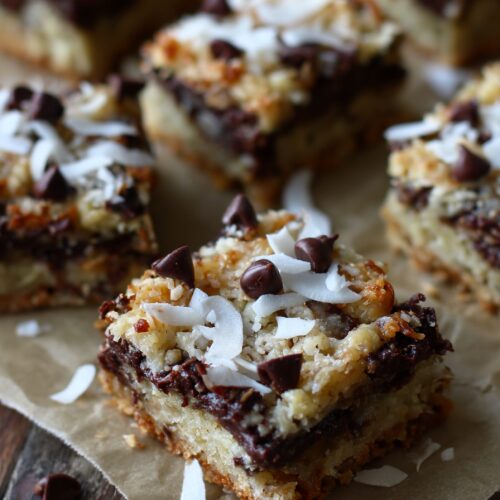
Paleo Magic Cookie Bars Recipe
This Paleo Magic Cookie Bars Recipe gives you gooey, chocolatey, coconut-rich cookie bars that feel like a bakery treat—but they’re gluten free, grain free, dairy free, and made with real-food ingredients.
These healthy magic bars are my answer to the classic “7-layer bars” I grew up seeing at church potlucks and holiday cookie swaps. Only now, they’re a clean eating dessert recipe that fits a paleo lifestyle: an almond flour cookie bar base, coconut milk caramel, dark chocolate, and toasty coconut all snuggled together in one pan. I love bringing these paleo magic cookie bars to parties because no one guesses they’re a refined sugar free dessert—people just call them “dangerously good.”
Let me explain why I love them so much. As a 50-year-old mom who’s watched every fad diet come and go, I’m not chasing perfection; I just want treats that don’t leave me feeling tired and cranky. These coconut chocolate bars do exactly that. They’re sweet but not cloying, rich but not heavy, and they use pantry staples I actually keep on hand.
You can bake a pan on Sunday and have little squares of paleo-friendly sweets waiting in the fridge all week. And if you’re the person at the party who needs gluten free cookie bars or dairy free cookie bars, this recipe is your new “I know it’ll work” option.
Why You’ll Love This Paleo Magic Cookie Bars Recipe
- Naturally gluten free, grain free, and dairy free—perfect for mixed-diet gatherings.
- Uses almond flour and coconut milk caramel for a satisfying, indulgent texture without standard flour or condensed milk.
- A truly refined sugar free dessert: sweetened with coconut sugar and maple syrup instead of white sugar or corn syrup.
- Family-friendly flavor—no one needs to know these are a paleo dessert recipe unless you tell them.
- Great make-ahead treat: these almond flour cookie bars actually taste better the next day once the flavors settle.
- Freezer-friendly, so you can stash a batch for busy weeks, holidays, or unexpected guests.
- Customizable: these healthy magic bars welcome add-ins like nuts, seeds, or even a sprinkle of sea salt.
- Works year-round: cozy enough for winter, but light enough for summer barbecues and potlucks.
- Simple, no-fuss method—if you can stir and press dough into a pan, you can make these grain free cookie bars.
Ingredients
Here’s everything you’ll need to make this Paleo Magic Cookie Bars Recipe. I’ll break it into three simple parts: crust, caramel, and toppings.
For the almond flour crust (gluten free cookie bar base):
- 2 cups fine almond flour
- (Look for “super-fine” almond flour, not almond meal, for the best texture.)
- 1/4 cup melted coconut oil
- (Measure after melting; refined coconut oil has less coconut flavor if you prefer.)
- 3 tablespoons maple syrup
- (Dark or “Grade A Amber” adds a deeper caramel note.)
- 1 teaspoon vanilla extract
- 1/2 teaspoon fine sea salt
For the coconut milk caramel layer (dairy free cookie bars):
- 1 can (13.5–14 oz) full-fat coconut milk
- (Shake well; make sure it’s full-fat, not light.)
- 1/3 cup coconut sugar
- (Gives a deep, almost brown-sugar flavor and keeps this a refined sugar free dessert.)
- 3 tablespoons maple syrup
- 1 teaspoon vanilla extract
- 1/4 teaspoon fine sea salt
For the magic toppings (the fun part):
- 1 cup unsweetened shredded coconut
- (Use finely shredded for a more classic magic bar look.)
- 3/4 cup dairy-free dark chocolate chips or chunks
- (I like 60–70% cacao; brands like Hu, Enjoy Life, or Pascha work well.)
- 1/2 cup chopped pecans
- 1/2 cup chopped almonds
- (You can swap in walnuts, hazelnuts, or cashews—whatever you have.)
- Flaky sea salt, for sprinkling on top (optional but lovely)
This combination turns your pan into layered coconut milk caramel bars that feel indulgent but still live comfortably in the paleo baking recipe category.

Directions
-
Preheat and prep the pan
Preheat your oven to 350°F (175°C). Line an 8×8-inch (20×20 cm) baking pan with parchment paper, leaving some overhang on two sides so you can lift the bars out later. This little step makes cutting much easier. -
Make the almond flour crust
In a medium bowl, stir together the almond flour, melted coconut oil, maple syrup, vanilla, and sea salt. Mix until the dough looks like slightly sticky, sandy cookie dough—if it feels too dry, add 1 more teaspoon of coconut oil. -
Press and pre-bake the crust
Press the dough evenly into the prepared pan using clean hands or the bottom of a measuring cup. Try to pack it firmly so it holds together as a sturdy base. Bake for 10–12 minutes, just until the edges are lightly golden and the crust is set. Let it cool while you start the caramel. -
Cook the coconut milk caramel
In a small to medium saucepan, combine the coconut milk, coconut sugar, and maple syrup. Bring to a gentle simmer over medium heat, then reduce to medium-low. Cook, stirring often, for about 15–20 minutes, until the mixture has reduced and thickened slightly and darkened in color. It should coat the back of a spoon. -
Finish the caramel with vanilla and salt
Remove the pan from heat and stir in the vanilla and sea salt. Let the caramel cool for 5–10 minutes; it will thicken more as it cools. If a thin skin forms on top, just whisk it back in. You’re building the “glue” that holds these paleo magic cookie bars together. -
Layer on the toppings
Sprinkle the shredded coconut evenly over the cooled crust. Then add the chopped pecans, almonds, and dairy-free chocolate chips. Try to distribute everything fairly evenly so every bar has a little bit of everything. -
Pour the caramel over the pan
Slowly pour the warm coconut milk caramel over the layered toppings, using a spatula to nudge it toward the corners. It doesn’t need to cover every millimeter perfectly; the caramel will settle during baking. Sprinkle a pinch of flaky sea salt on top if you like that sweet-salty magic. -
Bake the bars
Return the pan to the oven and bake for 18–22 minutes, until the edges are bubbling and the coconut on top is lightly golden. If it starts browning too quickly, tent the pan loosely with foil. -
Cool completely and chill
Let the bars cool in the pan on a rack until they reach room temperature. Then transfer the pan to the fridge for at least 2 hours (or overnight) before cutting. This step is key: it helps the caramel set and turns these into neat, sliceable chocolate chip cookie bars paleo friends will love. -
Slice and serve
Use the parchment overhang to lift the slab out of the pan. Place on a cutting board and slice into 16 small bars (or 9 bigger ones if you prefer a bakery-style chunk). Serve chilled or at cool room temperature.
Servings & Timing
- Yield: About 16 small bars (or 9 larger bars)
- Prep Time: 20 minutes
- Cook Time: 30–35 minutes (including crust and final bake)
- Cooling/Chilling Time: 2–3 hours
- Total Time: About 3 hours (mostly hands-off while everything cools and sets)
If you’re planning these for a party or holiday dessert table, treat them like you would cheesecake bars—make them earlier in the day or the night before, and let the fridge do the work.
Variations
You know what? This Paleo Magic Cookie Bars Recipe is a great base to play with. Here are a few ideas:
- Nut-Free Version: Use a seed-based crust (sunflower seed flour instead of almond flour) and swap nuts with pumpkin seeds, sunflower seeds, or chopped coconut chips.
- Extra-Chocolate Magic Bars: Stir 2 tablespoons of cacao nibs into the toppings and drizzle melted dark chocolate over the chilled bars.
- Pumpkin Spice Holiday Bars: Add 1 teaspoon pumpkin pie spice to the crust mixture and 1/2 teaspoon cinnamon to the caramel for a cozy seasonal twist.
- Mocha Magic Bars: Stir 1–2 teaspoons instant espresso powder into the caramel while it cooks for coffee-house flavor.
- Berry Coconut Bars: Sprinkle 1/2 cup fresh or frozen raspberries or blueberries over the crust before adding toppings for a tart, fruity note.
- Nutty Crunch: Add a handful of chopped toasted hazelnuts on top for a richer, “fancy dessert” feel.
Storage & Reheating
These grain free cookie bars are very forgiving when it comes to storage, which is one reason I make them ahead for busy weeks.
-
Fridge:
Store sliced bars in an airtight container, layered with parchment if needed. They’ll keep in the refrigerator for up to 7 days. I actually think days 2–3 have the best flavor and texture. -
Freezer:
For longer storage, freeze bars on a parchment-lined baking sheet until firm, then transfer to a freezer-safe bag or container. They’ll keep for 2–3 months. -
Thawing:
Thaw in the fridge for a few hours or on the counter for 20–30 minutes. They’re lovely eaten slightly chilled—no actual reheating necessary. -
Make-Ahead Tips:
If you’re planning for holidays, bake a batch a week ahead, freeze, and move them to the fridge the night before serving. They hold up beautifully on a cookie tray for a couple of hours at room temperature.
Notes
A few personal tips from my kitchen to yours:
- Watch the caramel, not the clock. Every stove is a little different. You’re looking for a gently thickened, glossy caramel that coats the spoon—not syrup-thin, but not as thick as fudge.
- Don’t skip chilling. I know it’s tempting, but if you try to cut these while warm, they’ll taste great and look terrible. Letting them chill turns them into neat, firm bars, especially important if you’re gifting or sharing.
- Pan size matters. An 8×8 pan gives nice, thick bars. A 9×9 pan works too; your bars will just be slightly thinner and may bake a bit faster.
- Sweetness check. If you’re used to very sweet conventional magic bars, you can bump the chocolate chips up to 1 cup or add an extra tablespoon of maple syrup to the caramel. If you’re used to low-sugar treats, as written will feel just right.
- Cut with a warm knife. Run a sharp knife under hot water, wipe it dry, then slice. Repeat as needed for clean edges—this helps with the caramel layer.
When I first tested this recipe, my family “taste tested” half the pan before they were fully chilled. So if that happens at your house, you’re not alone.
FAQs
Are these magic cookie bars really paleo?
Yes—this recipe uses almond flour, coconut milk, coconut sugar, and maple syrup, which all fit within a typical paleo baking recipe approach. Just double-check that your chocolate chips are dairy free and refined sugar free if you’re strict.
Can I make these nut-free for allergies?
You can. Replace the almond flour with finely ground sunflower seed flour (or a store-bought seed flour blend) and skip the nuts on top, using seeds and extra coconut instead. Keep in mind sunflower seeds can turn slightly green when baked with baking soda, but we don’t use any here, so you should be safe.
Can I skip the shredded coconut?
The coconut is a classic part of healthy magic bars, but you can reduce it to 1/2 cup and increase the nuts or seeds to compensate. The texture will change slightly, but the recipe still works.
Can I use honey instead of maple syrup?
Yes, though the flavor will be a bit stronger and slightly less “caramel-y.” Use a light, mild honey and the same measurements; keep an eye on the caramel as honey can darken faster.
Why is my crust crumbly when I cut the bars?
Usually that means it needed a bit more moisture or more packing. Next time, press the crust very firmly into the pan and add 1–2 extra teaspoons of coconut oil if the dough looks dry. Chilling fully before cutting also helps a lot.
How can I tell if the coconut milk caramel is done?
Dip a spoon in the caramel and drag your finger through the coating on the back; if it leaves a clean line that doesn’t immediately fill in, it’s ready. It should also be a shade or two darker than when you started.
Can I double this recipe for a crowd?
Absolutely. Double everything and bake in a 9×13-inch pan. You may need to add 3–5 minutes to the final bake time and let the bars chill a little longer.
Are these bars kid-friendly?
Yes—most kids just taste “cookie bars with chocolate and coconut.” If your kids are used to very sugary treats, you might add a few extra chocolate chips on top for the first batch.
Conclusion
These Paleo Magic Cookie Bars bring together everything I love in a treat: simple ingredients, a little nostalgic flavor, and a whole lot of flexibility for different diets. They’re the kind of grain free cookie bars that feel special enough for holidays but easy enough for a random Tuesday, and I’m always grateful to have a batch tucked in the fridge.
If you make this Paleo Magic Cookie Bars Recipe, I’d genuinely love to hear how it went—tell me your twists, your favorite add-ins, or who you shared them with. And if you’re still in a baking mood, explore more of my paleo dessert recipes next; your future self (and your snack drawer) will thank you.
Paleo Magic Cookie Bars
Ingredients
- 2 cups almond flour super-fine, not almond meal
- 1/4 cup coconut oil melted; refined for less coconut flavor if preferred
- 3 tablespoons maple syrup
- 1 teaspoon vanilla extract
- 1/2 teaspoon fine sea salt
- 1 can full-fat coconut milk 13.5–14 oz (400 ml), shaken well
- 1/3 cup coconut sugar
- 3 tablespoons maple syrup
- 1 teaspoon vanilla extract
- 1/4 teaspoon fine sea salt
- 1 cup unsweetened shredded coconut finely shredded if possible
- 3/4 cup dairy-free dark chocolate chips or chunks about 60–70% cacao
- 1/2 cup pecans chopped
- 1/2 cup almonds chopped; or other nuts such as walnuts, hazelnuts, or cashews
- flaky sea salt for sprinkling on top, optional
Instructions
- Preheat your oven to 350°F (175°C). Line an 8×8-inch (20×20 cm) baking pan with parchment paper, leaving some overhang on two sides so you can lift the bars out later.
- In a medium bowl, stir together the almond flour, melted coconut oil, 3 tablespoons maple syrup, 1 teaspoon vanilla extract, and 1/2 teaspoon fine sea salt. Mix until the dough looks like slightly sticky, sandy cookie dough. If it feels too dry, add 1 more teaspoon of coconut oil.2 cups almond flour, 1/4 cup coconut oil, 3 tablespoons maple syrup, 1 teaspoon vanilla extract, 1/2 teaspoon fine sea salt
- Press the dough evenly into the prepared pan using clean hands or the bottom of a measuring cup, packing it firmly. Bake for 10–12 minutes, just until the edges are lightly golden and the crust is set. Let it cool while you start the caramel.
- In a small to medium saucepan, combine the full-fat coconut milk, coconut sugar, and 3 tablespoons maple syrup. Bring to a gentle simmer over medium heat, then reduce to medium-low. Cook, stirring often, for about 15–20 minutes, until the mixture has reduced and thickened slightly and darkened in color. It should coat the back of a spoon.1 can full-fat coconut milk, 1/3 cup coconut sugar, 3 tablespoons maple syrup
- Remove the saucepan from the heat and stir in 1 teaspoon vanilla extract and 1/4 teaspoon fine sea salt. Let the caramel cool for 5–10 minutes; it will thicken more as it cools. If a thin skin forms on top, whisk it back in.1 teaspoon vanilla extract, 1/4 teaspoon fine sea salt
- Sprinkle the shredded coconut evenly over the cooled crust. Then add the chopped pecans, chopped almonds, and dairy-free dark chocolate chips or chunks, distributing them evenly.1 cup unsweetened shredded coconut, 3/4 cup dairy-free dark chocolate chips or chunks, 1/2 cup pecans, 1/2 cup almonds
- Slowly pour the warm coconut milk caramel over the layered toppings, using a spatula to nudge it toward the corners. It does not need to cover every bit perfectly; it will settle during baking. Sprinkle flaky sea salt on top if using.flaky sea salt
- Return the pan to the oven and bake for 18–22 minutes, until the edges are bubbling and the coconut on top is lightly golden. If it starts browning too quickly, tent the pan loosely with foil.
- Let the bars cool in the pan on a rack until they reach room temperature. Then transfer the pan to the refrigerator for at least 2 hours, or overnight, until the caramel is set and the bars are firm.
- Use the parchment overhang to lift the slab out of the pan. Place on a cutting board and slice into 16 small bars (or 9 larger bars). Serve chilled or at cool room temperature.
Notes
Storage: Store sliced bars in an airtight container in the refrigerator for up to 7 days, or freeze for 2–3 months. Thaw in the fridge or at room temperature until just chilled. For the neatest slices, chill thoroughly and cut with a warm, sharp knife.