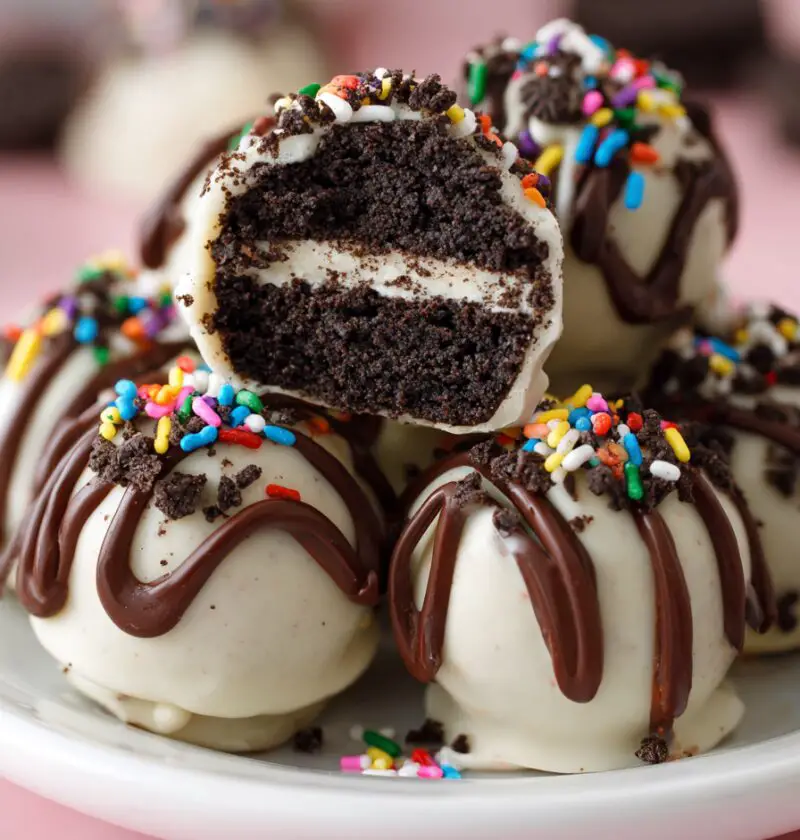
Oreo Truffles Recipe (No-Bake, Chocolate-Covered Bite-Size Treat)
If you’re craving something rich, chocolatey, and ridiculously easy, this Oreo Truffles Recipe is about to be your new favorite dessert—no baking, only a handful of ingredients, and perfect for parties, holidays, or late-night “treat yourself” moments.
These little Oreo cream cheese truffles are the kind of recipe I wish I’d had when my kids were younger and I was juggling work, school events, and potlucks. They look fancy enough for a Christmas cookie tray, taste like a gourmet candy shop treat, yet they’re simple enough that even a beginner can pull them off on a Tuesday night.
So let’s talk about what makes these easy Oreo truffle balls so special, and why they’ve stayed in my recipe binder for over a decade.
Why You’ll Love This Oreo Truffles Recipe
- No oven needed – This is a true no bake Oreo truffles recipe, which means no heating up the kitchen and no worrying about burned cookies.
- Just 3 main ingredients – Oreos, cream cheese, and chocolate; everything else is optional.
- Foolproof for beginners – If you can crush cookies and roll little balls, you can make these Oreo cookie truffles.
- Perfect for parties and holidays – They look impressive on dessert platters, in cookie exchanges, or tucked into gift boxes.
- Endlessly customizable – Change the chocolate, add toppings, or mix in flavors; you’ll see lots of fun variations below.
- Make-ahead friendly – Oreo truffles with cream cheese actually taste better after chilling and keep well in the fridge or freezer.
- Kid and teen approved – These Oreo truffle bites are always one of the first things to disappear at birthdays and game nights.
- Budget-friendly dessert – You get a whole batch of chocolate covered Oreo truffles for a fraction of bakery prices.
Ingredients
This homemade Oreo truffles recipe is short and sweet. Here’s what you’ll need for a basic batch of Oreo truffle candy.
- 36 Oreo cookies (about 1 standard 14.3 oz / 403 g package; regular, not Double Stuf)
- Tip: Store-brand chocolate sandwich cookies also work, but classic Oreos give that nostalgic flavor.
- 8 oz (225 g) cream cheese, softened to room temperature
- Tip: Use full-fat block cream cheese for the best texture. The tub-style often has more air and water.
- 12–16 oz (340–450 g) baking chocolate or candy melts
- Semi-sweet, dark, or white chocolate all work; I like Ghirardelli melting wafers for smooth dipping.
Optional, but highly recommended:
- 1–2 teaspoons vanilla extract – Adds warmth and depth to the Oreo cream cheese truffles.
- 1–2 teaspoons coconut oil or vegetable shortening – Helps thin the melted chocolate for smoother coating.
- Sprinkles, crushed Oreos, or flaky sea salt – For garnishing the tops of your Oreo truffles with chocolate coating.
- Colored candy melts – Ideal if you’re making Oreo truffles for parties, baby showers, or holidays.
You’ll also need:
- A food processor (or a sturdy zip-top bag and rolling pin)
- Mixing bowl
- Baking sheet lined with parchment paper
- Fork or dipping tool

Directions
These no bake Oreo truffles come together in three simple stages: crush, mix, and dip. Let me walk you through it step by step.
-
Crush the Oreos
- Place all the Oreo cookies (yes, cream and all) in a food processor.
- Pulse until you have fine, even crumbs that look like potting soil—no big chunks.
- No food processor? Add the cookies to a heavy zip-top bag, squeeze out the air, and crush with a rolling pin until very fine. This might take a little arm strength, but it works.
-
Make the Oreo–cream cheese mixture
- Add the softened cream cheese to the Oreo crumbs. If you’re using vanilla, add that here too.
- Pulse again in the food processor, or stir with a sturdy spatula, until the mixture is well combined and forms a soft, thick “dough.”
- It should stick together easily when you press it with your hands—kind of like a fudgy brownie that hasn’t set yet.
-
Chill the mixture briefly (optional but helpful)
- If the mixture feels very soft or sticky, place the bowl in the fridge for 15–20 minutes.
- This makes it easier to roll into neat Oreo truffle balls and helps them hold their shape.
-
Roll into truffle balls
- Line a baking sheet with parchment paper.
- Using a small cookie scoop or a tablespoon, scoop portions of the mixture and roll between your palms to form smooth balls.
- Aim for 1–1.25 inch balls—about the size of a large marble or small walnut.
- Place each ball on the parchment-lined baking sheet.
-
Chill until firm
- Transfer the tray to the fridge for at least 30–45 minutes, or the freezer for 15–20 minutes.
- This step is essential; cold truffles are much easier to dip, and the chocolate will set faster.
-
Melt the chocolate
- Place your chopped chocolate or candy melts in a microwave-safe bowl.
- Heat in 20–30 second bursts, stirring each time, until smooth and glossy.
- If the chocolate seems thick, stir in 1–2 teaspoons of coconut oil or shortening to thin it slightly.
- Tip: Don’t overheat; burned chocolate can seize and turn grainy. Slow and steady is better.
-
Dip the truffles
- Take a few chilled Oreo truffle balls out of the fridge at a time (keep the rest cold while you work).
- Drop one ball into the melted chocolate. Use a fork to gently roll it around and coat completely.
- Lift it out with the fork, letting the excess chocolate drip off. Tap the fork gently on the side of the bowl to remove extra chocolate.
- Slide the coated truffle back onto the parchment. A toothpick or another fork helps nudge it off cleanly.
-
Decorate while wet
- While the chocolate coating is still wet, sprinkle with crushed Oreos, colored sprinkles, or a pinch of flaky sea salt.
- If you’re decorating with melted white chocolate or colored candy melts, let the first layer firm up, then drizzle on top with a spoon or piping bag.
-
Let the chocolate set
- Let the chocolate covered Oreo truffles sit at room temperature until firm, or chill them in the fridge for 10–15 minutes.
- Once set, trim any little “feet” of chocolate around the base if you want a very clean look.
-
Serve and enjoy
- Arrange your homemade Oreo truffles on a plate, in mini cupcake liners, or in a pretty tin if you’re gifting them.
- Try not to eat too many before they leave the kitchen—I speak from experience.
Servings & Timing
- Yield: About 24–30 truffles, depending on how large you roll them
- Prep Time: 20–30 minutes active time (crushing, mixing, rolling, dipping)
- Chill Time: 45–60 minutes total (before and/or after dipping)
- Total Time: About 1 hour 15 minutes, mostly hands-off
You know what? For something that looks this fancy, that timeline is very kind. Most of the work is just waiting while the fridge does its thing.
Variations
Once you’ve made the classic version, it’s easy to turn this Oreo truffles recipe into a little dessert playground.
- Peppermint Oreo Truffles – Stir ½ teaspoon peppermint extract into the Oreo–cream cheese mixture and top with crushed candy canes.
- Golden Oreo Truffles – Use Golden Oreos and coat with white chocolate for a vanilla birthday-cake style treat.
- Peanut Butter Oreo Truffles – Replace 2–3 tablespoons of the cream cheese with creamy peanut butter for a Reese’s-style flavor.
- Mint Chocolate Oreo Truffles – Use mint Oreos and dip in dark chocolate for a rich, refreshing finish.
- Funfetti Party Truffles – Use Golden Oreos, add rainbow sprinkles to the filling, and coat in white chocolate with more sprinkles on top; perfect for birthdays.
- Gluten-Friendly Version – Use gluten-free sandwich cookies; the rest of the recipe stays exactly the same.
Storage & Reheating (or Rather, Re-Chilling)
One of my favorite things about these no bake Oreo truffles is how well they store. They’re made for planning ahead.
-
Fridge:
- Store Oreo truffles in an airtight container in the refrigerator for up to 1 week.
- Separate layers with parchment paper so they don’t stick or smudge.
-
Freezer:
- Freeze in a single layer on a baking sheet until solid, then transfer to a freezer-safe container or bag.
- They’ll keep well for up to 2 months.
- Let them thaw in the fridge for about an hour before serving, or enjoy slightly frozen for a firmer, candy-like bite.
-
Make-Ahead Tips:
- You can roll the Oreo truffle balls and freeze them before dipping in chocolate.
- Dip straight from the freezer—just work a little quicker, since very cold truffles can sometimes cause the chocolate coating to crack slightly as they warm.
There’s really no reheating here, but if your truffles sit out too long and get soft, just pop them back in the fridge for 15–20 minutes to firm up again.
Notes from My Kitchen
-
Cream cheese temperature matters.
Room-temperature cream cheese mixes more smoothly with the Oreo crumbs, giving you a silky, uniform filling. Cold cream cheese can leave tiny lumps—still tasty, just not quite as smooth. -
Crumb size = texture.
Finely crushed Oreos give you a truffle that tastes like fudge. If you leave small chunks, you’ll get more crunch and cookie texture in each bite. Both styles are good—just pick your favorite. -
Candy melts vs. real chocolate.
For the smoothest, most fuss-free chocolate coating, candy melts or melting wafers are hard to beat. If you use real chocolate chips or bars, adding a little coconut oil helps a lot. -
Temperature swing can cause cracks.
If your truffles are rock-solid frozen and your chocolate is very hot, some truffles may crack as they come back to fridge temperature. Keeping the chocolate warm, not hot, and letting frozen truffles sit a few minutes before dipping helps. -
Size matters for parties.
For big gatherings, I like making slightly smaller Oreo truffle bites (closer to 30 per batch). People can try one without feeling committed to a large piece. It sounds silly, but it really affects how quickly a tray disappears. -
Label flavors if you mix batches.
If you make multiple variations—peppermint, peanut butter, classic—use different drizzles or toppings and a little label on your tray. Your guests will appreciate knowing what’s what.
FAQs
1. Do Oreo truffles need to be refrigerated?
Yes. Because Oreo truffles with cream cheese contain dairy, they should be stored in the fridge when you’re not serving them. They can sit out for 2–3 hours at a party, though.
2. Can I make Oreo truffles without cream cheese?
You can. Some people use mascarpone, dairy-free cream cheese, or even sweetened condensed milk, but the texture and taste will change a bit. Classic Oreo cream cheese truffles stay my favorite.
3. My mixture is too soft to roll. What did I do wrong?
Most likely, the cream cheese was very soft or you used a bit too much. Just chill the bowl in the fridge for 20–30 minutes, then try rolling again.
4. Why is my chocolate coating lumpy or thick?
It may have overheated or seized from a little moisture. Try adding a teaspoon of coconut oil or shortening and stirring gently. Next time, heat the chocolate more slowly and stir often.
5. Can I use flavored Oreos for this recipe?
Absolutely. This simple Oreo dessert recipe works with all kinds—mint, birthday cake, peanut butter, or seasonal flavors—just expect the filling flavor to match the cookie you choose.
6. How can I make these look more professional for gift boxes?
Use a small cookie scoop for even sizes, tap off extra chocolate before setting down, and add a neat drizzle or single topping (like a tiny sprinkle of crushed Oreos) for each. Setting each truffle in a mini cupcake liner also adds a polished touch.
7. Are Oreo truffles freezer-safe if they’re already dipped in chocolate?
Yes. Freeze them on a tray, then store in a container with parchment between layers. Thaw in the fridge so condensation forms on the container, not on the chocolate.
8. Can I use white chocolate chips for coating?
Yes, but white chocolate chips can be a bit stubborn. Melt them low and slow, and thin with a little coconut oil if needed for smoother dipping.
Conclusion
This Oreo Truffles Recipe checks all the boxes: quick, no bake, rich, and impressive enough for any holiday table or celebration. It’s the kind of simple Oreo dessert recipe you’ll reach for again and again, whether you’re making a batch of easy Oreo truffle balls for a movie night or a tray of chocolate covered Oreo truffles for a baby shower.
If you try these, let me know how they turned out and which variation you liked best. And if you’re in the mood for more no-fuss treats, take a peek at my other simple party desserts and candy-style recipes—you might just find your next signature sweet.
Oreo Truffles (No-Bake, Chocolate-Covered Bite-Size Treat)
Ingredients
- 36 Oreo cookies about 1 standard 14.3 oz (403 g) package; regular, not Double Stuf
- 8 oz cream cheese 225 g; full-fat block, softened to room temperature
- 12-16 oz baking chocolate or candy melts 340–450 g; semi-sweet, dark, or white chocolate
- 1-2 teaspoons vanilla extract optional, for added flavor
- 1-2 teaspoons coconut oil or vegetable shortening optional; helps thin the melted chocolate for dipping
- sprinkles, crushed Oreos, or flaky sea salt optional; for garnish
- colored candy melts optional; for decorative drizzle or themed colors
Instructions
- Place all 36 Oreo cookies (cream and all) in a food processor and pulse until you have fine, even crumbs with no large chunks. If you don’t have a food processor, add the cookies to a heavy zip-top bag, remove excess air, and crush very finely with a rolling pin.36 Oreo cookies
- Add the softened cream cheese to the Oreo crumbs. If using vanilla extract, add it now. Pulse again in the food processor or stir together with a sturdy spatula until the mixture is fully combined and forms a soft, thick dough that holds together easily when pressed.36 Oreo cookies, 8 oz cream cheese, 1-2 teaspoons vanilla extract
- If the mixture feels very soft or sticky, chill the bowl in the refrigerator for 15–20 minutes to firm it up. This will make rolling neater truffle balls easier.
- Line a baking sheet with parchment paper. Using a small cookie scoop or a tablespoon, portion the mixture and roll each portion between your palms to form smooth balls about 1–1.25 inches in diameter. Place the rolled balls on the prepared baking sheet.
- Refrigerate the tray of Oreo balls for 30–45 minutes, or place in the freezer for 15–20 minutes, until the truffles are firm and cold. This helps them keep their shape when dipping.
- Place the chopped chocolate or candy melts in a microwave-safe bowl. Microwave in 20–30 second bursts, stirring well after each interval, until completely melted and smooth. If the chocolate is too thick for dipping, stir in 1–2 teaspoons of coconut oil or shortening to thin it slightly. Avoid overheating to prevent the chocolate from seizing.12-16 oz baking chocolate or candy melts, 1-2 teaspoons coconut oil or vegetable shortening
- Working with a few chilled Oreo balls at a time, drop one ball into the melted chocolate. Use a fork to gently roll and coat it completely. Lift it out with the fork, allowing excess chocolate to drip off, tapping the fork gently on the side of the bowl. Slide the coated truffle back onto the parchment-lined sheet, using a toothpick or another fork to help release it if needed.12-16 oz baking chocolate or candy melts
- While the chocolate coating is still wet, immediately top each truffle with sprinkles, crushed Oreos, or a pinch of flaky sea salt if desired. If using melted white chocolate or colored candy melts for drizzling, allow the base coat to firm up first, then drizzle decoratively over the tops.36 Oreo cookies, sprinkles, crushed Oreos, or flaky sea salt, colored candy melts
- Allow the dipped truffles to sit at room temperature until the chocolate is fully set, or chill them in the refrigerator for 10–15 minutes to speed things up. Once set, you can trim any excess chocolate around the bases for a cleaner look if desired.
- Arrange the finished Oreo truffles on a serving plate, in mini cupcake liners, or in gift boxes or tins. Serve chilled or slightly cool, and store any leftovers in the refrigerator.
Notes
Storage: Store Oreo truffles in an airtight container in the refrigerator for up to 1 week, separating layers with parchment paper. To freeze, place in a single layer on a baking sheet until solid, then transfer to a freezer-safe container or bag; they keep up to 2 months. Thaw in the fridge for about 1 hour before serving, or enjoy slightly frozen for a firmer texture.
Tips: Room-temperature cream cheese blends more smoothly than cold. Finely crushed Oreos give a fudgier texture; small chunks add more cookie crunch. Candy melts or melting wafers are usually easier to work with than regular chocolate chips. If your truffles crack after dipping, the temperature difference between very cold centers and hot chocolate may be the cause—let frozen truffles sit a few minutes before dipping and keep the chocolate warm, not very hot.