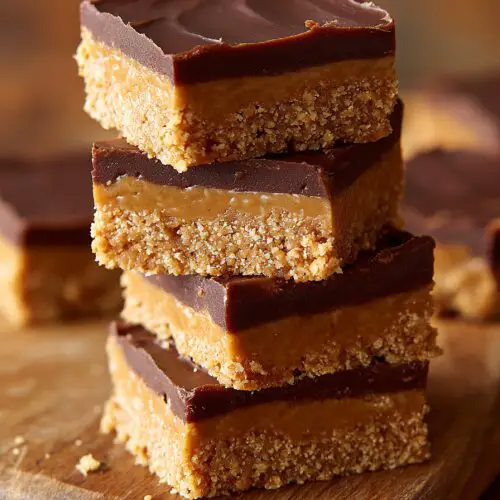
No Bake Peanut Butter Bars Recipe
If you love chocolate and peanut butter but don’t want to turn on the oven, this No Bake Peanut Butter Bars Recipe is going to be your new go-to dessert—rich, creamy, chocolatey, and ready with just a few pantry ingredients.
Recipe Introduction
These no bake peanut butter bars are a cross between a peanut butter cup and a soft cookie bar—except you make them in a pan and let the fridge do all the work. No baking, no fuss, no heating up the kitchen. They’re one of those easy no bake dessert bars I pull out for holidays, potlucks, and “the grandkids are coming in an hour” emergencies.
What makes this peanut butter bars recipe special is how simple and flexible it is. You stir together a sweet peanut butter base (it tastes like a soft peanut butter fudge), press it into a pan, and spread a silky chocolate-peanut butter topping over the top. Chill, slice, and you’ve got the kind of chocolate peanut butter bars that disappear from dessert tables in about 10 minutes.
I started making homemade peanut butter bars in the late ’90s when I was a very tired young mom and needed an easy no bake recipe I could trust. Over the years, I’ve tweaked the ratios so the bars are firm enough to slice, but still melt-in-your-mouth soft. They’re naturally egg-free, easily made gluten-free, and they freeze beautifully—so they’ve become my “always have something sweet on hand” dessert.
Whether you call them no bake chocolate bars, peanut butter dessert bars, or “those things Aunt Lisa makes that everyone fights over,” they’re simple, nostalgic, and crowd-pleasing.
Why You’ll Love This Recipe
So, why keep this No Bake Peanut Butter Bars Recipe in your back pocket?
- No oven needed: Perfect for hot summer days, busy holidays, or tiny kitchens.
- Quick to prep: About 15 minutes of actual work, then the fridge takes it from there.
- Pantry-friendly ingredients: Peanut butter, graham crackers, butter, chocolate—nothing fancy, just basics.
- Crowd-pleasing flavor: Think giant peanut butter cup in bar form—kids and adults go wild for them.
- Easy to make gluten-free: Use gluten-free graham cracker crumbs and you’re set.
- Scales well for parties: Double the recipe and use a 9×13-inch pan for potlucks and bake sales.
- Freezer-friendly: Make ahead, freeze, and pull out a few bars whenever the sweet tooth hits.
- Beginner-friendly: No candy thermometers, no special techniques—just mixing, pressing, and chilling.
- Customizable: Add sea salt, swap the chocolate, or sprinkle on toppings to match the season or your mood.
Ingredients
Let’s break down what you need for these no bake peanut butter bars and how to choose the best ingredients.
For the Peanut Butter Base:
- 1 cup (250 g) creamy peanut butter (not natural “stir-in” style; Jif or Skippy work great)
- 1/2 cup (113 g) unsalted butter, melted and slightly cooled
- 2 cups (240 g) powdered sugar, sifted if lumpy
- 2 cups (200 g) graham cracker crumbs (about 14 full sheets; regular or gluten-free)
- 1 teaspoon pure vanilla extract
- 1/4 teaspoon fine sea salt (skip this if you’re using salted butter or very salty peanut butter)
For the Chocolate Topping:
- 1 1/2 cups (270 g) semi-sweet chocolate chips (you can use dark chocolate if you prefer)
- 1/4 cup (60 g) creamy peanut butter
Optional Toppings:
- Flaky sea salt (for a sweet-salty finish)
- Chopped peanuts
- Mini chocolate chips
- Sprinkles (fun for birthdays and holidays)
Ingredient Notes & Tips
- Peanut Butter: For this peanut butter bars recipe, use a stable, creamy peanut butter. Natural peanut butter that separates can make the bars oily and too soft. If that’s what you have, stir it very well and add a bit more graham cracker crumbs.
- Graham Cracker Crumbs: You can buy pre-crushed crumbs or crush whole graham crackers in a food processor or a zip-top bag with a rolling pin. Aim for fine, sandy crumbs so the base holds together.
- Chocolate Chips: Use a brand you actually like to snack on—the flavor really comes through. Ghirardelli, Guittard, or Trader Joe’s chocolate chips are all solid choices.
- Butter: Unsalted butter lets you control the salt level. If you use salted butter, reduce or skip the added salt.

Directions
Here’s how to make these no bake chocolate peanut butter bars step-by-step.
-
Prepare your pan.
Line an 8×8-inch (20×20 cm) baking pan with parchment paper, letting some hang over the sides to make a sling. This makes it easy to lift the bars out later. Lightly spray the parchment with nonstick spray if your peanut butter tends to stick. -
Mix the peanut butter base.
In a medium mixing bowl, stir together the melted butter and 1 cup peanut butter until smooth and glossy. Add the powdered sugar, graham cracker crumbs, vanilla, and salt. Use a sturdy spoon or spatula to mix until everything is well combined and no dry patches remain. The mixture should be thick and a bit crumbly, like a soft cookie dough that holds together when pressed. -
Press the base into the pan.
Transfer the peanut butter mixture to your prepared pan. Use clean hands or the back of a spoon to press it firmly and evenly into the bottom of the pan. Take a moment here to really pack it down; this helps the bars slice cleanly later. You can lay a piece of parchment on top and use the bottom of a measuring cup to smooth the surface. -
Make the chocolate topping.
In a microwave-safe bowl, combine the chocolate chips and 1/4 cup peanut butter. Microwave in 20–30 second bursts, stirring well after each round, until the chocolate is just melted and smooth. Don’t rush this step—stirring helps the chocolate finish melting without burning. -
Spread the chocolate layer.
Pour the warm chocolate mixture over the peanut butter base. Tilt the pan gently and use an offset spatula or the back of a spoon to spread it into an even layer, all the way to the edges. If you’re adding flaky sea salt or chopped peanuts, sprinkle them on now while the chocolate is still soft. -
Chill the bars.
Place the pan in the refrigerator and chill for at least 2 hours, or until the chocolate is set and the bars feel firm when you press the center gently. If you’re in a rush, you can chill them in the freezer for about 45 minutes, but the texture is slightly better from a slower chill in the fridge. -
Slice and serve.
Once set, use the parchment sling to lift the slab out of the pan and place it on a cutting board. Let it sit at room temperature for about 5–10 minutes before cutting—this helps prevent the chocolate from cracking. Use a sharp knife, wiping it between cuts, to slice into 16 small squares or 12 larger bars. -
Enjoy and share.
Serve your no bake dessert bars chilled or just slightly cool. They’re rich, so a little square goes a long way—though, if your house is anything like mine, people usually come back for “just one more.”
Servings & Timing
How much does this No Bake Peanut Butter Bars Recipe make and how long does it take?
- Yield: About 16 bars (or 12 larger bars)
- Prep Time: 15–20 minutes
- Chill Time: 2 hours (or about 45 minutes in the freezer)
- Total Time: About 2 hours 20 minutes, mostly hands-off
If you’re planning for a party or holiday table, you can easily double the recipe and use a 9×13-inch pan. The thickness will be very similar, and you’ll get around 24–32 bars, depending on how generous you are with your slices.
Variations
Want to change things up a bit? Here are some fun twists on these peanut butter dessert bars.
- Gluten-Free Version: Use certified gluten-free graham cracker crumbs; everything else stays exactly the same.
- Dark Chocolate Lover’s Bars: Swap the semi-sweet chips for dark chocolate chips or a chopped dark chocolate bar for a deeper, less sweet flavor.
- Crunchy Peanut Butter Bars: Use crunchy peanut butter in the base or stir in 1/2 cup chopped peanuts for added crunch.
- Peanut-Free Swap: Use sunflower seed butter or almond butter in place of peanut butter (just make sure it’s not too runny and adjust crumbs as needed).
- Reese’s-Style Bars: Add 1/2 teaspoon extra vanilla and a pinch more salt to the base for that classic peanut butter cup vibe.
- Holiday Sprinkle Bars: Add seasonal sprinkles on top of the chocolate layer—red and green for Christmas, pastel for Easter, orange and black for Halloween.
Storage & Reheating
Storing these homemade peanut butter bars is almost as easy as making them.
-
Fridge Storage:
Place sliced bars in an airtight container, layering with parchment or wax paper so they don’t stick. Store in the refrigerator for up to 1 week. -
Freezer Storage:
For longer storage, freeze the bars in a single layer on a baking sheet until solid, then transfer to a freezer-safe container or bag. They’ll keep well for up to 2–3 months. -
Thawing:
Let frozen bars sit in the fridge for about an hour or at room temperature for 15–20 minutes before serving. They’re actually pretty tasty straight from the freezer too—firmer, but still delicious.
There’s no real reheating here, since it’s a no bake recipe; you’re mostly just bringing them back toward room temperature so the texture softens slightly.
Notes
A few personal tips from all my years of making these no bake chocolate peanut butter bars:
- Don’t skip packing the base firmly. If the base isn’t tightly pressed, the bars can crumble when sliced. I’ve learned this the hard way when I tried to rush through a batch before a school bake sale.
- Soften the chocolate before cutting. Letting the pan sit out for 5–10 minutes makes a big difference—your knife glides through instead of cracking the top.
- Sweetness level: If you like things less sweet, reduce the powdered sugar to 1 3/4 cups and use dark chocolate for the topping. The base will be slightly softer but still hold together.
- Peanut butter brands: Shelf-stable brands like Jif, Skippy, or store-brand creamy usually give the most reliable results for these no bake dessert bars.
- Room temperature matters: On a very warm day, the bars can soften a bit if left out for hours; keep them chilled until just before serving if your kitchen is warm.
- Flavor improves by the next day. The base and chocolate settle together and the texture gets even better after a night in the fridge.
FAQs
Can I use natural peanut butter in this recipe?
Yes, but it can change the texture. Stir it very well, start with the listed amount, and add an extra tablespoon or two of graham cracker crumbs if the mixture looks oily or too soft.
Why are my bars crumbly when I slice them?
They might need more pressure when pressing into the pan or a little more moisture. Next time, make sure the base is very firmly packed and not too dry—add a tablespoon or two of melted butter if needed.
Can I make these no bake peanut butter bars dairy-free?
You can use vegan butter and dairy-free chocolate chips. Many store brands work well—just check the labels for hidden milk ingredients.
Do I have to use graham crackers?
No. You can use crushed digestive biscuits, vanilla wafers, or even pretzels (for a salty twist). Just keep the total crumb volume about the same.
How long can these sit out at room temperature?
They’re fine for about 2 hours at normal room temperature. If your space is very warm, they’ll soften, so keep them chilled until right before serving for the best texture.
Can I cut this recipe in half?
You can, but you’ll need a smaller pan, like a 6×6-inch dish, or you can press a thinner layer into half of an 8×8-inch pan and leave the rest empty. Personally, I’d rather make the full batch and freeze some.
What kind of chocolate works best?
Semi-sweet chocolate chips are classic, but you can use milk chocolate for a sweeter bar or dark chocolate for a richer, slightly more grown-up taste.
Can I make these ahead for a party?
Yes—these no bake chocolate bars are perfect make-ahead treats. Make them 1–2 days before, keep them chilled, then slice the day of your event.
Conclusion
These no bake peanut butter bars check all the boxes: easy, fast, rich, and completely kid-approved, while still making the adults in the room very happy. They’re one of those recipes that quietly makes its way into every season of life—back-to-school snacks, holiday trays, late-night movie treats.
If you try this No Bake Peanut Butter Bars Recipe, I’d love to hear how it went—tell me your favorite variation, or what your family nicknamed them. And if you enjoy no bake dessert bars, you might also like exploring similar recipes like no bake cheesecake bars or rice krispie treats next time you’re craving something sweet without turning on the oven.
No Bake Peanut Butter Bars
Ingredients
- 1 cup creamy peanut butter about 250 g; not natural “stir-in” style; Jif or Skippy work well
- 1/2 cup unsalted butter melted and slightly cooled
- 2 cups powdered sugar about 240 g; sift if lumpy
- 2 cups graham cracker crumbs about 200 g; about 14 full sheets; regular or gluten-free
- 1 teaspoon pure vanilla extract
- 1/4 teaspoon fine sea salt skip if using salted butter or very salty peanut butter
- 1 1/2 cups semi-sweet chocolate chips about 270 g; or use dark chocolate chips
- 1/4 cup creamy peanut butter for chocolate topping
- flaky sea salt optional, for sprinkling on top
- chopped peanuts optional topping
- mini chocolate chips optional topping
- sprinkles optional; fun for birthdays and holidays
Instructions
- Line an 8×8-inch (20×20 cm) baking pan with parchment paper, leaving overhang on two sides to form a sling. Lightly spray the parchment with nonstick spray if desired to prevent sticking.
- In a medium mixing bowl, stir together the melted butter and 1 cup creamy peanut butter until smooth and glossy. Add the powdered sugar, graham cracker crumbs, vanilla, and fine sea salt. Mix with a sturdy spoon or spatula until everything is well combined and no dry patches remain. The mixture should be thick and slightly crumbly but hold together when pressed, like a soft cookie dough.1 cup creamy peanut butter, 1/2 cup unsalted butter, 2 cups powdered sugar, 2 cups graham cracker crumbs, 1 teaspoon pure vanilla extract, 1/4 teaspoon fine sea salt
- Transfer the peanut butter mixture to the prepared pan. Use clean hands or the back of a spoon to press it firmly and evenly into the bottom of the pan. Take a moment to really pack it down so the bars slice cleanly later. For an extra-smooth surface, place a piece of parchment on top and press with the bottom of a measuring cup.
- In a microwave-safe bowl, combine the semi-sweet chocolate chips and 1/4 cup creamy peanut butter. Microwave in 20–30 second bursts, stirring well after each interval, until the chocolate is just melted and smooth. Do not overheat; the residual heat will finish melting the chocolate as you stir.1 1/2 cups semi-sweet chocolate chips, 1/4 cup creamy peanut butter
- Pour the warm chocolate-peanut butter mixture over the peanut butter base. Gently tilt the pan and use an offset spatula or the back of a spoon to spread it into an even layer all the way to the edges. If using flaky sea salt, chopped peanuts, mini chocolate chips, or sprinkles, add them now while the chocolate is still soft so they adhere.flaky sea salt, chopped peanuts, mini chocolate chips, sprinkles
- Refrigerate the pan for at least 2 hours, or until the chocolate is set and the bars feel firm when you gently press the center. For faster setting, you can chill in the freezer for about 45 minutes, though the texture is slightly better with a slower chill in the refrigerator.
- Once fully set, use the parchment sling to lift the slab out of the pan and place it on a cutting board. Let sit at room temperature for 5–10 minutes to slightly soften the chocolate, which helps prevent cracking. Use a sharp knife, wiping it clean between cuts, to slice into 16 small squares or 12 larger bars.
- Serve the bars chilled or just slightly cool. Store leftovers in an airtight container in the refrigerator for up to 1 week, layering with parchment or wax paper so the bars don’t stick together. For longer storage, freeze for 2–3 months.