I’ll admit it—I’ve been a total peanut butter bar fanatic ever since my mum passed along her no-bake recipe decades ago. But these No-Bake Easter Peanut Butter Bars? They’re a whole new level of cozy, craveable goodness that even my picky teenager can’t resist. I first tried whipping them up on a sunny spring afternoon when my grandkids were begging to “help,” armed with pastel sprinkles and way-too-big wooden spoons. Spoiler alert: By the time we were done, the kitchen looked like Easter exploded, but every single sticky bite was worth it.
There’s something just so comforting about a dessert that doesn’t heat up your kitchen—especially here in the U.S., where April temps can swing from sweater-weather chills to unexpected heat waves. These bars marry creamy peanut butter, a satisfying crunch from cereal, and a glossy chocolate topping that shatters in the best way possible. It’s like peanut butter cups met Rice Krispies treats, had a little spring fling, and came up with this delightful mash-up. Trust me, you’ll fall head over heels (yes, really!).

Why You’ll Love These No-Bake Easter Peanut Butter Bars
- No oven? No problem—your kitchen stays cool (and so do you!).
- Ready in under 30 minutes (plus a quick chill) so you can dash out the door for Easter egg hunts on time.
- Makes a perfect gift for neighbors, teachers, or that friend who always brings wine to brunch.
- Simple, pantry-friendly ingredients—chances are you’ve got almost everything on hand.
- Totally customizable: swap nut butters, sprinkle colors, or chocolate types to match your vibe.
- Kid-approved activity—little hands will get messy (and they’ll love every second of it!).
- Travel-friendly snack for road trips, picnics, or potlucks.
- Balance of creamy, crunchy, and chocolaty in every bite—so addictive!
Ingredient Notes
- Peanut Butter: I’ve tried both natural (oil-separated) and commercial creamy brands—either works. Natural lends a wholesome, slightly tangy note, while the store-bought kind is super smooth. If you want a dairy-free twist, go ahead and sub half the butter for coconut oil.
- Butter or Coconut Oil: Unsalted butter gives rich, mellow flavor; coconut oil keeps it vegan-friendly and shakes up the taste ever so slightly.
- Sweetener: Honey, light corn syrup, or pure maple syrup all do the job. Maple adds a subtle woodsy flavor—so festive for springtime!
- Cereal: Rice cereal or crispy oat cereal both provide that delightful snap. Whole-grain versions boost fiber for a slightly better-for-you treat.
- Vanilla & Salt: Never skip the dash of vanilla—it brightens flavors. And a pinch of sea salt intensifies the peanut butter’s nuttiness (even if you’re using salted PB, just taste as you go).
- Chocolate Chips: Semi-sweet or dark work beautifully. Dark chocolate amps up the antioxidants and adds a richer contrast to the sweet base.
- Coconut Oil for Drizzle: This little trick makes your chocolate layer glossy and smooth—nobody wants dull, crumbly chocolate.
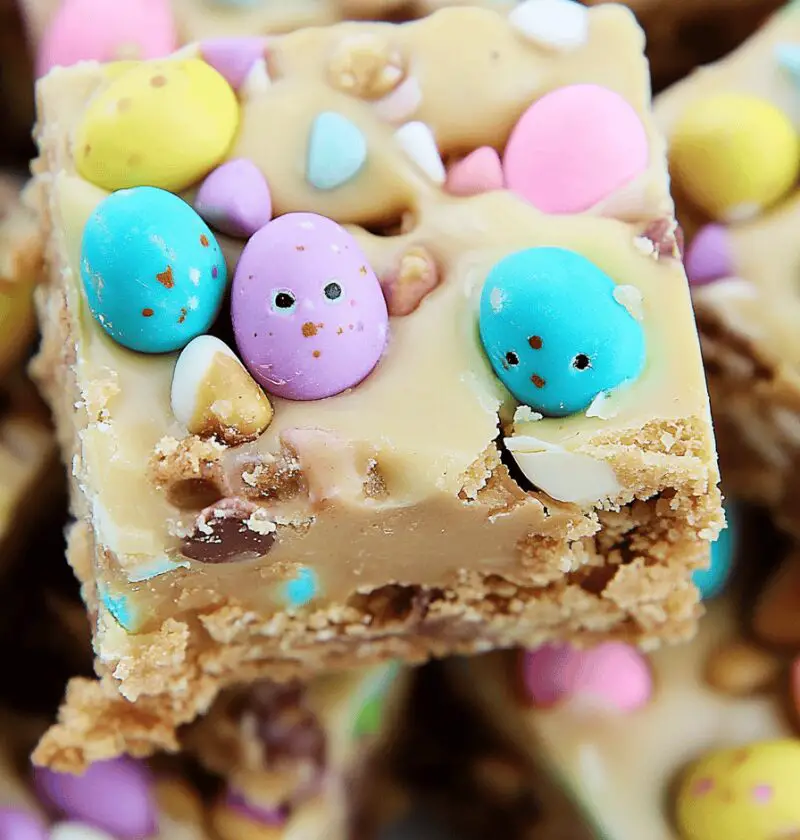
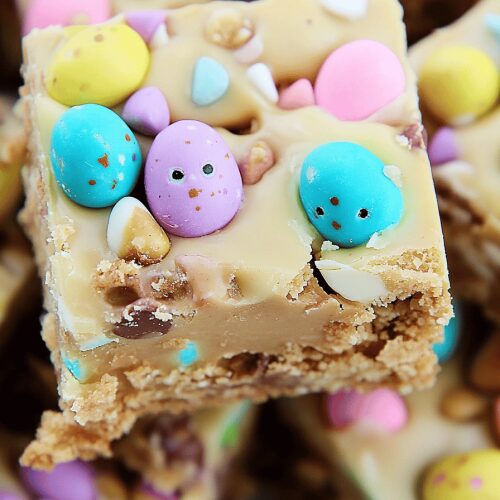
- Fun Toppers: Pastel candy-coated chocolates, sprinkles, mini eggs—whatever puts you in that Easter spirit!
Step-by-Step Directions
- Line an 8×8-inch pan with parchment paper, leaving a bit of overhang on two sides. This is your secret hack for easy removal—trust me, you’ll thank yourself later.
- In a roomy mixing bowl, pour in your melted butter (or coconut oil), peanut butter, sweetener of choice, pure vanilla, and sea salt. Stir vigorously until the mixture is silky and lump-free. (Pro tip: If it’s too stiff, nuke it in 10-second bursts.)
- Add in the cereal and give it a gentle fold. You want every crunchy nugget coated in that dreamy peanut butter blend. Don’t rush—gentle arms make for uniform bars.
- Transfer the mixture to your prepared pan and press down firmly. I like to cover it with plastic wrap or parchment and use the bottom of a flat glass to get a smooth, compact surface—this little step stops crumbly bars.
- Pop the pan into the fridge for 20–25 minutes. This chill time is crucial, so your chocolate topping stays perfectly glossy and doesn’t seep down into the base.
- Meanwhile, melt your chocolate chips and coconut oil together. I either use a double boiler or microwave in 30-second bursts, stirring between each to keep it lump-free and shiny. (If you skip stirring, you’ll get sad, grainy chocolate—don’t skip this part!)
- Once the base is firm, pour that luscious chocolate over the top. Use an offset spatula or the back of a spoon to smooth it. Right away, sprinkle on your pastel candy pieces or, heck, even a dash of edible glitter if you’re feeling fancy.
- Back into the fridge for another 15–20 minutes, until the chocolate sets with that lovely, satisfying snap.
- Grab the parchment overhang, lift out your slab of goodness, and slice into 12–16 bars. I like big bars, but hey, go petite if you’re watching portions.
- Serve immediately or stash extras in an airtight container. (Go ahead—prep a double batch; you’ll want backups.)
Variations & Flavor Twists
- Almond Butter Swap: Use almond or cashew butter instead of peanut for a gentle, nutty twist.
- Extra Crunch: Stir in chopped toasted peanuts, crushed pretzels, or even mini rice puffs.
- White Chocolate Drizzle: Melt white chocolate with a drop of natural food coloring for pastel stripes—perfect for Easter tables.
- Gluten-Free Friendly: Pick your favorite GF crispy rice or oat cereal, and voilà—everyone’s happy.
- Fruit & Nut: Mix in dried cranberries or cherries with a handful of chopped pistachios for a tangy crunch.
- Warm Spice Kick: Add a pinch of ground cinnamon or a drop of maple extract to the base for cozy depth.
- Minty Fresh: Stir a touch of peppermint extract into your melted chocolate for a festive mint-chocolate vibe.
Storage & Reheating Tips
Here’s the best part: these bars are low-maintenance once they’re set. Store them in an airtight container in the fridge for up to 7 days—though they rarely last that long in my house! If you’d like to freeze extras, layer the bars between parchment sheets and freeze for up to 3 months.
- Thaw frozen bars in the fridge for a couple of hours before serving.
- If the chocolate topping cracks when you slice, let the bars sit at room temperature for 10 minutes to mellow out.
- No reheating needed—these are perfectly delightful cold or at room temp.
- Make-Ahead Hack: Mix and press the base the night before, cover tightly, then melt the chocolate just before your gathering.
And that’s it—simple, right? I love how these No-Bake Easter Peanut Butter Bars feel like a spring celebration in every bite, without turning on the oven or fussing over tricky steps. Whether you’re feeding a crowd at church, passing plates at a family brunch, or sneaking a few for yourself during a Netflix binge (no judgment here), these bars have your back.
Give this recipe a whirl, and let me know how it goes! Drop a comment below with your favorite twist—did you try the minty version, or maybe you went all out with white-chocolate stripes? I adore hearing from you, and if you snap a pic, tag me so I can share the love. Happy Easter baking (or rather, no-baking!), and see you next time over on the blog for more cozy, comforting treats.
No Bake Easter Peanut Butter Bars
Ingredients
- 2 cups creamy peanut butter (natural or commercial brand)
- 1/2 cup unsalted butter melted (sub coconut oil for dairy-free)
- 1/4 cup honey or light corn syrup (maple syrup works too)
- 1/4 tsp fine sea salt (adjust if using salted peanut butter)
- 1 1/2 cups semi-sweet chocolate chips (dark for less sugar)
- 1 tbsp coconut oil (for shiny chocolate drizzle)
- pastel candy-coated chocolates or sprinkles Optional