Monster Cookies Recipe
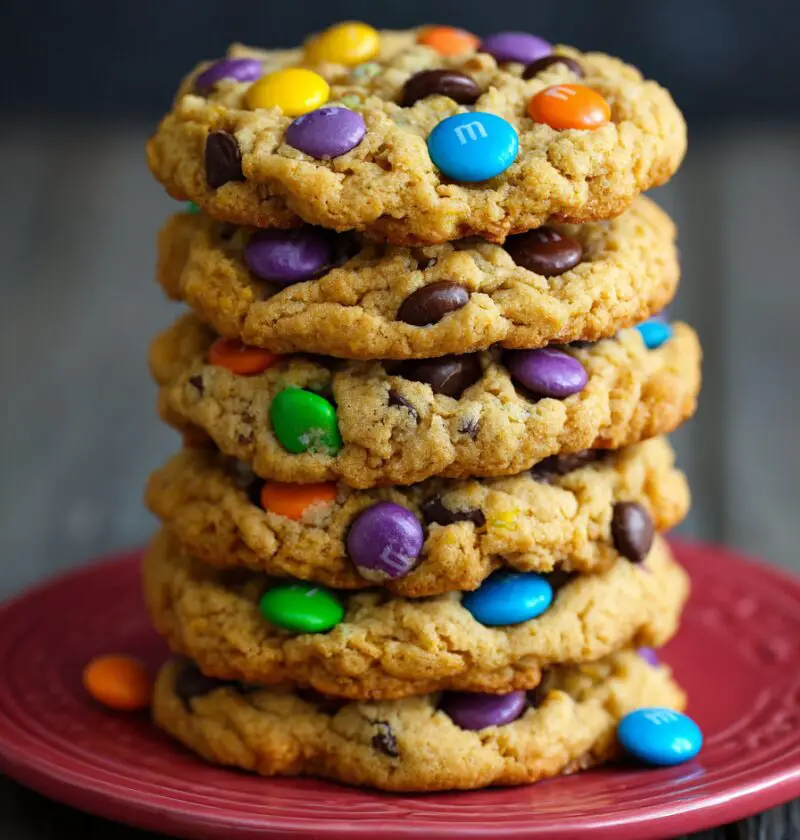
Big, chewy, colorful, and loaded with goodies, this Monster Cookies Recipe gives you bakery-style cookies that are soft in the center, crisp at the edges, and packed with peanut butter, oats, chocolate chips, and M&M’s. They’re the kind of family-friendly cookies that disappear from the plate faster than you can say “save me one!”
As a 50-year-old mom who’s baked her way through countless school events, church potlucks, and late-night teen hangouts, I can tell you: a good, classic monster cookie recipe is pure magic. These are my go-to when I need something that always gets compliments, from kids clutching colorful cookies to grown-ups sneaking “just one more.”
Why This Monster Cookies Recipe Belongs in Your Favorites
Let me explain why these chewy monster cookies are such a keeper.
- Big, bakery-style cookies – Thick, chewy centers with lightly crisp edges, just like the fancy bakery case.
- Loaded with mix-ins – Peanut butter, oats, chocolate chips, and M&M’s in every single bite—true loaded peanut butter cookies.
- Easy, no-fuss dough – No mixer drama and no complicated steps; just basic pantry ingredients and a bowl.
- Soft and chewy for days – Thanks to oats and peanut butter, these soft and chewy cookies stay tender, not dry.
- Totally customizable – Swap in different candies, nuts, or chips to create your own homemade monster cookies combo.
- Freezer-friendly – Freeze the dough balls or baked cookies for quick, crowd-pleasing cookies anytime.
- Perfect for parties and bake sales – Colorful candy cookies that look fun and festive on any dessert table.
- Naturally gluten-friendly version available – Use certified gluten-free oats and a simple tweak, and you’re good to go.
What Makes This Monster Cookies Recipe Special
Monster cookies are like the happy marriage of three classics: peanut butter oatmeal cookies, peanut butter chocolate chip cookies, and M&M cookies. You get that nutty peanut butter flavor, the hearty texture of oats, and the sweet crunch of chocolate candy all in one giant, chewy cookie.
This version leans into a few things I’ve learned after many, many batches:
- A mix of brown sugar and granulated sugar gives you rich flavor and those chewy centers.
- Slightly underbaking keeps them soft and tender.
- Chilling the dough (just 30 minutes) helps them bake up thick and bakery-style instead of spreading flat.
I love these around Halloween and back-to-school season because the colors feel festive, but honestly, they’re a year-round favorite. They travel well in lunchboxes, they’re sturdy in cookie tins, and they somehow feel like both a nostalgic classic monster cookie recipe and a fun, modern treat.
And you know what? These are “peacekeeper cookies” at my house—teen drama, busy days, or late-night homework? A batch of warm monster cookies on the counter and people suddenly remember they like each other.
Ingredients
Here’s exactly what you’ll need for this Monster Cookies Recipe. This makes large, bakery-style monster cookies, but you can scoop them smaller if you’d like.
Wet Ingredients
- 1 cup creamy peanut butter (not natural “stir” style; use something like Jif or Skippy)
- 1/2 cup unsalted butter, softened (1 stick)
- 1 cup packed light brown sugar
- 1/2 cup granulated sugar
- 2 large eggs, at room temperature
- 2 tsp pure vanilla extract
Dry Ingredients
- 1 1/2 cups old-fashioned rolled oats (not quick oats; they give the best hearty, chewy texture)
- 1 cup all-purpose flour
- 1 tsp baking soda
- 1/2 tsp fine sea salt
Mix-ins (the “monster” part)
- 1 cup semisweet chocolate chips (mini or regular)
- 1 cup M&M’s (plus a small handful extra for pressing on top)
- 1/2 cup peanut butter chips or butterscotch chips (optional, but so good)
Helpful Ingredient Tips
- Peanut butter: Use a classic, shelf-stable creamy peanut butter for structure. Natural peanut butters can make the dough greasy and crumbly.
- Oats: Old-fashioned rolled oats help create those chewy monster cookies we’re after. Quick oats can make the cookies dry.
- Candy: Regular or mini M&M’s both work; mini give you more color in every bite. Holiday colors are fun for seasonal bakes.

Directions
Follow these simple steps and you’ll have homemade monster cookies cooling on your counter in no time.
-
Cream the butter, peanut butter, and sugars
In a large mixing bowl, beat together the softened butter, creamy peanut butter, brown sugar, and granulated sugar until smooth, light, and fluffy—about 2–3 minutes. You can use a hand mixer or a stand mixer with the paddle attachment. -
Add eggs and vanilla
Add the eggs one at a time, mixing well after each addition. Stir in the vanilla. Scrape down the sides of the bowl so everything’s nicely combined. -
Combine the dry ingredients
In a separate bowl, whisk together the oats, flour, baking soda, and salt. This helps the baking soda and salt spread evenly through the dough, so you don’t get odd salty or flat spots. -
Mix wet and dry together
Add the dry mixture to the peanut butter mixture. Mix on low speed just until most of the flour and oats disappear. The dough will be thick—this is exactly what you want for hearty, bakery-style monster cookies. -
Fold in the mix-ins
Gently stir in the chocolate chips, M&M’s, and peanut butter chips with a spatula or wooden spoon. Save a few M&M’s to press on top of the dough balls later; it makes the cookies extra pretty. -
Chill the dough
Cover the bowl and chill the dough in the refrigerator for at least 30 minutes (up to 24 hours). Chilling helps control spread and gives you soft and chewy cookies with thick centers. If chilling longer than 2 hours, let it sit at room temp for 10–15 minutes before scooping. -
Preheat and prep the pans
When you’re almost ready to bake, preheat your oven to 350°F (175°C). Line two baking sheets with parchment paper or silicone baking mats for easy cleanup and even baking. -
Scoop the dough
For classic bakery-style monster cookies, use a large cookie scoop (about 3 tablespoons of dough per cookie) and place dough mounds 3 inches apart. Gently press a few extra M&M’s on top of each dough ball for that colorful, crowd-pleasing cookie shop look. -
Bake the cookies
Bake, one sheet at a time, for 10–12 minutes, just until the edges are set and lightly golden, and the centers still look a bit soft and puffy. They’ll continue to cook on the hot pan after you pull them out. -
Cool and set
Let the cookies cool on the baking sheet for 5–10 minutes, then transfer to a wire rack to cool completely. This rest helps them firm up into perfect, soft and chewy cookies instead of drying out.
Servings & Timing
- Yield: About 20 large bakery-style monster cookies (or 32–36 medium cookies if you scoop smaller)
- Prep Time: 20 minutes
- Chill Time: 30 minutes (minimum)
- Bake Time: 10–12 minutes per batch
- Total Time: About 1 hour, including chilling (not counting extra batches in the oven)
If you’re baking for a crowd or a bake sale, you can easily double this recipe and stagger your baking sheets.
Variations
You know what? Monster cookies really are a playground for creativity. Try a few of these twists:
- Gluten-friendly monster cookies – Use certified gluten-free oats and swap the all-purpose flour for a 1:1 gluten-free baking blend.
- Trail mix monster cookies – Add chopped peanuts, raisins, or dried cranberries for a trail-mix-inspired, loaded peanut butter cookie.
- Peanut-free version – Use sunflower seed butter and peanut-free candies (check labels) for a school-safe cookie.
- Dark chocolate dream – Use dark chocolate chips and dark chocolate M&M’s for a richer, less-sweet cookie.
- Holiday monster cookies – Use seasonal M&M’s (red and green, pastels, or orange and brown) for festive, colorful candy cookies.
- Mini monster cookies – Make smaller 1-tablespoon cookies for kids’ parties; reduce baking time to about 8–9 minutes.
Storage & Reheating
Room temperature:
- Store cooled cookies in an airtight container at room temperature for 4–5 days.
- Layer with parchment paper if you stack them to keep the M&M’s from smudging.
Freezer (baked cookies):
- Freeze baked cookies in a zip-top bag or freezer-safe container for up to 3 months.
- Thaw at room temperature, or warm in a 300°F oven for 3–5 minutes for that “just baked” feel.
Freezer (cookie dough):
- Scoop the dough into balls, place on a tray, and freeze until solid.
- Transfer to a freezer bag and label. Freeze for up to 3 months.
- Bake from frozen at 350°F, adding 1–2 extra minutes; watch the edges for doneness.
Make-ahead tip:
If I know a busy week is coming, I mix a batch of dough on Sunday, chill it, and bake fresh cookies midweek. Chilled dough actually gives you even better soft, chewy monster cookies.
Notes from My Kitchen
- Don’t overbake: The secret to the best monster cookie recipe is to pull them when the centers still look a little soft. They’ll set as they cool, giving you that crowd-pleasing chewy texture.
- Control the spread: If your kitchen is warm, keep the scooped dough in the fridge between batches so the butter doesn’t get too soft.
- Customize the sweetness: If you like cookies a bit less sweet, reduce the granulated sugar to 1/3 cup and use dark chocolate chips.
- Bigger is better (sometimes): Large cookies bake more evenly and stay softer in the center. For that true bakery-style monster cookie look, stick with the big scoops.
- For kids’ baking days: Pre-measure the mix-ins into little bowls and let kids “build” their own monster cookies by stirring in extra candy or chips.
Honestly, these cookies have become a bit of a family tradition. When my grown kids come home, someone always asks, “Are you making the monster cookies?” That’s how you know a recipe’s a keeper.
Monster Cookies Recipe FAQs
1. Can I use natural peanut butter in this Monster Cookies Recipe?
You can, but the texture may be crumbly and greasy. For consistent results with soft and chewy cookies, stick with a regular creamy peanut butter like Jif or Skippy.
2. Do I have to chill the dough?
Chilling isn’t strictly required, but it really helps the cookies stay thick and chewy rather than spreading thin. I recommend at least 30 minutes.
3. Can I make these monster cookies smaller?
Yes, use about 1 tablespoon of dough for smaller cookies and bake 8–9 minutes. Just keep an eye on them so they don’t overbake.
4. Why did my cookies spread too much?
Common causes are warm dough, very soft butter, or not enough flour/oats. Make sure you chill the dough and measure dry ingredients with level measuring cups.
5. Can I leave out the M&M’s or switch candies?
Absolutely. You can make straight peanut butter chocolate chip cookies using just chips, or swap in chopped candy bars, Reese’s pieces, or other chocolate candy.
6. Are monster cookies gluten-free?
Traditional recipes can be close, but this one uses all-purpose flour. For a gluten-friendly version, use gluten-free oats and a 1:1 gluten-free flour blend.
7. How do I keep my cookies soft after baking?
Store them in an airtight container and don’t overbake. You can also tuck a small piece of bread in the container; it helps maintain moisture.
8. Can I double this recipe for a crowd?
Yes, this recipe doubles well. Just use a large mixing bowl and rotate baking sheets halfway through baking if your oven has hot spots.
Conclusion
These chewy, colorful monster cookies are everything I love in a family-friendly cookie: simple to make, easy to customize, and absolutely loaded with peanut butter, oats, chocolate chips, and M&M’s. They’re the kind of crowd-pleasing cookies that feel special enough for a party but cozy enough for a random Tuesday night.
If you try this Monster Cookies Recipe, I’d love to hear how it goes—tell me what mix-ins you used or how your kids decorated theirs. And if you’re in a cookie mood, you might also enjoy my classic chocolate chip cookies or peanut butter blossoms; they all play very nicely together on a cookie tray.

Monster Cookies
Ingredients
- 1 cup creamy peanut butter not natural “stir” style; use a brand like Jif or Skippy
- 1/2 cup unsalted butter softened (1 stick)
- 1 cup light brown sugar packed
- 1/2 cup granulated sugar
- 2 large eggs at room temperature
- 2 teaspoons vanilla extract pure
- 1 1/2 cups old-fashioned rolled oats not quick oats
- 1 cup all-purpose flour
- 1 teaspoon baking soda
- 1/2 teaspoon fine sea salt
- 1 cup semisweet chocolate chips mini or regular
- 1 cup M&M’s plus extra for pressing on top
- 1/2 cup peanut butter chips or butterscotch chips optional
Instructions
- In a large mixing bowl, beat together the softened butter, creamy peanut butter, brown sugar, and granulated sugar until smooth, light, and fluffy, about 2–3 minutes. Use a hand mixer or a stand mixer with the paddle attachment.1 cup creamy peanut butter, 1/2 cup unsalted butter, 1 cup light brown sugar, 1/2 cup granulated sugar
- Add the eggs one at a time, mixing well after each addition. Stir in the vanilla extract and scrape down the sides of the bowl so everything is evenly combined.2 large eggs, 2 teaspoons vanilla extract
- In a separate bowl, whisk together the rolled oats, all-purpose flour, baking soda, and fine sea salt until well combined.1 1/2 cups old-fashioned rolled oats, 1 cup all-purpose flour, 1 teaspoon baking soda, 1/2 teaspoon fine sea salt
- Add the dry mixture to the peanut butter mixture. Mix on low speed just until most of the flour and oats are incorporated. The dough will be thick.
- Gently fold in the chocolate chips, M&M’s, and peanut butter or butterscotch chips with a spatula or wooden spoon. Reserve a small handful of M&M’s to press on top of the dough balls before baking.1 cup semisweet chocolate chips, 1 cup M&M’s, 1/2 cup peanut butter chips or butterscotch chips
- Cover the bowl and chill the dough in the refrigerator for at least 30 minutes and up to 24 hours. If chilling longer than 2 hours, let the dough sit at room temperature for 10–15 minutes before scooping.
- When ready to bake, preheat your oven to 350°F (175°C). Line two baking sheets with parchment paper or silicone baking mats.
- Use a large cookie scoop (about 3 tablespoons of dough per cookie) to form dough balls and place them 3 inches apart on the prepared baking sheets. Gently press a few extra M&M’s on top of each dough ball for a colorful finish.
- Bake one sheet at a time for 10–12 minutes, just until the edges are set and lightly golden and the centers still look slightly soft and puffy. They will continue to cook on the hot pan after you remove them from the oven.
- Let the cookies cool on the baking sheet for 5–10 minutes, then transfer them to a wire rack to cool completely.