Microwave Fudge Recipe
This Microwave Fudge Recipe gives you rich, chocolatey fudge in minutes—no oven, no candy thermometer, and almost no effort, just smooth, easy microwave fudge that tastes like you stood over the stove all afternoon.
You know what? For years, I thought good homemade fudge had to be fussy and a little dramatic. Stirring, checking temperatures, worrying about grainy sugar—no, thank you. Then this simple microwave fudge recipe came into my life, and I’ve never looked back. It’s a quick microwave fudge that uses sweetened condensed milk, real chocolate, and a pinch of love. It’s especially perfect during the holidays, for last‑minute gifts, or whenever you want a no bake fudge that still feels special.
About This Easy Microwave Fudge
This chocolate microwave fudge is a 3 ingredient fudge at its heart: chocolate, sweetened condensed milk, and butter. From there, you can dress it up however you like—nuts, crushed candy canes, flaky salt, even peanut butter swirls. It’s one of those easy homemade fudge recipes you can memorize after making it once.
I’m a 50‑year‑old mom and new grandma, and I’ll tell you exactly when this fudge saves me:
- When one of my kids texts, “Hey, can we stop by tonight?” and I want a fast dessert.
- When I need something for a potluck, but also need to wash three loads of laundry.
- When I refuse to turn on the oven in July, but still want a homemade fudge recipe that tastes like a hug.
There’s no long cooking time, no fussy steps, and no guesswork. You melt, stir, microwave again, then chill. That’s it. This is one of those microwave dessert recipes that truly earns its spot in your “emergency dessert” file.
And while no one is calling this health food, it is special because:
- You control the ingredients—no artificial flavors.
- It’s very rich, so small pieces satisfy your sweet tooth.
- It freezes beautifully, so you can keep portions small and stash the rest.
Why You’ll Love This Microwave Fudge Recipe
- No oven needed: This is a true no bake fudge—everything happens right in the microwave.
- Ready fast: About 10 minutes of hands‑on time, plus chilling, and you’re done.
- Beginner‑friendly: No candy thermometer, no tricky stages, just simple steps.
- Perfect for gifts: Cut into neat squares, it looks like you bought it from a fancy candy shop.
- Customizable: Turn it into peppermint fudge, nutty fudge, or even a swirl fudge with simple mix‑ins.
- Kid‑friendly project: Older kids can safely help as long as an adult handles the hot bowl.
- Great make‑ahead dessert: It keeps well in the fridge and freezer, so you can prepare it days ahead.
- Uses pantry staples: Sweetened condensed milk, chocolate chips, and butter—things many of us already have.
- Ideal quick dessert recipe: Last‑minute guests? Dessert emergency? This covers you without stress.
- Naturally gluten‑free: As long as your mix‑ins are gluten‑free, it’s an easy treat for many diets.
Ingredients
For this easy chocolate fudge, you’ll need:
-
3 cups (about 18 oz / 510 g) semi‑sweet chocolate chips
Use a good brand like Ghirardelli or Guittard if you can; they melt smoothly and give richer flavor. You can also mix half semi‑sweet and half milk chocolate for softer, sweeter fudge. -
1 can (14 oz / 396 g) sweetened condensed milk
This is condensed milk fudge at its finest. Make sure you’re using sweetened condensed milk, not evaporated milk—they are very different. -
4 tablespoons (½ stick / 56 g) unsalted butter
Cut into pieces so it melts evenly. Salted butter works too; just reduce or skip the added salt. -
1 teaspoon pure vanilla extract
This rounds out the chocolate flavor and makes the fudge taste more “bakery style.” -
¼ teaspoon fine sea salt
Just enough to balance the sweetness. Don’t skip it; a pinch of salt makes chocolate shine.
Optional mix‑ins and toppings (pick one or more):
- ½–¾ cup chopped nuts (walnuts, pecans, or almonds)
- ½ cup mini marshmallows
- ½ cup crushed peppermint candy or candy canes
- ¼ cup peanut butter, warmed slightly, for swirling
- Flaky sea salt for sprinkling on top

Ingredient tips:
- Chocolate: Chips are easiest, but chopped chocolate bars also work. Dark chocolate gives a more intense flavor; milk chocolate gives very soft, sweet fudge.
- Sweetened condensed milk: A full‑fat version gives the best texture. Store brand usually works fine.
- Butter: Bring it closer to room temperature if you remember; it blends more smoothly with the warm chocolate.
Directions
-
Prepare your pan
Line an 8×8‑inch (20×20 cm) baking pan with parchment paper, leaving some overhang on two sides like little “handles.” Lightly grease the parchment if you want ultra‑clean edges. This makes it easy to lift the fudge out later. -
Combine chocolate, condensed milk, and butter
In a large microwave‑safe bowl (glass is great), add the chocolate chips, the full can of sweetened condensed milk, and the pieces of butter. Don’t add the vanilla yet—that comes later. -
Microwave gently
Microwave the mixture on 50% power for 1 minute. Stir well, then microwave again in 20–30 second bursts at 50% power, stirring after each one, until the chocolate is mostly melted and smooth. This usually takes 2–3 rounds, depending on your microwave. It’s better to stop early and stir than scorch the chocolate. -
Finish melting with residual heat
When about 90% of the chocolate is melted, stop microwaving and stir until it finishes melting from the heat of the bowl. This helps keep the texture silky instead of grainy. -
Add vanilla and salt
Stir in the vanilla extract and sea salt until fully combined. The mixture should be thick, glossy, and still pourable, a bit like brownie batter. -
Fold in mix‑ins (if using)
If you’re adding nuts, marshmallows, or crushed candy, gently fold them into the fudge now. If you’re doing a peanut butter swirl, pour the fudge into the pan first, then spoon warm peanut butter over the top and swirl with a knife. -
Transfer to the pan
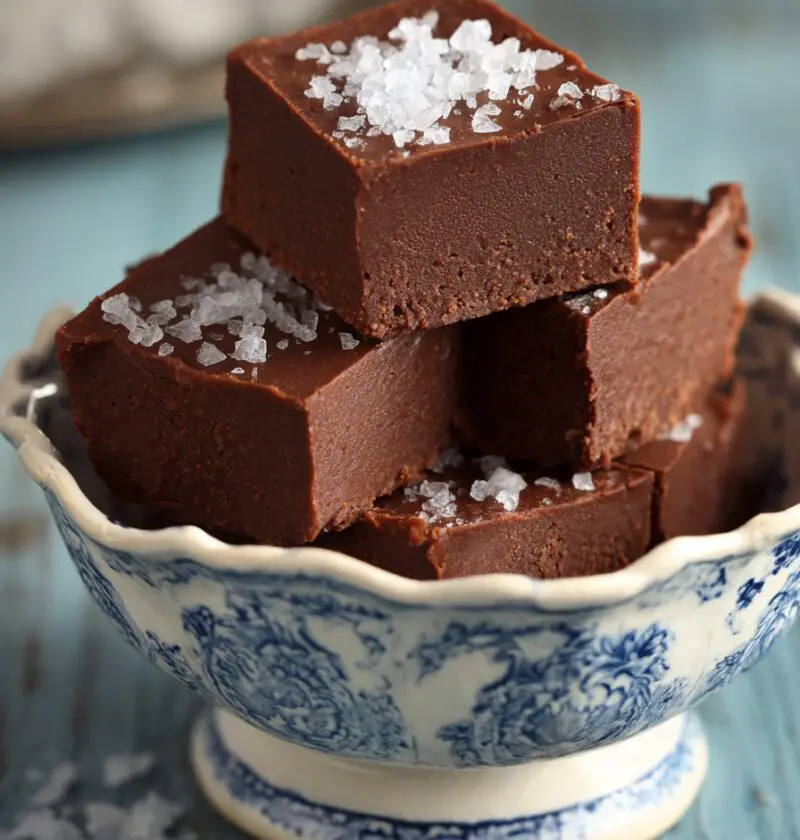
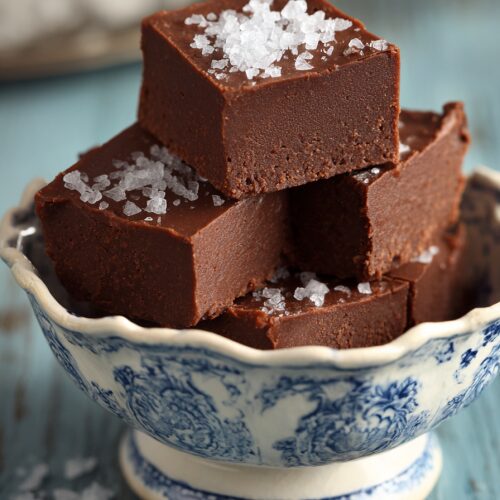
Scrape the fudge mixture into your prepared pan. Use a rubber spatula or an offset spatula to spread it into an even layer, smoothing the top. If you’d like, sprinkle flaky sea salt or extra toppings over the surface and press gently so they stick. -
Chill until firm
Place the pan in the refrigerator for at least 2 hours, or until the fudge is firm to the touch in the center. For very clean squares, chill 3–4 hours or even overnight. -
Cut into squares
Use the parchment handles to lift the slab of fudge out of the pan and onto a cutting board. With a sharp knife, cut into 1‑inch squares (or larger if you’re feeling bold). Wipe the knife with a warm, damp cloth between cuts for neat edges. -
Serve and enjoy
Arrange your easy homemade fudge on a plate or in gift boxes. Let it sit at room temperature for about 10 minutes before serving so the texture softens just a bit. Then enjoy your quick microwave fudge victory.
Servings & Timing
- Yield: About 36 small squares (1‑inch pieces)
- Prep Time: 10 minutes
- Chill Time: 2–4 hours (hands‑off)
- Total Time: About 2 hours 10 minutes (most of that is chilling in the fridge while you do something else)
If you’re planning this microwave dessert recipe for a party, make it the night before and forget about it until you’re ready to cut and serve.
Variations
- Peppermint Holiday Fudge: Stir in crushed candy canes and top with a few extra pieces—perfect for Christmas treat boxes.
- Nutty Walnut Fudge: Fold in chopped walnuts or pecans for a classic old‑fashioned fudge vibe.
- Peanut Butter Swirl Fudge: Drizzle warmed peanut butter over the top and swirl with a knife before chilling.
- Rocky Road Microwave Fudge: Add mini marshmallows and chopped almonds for a fun, chewy texture.
- Dark Chocolate Sea Salt Fudge: Use dark chocolate chips and finish with flaky sea salt for a grown‑up dessert.
- Mocha Fudge: Stir in 1–2 teaspoons of instant espresso powder with the chocolate for a subtle coffee flavor.
Storage & Reheating
This simple fudge recipe stores very well, which is one reason I love making a double batch.
- Room temperature: In a cool kitchen, you can keep the fudge at room temperature in an airtight container for about 3–4 days. Keep it away from heat and sunlight so it doesn’t get too soft.
- Refrigerator: For longer storage, keep fudge in a covered container in the fridge for up to 2 weeks. Place parchment between layers to prevent sticking.
- Freezer: For even longer storage, freeze the fudge (well wrapped) for 2–3 months. I like to freeze it in a single layer first, then move it to a freezer bag with the air pressed out.
To enjoy frozen fudge, let it sit in the refrigerator for a few hours or overnight, or on the counter for 20–30 minutes. There’s no real “reheating” here—just let it warm slightly for the best creamy texture.
Make‑ahead tip: This quick dessert recipe is ideal for making early in the holiday season. I’ll often make a few flavors of microwave fudge in November, freeze them, and pull out mixed platters all December long.
Notes From My Kitchen
- Use a bigger bowl than you think you need. The mixture thickens as you stir, and a roomy bowl keeps you from chasing chocolate around the edges.
- Don’t rush the microwave. Short bursts at reduced power are your friend. High power can scorch chocolate, and once it burns, there’s no saving it.
- The salt matters. Even though it’s such a tiny amount, that little bit of salt keeps the fudge from tasting flat and overly sweet.
- Texture tweaks:
- If you like firmer fudge, use more semi‑sweet or dark chocolate.
- For softer fudge, use some milk chocolate or reduce the chocolate chips slightly (to about 2¾ cups).
- Cutting neat squares: Chill well, use a sharp knife, and warm the knife under hot water, then dry it, before each pass. It feels fussy, but it makes gift‑worthy pieces.
- Batch size: You can make this recipe in a 9×13‑inch pan by increasing all ingredients by 50%; just watch the microwave time as the bowl will be fuller.
Microwave Fudge Recipe FAQs
Can I use evaporated milk instead of sweetened condensed milk?
No—evaporated milk is thinner and unsweetened, so it won’t set the same way. For this microwave fudge recipe, it really has to be sweetened condensed milk.
Why is my fudge grainy or dry?
Most of the time, grainy fudge means the chocolate overheated. Next time, use lower power on the microwave and stop when it’s almost melted, then stir until smooth.
Can I make this easy microwave fudge without butter?
Yes, you can leave the butter out; the fudge will still set but will be a little firmer and slightly less creamy. You can also use a neutral‑tasting coconut oil for a different twist.
Can I use white chocolate for this recipe?
You can, but white chocolate behaves differently. Use high‑quality white chips or bars, and know that white chocolate fudge will usually be softer and sweeter than chocolate microwave fudge.
How long does microwave fudge last?
Properly stored in the fridge, this simple fudge recipe keeps well for about 2 weeks. In the freezer, it can last up to 3 months without much change in texture.
Is this recipe gluten‑free?
Yes, the base of this easy chocolate fudge is gluten‑free. Just check your mix‑ins (like cookies or certain candies) if you’re serving someone who needs to avoid gluten.
Can kids help make this fudge?
Absolutely. Kids can help measure ingredients, stir between microwave rounds, and add toppings. Just have an adult handle the hot bowl and any knife work.
What pan size works best?
An 8×8‑inch pan gives nice thick pieces. You can use a 9×9‑inch pan for slightly thinner fudge, or a loaf pan for a half batch.
Conclusion
This Microwave Fudge Recipe is the kind of dessert I wish I’d had in my back pocket when my kids were little—fast, fuss‑free, and always a hit. You get rich, creamy, chocolate fudge with very little effort, and you can twist it into all sorts of flavors depending on your mood or the season.
If you try this easy homemade fudge, let me know how it turns out—tell me your favorite mix‑ins or who you shared it with. And if you’re still in a no‑bake mood, you might like pairing this with a simple no‑bake cheesecake or peanut butter bars for a full dessert spread.
Microwave Fudge
Ingredients
- 3 cups semi-sweet chocolate chips about 18 oz / 510 g; or use half semi-sweet and half milk chocolate for softer, sweeter fudge
- 14 oz sweetened condensed milk one can (396 g); do not substitute evaporated milk
- 4 tablespoons unsalted butter ½ stick / 56 g, cut into pieces; salted butter is fine if you reduce or omit added salt
- 1 teaspoon pure vanilla extract
- 1/4 teaspoon fine sea salt
- 1/2-3/4 cup chopped nuts walnuts, pecans, or almonds; optional mix-in
- 1/2 cup mini marshmallows optional mix-in
- 1/2 cup crushed peppermint candy or candy canes optional mix-in or topping
- 1/4 cup peanut butter warmed slightly for swirling; optional
- flaky sea salt for sprinkling on top; optional
Instructions
- Line an 8x8-inch (20x20 cm) baking pan with parchment paper, leaving overhang on two sides to form handles. Lightly grease the parchment if you want ultra-clean edges.
- In a large microwave-safe bowl, add the chocolate chips, the full can of sweetened condensed milk, and the pieces of butter. Do not add the vanilla yet.3 cups semi-sweet chocolate chips, 14 oz sweetened condensed milk, 4 tablespoons unsalted butter
- Microwave the mixture on 50% power for 1 minute. Stir well, then microwave again in 20–30 second bursts at 50% power, stirring after each, until the chocolate is mostly melted and smooth. Avoid overheating.
- When about 90% of the chocolate is melted, stop microwaving and stir until the remaining chocolate melts from the residual heat and the mixture is silky and smooth.
- Stir in the vanilla extract and fine sea salt until fully combined. The mixture should be thick, glossy, and pourable, similar to brownie batter.1 teaspoon pure vanilla extract, 1/4 teaspoon fine sea salt
- If using nuts, mini marshmallows, or crushed peppermint candy, gently fold them into the fudge mixture now. If using peanut butter for a swirl, wait to add it until after the fudge is in the pan.1/2-3/4 cup chopped nuts, 1/2 cup mini marshmallows, 1/2 cup crushed peppermint candy or candy canes
- Scrape the fudge mixture into the prepared pan. Use a spatula to spread it into an even layer and smooth the top.
- If using peanut butter, spoon the warmed peanut butter over the surface and use a knife to swirl it through the fudge. Sprinkle flaky sea salt or extra crushed candy/nuts on top, pressing gently so they stick.1/4 cup peanut butter, flaky sea salt
- Refrigerate the pan for at least 2 hours, or until the fudge is firm in the center. For very clean squares, chill 3–4 hours or overnight.
- Use the parchment handles to lift the fudge from the pan onto a cutting board. Cut into 1-inch squares with a sharp knife, wiping the blade with a warm, damp cloth between cuts. Let sit at room temperature for about 10 minutes before serving.
Notes
- Peppermint Holiday Fudge: Fold in crushed candy canes and sprinkle more on top.
- Nutty Walnut Fudge: Fold in chopped walnuts or pecans.
- Peanut Butter Swirl Fudge: Swirl warmed peanut butter over the top before chilling.
- Rocky Road Fudge: Add mini marshmallows and chopped almonds.
- Dark Chocolate Sea Salt Fudge: Use dark chocolate chips and finish with flaky sea salt.
- Mocha Fudge: Stir 1–2 teaspoons instant espresso powder in with the chocolate. Tips: Use a larger bowl than you think you need, microwave on reduced power in short bursts to avoid scorching, and don’t skip the pinch of salt for balanced flavor. For firmer fudge, lean toward more semi-sweet or dark chocolate; for softer fudge, include some milk chocolate or reduce chocolate slightly.