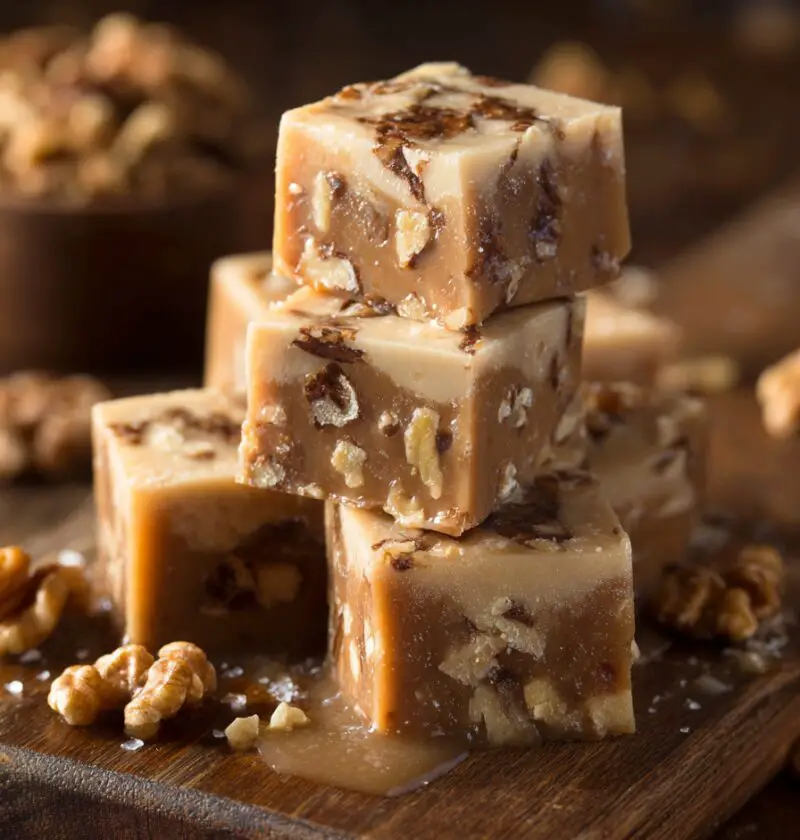
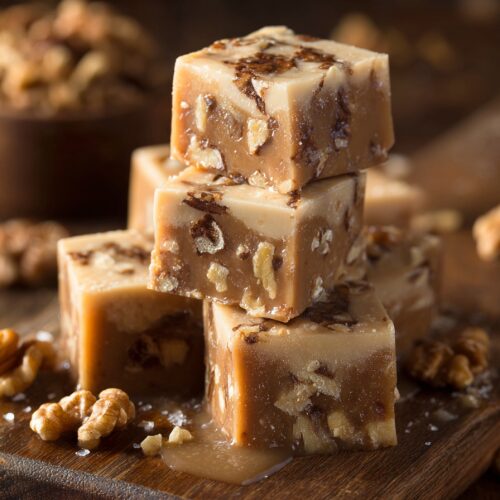
Maple Walnut Fudge Recipe
This Maple Walnut Fudge Recipe gives you a rich, creamy bite of maple sweetness studded with crunchy toasted walnuts—perfect for gift boxes, holiday platters, or a little treat with your afternoon coffee.
If you grew up with old fashioned maple fudge on the holiday table, this will feel like a warm hug from the past. This classic maple walnut fudge is cooked on the stove with real maple syrup, butter, and cream, then beaten until thick and silky. It’s a true homemade maple fudge experience—not the shortcut marshmallow fluff kind—so you get that melt-in-your-mouth texture with just the right snap when you slice it.
I love making this maple nut fudge recipe in early December, wrapping squares in wax paper, and tucking them into tins for neighbors and my grown kids. It’s one of those desserts that’s simple, but feels special. And even though it tastes like something from an old church cookbook, this version leans a little lighter: real maple syrup for flavor, no corn syrup, and a straightforward ingredient list you can pronounce.
Whether you’re building a cookie tray, planning a Thanksgiving dessert board, or just craving creamy maple walnut fudge “for research,” this easy maple walnut fudge fits the moment.
Why You’ll Love This Maple Walnut Fudge Recipe
- True maple flavor. Uses real maple syrup, so this maple syrup fudge recipe tastes like fall in New England in every bite.
- Old-fashioned method, modern tips. You get that classic maple walnut fudge texture with clear, step-by-step instructions.
- No fancy equipment. A saucepan, a wooden spoon, and a candy thermometer are helpful—but I’ll tell you how to manage without one.
- Perfect for gifting. The fudge holds its shape, slices cleanly, and packs well in boxes and tins.
- Make-ahead friendly. This homemade maple fudge actually tastes better the next day once it sets and the flavors settle.
- Texture lovers’ dream. Rich maple fudge base, crunchy toasted walnuts—every bite is a little party.
- Easy to customize. Swap nuts, dip in chocolate, or add a sprinkle of sea salt without changing the main recipe.
- Naturally gluten-free. Great option when you need a dessert that skips flour but still feels decadent.
Ingredients
Here’s everything you need for a batch of creamy, rich maple walnut fudge. Measuring carefully matters here—fudge likes precision.
- 1 ½ cups (315 g) pure maple syrup (Grade A dark/robust for deeper flavor is ideal)
- 1 ½ cups (300 g) granulated sugar
- 1 cup (240 ml) heavy cream (look for 36% or more milk fat)
- 4 tablespoons (56 g) unsalted butter, plus a bit more for greasing the pan
- ¼ teaspoon fine sea salt
- 1 teaspoon pure vanilla extract
- 1 ¼ cups (120 g) walnuts, coarsely chopped
- Optional: ¼ teaspoon maple extract (for extra-strong maple punch if your syrup is very mild)
A few quick ingredient tips, because these things matter with a classic maple walnut fudge:
- Maple syrup: Use real maple syrup, not pancake syrup. A darker grade gives a deeper, more “old fashioned maple fudge” flavor.
- Walnuts: Toast them lightly in a dry skillet or a 325°F (165°C) oven for 6–8 minutes. It makes the walnut flavor warmer and more buttery.
- Butter: Unsalted butter gives you better control over the saltiness. If you use salted butter, reduce or skip the added salt.
- Cream: Heavy cream makes a creamier, more luxurious texture than half-and-half. This is fudge—we’re not making salad.

Directions
You know what? Fudge sounds fussy, but if you follow the steps and trust the thermometer (or the cold water test), you’ll be just fine.
-
Prepare the pan.
Grease an 8-inch square baking pan with a thin layer of butter, then line it with parchment paper, leaving an overhang on two sides to help lift the fudge later. Lightly butter the parchment as well. This extra step keeps your homemade walnut fudge from sticking. -
Toast the walnuts.
In a dry skillet over medium-low heat, toast the chopped walnuts for 4–5 minutes, stirring often, until they smell nutty and just deepen in color. Set aside to cool. Toasting keeps them crisp inside the creamy maple walnut fudge. -
Combine the base ingredients.
In a heavy-bottomed medium saucepan, add the maple syrup, granulated sugar, heavy cream, butter, and salt. Stir gently with a wooden spoon or heatproof spatula to combine before turning on the heat—this helps the sugar dissolve evenly. -
Bring to a boil.
Set the pan over medium heat. Stir occasionally as the mixture warms and the sugar melts. Once you see the first big bubbles, clip on a candy thermometer to the side of the pot, making sure the tip doesn’t touch the bottom. -
Cook to the right stage.
Cook the mixture—without stirring—until it reaches 236–238°F (113–114°C), the “soft-ball stage.” This usually takes 10–15 minutes. If you don’t have a thermometer, drop a little of the hot syrup into a glass of very cold water. It should form a soft ball that flattens when you pinch it. -
Let it cool before beating.
Remove the pan from the heat and set it on a trivet. Let the mixture sit undisturbed until it cools to about 110°F (43°C) or is just slightly warmer than body temperature. The surface will look duller and thicker. This cooling step is what gives you that classic maple fudge recipe texture instead of a sticky sauce. -
Add flavorings.
Once cooled, add the vanilla extract and maple extract (if using). Don’t add them when the syrup is boiling hot or they’ll just evaporate. -
Beat the fudge.
Using a sturdy wooden spoon, beat the mixture vigorously. You can do this by hand (think of it as a quick arm workout) or use a hand mixer on low speed. Beat for 4–8 minutes, until the fudge thickens, lightens in color, and starts to lose its glossy shine. It should look more like thick frosting. This is the moment that turns a sweet syrup into real maple nut fudge. -
Fold in the walnuts.
Quickly fold in the toasted walnuts, making sure they’re evenly distributed. Work fairly fast here—once the fudge thickens, it sets in a hurry. -
Spread and smooth.
Scrape the maple walnut fudge into your prepared pan. Use a buttered spatula or an offset spatula to spread it into an even layer, pressing gently into the corners. Smooth the top as best you can; little ripples and swirls are part of the homemade charm. -
Let it set.
Allow the fudge to cool at room temperature for about 2–3 hours, or until firm. If your kitchen is very warm, you can move it to the fridge after the first hour, but slow cooling at room temperature gives a slightly better texture. -
Slice and serve.
Lift the slab of fudge out of the pan using the parchment overhang. Place on a cutting board and cut into 1-inch squares with a sharp knife. For the cleanest edges, wipe the knife with a warm damp cloth between cuts.
Servings & Timing
- Yield: About 36 small squares (1-inch pieces)
- Prep Time: 15 minutes
- Cook Time: 15–20 minutes
- Cooling/Set Time: 2–3 hours
- Total Time: About 3 hours 30 minutes, mostly hands-off once it’s in the pan
This easy maple walnut fudge is great to make the day before a party so it has plenty of time to set and mellow.
Variations
Once you’ve made this basic rich maple walnut fudge, feel free to play a little:
- Pecan Maple Fudge: Swap walnuts for toasted pecans for a Southern twist on this maple fudge recipe.
- Salted Maple Walnut Fudge: Sprinkle flaky sea salt over the top right after spreading for a sweet-salty finish.
- Maple Espresso Fudge: Stir 1–2 teaspoons instant espresso powder into the mixture after it cools before beating.
- Chocolate-Drizzled Maple Fudge: Once set, drizzle melted dark chocolate over the slab, let it harden, then slice.
- Cranberry Maple Nut Fudge: Fold in ¼–⅓ cup dried cranberries with the walnuts for a festive pop of color and tartness.
- Maple Almond Fudge: Use toasted sliced almonds and add a tiny splash of almond extract with the vanilla.
Storage & Reheating
Fudge doesn’t really need reheating, but storage does matter if you want that creamy texture to last.
-
At room temperature:
Store your classic maple walnut fudge in an airtight container, layered between pieces of parchment or wax paper, for up to 7–10 days. Keep it in a cool, dry spot away from direct sunlight or a hot stove. -
In the refrigerator:
If your kitchen runs warm or you’re keeping it longer, refrigerate it for up to 3 weeks. Bring pieces to room temperature for 15–20 minutes before serving so the texture softens and the maple flavor blooms. -
In the freezer:
Wrap the slab (or individual pieces) tightly in plastic wrap, then place in a freezer bag or airtight container. Freeze for up to 3 months. Thaw overnight in the fridge, then let sit on the counter for 20–30 minutes before serving. -
Make-ahead tip:
For holiday gifting, I often make two or three batches of homemade walnut fudge over a weekend, freeze them in slabs, and slice as needed for cookie trays and tins all month long.
Notes
A few “from-my-kitchen” notes, since I’ve tested this maple walnut fudge recipe more times than I’ll admit:
- Candy thermometer vs. cold water test: A thermometer is more precise and honestly less stressful, but my mother made maple fudge for years with nothing but a glass of cold water. If the syrup forms a soft, squishy ball that you can pick up, you’re there.
- Don’t stir while boiling: Once the mixture hits a steady boil, stop stirring. Stirring can cause sugar crystals to form on the sides of the pan, which can make your fudge grainy. If crystals form, you can gently brush the sides with a wet pastry brush.
- Beating time is key: Under-beaten fudge stays too soft and can be sticky; over-beaten fudge might set too fast and crumble. You’re looking for that moment the gloss fades and the mixture thickens noticeably—this is your sweet spot.
- Humidity matters (a little). Very humid days can make any fudge, from maple fudge recipe to chocolate, softer. If it’s pouring rain and you’re nervous, give it an extra hour to dry after setting.
- Cutting cleaner squares: A long, sharp chef’s knife works better than a short knife. Press straight down rather than sawing back and forth.
- Flavor develops: This homemade maple fudge actually tastes better after resting overnight. The maple flavor deepens, and the texture relaxes a bit.
If you’re a visual learner, it also helps to watch a quick candy-making video or two; the stages of sugar syrup look the same whether you’re making caramel or a maple nut fudge recipe.
FAQs
Can I make this maple walnut fudge recipe without a candy thermometer?
Yes. Use the cold water test: drop a little of the hot syrup into a glass of very cold water—if it forms a soft ball that you can shape with your fingers but that flattens when pressed, you’re at soft-ball stage.
Why did my fudge turn out grainy?
Grainy fudge usually means sugar crystals formed on the sides of the pan or the mixture was stirred while boiling. Next time, avoid stirring once it boils and consider brushing down the sides of the pan with a wet pastry brush.
Can I use half-and-half instead of heavy cream?
You can, but the texture will be a little less creamy and more firm. For the creamiest maple walnut fudge, stick with heavy cream.
Does it have to be real maple syrup?
Yes. For a true maple syrup fudge recipe with classic flavor, you need real maple syrup. Pancake syrup is mostly corn syrup and artificial flavor and won’t give the same taste or texture.
Can I leave out the nuts?
Absolutely. You’ll have a smooth old fashioned maple fudge without walnuts. Just skip the nuts and follow the rest of the directions the same way.
How do I fix fudge that didn’t set?
If your fudge is too soft and doesn’t set, you can scrape it back into the pan, add 1–2 tablespoons of cream, gently reheat until melted, cook again to soft-ball stage, cool, and beat once more.
Is this maple walnut fudge gluten-free?
Yes, as long as your vanilla and any add-ins are gluten-free, this recipe is naturally gluten-free since it’s based on sugar, maple syrup, cream, butter, and nuts.
Can I double the recipe?
Yes, but use a large, heavy pot—the mixture bubbles up quite a bit—and be prepared to beat it a little longer since a bigger batch cools more slowly.
Conclusion
This Maple Walnut Fudge Recipe brings together everything I love about classic homemade candy: simple ingredients, a bit of cooking magic, and a rich, creamy texture that feels like a celebration in one small square. It’s a nostalgic, classic maple walnut fudge that still fits beautifully on a modern dessert table.
If you try this recipe, let me know how it turned out for you—did you stick with walnuts, or try one of the variations? Leave a comment, share a photo, or explore more homemade fudge and candy recipes next; once you’ve mastered maple walnut fudge, a whole world of sweet little squares opens right up.
Maple Walnut Fudge
Ingredients
- 1 1/2 cups pure maple syrup Grade A dark/robust for deeper flavor, not pancake syrup
- 1 1/2 cups granulated sugar
- 1 cup heavy cream 36% milk fat or higher
- 4 tablespoons unsalted butter plus extra for greasing the pan and parchment
- 1/4 teaspoon fine sea salt
- 1 teaspoon pure vanilla extract
- 1 1/4 cups walnuts coarsely chopped and toasted
- 1/4 teaspoon maple extract optional, for stronger maple flavor if syrup is mild
Instructions
- Grease an 8-inch square baking pan with a thin layer of butter. Line it with parchment paper, leaving an overhang on two sides to help lift the fudge out later, then lightly butter the parchment as well to prevent sticking.
- In a dry skillet over medium-low heat, toast the chopped walnuts for 4–5 minutes, stirring often, until they smell nutty and just deepen in color. Alternatively, toast in a 325°F (165°C) oven for 6–8 minutes. Set aside to cool.
- In a heavy-bottomed medium saucepan, add the maple syrup, granulated sugar, heavy cream, butter, and salt. Stir gently with a wooden spoon or heatproof spatula to combine before turning on the heat so the sugar dissolves evenly.
- Set the pan over medium heat. Stir occasionally as the mixture warms and the sugar melts. Once you see the first large bubbles and a steady boil, clip a candy thermometer to the side of the pot, making sure the tip does not touch the bottom.
- Cook the mixture without stirring until it reaches 236–238°F (113–114°C), the soft-ball stage, usually 10–15 minutes. If you do not have a thermometer, drop a small amount of the hot syrup into a glass of very cold water: it should form a soft ball that flattens when you pinch it.
- Remove the pan from the heat and set it on a trivet. Let the mixture cool undisturbed until it reaches about 110°F (43°C), or is just slightly warmer than body temperature. The surface will look thicker and less glossy. Do not stir during this cooling step.
- When the mixture has cooled to around 110°F (43°C), add the vanilla extract and maple extract (if using). Stir just to combine. Adding them at this stage preserves their flavor.
- Using a sturdy wooden spoon or a hand mixer on low speed, beat the mixture vigorously for 4–8 minutes, until it thickens, lightens in color, and loses its glossy shine. It should look like thick frosting and hold its shape. This beating step creates the classic creamy fudge texture.
- Quickly fold the cooled, toasted walnuts into the fudge until evenly distributed. Work promptly, as the fudge will begin to set once it thickens.
- Scrape the fudge into the prepared pan. Use a buttered spatula or offset spatula to spread it into an even layer, pressing gently into the corners and smoothing the top as much as possible.
- Allow the fudge to cool at room temperature for 2–3 hours, or until completely firm. If your kitchen is very warm, you can move the pan to the refrigerator after the first hour, but slow cooling at room temperature gives the best texture.
- Use the parchment overhang to lift the slab of fudge out of the pan onto a cutting board. Cut into approximately 1-inch squares with a sharp knife, wiping the blade with a warm damp cloth between cuts for the cleanest edges. Serve at room temperature.
Notes
Tips: Avoid stirring once the mixture reaches a steady boil to prevent crystallization and grainy texture; if sugar crystals form on the sides of the pan, gently brush them down with a wet pastry brush. Beat only until the mixture loses its gloss and thickens noticeably—under-beating can make it too soft, over-beating can make it crumbly. The flavor and texture improve after resting overnight.
Variations: Swap walnuts for toasted pecans, almonds, or leave nuts out for smooth maple fudge. Add flaky sea salt on top for salted maple fudge, stir in instant espresso powder after cooling for maple espresso fudge, drizzle with melted dark chocolate once set, or fold in dried cranberries with the nuts for a festive version.