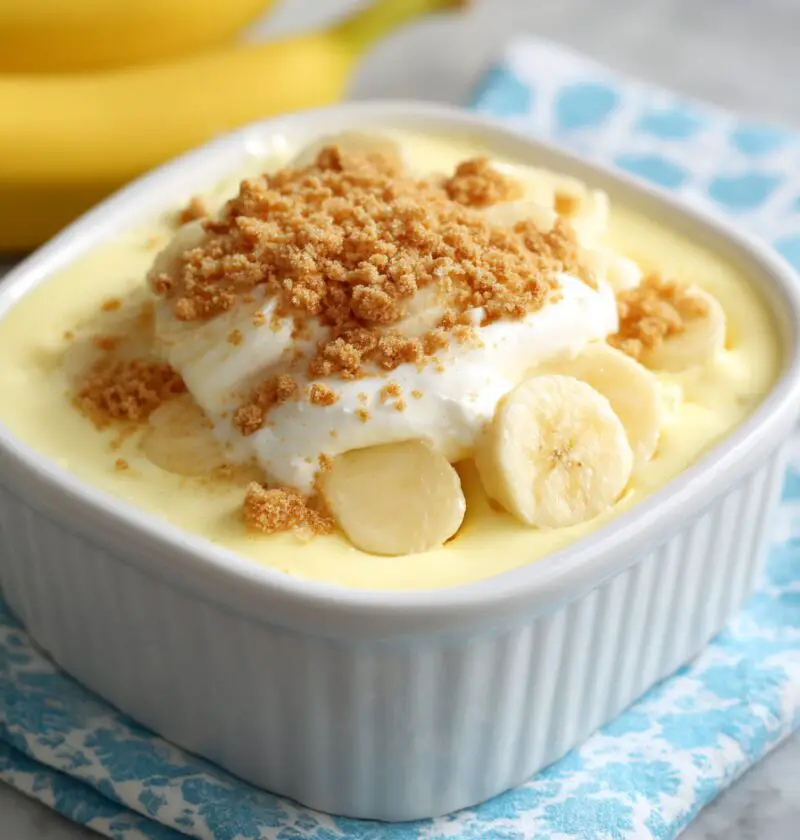
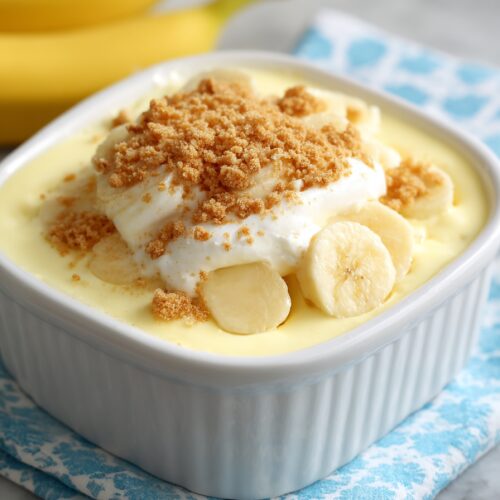
Magnolia Bakery Banana Pudding Recipe
If you’ve ever stood in line at a bakery in New York dreaming about creamy, layered banana pudding, this Magnolia Bakery Banana Pudding Recipe is your shortcut to bringing that famous banana pudding home—no oven, no fuss, just pure comfort in a bowl.
This is my tried-and-true, copycat magnolia bakery recipe that tastes like the real New York bakery banana pudding: soft vanilla wafer banana pudding, fluffy whipped cream, and ripe bananas layered into the most classic banana pudding dessert. It’s a no-bake, make-ahead crowd-pleaser that works just as well for a weeknight treat as it does for a holiday table or summer cookout.
I’m 50 now, and I’ve lived long enough to know that some desserts just stop the table chatter. This homemade banana pudding is one of them. I’ve brought it to church potlucks, 4th of July parties, and more birthday dinners than I can count. There’s always one quiet moment when everyone takes the first spoonful—then the “Oh my goodness…” starts. That’s when you know you’ve done something right.
Why You’ll Love This Recipe
- No baking required – This Magnolia Bakery Banana Pudding Recipe sets beautifully in the fridge, so you can keep your oven off.
- Tastes just like the bakery version – It’s a true copycat magnolia bakery recipe with that same light, cloud-like texture and layered banana pudding flavor.
- Perfect make-ahead dessert – You have to chill it, which makes it a built-in stress-saver for parties and holidays.
- Feeds a crowd easily – This classic banana pudding dessert fills a trifle bowl or 9×13 dish and serves 10–12 people generously.
- Simple pantry ingredients – Instant vanilla pudding, sweetened condensed milk, Nilla wafers, cream, and bananas—nothing fancy or hard to find.
- Customizable – You can tweak this famous banana pudding for gluten-free, nutty, or chocolatey versions without losing its charm.
- Kid- and adult-approved – It has that nostalgic vanilla wafer banana pudding vibe that reminds people of childhood, but with New York bakery banana pudding flair.
- Travel-friendly – It holds up well in the fridge and transports nicely in a casserole dish or trifle bowl.
Ingredients
Here’s everything you’ll need for this Magnolia Bakery Banana Pudding Recipe, plus a few notes from my own kitchen testing.
For the pudding base
- 1 can (14 oz / 396 g) sweetened condensed milk
- (I usually grab Eagle Brand; any good-quality brand works.)
- 1 ½ cups (355 ml) ice-cold water
- (Cold water helps the instant pudding set properly and quickly.)
- 1 box (3.4 oz / 96 g) instant vanilla pudding mix
- (Use instant, not cook-and-serve, or it won’t thicken right.)
For the whipped cream layer
- 3 cups (710 ml) heavy whipping cream, very cold
- (Cold cream whips faster and stays fluffy.)
- 2–3 tablespoons powdered sugar (optional)
- (Traditional Magnolia Bakery banana pudding isn’t very sweet in the cream, but I add a little if serving to kids.)
- 1 teaspoon pure vanilla extract
- (Adds a deeper vanilla note, especially nice if your pudding mix is mild.)
For layering
- 1 box (about 11–12 oz / 311–340 g) vanilla wafers
- (Nilla Wafers are the classic choice for this magnolia bakery dessert.)
- 4–5 medium ripe bananas, sliced (about 4 cups)
- (Use ripe but not mushy—yellow with just a few freckles, so they hold their shape.)
Optional garnish
- Extra crushed vanilla wafers for topping
- A few banana slices (add just before serving so they don’t brown)
- Shaved chocolate or mini chocolate chips, if you want to dress it up a bit
Substitution notes:
- Gluten-free: Use gluten-free vanilla wafers for a gluten-friendly layered banana pudding.
- Dairy-light version: Swap half of the heavy cream for whipped coconut cream, knowing the texture will be a little softer but still delicious.

Directions
This homemade banana pudding is very forgiving, but the chilling times matter. Here’s how I do it, step by step.
-
Mix the pudding base
In a large mixing bowl, whisk together the sweetened condensed milk and ice-cold water until smooth and well combined. Sprinkle in the instant vanilla pudding mix while whisking constantly so you don’t get lumps. -
Chill the pudding mixture
Cover the bowl with plastic wrap and chill in the refrigerator for at least 3–4 hours, or up to overnight.- The mixture should be thick, like a soft custard. If it still looks runny, give it another 30 minutes in the fridge.
-
Whip the cream
Once the pudding base is fully chilled and set, add the heavy cream to a separate large, chilled bowl. Beat on medium-high speed with a hand mixer or stand mixer until soft peaks form.- Add the vanilla extract (and powdered sugar if using) and keep whipping just until medium peaks form—light and billowy, not stiff.
-
Fold the cream into the pudding
Gently add the whipped cream to the cold pudding base in 3 batches, folding with a spatula.- Use slow, sweeping motions from the bottom up so you don’t deflate the cream.
- When you’re done, you should have a light, mousse-like banana pudding mixture.
-
Prep the bananas and wafers
Right before you start layering, peel and slice the bananas into ¼-inch rounds. Don’t cut them too early, or they’ll brown.- Keep the vanilla wafers ready in an open box or bowl so you can work quickly.
-
Layer the banana pudding
In a large glass trifle bowl, 9×13-inch dish, or deep serving bowl, start with a layer of vanilla wafers, placing them in a single layer to cover the bottom.- Add a layer of banana slices over the wafers.
- Spoon a generous layer of the pudding mixture over the bananas, smoothing it gently.
- Repeat the layers (wafers, bananas, pudding) until you reach the top, finishing with a layer of pudding.
-
Add topping and chill again
Sprinkle crushed vanilla wafers over the final layer of pudding for a little crunch and a pretty finish.- Cover the dish tightly with plastic wrap and chill for at least 4 hours, and preferably 6–8 hours.
- This step lets the wafers soften slightly and creates that classic Magnolia Bakery banana pudding texture.
-
Serve and enjoy
Just before serving, you can garnish with a few fresh banana slices or shaved chocolate.- Serve cold, straight from the fridge, scooping down deep so everyone gets a bit of every layer.
Servings & Timing
- Yield: About 10–12 servings (more if you’re serving small dessert cups)
- Prep Time: 20 minutes active time
- Chill Time (Pudding Base): 3–4 hours
- Chill Time (Assembled Dessert): 4–8 hours
- Total Time: About 8 hours (mostly chilling time—hands-off, which I love)
This Magnolia Bakery Banana Pudding Recipe is ideal for making the day before a party. You can mix the pudding base in the morning, assemble in the afternoon, and serve it the next day after a full overnight chill.
Variations
You know what? Once you’ve made this classic layered banana pudding once or twice, you’ll start playing with it. Here are some of my favorite twists:
- Chocolate Banana Pudding: Use chocolate wafers for one of the layers and sprinkle mini chocolate chips between the bananas and pudding.
- Peanut Butter Banana Pudding: Drizzle warmed peanut butter between the layers for a peanut butter “pie” version of this famous banana pudding.
- Salted Caramel Banana Pudding: Add thin ribbons of salted caramel sauce between layers of wafers and bananas.
- Berry-Banana Pudding: Add sliced strawberries or blueberries along with the bananas for a brighter, summery twist.
- Gluten-Free Banana Pudding: Use gluten-free vanilla wafers or sponge cookies and keep everything else the same.
- Mini Banana Pudding Cups: Layer the pudding, wafers, and bananas into individual glass jars or cups for parties or lunchbox treats.
Storage & Reheating
No reheating here—this is a cold dessert—but storage does matter.
-
Refrigerator:
- Store the assembled banana pudding tightly covered in the fridge for up to 2 days for best texture.
- After about day 3, the bananas start to soften too much and the wafers can get a bit soggy, though it’s still tasty.
-
Freezer:
- I don’t recommend freezing the fully assembled Magnolia Bakery banana pudding. The bananas and cream tend to separate and turn grainy when thawed.
- If you absolutely must, you can freeze just the pudding-and-cream mixture (without bananas and wafers) for up to 1 month, then thaw overnight and layer fresh.
-
Make-ahead tips:
- You can mix and chill the pudding base up to 24 hours before folding in the whipped cream.
- You can fully assemble the dessert up to 1 day ahead; that’s actually when it’s at its best.
- If you want extra fresh banana slices on top, add those right before serving.
Notes
I’ve tested this Magnolia Bakery Banana Pudding Recipe more times than I’ll admit—family birthdays, church gatherings, even a “just because it’s Tuesday” treat. A few things I’ve learned along the way:
- Cold ingredients are your friend. Use ice-cold water and cold pudding base before adding the whipped cream. It keeps everything light and fluffy.
- Don’t rush the chill time. The most common problem I hear from readers about homemade banana pudding is that it’s too loose. That almost always means it didn’t chill long enough.
- Banana ripeness matters. Overripe bananas turn mushy and strong-tasting. Slightly freckled bananas give the best flavor and keep their shape in this layered banana pudding.
- Layer thickness makes a difference. Thinner banana layers and slightly thicker pudding layers give you that bakery-style look and feel—plus a better bite.
- Serve it cold. This classic banana pudding dessert loses some of its structure if it warms up too much. Keep it chilled right up until serving.
- Use a clear glass dish if you can. Part of the charm of this magnolia bakery dessert is seeing those creamy layers through the side of the bowl.
If you’re a numbers person like me, here’s a general ballpark: one serving of this dessert is rich. Most folks are satisfied with a modest scoop, especially after a big meal.
FAQs
1. Can I make this Magnolia Bakery Banana Pudding Recipe without instant pudding mix?
You can use a homemade vanilla pudding, but the texture won’t be quite the same and it may not hold as well; instant pudding is what gives that signature thick, fluffy structure.
2. How do I keep the bananas from browning?
Slice the bananas right before layering, cover the dessert tightly, and keep it chilled; you can also very lightly brush slices with lemon juice, though that can add a slight tart note.
3. Can I use whipped topping instead of heavy cream?
Yes, you can use a tub of whipped topping (like Cool Whip) instead of fresh whipped cream; the flavor is a bit different, sweeter and less fresh, but still very good and handy for busy days.
4. My pudding is runny—what went wrong?
Usually that means the pudding base didn’t chill long enough or you used cook-and-serve pudding instead of instant. Give it more chill time, and next time double-check the pudding box.
5. How far in advance can I assemble the banana pudding?
The sweet spot is about 8–24 hours before serving. After 2 days, the wafers get very soft and the bananas may look less pretty, even though it’s still tasty.
6. Can I halve the recipe?
Absolutely. Use half a box of pudding mix, about ¾ cup water, half a can of sweetened condensed milk, and 1 ½ cups cream. Layer it in an 8×8-inch dish or a smaller bowl.
7. What brand of vanilla wafers works best?
Nilla Wafers are the classic choice for that true magnolia bakery banana pudding flavor, but any crisp vanilla wafer will work in a pinch.
8. Is this the exact Magnolia Bakery recipe?
This is a very close copycat magnolia bakery recipe based on publicly shared ingredient ratios and method; the taste and texture are extremely similar, but I include a few small tweaks and tips from my own kitchen testing.
Conclusion
This Magnolia Bakery Banana Pudding Recipe brings that famous banana pudding experience right into your kitchen—no trip to New York, no long bakery line, just a chilled bowl of vanilla wafer banana pudding that feels special every single time. It’s easy, no-bake, make-ahead, and guaranteed to impress anyone lucky enough to grab a spoon.
If you make this layered banana pudding, I’d love to hear how it turned out—leave a comment, tell me if you made any fun variations, or share it with a friend who misses that New York bakery banana pudding as much as I do. And if creamy desserts are your thing, you might want to look for my chocolate pudding and banana cream pie recipes next—they’re right in the same cozy, nostalgic neighborhood.
Magnolia Bakery Banana Pudding
Ingredients
- 1 can (14 oz / 396 g) sweetened condensed milk
- 1 1/2 cups water ice-cold
- 1 box (3.4 oz / 96 g) instant vanilla pudding mix use instant, not cook-and-serve
- 3 cups heavy whipping cream very cold
- 2-3 tablespoons powdered sugar optional, for lightly sweetening the whipped cream
- 1 teaspoon pure vanilla extract
- 1 box (11–12 oz / 311–340 g) vanilla wafers Nilla Wafers are classic
- 4-5 medium bananas ripe but not mushy, sliced into 1/4-inch rounds (about 4 cups)
- extra vanilla wafers crushed, for topping (optional)
- banana slices for garnish, add just before serving (optional)
- shaved chocolate or mini chocolate chips optional garnish
Instructions
- In a large mixing bowl, whisk together the sweetened condensed milk and ice-cold water until smooth and well combined. Sprinkle in the instant vanilla pudding mix while whisking constantly to avoid lumps.1 can (14 oz / 396 g) sweetened condensed milk, 1 1/2 cups water, 1 box (3.4 oz / 96 g) instant vanilla pudding mix
- Cover the bowl with plastic wrap and chill in the refrigerator for at least 3–4 hours, or up to overnight, until very thick and custard-like. If it is still runny, chill for an additional 30 minutes.
- Once the pudding base is fully chilled and set, add the cold heavy whipping cream to a separate large, chilled bowl. Beat on medium-high speed with a hand mixer or stand mixer until soft peaks form.3 cups heavy whipping cream
- Add the vanilla extract and powdered sugar (if using) to the whipped cream and continue beating just until medium peaks form—light and billowy, not stiff.2-3 tablespoons powdered sugar, 1 teaspoon pure vanilla extract
- Gently fold the whipped cream into the cold pudding base in 3 batches using a spatula. Use slow, sweeping motions from the bottom up to keep the mixture light and airy. The finished mixture should be mousse-like.
- Right before assembling, peel and slice the bananas into 1/4-inch rounds so they do not brown. Have the vanilla wafers ready in an open box or bowl for easy layering.1 box (11–12 oz / 311–340 g) vanilla wafers, 4-5 medium bananas
- In a large glass trifle bowl, 9x13-inch dish, or deep serving bowl, arrange a single layer of vanilla wafers to cover the bottom. Add a layer of banana slices over the wafers, then spoon a generous layer of the pudding mixture over the bananas, smoothing gently. Repeat the layers—wafers, bananas, pudding—until you reach the top, finishing with a layer of pudding.1 box (11–12 oz / 311–340 g) vanilla wafers, 4-5 medium bananas
- Sprinkle crushed vanilla wafers over the final layer of pudding for texture and presentation. Cover the dish tightly with plastic wrap and chill for at least 4 hours, preferably 6–8 hours, to allow the wafers to soften slightly and the flavors to meld.extra vanilla wafers
- Just before serving, garnish with a few fresh banana slices and shaved chocolate or mini chocolate chips if desired. Serve cold, scooping down deep so each portion includes all the layers.banana slices, shaved chocolate or mini chocolate chips