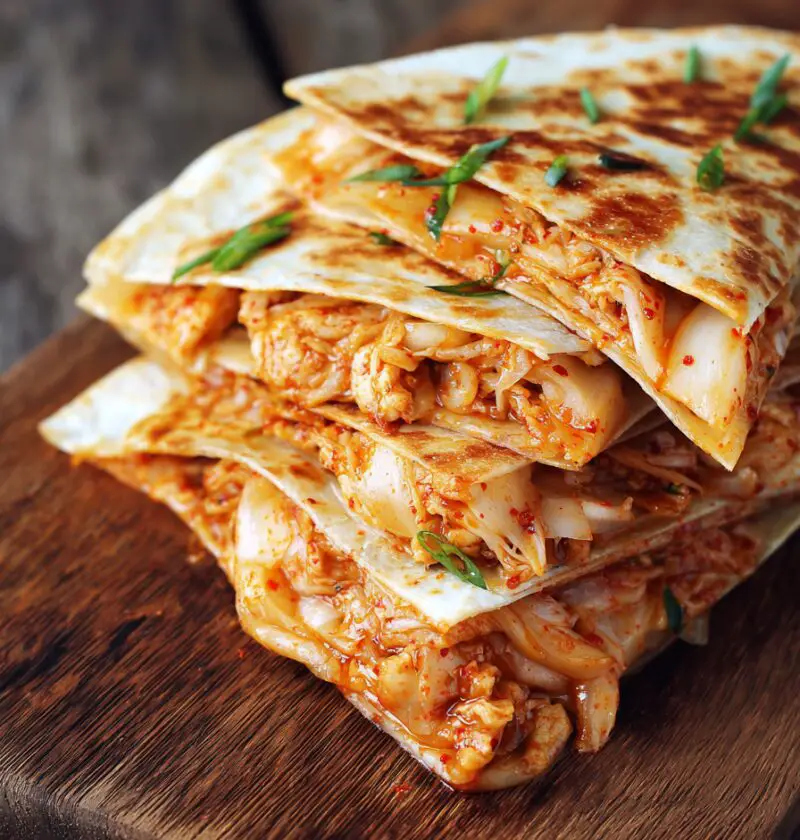
Kimchi Quesadilla Recipe
If you’re craving something crispy, cheesy, tangy, and a little fiery, this Kimchi Quesadilla Recipe is the kind of quick lunch idea that wakes up your whole day.
A crispy, cheesy fusion recipe you’ll make on repeat
There’s something so satisfying about a good quesadilla. It’s humble, fast, and usually made from what’s already hanging around in the fridge. But this kimchi quesadilla recipe takes that everyday comfort food and gives it a bold, punchy twist. You get buttery toasted tortillas, gooey melted cheese, and the bright, savory kick of fermented cabbage all in one bite. It’s a little Korean Mexican fusion magic, and honestly, it works better than you’d think if you’ve never tried it before.
I started making kimchi quesadillas on busy afternoons when I wanted a quick lunch idea that felt more exciting than a plain sandwich. Once my kids were grown and my kitchen got a bit quieter, I found myself leaning into these simple, flavor-packed meals even more. This one has become a favorite because it’s fast, vegetarian-friendly, and deeply satisfying without needing a big grocery list or a lot of fuss.
Kimchi, if you’re new to it, is a traditional Korean fermented cabbage dish with garlic, chili, and a lovely tang. Pair that with melty cheese and a crispy tortilla quesadilla, and you’ve got a balance of rich and sharp flavors that’s hard to beat. It’s not exactly health food in the strictest sense, but it does have some nice perks—kimchi brings fermented goodness, vegetables, and lots of flavor, so you don’t need much else to make the whole thing sing.
And if you’ve been looking for an easy kimchi recipe that feels approachable, this is a fine place to start. No specialty technique. No culinary gymnastics. Just a skillet, a handful of ingredients, and about 20 minutes.
Why You’ll Love This Recipe
- Ready in about 20 minutes from start to finish
- Big flavor with very little prep
- A fun Korean Mexican fusion meal for lunch or dinner
- Great way to use leftover kimchi
- Crispy outside, gooey inside—always a winning combo
- Easy to make vegetarian and simple to customize
- Works as a snack, light meal, or party appetizer
- Budget-friendly with pantry and fridge staples
- A smart choice when you want a spicy quesadilla without a complicated sauce
- Perfect for anyone curious about a fermented cabbage quesadilla
Ingredients
Here’s what you’ll need to make 2 large quesadillas, or 4 smaller servings:
-
4 medium flour tortillas
(Use burrito-size for larger quesadillas; corn tortillas can work, but flour tortillas hold together better and crisp more evenly.) -
1 1/2 cups shredded mozzarella cheese
(Mozzarella gives you that stretchy melt; low-moisture mozzarella works especially well.) -
1 cup shredded sharp cheddar cheese
(Cheddar adds color and bite; Monterey Jack is a nice swap if you want a milder finish.) -
1 cup kimchi, drained and roughly chopped
(Drain excess liquid well so the quesadilla stays crisp, not soggy. Napa cabbage kimchi is ideal.) -
2 teaspoons kimchi juice
(Optional, but lovely for extra punch—just don’t overdo it.) -
2 green onions, thinly sliced
(These bring freshness and a gentle onion flavor.) -
1 teaspoon toasted sesame oil
(A little goes a long way; it adds warm, nutty depth.) -
1 tablespoon unsalted butter, divided
(For browning the tortillas. You can use neutral oil if you prefer.) -
1 teaspoon neutral oil
(Avocado or canola oil both work well, especially if your butter tends to brown too fast.) -
1/2 teaspoon sugar
(Optional, but helpful if your kimchi is especially sharp.) -
1/4 teaspoon black pepper
(Freshly ground gives the best flavor.)
Optional add-ins
- 1/2 cup cooked mushrooms, chopped
- 1/2 cup sautéed onions
- 1/2 cup cooked tofu crumbles
- 1 tablespoon gochujang mayo for serving
- Sour cream or plain Greek yogurt for topping
- Fresh cilantro for a bright finish
- Sesame seeds for garnish

Directions
-
Prep the kimchi filling.
Place the chopped kimchi in a bowl and gently squeeze or press out excess moisture if it seems very wet. Toss it with the green onions, sesame oil, black pepper, and sugar if using. If you want a bolder flavor, stir in the 2 teaspoons of kimchi juice. This small step keeps the filling punchy without making the tortilla limp. -
Mix the cheeses.
In a separate bowl, combine the mozzarella and cheddar. I like using two cheeses here because mozzarella melts like a dream, while cheddar keeps the cheesy kimchi quesadilla from tasting flat. It’s a little kitchen teamwork. -
Heat your skillet.
Set a large nonstick or cast-iron skillet over medium heat. Let it warm up for a minute or two. A properly heated pan is one of those little things that makes a big difference—you’ll get that golden, crispy tortilla quesadilla texture instead of pale, floppy tortillas. -
Assemble the first quesadilla.
Brush or spread a bit of butter and oil in the skillet. Lay down one tortilla, then sprinkle on a light layer of cheese, add half the kimchi mixture, and top with more cheese. Place the second tortilla on top and press gently with a spatula. Cheese on both sides of the kimchi helps hold everything together. -
Cook until golden and melty.
Cook for 2 to 4 minutes on the first side, adjusting heat if needed. You’re looking for a tortilla that’s golden brown with a few deeper toasted spots. Flip carefully—using a wide spatula helps a lot—and cook the second side for another 2 to 3 minutes until the cheese is fully melted. -
Rest before slicing.
Transfer the quesadilla to a cutting board and let it sit for 1 to 2 minutes. I know, I know—waiting is hard. But this brief rest helps the cheese set a bit so your slices stay neat instead of sliding apart. -
Repeat with the second quesadilla.
Add a little more butter or oil to the skillet and repeat with the remaining tortillas, cheese, and kimchi mix. Keep the heat at medium so the filling warms through before the outside gets too dark. -
Slice and serve warm.
Cut each quesadilla into wedges and serve right away. A spoonful of sour cream, Greek yogurt, or gochujang mayo on the side is terrific. If you like contrast, add a simple cucumber salad or a few avocado slices.
Servings & Timing
- Yield: 2 large quesadillas, about 4 servings
- Prep Time: 10 minutes
- Cook Time: 10 minutes
- Total Time: 20 minutes
This is one of those rare recipes that truly is quick. No marinating, no baking, no rest time beyond a minute or two on the board.
Variations
- Add protein: Tuck in cooked shredded chicken, bulgogi-style beef, or crumbled tofu for a heartier meal.
- Make it vegan: Use plant-based cheese and vegan butter, and double-check that your kimchi is fish-free.
- Turn up the heat: Add sliced jalapeños or a thin smear of gochujang for a hotter spicy quesadilla.
- Use corn tortillas: They’ll give a more traditional taco-shop feel, though they’re a bit more delicate.
- Breakfast version: Add scrambled eggs and serve with hot sauce for a savory morning meal.
- Extra veggie twist: Mix in sautéed spinach, mushrooms, or thinly sliced bell peppers.
Storage & Reheating
If you have leftovers, let the quesadillas cool fully before storing.
- Refrigerator: Store in an airtight container for up to 3 days. Place parchment between slices if stacking.
- Freezer: Wrap individual wedges tightly and freeze for up to 1 month. Texture is best fresh, but freezing works in a pinch.
- Reheating: Warm in a dry skillet over medium-low heat for 2 to 3 minutes per side. You can also use an air fryer at 350°F for 3 to 5 minutes.
- Avoid the microwave if possible: It reheats the filling quickly, yes, but the tortilla tends to go soft and chewy rather than crisp.
- Make-ahead tip: Prep the kimchi filling and shred the cheese ahead of time, then assemble and cook just before serving.
Notes
A few things I learned while testing this recipe more than once—because yes, I happily ate my “mistakes”:
First, draining the kimchi matters. A lot. Kimchi is wonderfully juicy, but too much liquid is the enemy of a good quesadilla. If your kimchi seems extra wet, pat it lightly with paper towels after chopping.
Second, medium heat is your friend. High heat sounds efficient, but it usually browns the tortilla before the cheese fully melts. And nobody wants that awkward moment where the outside looks done and the inside is still patchy and cold.
Third, don’t skimp on the cheese, but don’t overstuff either. There’s a sweet spot. Too little cheese and the filling won’t cling together; too much and it starts slipping out into the skillet. Around 1 1/4 cups cheese per quesadilla is usually just right.
And one more thing—kimchi brands vary a lot. Some are funkier, some sweeter, some more garlicky. If you’re using a strongly fermented jar from a Korean market, you may not need the kimchi juice or extra sugar. Taste as you go. That’s the kind of kitchen common sense that never goes out of style.
FAQs
What kind of kimchi is best for this kimchi quesadilla recipe?
Napa cabbage kimchi is the easiest and most traditional choice. It softens nicely when heated and gives the best balance of tang, spice, and texture.
Can I make this vegetarian quesadilla recipe vegan too?
Yes, absolutely. Use vegan cheese, plant-based butter, and make sure your kimchi doesn’t contain fish sauce or shrimp paste.
Why is my quesadilla getting soggy?
The most common reason is wet kimchi. Drain it well and avoid adding too much kimchi juice to keep your crispy tortilla quesadilla nice and firm.
What cheese works best with kimchi?
Mozzarella, Monterey Jack, and cheddar are all excellent. They melt smoothly and mellow out kimchi’s acidity without muting its flavor.
Is kimchi quesadilla very spicy?
It depends on your kimchi. Many versions are moderately spicy, but the cheese softens the heat quite a bit, so the final dish is usually balanced rather than fiery.
Can I make this in the oven or air fryer?
Yes. You can bake assembled quesadillas at 425°F for about 8 to 10 minutes, flipping once if you want even browning. An air fryer also works well for reheating or smaller portions.
What should I serve with a cheesy kimchi quesadilla?
A cucumber salad, avocado slices, tomato soup, or even a simple fried egg on top all work beautifully. If you want more of that Korean Mexican fusion feel, try it with pickled onions and a drizzle of spicy mayo.
Is this a good quick lunch idea for busy weekdays?
It really is. Most people can get it on the table in 20 minutes or less, and the flavor payoff is far bigger than the effort.
Conclusion
This Kimchi Quesadilla Recipe is crisp, melty, tangy, and just spicy enough to keep things interesting. It’s an easy, satisfying way to turn a jar of kimchi and a handful of cheese into something that feels fresh and a little special. If you make it, I’d love to hear how you served it—leave a comment, share your twist, or browse my other easy lunch and vegetarian quesadilla recipe ideas for more kitchen inspiration.