Instant Pot Cheesecake Recipe
If you’ve been craving a rich, bakery-style cheesecake but don’t feel like heating up the whole kitchen, this Instant Pot Cheesecake Recipe is going to be your new weeknight (and weekend!) dessert hero—smooth, creamy, no cracks, and surprisingly easy.
I make this pressure cooker cheesecake in my 6-quart Instant Pot with a 7-inch springform pan, and it’s become my go-to “wow” dessert when I want something special without hovering over the oven. It’s a classic rich vanilla cheesecake with a buttery graham cracker crust, cooked gently in an Instant Pot water bath for that ultra-creamy texture you usually only get from a fancy bakery.
And you know what? Once you make cheesecake in an electric pressure cooker, you may never go back to the oven again.
Why This Instant Pot Cheesecake Recipe Works So Well
I’ve baked cheesecakes for years—holiday tables, birthday “cake,” even breakfast the next morning with coffee when no one was looking. When the Instant Pot craze started, I was skeptical. A baked cheesecake in Instant Pot? Really?
But this method has some serious advantages: the steamy environment acts like a perfect water bath, the temperature stays steady, and the result is a rich vanilla cheesecake with a lush, creamy cheesecake filling and almost no chance of cracking.
This Instant Pot Cheesecake Recipe is:
- A classic New York–style vanilla cheesecake
- Made in a 7-inch Instant Pot springform pan
- Ideal when you don’t want to turn on the oven
- Great for holidays, birthdays, or “just because” nights
- Easy to flavor with lemon, chocolate, or seasonal toppings
I usually serve it plain with fresh berries, but you can dress it up with caramel, chocolate sauce, or a simple berry compote. My kids love it cold from the fridge; my husband warms his slice slightly so the center gets extra silky. We all have our ways.
Why You’ll Love This Recipe
- No oven needed – Your Instant Pot does all the work, and your kitchen stays cool.
- Ultra creamy, no‑crack cheesecake method – The pressure cooker’s gentle steam gives you that smooth, custardy center.
- Beginner-friendly – If this is your first homemade cheesecake recipe, this is a forgiving place to start.
- Small but rich – A 7-inch pressure cooker cheesecake is perfect for small families or intimate gatherings, but still feels impressively decadent.
- Consistent results – Electric pressure cookers are steady; once you learn your machine, this instant pot dessert recipe becomes very reliable.
- Classic graham cracker crust cheesecake – Familiar, cozy flavors that everyone recognizes and loves.
- Customizable flavors – Lemon, chocolate swirl, pumpkin spice, or berry toppings all work beautifully.
- Great make-ahead dessert – Cheesecake tastes even better after chilling overnight, so it’s perfect for planning ahead.
Ingredients
Let’s break it into two parts: the buttery graham cracker crust and the creamy cheesecake filling.
For the Graham Cracker Crust
- 1 cup graham cracker crumbs (about 8 full sheets, finely crushed)
- 2 tablespoons granulated sugar
- 4 tablespoons unsalted butter, melted
- 1/8 teaspoon fine sea salt (just a pinch; enhances flavor)
For the Creamy Cheesecake Filling
- 16 ounces full-fat cream cheese, room temperature (2 standard 8-ounce blocks; don’t use whipped)
- 2/3 cup granulated sugar
- 2 large eggs, room temperature
- 1/3 cup sour cream (full-fat for the creamiest texture)
- 1/4 cup heavy cream
- 1 1/2 teaspoons pure vanilla extract (this is where a good-quality vanilla really shines)
- 1 tablespoon cornstarch (helps set the cheesecake and reduce cracking)
- 1/8 teaspoon fine sea salt
For the Instant Pot
- 1 cup water (for the Instant Pot water bath effect)
Tools You’ll Need
- 6-quart (or larger) Instant Pot or similar electric pressure cooker
- 7-inch round springform pan (labeled as an Instant Pot springform pan in many stores)
- Trivet with handles or a homemade foil sling
- Aluminum foil
- Mixing bowl and hand mixer (or stand mixer)
- Rubber spatula
Use room temperature cream cheese and eggs—this is one of those small details that makes a big textural difference. Cold cream cheese tends to stay lumpy; softened cream cheese blends silky smooth.

Directions
Follow these steps and you’ll have an easy Instant Pot cheesecake that looks like it came from a bakery.
-
Prepare the pan
Lightly grease a 7-inch springform pan with butter or nonstick spray. If your pan has a loose base, you can line the bottom with a round of parchment paper to help with easy release. -
Make the graham cracker crust
In a medium bowl, stir together the graham cracker crumbs, sugar, melted butter, and salt until the mixture looks like damp sand and holds together when pressed between your fingers. If it’s too dry, add another teaspoon of melted butter. -
Press the crust into the pan
Pour the crust mixture into the pan. Use your fingers or the bottom of a flat measuring cup to press it firmly and evenly across the bottom and slightly up the sides (about 1 inch). Pack it tightly; a firmly packed crust won’t crumble when sliced. Place the pan in the freezer while you prepare the filling. -
Beat the cream cheese and sugar
In a large bowl, beat the softened cream cheese with a hand mixer on medium speed until completely smooth, 1–2 minutes. Add the sugar and beat again until the mixture is fluffy and no graininess remains. Scrape down the bowl well; this helps avoid lumps. -
Add sour cream, heavy cream, vanilla, and cornstarch
Add the sour cream, heavy cream, vanilla, cornstarch, and salt. Mix on low just until combined and creamy. Overmixing at this stage whips in extra air, which can cause bubbles and tiny cracks, so keep it gentle. -
Mix in the eggs (gently!)
Add the eggs one at a time, beating on low speed just until each egg disappears into the batter. Stop the mixer as soon as the mixture looks smooth. Use a spatula to give the batter a final stir, making sure there are no streaks at the bottom of the bowl. -
Pour and smooth the filling
Take the crust out of the freezer and pour the cheesecake filling over it. Tap the pan a few times on the counter to release air bubbles. If you see a few large bubbles rise, you can pop them with a toothpick and smooth the top. -
Cover the pan
Tightly cover the top of the pan with a piece of aluminum foil. This helps keep condensation from dripping onto the cheesecake and gives you that pretty, smooth top every time. -
Set up the Instant Pot
Pour 1 cup of water into the Instant Pot. Place the trivet in the pot. If your trivet doesn’t have handles, make a foil sling (a long folded strip of foil) so you can lift the pan out safely. Set the covered springform pan on the trivet. -
Pressure cook the cheesecake
Lock the lid, set the valve to Sealing, and cook on High Pressure for 35 minutes. This Instant Pot baking recipe is tested for a 7-inch pan; if your cheesecake is thicker or your pan is slightly different, you may need a couple extra minutes. -
Natural release
When the cook time is done, let the pressure release naturally for 10 minutes. After that, carefully turn the valve to Venting to release any remaining pressure. Gently lift the cheesecake out using the trivet handles or foil sling. -
Check doneness
Remove the foil cover. The center of the cheesecake should jiggle slightly like Jell-O when you nudge the pan, but it shouldn’t look liquid. The edges will be set. If it seems too loose, you can return it to the Instant Pot, cover again, and cook 3–5 minutes more with another 10-minute natural release. -
Cool gradually
Run a thin knife around the edge of the cheesecake (between the cake and the pan) to loosen it—this helps prevent cracking as it cools and shrinks slightly. Let it cool at room temperature for about 1 hour. -
Chill completely
Cover the pan (you can reuse the foil) and refrigerate for at least 4 hours, or overnight for the best flavor and texture. This is when the cheesecake fully sets and develops that dense, creamy bite. -
Serve and enjoy
When you’re ready to serve, release the springform ring, slice with a sharp knife, and wipe the blade between cuts for clean, neat slices. Top with fresh berries, fruit sauce, chocolate drizzle, or caramel if you’d like.
Servings & Timing
- Yield: About 8–10 slices (depending on how generous you’re feeling)
- Prep Time: 20–25 minutes
- Cook Time: 35 minutes under pressure + 10 minutes natural release
- Chill Time: Minimum 4 hours, preferably overnight
- Total Time: Around 5–6 hours, most of it hands-off
This is a great make-ahead quick cheesecake dessert in the sense that the active time is short, but the chilling makes it taste like you fussed all day.
Variations
Once you’ve mastered this easy Instant Pot cheesecake, it becomes a canvas for all sorts of flavors:
- Lemon Cheesecake: Add 1–2 teaspoons finely grated lemon zest and 2 tablespoons lemon juice to the filling for a bright, tangy twist.
- Chocolate Swirl Cheesecake: Melt 1/3 cup semi-sweet chocolate chips and swirl into the top of the batter before cooking.
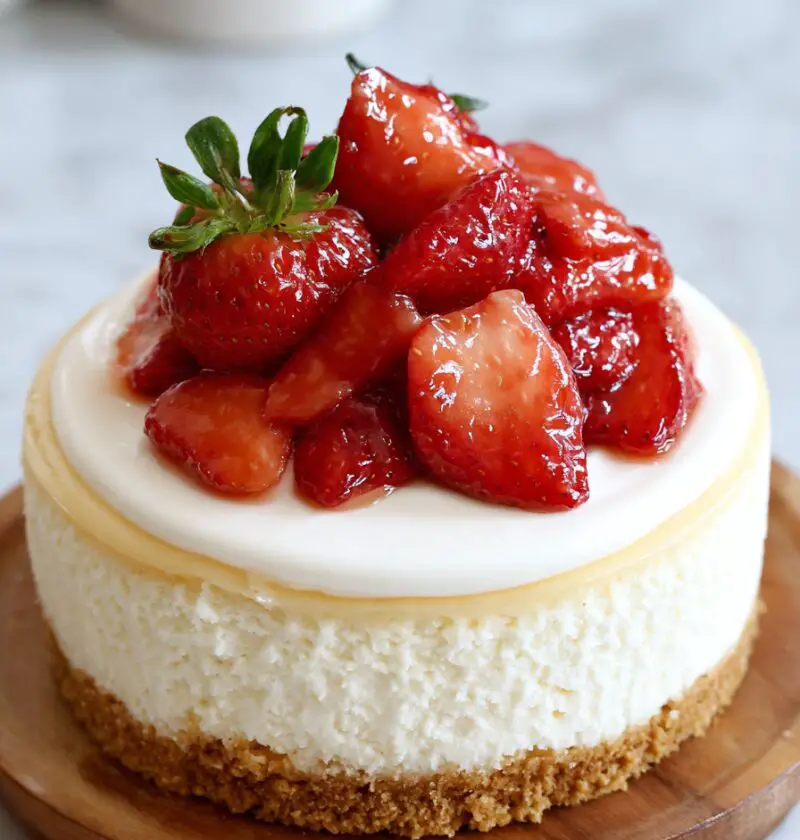
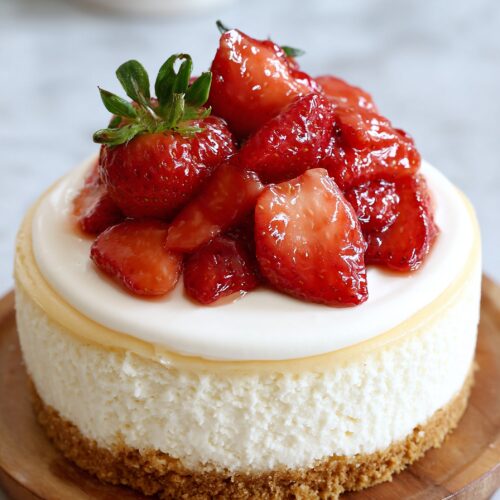
- Berry-Topped Cheesecake: Top the chilled cheesecake with fresh strawberries, raspberries, or a simple berry compote for a summery finish.
- Salted Caramel Cheesecake: Drizzle cooled salted caramel sauce over each slice and sprinkle with a few flakes of sea salt.
- Pumpkin Spice Cheesecake: Replace the sour cream with canned pumpkin puree and add 1 teaspoon pumpkin pie spice for a fall-focused version.
- Gluten-Free Crust Cheesecake: Use gluten-free graham crackers (or almond flour) for the crust to make it gluten-friendly.
Storage & Reheating
Cheesecake is one of those desserts that actually tastes better the next day, so it’s perfect for making ahead.
- Refrigerator: Store leftover cheesecake covered in the fridge for up to 4–5 days. I like to keep it in an airtight container so it doesn’t pick up fridge odors.
- Freezer: For longer storage, freeze slices individually on a parchment-lined tray until solid, then wrap tightly and store in a freezer bag for up to 2 months.
- Thawing: Thaw frozen slices in the fridge overnight, or let them sit at room temperature for 30–45 minutes if you’re in a hurry.
- Reheating (if you prefer it slightly warm): Cheesecake is usually served chilled, but you can very gently warm a slice in the microwave for 10–15 seconds if you like a softer, creamier texture. Just be careful not to melt it.
If you’re hosting, you can cook the cheesecake a day or two ahead and keep it chilled. Add fresh toppings just before serving so they stay bright and pretty.
Notes From My Kitchen
- Room temperature ingredients are key. This is one of those small but mighty details. Soft cream cheese and eggs mix more smoothly, which means a creamier texture and fewer lumps.
- Don’t overmix the batter. Once the eggs are in, treat the batter gently. Too much air can make the cheesecake puff up and then fall, leading to cracks.
- The Instant Pot behaves like a built-in water bath. The steam and constant temperature are what make pressure cooker cheesecake so forgiving compared with the oven.
- Give it time to chill. I know it’s tempting to cut in early—I’ve done it—but the flavor and texture really settle in after a long, cold rest.
- Every Instant Pot is a little different. Some run a bit hotter or cooler. After you make this once, you’ll know if your machine likes 35 minutes or closer to 38–40 for your perfect center.
And honestly, even if the first one has a tiny crack or the top isn’t “Instagram perfect,” it will still taste wonderful. Cheesecake is like that forgiving friend who still shows up delicious, even when the day wasn’t flawless.
FAQs
Can I use low-fat cream cheese?
You can, but the cheesecake won’t be as creamy and rich. For the best texture in this Instant Pot cheesecake, full-fat cream cheese is strongly recommended.
What size pan should I use?
This Instant Pot Cheesecake Recipe is tested with a 7-inch springform pan in a 6-quart Instant Pot. An 8-inch pan may work in an 8-quart cooker but will be thinner and may need a slightly shorter cook time.
Why did my cheesecake crack?
Cracks usually come from overmixing, sudden temperature changes, or not loosening the edges as it cools. The good news is, with this no‑crack cheesecake method in the pressure cooker, cracks are less common—and a topping of berries or chocolate sauce covers a multitude of sins.
My cheesecake seems too jiggly. Is it undercooked?
A little wobble in the center is normal; it sets more as it chills. If it looks wet or sloshy, return it to the Instant Pot for 3–5 more minutes at High Pressure plus a 10-minute natural release.
Can I make this ahead for a party?
Yes, absolutely. This is an ideal make-ahead electric pressure cooker dessert. Make it 1–2 days before serving, chill it fully, and add toppings right before guests arrive.
Can I change the crust?
Yes. You can use crushed chocolate cookies, vanilla wafers, or even ginger snaps. Just keep about the same crumb-to-butter ratio for a sturdy crust.
Do I have to cover the cheesecake with foil?
You don’t have to, but I highly recommend it. The foil keeps water droplets from forming on top of the cheesecake and helps you get that smooth, bakery-style finish.
Can I double the recipe?
You can’t double it in the same pan (it would be too thick and might not cook through), but you can make two separate cheesecakes back-to-back if you’re feeding a crowd.
Conclusion
This Instant Pot Cheesecake Recipe brings together all the things I love about dessert: simple ingredients, cozy flavors, and a bit of “wow” with a whole lot less fuss. You get a rich vanilla cheesecake with a buttery graham cracker crust, cooked gently in your Instant Pot for that soft, creamy, no-crack finish every cheesecake lover is chasing.
If you make this pressure cooker cheesecake, I’d love to hear how it turns out—tell me your favorite toppings, any flavor twists you try, or who you shared it with. And if you’re hooked on Instant Pot dessert recipes now, you might also enjoy trying an Instant Pot lava cake or rice pudding next.
Instant Pot Cheesecake
Ingredients
- 1 cup graham cracker crumbs about 8 full sheets, finely crushed
- 2 tablespoons granulated sugar for crust
- 4 tablespoons unsalted butter melted, for crust
- 1/8 teaspoon fine sea salt just a pinch; for crust
- 16 ounces cream cheese full-fat blocks, room temperature; do not use whipped
- 2/3 cup granulated sugar for filling
- 2 large eggs room temperature
- 1/3 cup sour cream full-fat, room temperature if possible
- 1/4 cup heavy cream
- 1 1/2 teaspoons pure vanilla extract
- 1 tablespoon cornstarch
- 1/8 teaspoon fine sea salt for filling
- 1 cup water for Instant Pot water bath
- butter or nonstick spray for greasing the pan
- fresh berries, caramel, chocolate sauce, or berry compote optional, for serving
Instructions
- Lightly grease a 7-inch springform pan with butter or nonstick spray. If the pan has a loose base, line the bottom with a round of parchment paper for easier release.butter or nonstick spray
- In a medium bowl, stir together the graham cracker crumbs, 2 tablespoons sugar, melted butter, and 1/8 teaspoon fine sea salt until the mixture looks like damp sand and holds together when pressed. If it seems too dry, add another teaspoon of melted butter.1 cup graham cracker crumbs, 2 tablespoons granulated sugar, 4 tablespoons unsalted butter, 1/8 teaspoon fine sea salt
- Pour the crust mixture into the prepared pan. Use your fingers or the bottom of a flat measuring cup to press it firmly and evenly across the bottom and about 1 inch up the sides. Pack it tightly so it doesn’t crumble when sliced. Place the pan in the freezer while you prepare the filling.
- In a large bowl, beat the softened cream cheese with a hand mixer on medium speed until completely smooth, 1–2 minutes. Add 2/3 cup granulated sugar and beat again until the mixture is fluffy and no graininess remains, scraping down the bowl as needed.16 ounces cream cheese, 2/3 cup granulated sugar
- Add the sour cream, heavy cream, vanilla extract, cornstarch, and 1/8 teaspoon fine sea salt to the bowl. Mix on low speed just until combined and creamy, avoiding overmixing to prevent excess air in the batter.1/3 cup sour cream, 1/4 cup heavy cream, 1 1/2 teaspoons pure vanilla extract, 1 tablespoon cornstarch, 1/8 teaspoon fine sea salt
- Add the eggs one at a time, beating on low speed just until each egg is incorporated. Stop the mixer as soon as the batter looks smooth. Use a spatula to gently stir the batter and make sure there are no streaks at the bottom of the bowl.2 large eggs
- Remove the crust from the freezer and pour the cheesecake filling over it. Tap the pan firmly a few times on the counter to release air bubbles. If you see large bubbles on top, pop them with a toothpick and smooth the surface.
- Tightly cover the top of the springform pan with a piece of aluminum foil to prevent condensation from dripping onto the cheesecake and to help create a smooth top.
- Pour 1 cup of water into the bottom of a 6-quart (or larger) Instant Pot. Place the trivet in the pot. If your trivet has no handles, make a foil sling. Set the covered springform pan on the trivet.1 cup water
- Lock the lid and set the valve to Sealing. Cook on High Pressure for 35 minutes. This timing is for a 7-inch pan; very thick or different-sized pans may need slight adjustment.
- When the cook time ends, let the pressure release naturally for 10 minutes. Then carefully turn the valve to Venting to release any remaining pressure. Lift the cheesecake out using the trivet handles or foil sling.
- Remove the foil cover. Gently nudge the pan; the center of the cheesecake should jiggle slightly like Jell-O but should not look liquid, and the edges should be set. If it seems too loose or wet, re-cover with foil, return to the Instant Pot, and cook for an additional 3–5 minutes at High Pressure followed by another 10-minute natural release.
- Run a thin knife around the edge of the cheesecake between the cake and the pan to loosen it and help prevent cracking as it cools. Let the cheesecake cool at room temperature in the pan for about 1 hour.
- Cover the pan (you can reuse the foil) and refrigerate the cheesecake for at least 4 hours, preferably overnight, until fully chilled and set with a dense, creamy texture.
- When ready to serve, release and remove the springform ring. Slice with a sharp knife, wiping the blade between cuts for clean slices. Serve plain or topped with fresh berries, fruit sauce, chocolate drizzle, or caramel.fresh berries, caramel, chocolate sauce, or berry compote