Homemade Hummus Recipe Without Tahini
If you’ve ever wanted a creamy, healthy snack but didn’t have tahini on hand, this Homemade Hummus Recipe Without Tahini is your new weeknight hero—simple pantry ingredients, no fuss, and ready in minutes.
I’ve been making some variation of homemade hummus since the late ’90s (yes, back when chickpeas were still “garbanzo beans” in most American pantries and hummus felt a little exotic at potlucks). Over the years, one question has popped up over and over from friends and readers:
“Can I make hummus without tahini—and will it still be creamy and good?”
The answer is a big, happy yes.
This hummus recipe is tahini free, uses basic ingredients you probably already have, and still gives you that classic Mediterranean hummus vibe: silky, garlicky, lemony, and perfect for dipping everything from carrot sticks to warm pita. It’s a healthy hummus recipe that feels snacky but also works beautifully as part of a simple lunch plate.
I love serving this no tahini hummus when:
- I’m throwing together a casual appetizer board for family movie night
- Friends stop by and I want something gluten-free and dairy-free friendly
- I need a high-fiber, plant-based snack that keeps me full through the afternoon
Let’s walk through exactly how to make this homemade chickpea dip from scratch—and how to tweak it so it fits your taste, your pantry, and honestly, your mood.
Why You’ll Love This Recipe
This Homemade Hummus Recipe Without Tahini has become a staple in my house for a reason (several reasons, actually):
- No tahini needed at all – Perfect when you don’t have tahini or just don’t love the flavor.
- Creamy and smooth – Smart tricks (like warm chickpeas and extra blending time) give you that restaurant-style texture.
- Pantry-friendly ingredients – Chickpeas, lemon, olive oil, garlic—nothing fancy, just real food.
- Fast and easy hummus recipe – About 10 minutes from can to bowl, especially with a food processor.
- Budget-friendly snack – Way cheaper than store-bought tubs of hummus, especially if you eat it often.
- Customizable flavor – Adjust lemon, garlic, and seasonings for a basic hummus recipe or a bold, zesty one.
- Naturally vegan and gluten-free – Great for mixed groups, potlucks, or game-day snack tables.
- Versatile – Use as a simple hummus dip, a sandwich spread, or a base for Mediterranean hummus bowls.
- Healthy, fiber-rich, and satisfying – Chickpeas (garbanzo beans) bring protein, fiber, and steady energy.
Ingredients
Here’s everything you need for this tahini free hummus. These measurements make about 1½–2 cups of hummus—perfect for a small gathering or several snacks throughout the week.
- 1 can (15 oz / 425 g) chickpeas, drained and rinsed (also labeled garbanzo beans)
- 3–4 tablespoons aquafaba (liquid from the chickpea can; start with 3 and add more as needed)
- 3 tablespoons extra-virgin olive oil, plus more for drizzling
- 3 tablespoons fresh lemon juice (about 1 large lemon)
- 1–2 cloves garlic, roughly chopped (start with 1 if you’re garlic-shy)
- ½ teaspoon fine sea salt, plus more to taste
- ¼ teaspoon ground cumin (optional, but highly recommended for a classic hummus recipe flavor)
- 2–4 tablespoons cold water, as needed for texture
- Optional garnish: paprika or smoked paprika, extra olive oil, chopped fresh parsley, sesame seeds, or a few whole chickpeas
A few ingredient tips from my kitchen to yours:
- Chickpeas / garbanzo beans: Canned chickpeas make this a truly easy hummus recipe. If you cook chickpeas from dry, use about 1½ cups cooked and very soft beans. Overcooked (slightly “mushy”) chickpeas actually make creamier hummus.
- Aquafaba (chickpea liquid): This is my secret weapon in tahini free hummus. It adds creaminess and helps the hummus whip up fluffy without extra oil. Don’t toss it!
- Olive oil: Use a good-tasting extra-virgin olive oil. It doesn’t have to be fancy, but it should be something you like the flavor of straight off the spoon.
- Lemon: Fresh lemon juice is one ingredient I don’t compromise on here. Bottled lemon juice tastes flat in hummus from scratch.
- Garlic: Raw garlic is punchy. If you’re serving this Mediterranean hummus recipe to kids or folks who prefer mild flavors, use a small clove or briefly sauté the chopped garlic in a teaspoon of olive oil to mellow it.
- Cumin: That tiny ¼ teaspoon makes this simple hummus dip taste like it came from your favorite Middle Eastern restaurant. Add more if you love a smokier, warmer flavor.
Directions
You don’t need tahini for creamy hummus, but you do need a few simple techniques. A food processor is easiest, but a high-speed blender also works.
-
Warm the chickpeas (optional but very helpful).
Add the drained, rinsed chickpeas to a microwave-safe bowl with 2–3 tablespoons of aquafaba and microwave for 45–60 seconds, just until warm. Warm chickpeas blend smoother and give you silkier hummus without tahini. -
Blend the garlic, lemon, and salt first.
In the bowl of a food processor, add the lemon juice, chopped garlic, and salt. Process for 20–30 seconds. Scrape down the sides, then process again. This step mellows the raw garlic and infuses the lemon with flavor, giving your homemade hummus a balanced taste. -
Add chickpeas, cumin, and aquafaba.
Add the warm chickpeas, cumin (if using), and 3 tablespoons of aquafaba to the food processor. Blend for about 1 minute. Stop, scrape down the sides, then blend again for another 30–60 seconds. The mixture will look thick and a bit grainy—don’t worry, we’re not done yet. -
Stream in olive oil while blending.
With the motor running, slowly pour in the 3 tablespoons of olive oil. Process for 1–2 minutes. The hummus will start to transform from thick and clumpy to smoother and creamier. If the processor sounds like it’s working too hard, pause and scrape down the sides again. -
Adjust with cold water for extra creaminess.
Now for the magic: with the machine running, add cold water 1 tablespoon at a time until the hummus becomes very smooth and a little fluffy. I usually end up using 3 tablespoons. The cold water helps whip tiny air bubbles into the hummus, which gives that dreamy, creamy hummus without tahini. -
Taste and fine-tune the flavor.
Taste your no tahini hummus. Need more brightness? Add another teaspoon of lemon juice. Want more depth? Add a pinch more cumin or salt. If the garlic is too sharp, let the hummus sit in the fridge for 30 minutes—it mellows as it rests. -
Serve it up.
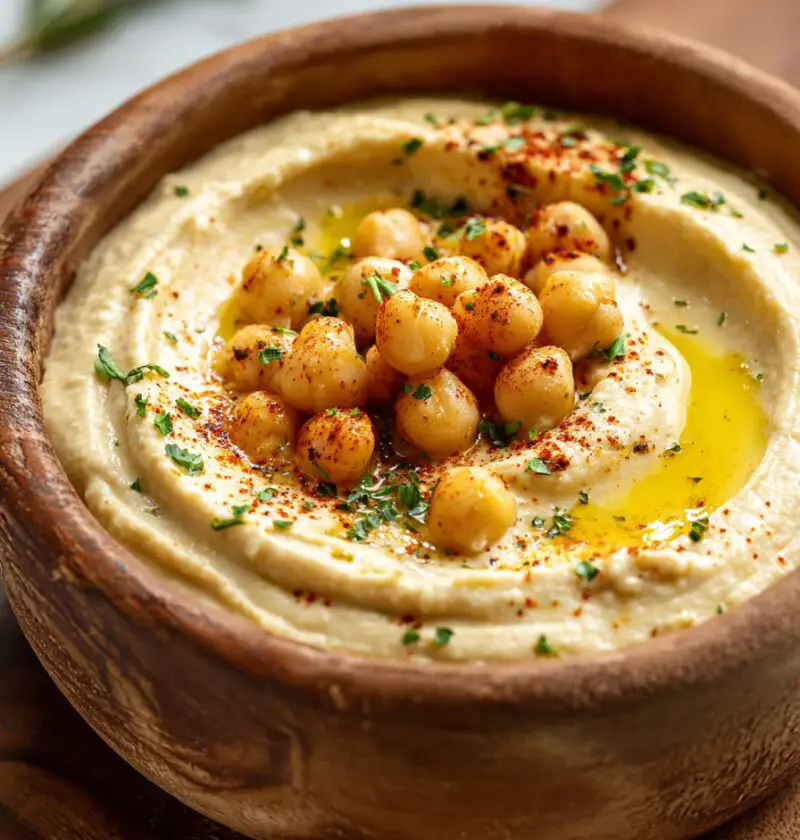
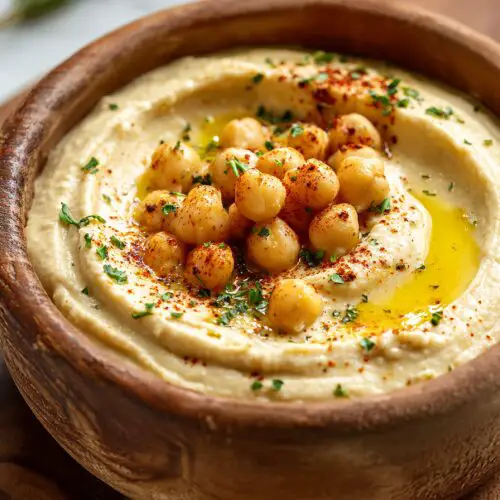
Spoon the hummus into a shallow bowl. Use the back of a spoon to swirl little “wells” in the top. Drizzle with extra olive oil, then sprinkle with paprika or smoked paprika and chopped parsley. Add a few whole chickpeas in the center if you’re feeling fancy. Serve with pita bread, pita chips, crackers, or crisp veggies.
Servings & Timing
- Yield: About 1½–2 cups of hummus (roughly 6–8 appetizer servings)
- Prep Time: 10 minutes
- Cook Time: 0 minutes (just warming chickpeas, if you choose)
- Total Time: 10–12 minutes
On busy weekdays, I can pull this together while my coffee is brewing. It’s that quick.
Simple Variations to Keep Things Interesting
Once you’ve made this Homemade Hummus Recipe Without Tahini once or twice, you’ll probably start playing with it—that’s the fun part. Here are some easy twists:
- Roasted Garlic Hummus Without Tahini: Swap raw garlic for 2–3 cloves of soft roasted garlic for a sweeter, mellow flavor.
- Spicy No Tahini Hummus: Add ½–1 teaspoon crushed red pepper flakes or a spoonful of harissa for heat.
- Herby Green Hummus: Blend in ½ cup fresh parsley, cilantro, or a mix of both for a bright green, herb-packed hummus.
- Smoky Paprika Chickpea Hummus: Add ½ teaspoon smoked paprika and a squeeze of lime instead of lemon.
- Lemon-Pepper Hummus: Increase lemon juice slightly and add ½ teaspoon freshly ground black pepper for a tangy, bold flavor.
- Olive Hummus From Scratch: Pulse in ¼–⅓ cup chopped Kalamata or green olives at the end for salty little bites.
Storage & Make-Ahead Tips
Homemade hummus stores very well, which makes it ideal for meal prep.
- Fridge: Store your hummus in an airtight container in the refrigerator for 4–5 days. Press a small piece of parchment or plastic wrap directly on the surface before putting on the lid if you want to minimize any drying.
- Freezer: Yes, you can freeze hummus. Place it in a freezer-safe container (leaving a little space at the top) and freeze for up to 2–3 months.
- Thawing: Thaw frozen hummus overnight in the fridge. Stir well and, if needed, mix in a teaspoon of olive oil or a tablespoon of water to bring back the creamy texture.
- Make-ahead: This tahini free hummus actually tastes even better after a few hours in the fridge. The flavors settle in and the garlic softens. If I’m serving guests, I often make it the night before and garnish right before serving.
Notes from My Kitchen (Little Things That Make a Big Difference)
- Warm beans = smoother hummus. I resisted this tip for years, but it really works. Slightly warm chickpeas blend much more easily, especially when you’re skipping tahini.
- Peeling chickpeas is optional. If you’ve ever seen someone painstakingly pop each chickpea out of its skin—yes, that does make extremely smooth hummus, but I’ll be honest: I rarely have the patience. If you want ultra-silky texture for a special occasion, gently pinch the skins off after rinsing. For everyday hummus, I leave them on and just blend longer.
- Blend longer than you think. Most folks stop too soon. Let the food processor run for a full 2–3 minutes, stopping to scrape down the sides once or twice. Hummus should be soft and almost pillowy, not stiff.
- Salt and lemon are your best friends. If your hummus tastes “meh,” it usually needs more acid or a pinch of salt, not extra garlic. Try those first.
- Olive oil on top, not in excess inside. This recipe uses enough oil to make the hummus creamy but not heavy. A pretty drizzle on top adds richness and flavor without loading the hummus with extra fat.
- Think beyond dipping. I spread this simple hummus dip on toast with sliced tomatoes, tuck it into wraps with grilled veggies, and even dollop it on grain bowls. It’s not just a snack; it’s a building block for quick meals.
FAQs
1. Can I make this Homemade Hummus Recipe Without Tahini without a food processor?
Yes. A high-speed blender works well—just stop and scrape down the sides often. In a pinch, you can mash chickpeas by hand with a potato masher, but the hummus will be rustic, not ultra-smooth.
2. My hummus is too thick—what should I do?
Add more cold water or a bit of aquafaba, 1 tablespoon at a time, blending after each addition until it’s smooth and creamy again.
3. How do I make this no tahini hummus lower in fat?
Reduce the olive oil to 1–2 tablespoons and replace the rest with aquafaba and cold water. The texture will still be creamy, just a bit lighter.
4. Can I use another bean instead of chickpeas?
Yes. White beans (like cannellini or Great Northern beans) make a softer, milder “hummus” that’s lovely with lemon and garlic. The flavor will be different from classic chickpea hummus but still delicious.
5. Is hummus without tahini still considered hummus?
Traditional Mediterranean hummus recipe usually includes tahini, but many home cooks (especially in the U.S.) make hummus-style chickpea dips without it. Think of this as a tahini free hummus variation—same spirit, slightly different personality.
6. How can I make this hummus extra garlicky without it being harsh?
Use roasted garlic instead of raw, or quickly sauté the chopped garlic in a teaspoon of olive oil before blending. You’ll get deeper garlic flavor with less bite.
7. Can I use bottled lemon juice instead of fresh?
You can, but the flavor won’t be as bright or fresh. If you must, use a good-quality bottled juice and consider adding a bit of lemon zest for extra zing.
8. What should I serve with this basic hummus recipe?
Classic choices are pita wedges, pita chips, cucumber slices, bell pepper strips, carrot sticks, cherry tomatoes, radishes, crackers, or even pretzels. It also makes a great spread for sandwiches and wraps.
Conclusion
This Homemade Hummus Recipe Without Tahini is one of those simple, everyday recipes that quietly earns a permanent place in your rotation—no specialty ingredients, no cooking, just a creamy, tangy, healthy hummus you can whip up anytime. It’s flexible enough for snack trays, lunch boxes, or late-night “something savory” cravings, and it’s kind to your budget, too.
Give this tahini free hummus a try, then tweak it to make it truly yours—maybe extra lemon, a little more cumin, or a swirl of roasted red peppers. When you do, I’d love to hear how it turned out and what you served it with. Leave a comment, share a photo, or explore more homemade hummus and Mediterranean-style recipes next; your snack game is about to get a lot more fun.
Homemade Hummus Recipe Without Tahini
Ingredients
- 1 can (15 oz / 425 g) chickpeas (garbanzo beans) drained and rinsed
- 3-4 tablespoons aquafaba liquid from the chickpea can; start with 3 tablespoons and add more as needed
- 3 tablespoons extra-virgin olive oil plus more for drizzling on top
- 3 tablespoons fresh lemon juice about 1 large lemon
- 1-2 cloves garlic roughly chopped; start with 1 clove if you prefer milder garlic flavor
- 1/2 teaspoon fine sea salt plus more to taste
- 1/4 teaspoon ground cumin optional but recommended for classic hummus flavor
- 2-4 tablespoons cold water as needed for texture
- paprika or smoked paprika optional, for garnish
- extra olive oil optional, for drizzling on top
- fresh parsley optional, chopped, for garnish
- sesame seeds or a few whole chickpeas optional, for garnish
Instructions
- Add the drained, rinsed chickpeas to a microwave-safe bowl with 2–3 tablespoons of aquafaba. Microwave for 45–60 seconds, just until warm. Warming the chickpeas helps them blend smoother and gives a silkier hummus.1 can (15 oz / 425 g) chickpeas (garbanzo beans), 3-4 tablespoons aquafaba
- In the bowl of a food processor, add the fresh lemon juice, chopped garlic, and fine sea salt. Process for 20–30 seconds, scrape down the sides, then process again. This step mellows the raw garlic and infuses the lemon with flavor.3 tablespoons fresh lemon juice, 1-2 cloves garlic, 1/2 teaspoon fine sea salt
- Add the warm chickpeas, ground cumin (if using), and 3 tablespoons of aquafaba to the food processor. Blend for about 1 minute, stop and scrape down the sides, then blend again for another 30–60 seconds. The mixture will be thick and a bit grainy at this stage.1 can (15 oz / 425 g) chickpeas (garbanzo beans), 3-4 tablespoons aquafaba, 1/4 teaspoon ground cumin
- With the motor running, slowly pour in the 3 tablespoons of extra-virgin olive oil. Process for 1–2 minutes, until the hummus starts to become smoother and creamier. Pause to scrape down the sides if needed.3 tablespoons extra-virgin olive oil
- With the machine running, add cold water 1 tablespoon at a time until the hummus is very smooth, creamy, and slightly fluffy. Usually 2–4 tablespoons of water are enough. The cold water helps whip tiny air bubbles into the hummus.2-4 tablespoons cold water
- Taste the hummus and adjust to your liking. Add more lemon juice for brightness, a pinch more salt for balance, or additional cumin for warmth. If the garlic flavor is too sharp, refrigerate the hummus for about 30 minutes to let it mellow.3 tablespoons fresh lemon juice, 1/2 teaspoon fine sea salt, 1/4 teaspoon ground cumin
- Spoon the hummus into a shallow bowl and use the back of a spoon to swirl little wells on the surface. Drizzle with extra olive oil, then sprinkle with paprika or smoked paprika and chopped fresh parsley. Garnish with sesame seeds or a few whole chickpeas if desired. Serve with pita, chips, crackers, or fresh veggies.3 tablespoons extra-virgin olive oil, paprika or smoked paprika, fresh parsley, sesame seeds or a few whole chickpeas