Graduation Cupcakes Recipe
If you need a festive, crowd-pleasing Graduation Cupcakes Recipe that looks bakery-pretty but feels totally doable at home, these sweet little celebration treats are it. They’re soft, fluffy, easy to decorate, and perfect for turning a graduation party dessert table into something memorable.
A sweet little send-off worth celebrating
There’s something about graduation season that gets me every time. Maybe it’s the pride, maybe it’s the caps and gowns, or maybe it’s the excuse to make adorable graduation cupcakes for everyone gathered around the kitchen island. Either way, this graduation cupcake recipe has become one of my go-to graduation celebration treats because it checks all the boxes: easy, cheerful, customizable, and downright delicious.
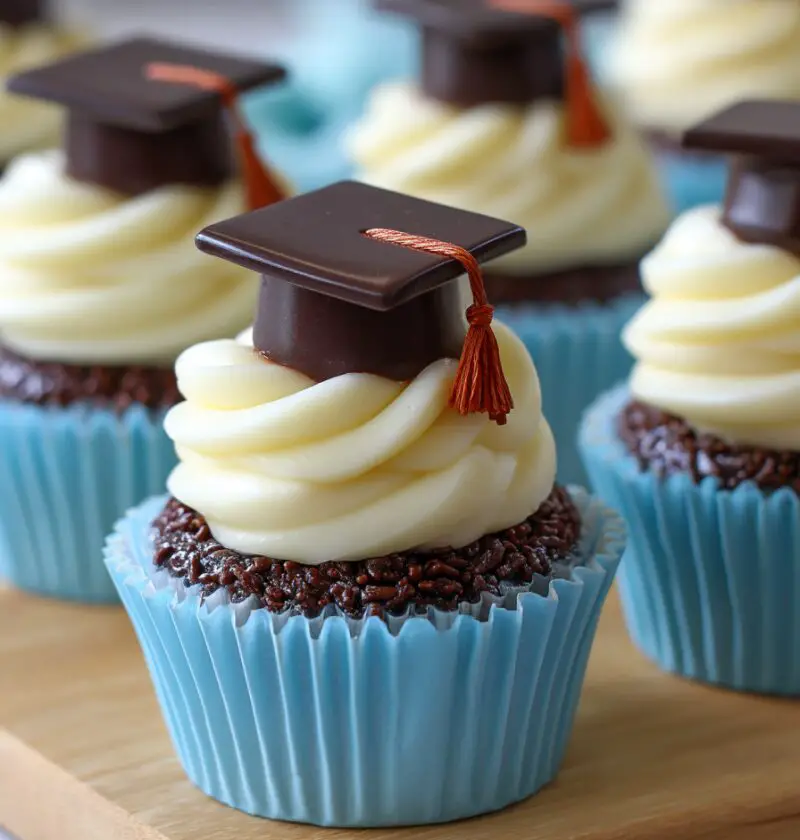
These homemade cupcakes start with a classic vanilla cupcake base—light, tender, and sturdy enough to hold pretty frosting and decorations. I’ll also share a simple chocolate variation because, let’s be honest, some folks will always head straight for the chocolate desserts first. What makes these especially fun is the decorating: think school colors, sprinkles, and even cute graduation cap cupcakes made with chocolate squares and candy tassels.
I love serving these at family parties because they’re easier than a layer cake and much less stressful when you’re feeding a crowd. From a hosting standpoint, cupcakes are a smart move. They’re portioned, portable, and easier for guests to grab while mingling. Data from party-planning and bakery trend reports consistently show that handheld desserts remain one of the most popular party dessert ideas for large celebrations, and it’s not hard to see why. Less mess, less cutting, less fuss. More fun.
And honestly? That’s what a good graduation themed dessert should do—celebrate the moment without making you feel like you need pastry school to pull it off.
Why you’ll love this recipe
- Easy enough for beginner bakers.
- Perfect for graduation parties, open houses, and family cookouts.
- Works beautifully as vanilla cupcakes or chocolate cupcakes.
- Simple to decorate in school colors.
- Easy to make ahead for stress-free party prep.
- Moist, fluffy texture that stays tender for days.
- A great kid-friendly project if you’ve got helpers in the kitchen.
- Turns into adorable decorated cupcakes with very little extra effort.
- Ideal for dessert tables, gift boxes, or party favors.
- Flexible enough for different dietary swaps and flavor twists.
Ingredients
Here’s everything you’ll need for this cupcake recipe, plus a few helpful notes so the results are as reliable as your favorite measuring cups.
For the vanilla cupcakes
- 1 1/2 cups all-purpose flour
(Spoon and level it; too much flour can make cupcakes dense.) - 1 1/2 teaspoons baking powder
(Check freshness—older baking powder gives weaker rise.) - 1/4 teaspoon fine salt
- 1/2 cup unsalted butter, softened
(Use real butter for the best flavor; Land O’Lakes and Kerrygold both work well.) - 1 cup granulated sugar
- 2 large eggs, room temperature
(Room temp eggs blend more smoothly and help with even baking.) - 2 teaspoons pure vanilla extract
(Use a good-quality extract like Nielsen-Massey if you can.) - 1/2 cup whole milk, room temperature
(Whole milk gives a richer crumb, though 2% works in a pinch.)
For the chocolate buttercream
- 1 cup unsalted butter, softened
- 3 1/2 cups powdered sugar, sifted if lumpy
- 1/2 cup unsweetened cocoa powder
- 2 to 4 tablespoons heavy cream or milk
- 1 teaspoon vanilla extract
- Pinch of salt
For decorating
- 24 mini chocolate sandwich cookies or chocolate wafer cookies
(For graduation cap cupcakes) - 24 squares of chocolate, such as Ghirardelli squares or cut candy melts
(These make the flat top of the “cap.”) - Black decorating gel or melted chocolate
- Assorted sprinkles in school colors
- Candy-coated chocolates, licorice strings, or sour belts for tassels
- Optional: gold sugar pearls, edible glitter, or letter sprinkles for initials and graduation year
Optional chocolate cupcake variation
If you want half vanilla and half chocolate cupcakes, use your favorite trusted chocolate cupcake base or add:
- Replace 1/4 cup flour with 1/4 cup cocoa powder
- Add 2 tablespoons extra milk if the batter seems thick
Directions
1. Prep the pans and preheat the oven
Preheat your oven to 350°F. Line two standard muffin pans with 24 cupcake liners. If you’re using school-color liners, now’s the time to show a little spirit.
2. Mix the dry ingredients
In a medium bowl, whisk together the flour, baking powder, and salt. This quick step helps distribute the leavening evenly, which means better rise and a more even crumb.
3. Cream the butter and sugar
In a large bowl, beat the softened butter and sugar with a hand mixer or stand mixer for about 2 to 3 minutes, until light and fluffy. Don’t rush this part—it’s where a lot of the cupcake’s tender texture begins.
4. Add eggs and vanilla
Beat in the eggs one at a time, then stir in the vanilla extract. If the batter looks a little curdled, don’t worry. Once the flour mixture goes in, it usually smooths right out.
5. Alternate dry ingredients and milk
Add half the dry ingredients to the butter mixture, then half the milk. Repeat with the remaining dry ingredients and milk, mixing on low speed just until combined. Scrape the bowl so no flour pockets hide at the bottom. Overmixing is the enemy here, so stop as soon as the batter looks smooth.
6. Fill and bake
Divide the batter evenly among the cupcake liners, filling each about two-thirds full. A cookie scoop makes this neat and fast. Bake for 16 to 19 minutes, or until the tops spring back lightly and a toothpick comes out with a few moist crumbs.
7. Cool completely
Let the cupcakes cool in the pan for 5 minutes, then transfer them to a wire rack. They must be fully cool before frosting—warm cupcakes and buttercream are a messy little heartbreak.
8. Make the chocolate buttercream
Beat the butter until creamy, about 1 minute. Add the powdered sugar, cocoa powder, vanilla, salt, and 2 tablespoons cream. Beat until fluffy, adding more cream a teaspoon at a time until the frosting is smooth and pipeable. If it feels too soft, let it sit for a few minutes; if too thick, add a splash more cream.
9. Frost the cupcakes
Pipe or spread the buttercream onto each cupcake. A large star tip gives them that classic bakery swirl, but an offset spatula works beautifully too. Don’t overthink it—these are festive cupcakes, not a final exam.
10. Make the graduation caps
Use a dot of melted chocolate or decorating gel to attach a mini cookie to the center of each frosted cupcake. Then attach a chocolate square on top of the cookie to create the cap. Add a candy string or thin strip of sour belt as the tassel, and finish with a sprinkle or sugar pearl at the center.
11. Add school colors and finishing touches
Scatter sprinkles in school colors around the base, or add a few custom touches like the graduation year. If you’re serving these at a larger party, you can decorate some simply and make a dozen as full graduation cap cupcakes for a nice visual mix.
Servings & Timing
- Yield: 24 cupcakes
- Prep Time: 25 minutes
- Bake Time: 16 to 19 minutes
- Decorating Time: 20 minutes
- Total Time: About 1 hour 5 minutes
If you make the cupcakes the day before, decorating day becomes much easier—especially helpful if you’re juggling family, photos, and party setup.
Variations
- Vanilla-Almond Version: Replace 1/2 teaspoon of vanilla with almond extract for a bakery-style flavor.
- Chocolate Lover’s Batch: Use a full chocolate base and top with chocolate buttercream for rich celebration cupcakes.
- Confetti Cupcakes: Fold 1/3 cup rainbow or school-color jimmies into the batter for extra festive flair.
- Gluten-Free Option: Use a reliable 1:1 gluten-free flour blend such as Bob’s Red Mill.
- Lemon Celebration Cupcakes: Add 1 tablespoon lemon zest to the batter and use vanilla frosting for a bright spring twist.
- Mini Cupcakes: Bake in mini liners for bite-sized graduation party cupcakes; start checking at 10 minutes.
Storage & Reheating
Store frosted cupcakes in an airtight container at room temperature for up to 2 days, or in the refrigerator for up to 4 days. If your kitchen runs warm, refrigerating is the safer choice, especially with decorated toppers.
For the best texture, let chilled cupcakes sit at room temperature for 20 to 30 minutes before serving. Buttercream tastes creamier that way, and the cake softens up nicely.
Unfrosted cupcakes freeze well for up to 2 months. Wrap them tightly, then thaw overnight in the fridge or on the counter for a couple of hours before decorating.
Make-ahead tip: bake the cupcakes one day ahead, prepare the frosting the same day or the next morning, and assemble the graduation cap toppers shortly before serving so they stay crisp and polished.
Notes
A few things I learned while testing this graduation cupcakes recipe—some the easy way, some not so easy.
First, room-temperature ingredients really do matter. I know, I know, it sounds fussy. But they create a smoother batter and a more even rise. Cold eggs and milk can make the mixture look grainy and slow down the creaming process.
Second, don’t overload the toppers. Those little graduation cap cupcakes are charming, but if the cookie and chocolate piece are too heavy or off-center, they can slide. A stable frosting swirl and a little melted chocolate “glue” help a lot.
Third, if you’re baking for a school with bold colors—navy, red, emerald, black—use gel food coloring in frosting or buy sprinkles in matching shades. It makes the whole tray look coordinated, and readers tell me all the time that matching school colors is what makes these feel personal.
And one more thing: this recipe works wonderfully for mixed-age gatherings. Kids love the candy toppers. Adults appreciate a dessert that’s easy to eat while chatting. It’s practical and cute, which is a lovely combination.
FAQs
Can I make this graduation cupcake recipe ahead of time?
Yes. Bake the cupcakes up to 1 day ahead and store them covered. Frost and decorate the day of the party for the freshest look.
Can I use store-bought cupcakes or frosting?
Absolutely. If time is tight, use bakery or boxed cupcakes and focus your energy on the decorations. The graduation cap toppers still make them feel homemade and special.
What’s the best frosting for graduation party cupcakes?
Buttercream is the easiest and most reliable because it holds piping shapes well and supports decorations nicely. Cream cheese frosting is tasty too, but it’s softer.
How do I keep the graduation caps from sliding off?
Use a generous but stable frosting swirl and attach the cookie and chocolate square with a small dab of melted chocolate or decorating gel. Let them set for a few minutes before moving the cupcakes.
Can I make these in school colors?
Yes, and you should if you can. Use matching liners, sprinkles, candy tassels, or tinted frosting to turn basic decorated cupcakes into a personalized graduation themed dessert.
Can I make mini graduation cupcakes?
You sure can. Mini cupcakes are great for dessert tables and younger guests. Just reduce the baking time and keep decorations a little lighter.
Do these work as vanilla cupcakes and chocolate cupcakes in the same batch?
Yes. Many hosts make a half-and-half spread because guests like choices. It also adds visual variety to your graduation dessert table.
What other party dessert ideas go well with these?
Fresh fruit skewers, brownie bites, lemon bars, and iced tea all pair nicely. If you’re building a dessert table, mix a few rich treats with a few lighter ones so guests have options.
Conclusion
This Graduation Cupcakes Recipe is sweet, simple, and made for celebrating big milestones with the people you love most. Between the fluffy cake, creamy frosting, and playful graduation cap toppers, these graduation celebration treats bring charm to any party table. If you make them, I’d love to hear how they turned out—leave a comment, share your school colors, or save this recipe for your next batch of party dessert ideas.