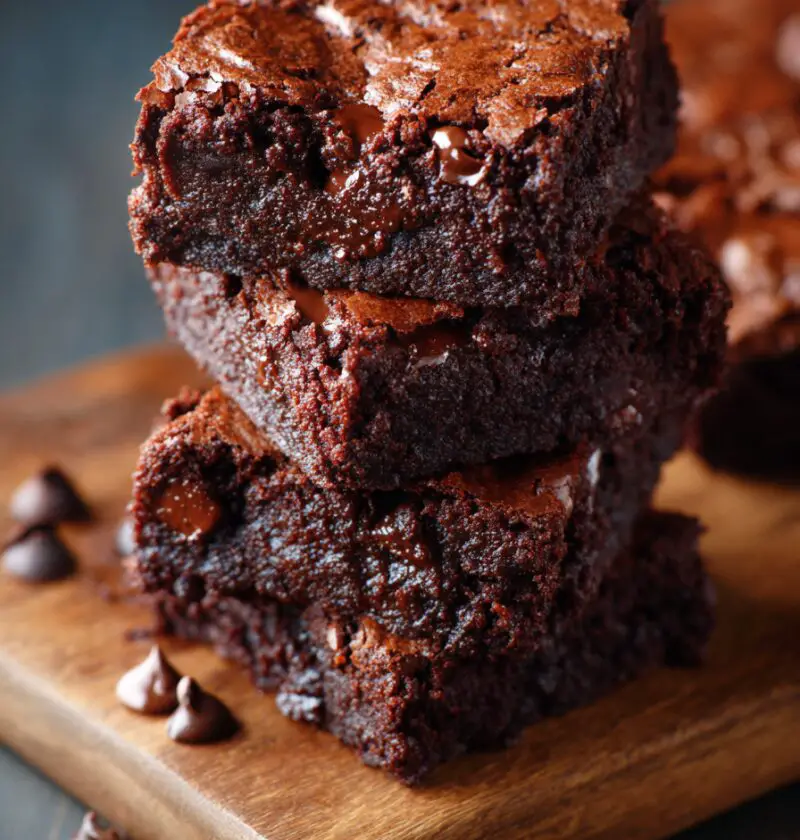
Gluten Free Fudge Brownies Recipe
This Gluten Free Fudge Brownies Recipe gives you rich, chewy, fudgy chocolate squares that no one will ever guess are gluten free—and they’re easy enough for a weeknight craving.
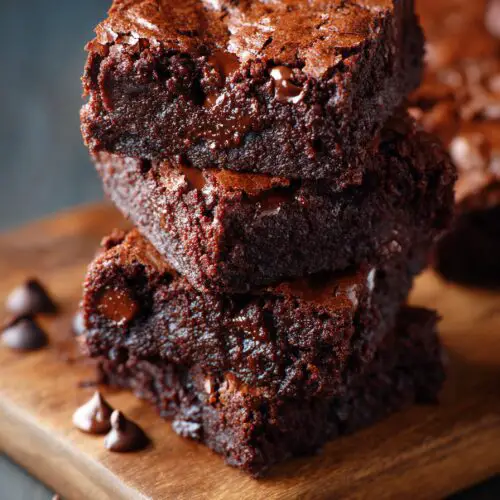
I’ve tested a lot of gluten free desserts over the years, and these gluten free fudge brownies are the ones my family actually argues over. Thick, glossy, rich chocolate fudge brownies with that shiny, crackly top and a dense, chewy center… they’re everything you want in a gluten free chocolate brownies recipe, just without the wheat. If you’ve been hunting for the best gluten free brownies—something that tastes like “real” bakery brownies—this is the one I come back to again and again.
I like to bake a pan of these homemade gluten free brownies on Sunday afternoons. My kids wander through the kitchen, my husband pretends he’s only “tasting the edge,” and before you know it, half the pan is gone. They’re perfect for potlucks, holidays, bake sales, and those nights when you just need a deep, fudgy gluten free brownie recipe and a quiet corner of the couch.
What makes these easy gluten free brownies special? A few small technique tweaks that give you that classic chewy texture: melted butter and chocolate, a higher ratio of sugar, and just enough gluten free flour blend and cocoa powder to hold everything together without making them cakey. They’re a simple, reliable gluten free dessert recipe with big, bakery-style flavor and texture.
Why You’ll Love This Recipe
- Naturally rich, fudgy texture that tastes like classic “wheat” brownies
- Uses simple pantry ingredients—no weird gums or specialty products beyond a good gluten free flour blend
- Shiny, crackly top that looks bakery-perfect in every pan
- Easy gluten free brownies recipe that comes together in one bowl (less cleanup!)
- Flexible and forgiving—add nuts, chocolate chips, or swirl in peanut butter
- Holds together well, so they’re great for lunch boxes, parties, and potlucks
- Freezer-friendly gluten free dessert recipe for last-minute guests
- Clear, step-by-step directions ideal for newer gluten free bakers
- Easily made dairy free with a couple of simple swaps
Ingredients
Here’s everything you need to make this Gluten Free Fudge Brownies Recipe. Measuring accurately (especially the flour) helps keep them fudgy, not dry.
- 1 cup (2 sticks / 226 g) unsalted butter, cut into pieces (or dairy-free buttery sticks)
- 1 ½ cups (255 g) semi-sweet chocolate chips or chopped chocolate (check that it’s gluten free)
- 1 cup (80 g) unsweetened cocoa powder (natural or Dutch-process both work)
- 1 ¾ cups (350 g) granulated sugar
- ½ cup (100 g) packed light brown sugar (adds moisture and chew)
- 4 large eggs, at room temperature
- 2 teaspoons pure vanilla extract
- 1 cup (130 g) 1:1 gluten free all-purpose flour blend
- (I like King Arthur Measure for Measure or Cup4Cup; avoid blends heavy on bean flours for brownies.)
- ¼ teaspoon baking powder (confirm gluten free)
- ½ teaspoon fine sea salt
- 1 teaspoon instant espresso powder, optional (deepens the chocolate flavor; you won’t taste coffee)
- 1 cup (170 g) chocolate chips, chunks, or a mix (for folding in)
- ½–1 cup chopped walnuts or pecans, optional
A quick note on the cocoa: use a fresh, dark cocoa for the most intense flavor. If your cocoa smells a little flat, your brownies will taste that way too.

Directions
-
Preheat and prepare the pan.
Preheat your oven to 350°F (175°C). Line a 9×13-inch metal baking pan with parchment paper, leaving a little overhang on the long sides so you can lift the brownies out later. Lightly grease the parchment and any exposed pan edges. (A metal pan helps get those chewy edges; glass tends to bake slower.) -
Melt the butter and chocolate.
In a large, heat-safe bowl, add the butter pieces and 1 ½ cups chocolate chips. Microwave in 20–30 second bursts, stirring after each, until the mixture is mostly melted and smooth. You can also do this over a double boiler on the stove if you prefer. Let it cool for 3–5 minutes; you want it warm, not hot, before adding the eggs. -
Whisk in the cocoa and sugars.
Whisk the cocoa powder into the warm chocolate-butter mixture until no lumps remain. Add the granulated sugar and brown sugar, and whisk until glossy and thick. It will look grainy at first, then start to look almost like thick chocolate syrup. -
Beat in the eggs and vanilla.
Add the eggs one at a time, whisking well after each addition. Take your time here—this is what helps create that shiny, crackly top. Once the eggs are fully incorporated, whisk in the vanilla extract. The batter should look glossy and slightly thick. -
Mix the dry ingredients.
In a separate medium bowl, whisk together the gluten free flour blend, baking powder, salt, and espresso powder (if using). This keeps the baking powder and salt from clumping so they spread evenly through the batter. -
Combine wet and dry ingredients.
Sprinkle the dry mixture over the chocolate mixture. Using a rubber spatula or wooden spoon, gently fold until just combined and you don’t see streaks of dry flour. Try not to over-mix—stir only until everything looks evenly blended. This helps keep your brownies tender instead of tough. -
Fold in mix-ins.
Gently fold in the remaining 1 cup chocolate chips and the nuts, if you’re using them. I like to save a small handful of chips to sprinkle on top for a prettier finish. -
Spread the batter in the pan.
Pour the thick brownie batter into your prepared pan and smooth the top with an offset spatula or the back of a spoon. If you reserved any chips or nuts, sprinkle them evenly over the top. -
Bake to fudgy perfection.
Bake on the center rack for 24–30 minutes. Start checking around 22 minutes—baking time can vary based on your pan and oven. The brownies are done when the edges are set and a toothpick inserted about 2 inches from the edge comes out with a few moist, fudgy crumbs (not wet batter). The center may still look slightly soft; it will firm up as it cools. -
Cool and slice.
Let the brownies cool completely in the pan on a wire rack—at least 1–1 ½ hours. This is the hardest part, I know, but it matters. Cooling lets the gluten free brownies set so they slice cleanly and stay chewy instead of falling apart. Use the parchment overhang to lift the slab out, then cut into squares with a sharp knife (wipe the knife between cuts for neat edges).
Servings & Timing
- Yield: About 24 small brownies or 16 generous bakery-style squares
- Prep Time: 20 minutes
- Bake Time: 24–30 minutes
- Cooling Time: 60–90 minutes
- Total Time: About 2 hours (mostly hands-off while they cool)
If you’re baking these gluten free fudge brownies for guests, I like to make them the day before. The texture gets even more fudgy by the next day.
Variations
You know what? Once you’ve got this base recipe down, you can play with it in all kinds of fun ways:
- Salted Caramel Swirl: Drizzle about ½ cup thick caramel sauce over the batter in the pan and gently swirl with a knife; sprinkle with flaky sea salt after baking.
- Peppermint Bark Brownies: Stir in ½ teaspoon peppermint extract and top with crushed gluten free candy canes and white chocolate chips.
- Peanut Butter Ribbon: Warm ½ cup peanut butter, dollop it over the batter, and swirl; this makes the most amazing fudgy gluten free brownie recipe for peanut butter lovers.
- Mocha Brownies: Increase espresso powder to 2 teaspoons and use dark chocolate chips for a coffeehouse-style treat.
- Double Nut Crunch: Fold in a mix of chopped pecans and almonds plus a sprinkle of coarse sea salt on top for texture.
- Mini Brownie Bites: Bake in a greased mini muffin tin for 12–15 minutes for bite-size gluten free dessert treats perfect for parties.
Storage & Reheating
Good news: these rich, chewy gluten free brownies store really well.
-
Room Temperature:
Store cooled brownies in an airtight container at room temperature for 3–4 days. I like to lay a piece of parchment between layers so they don’t stick together. -
Refrigerator:
For extra fudginess, you can refrigerate them. They’ll keep well for up to 6 days. Let them sit at room temp for 10–15 minutes before serving so the texture softens a bit. -
Freezer:
Wrap individual brownies tightly in plastic wrap, then place them in a freezer bag or airtight container. Freeze for up to 3 months. To thaw, leave them at room temperature for 30–45 minutes, or gently warm one in the microwave for 10–15 seconds. -
Reheating:
If you like a warm, gooey brownie (with a scoop of ice cream—highly recommended), microwave a room-temperature brownie for 10–12 seconds. Be careful not to overheat, or it can dry out.
If you’re hosting, you can absolutely make this gluten free brownies recipe a day or two ahead. They actually cut more cleanly and taste more chocolatey after resting overnight.
Notes
-
Weigh your flour if you can.
Gluten free flours all behave a little differently. If you have a kitchen scale, 130 g for the flour blend will give you a better chance at consistently chewy gluten free brownies every time. -
Don’t overbake.
The difference between rich chocolate fudge brownies and dry, cakey ones is often just 3–4 minutes in the oven. Pull them when the edges are set and the center still looks slightly soft. -
Use a good gluten free flour blend.
Not all blends are created equal. Blends made for “1:1” baking with xanthan gum usually work best here. If your blend doesn’t contain xanthan gum or a similar binder, your brownies may be more crumbly. -
Room temperature eggs are worth it.
Cold eggs can cause the melted chocolate mixture to seize a bit. If you forget to pull them out ahead of time, just put the eggs (still in the shell) in a bowl of warm water for 5–7 minutes. -
Coffee enhances chocolate.
That espresso powder won’t make your brownies taste like coffee—promise. It just deepens the chocolate flavor, especially helpful with gluten free chocolate brownies where the flour flavor can vary. -
Use parchment for easy removal.
Lining your pan lets you lift out the entire slab. This is especially helpful with gluten free baking, since the structure can be a bit more delicate when warm.
FAQs
Can I make these brownies dairy free?
Yes. Use dairy-free buttery sticks and dairy-free chocolate chips. The texture stays wonderfully fudgy as long as you don’t overbake.
What gluten free flour blend works best?
A 1:1 or “measure for measure” blend that already contains xanthan gum (like King Arthur Measure for Measure or Cup4Cup) tends to give the best, most consistent results in this gluten free brownies recipe.
Why didn’t my brownies get a shiny, crackly top?
Usually that happens if the sugar isn’t fully mixed in with the eggs and chocolate, or if the batter wasn’t whisked enough after adding the eggs. Next time, whisk the egg mixture a bit longer until it looks thick and glossy before adding the dry ingredients.
My brownies came out cakey—what went wrong?
Most likely they baked a bit too long, or there was too much flour. Try reducing the bake time by a few minutes and measuring the flour with the spoon-and-level method (or by weight).
Can I bake these in an 8×8 or 9×9 pan instead?
You can, but the brownies will be very thick and will need a longer bake time—start checking around 32–35 minutes. Make sure the center is just set and the edges don’t burn.
Are these brownies safe for someone with celiac disease?
They can be, as long as you use a certified gluten free flour blend, gluten free chocolate, and confirm that all ingredients (including baking powder and any mix-ins) are gluten free and haven’t been cross-contaminated.
Can I reduce the sugar?
You can cut about ¼ cup of granulated sugar without major issues, but keep in mind that sugar contributes to the fudgy texture and shiny top. Reducing it too much can make the brownies dry and dull-looking.
How do I know when gluten free brownies are done?
Look for set edges, a slightly soft center, and a toothpick inserted near the edge coming out with moist crumbs, not wet batter. It’s better to take them out a touch early than a touch late.
Conclusion
These Gluten Free Fudge Brownies Recipe bakes up into rich, chewy gluten free brownies with a deep chocolate flavor and a shiny crackly top that rivals any bakery tray. They’re simple enough for a weeknight treat, but special enough for holidays, parties, or a gluten free dessert recipe that pleases a mixed crowd.
Give them a try the next time a chocolate craving hits, and let me know how they turn out for you—especially any fun twists you try, like peanut butter swirls or peppermint for the holidays. And if you enjoy these, you might like exploring more easy gluten free dessert recipes, like flourless cookies or almond-based cakes, to round out your sweet treat collection.
Gluten Free Fudge Brownies
Ingredients
- 1 cup unsalted butter 2 sticks / 226 g, cut into pieces (or dairy-free buttery sticks)
- 1 1/2 cups semi-sweet chocolate chips or chopped chocolate 255 g, ensure gluten free
- 1 cup unsweetened cocoa powder 80 g, natural or Dutch-process
- 1 3/4 cups granulated sugar 350 g
- 1/2 cup light brown sugar 100 g, packed
- 4 large eggs at room temperature
- 2 teaspoons pure vanilla extract
- 1 cup 1:1 gluten free all-purpose flour blend 130 g; use a measure-for-measure blend like King Arthur or Cup4Cup; avoid blends heavy on bean flours
- 1/4 teaspoon baking powder ensure gluten free
- 1/2 teaspoon fine sea salt
- 1 teaspoon instant espresso powder optional, deepens chocolate flavor
- 1 cup chocolate chips or chunks 170 g, for folding into the batter
- 1/2–1 cup chopped walnuts or pecans optional
Instructions
- Preheat your oven to 350°F (175°C). Line a 9×13-inch metal baking pan with parchment paper, leaving an overhang on the long sides for easy removal. Lightly grease the parchment and any exposed pan edges.
- In a large, heat-safe bowl, add the butter pieces and 1 1/2 cups semi-sweet chocolate chips or chopped chocolate. Microwave in 20–30 second bursts, stirring after each, until mostly melted and smooth, or melt over a double boiler. Let cool for 3–5 minutes until warm but not hot.1 cup unsalted butter, 1 1/2 cups semi-sweet chocolate chips or chopped chocolate
- Whisk the cocoa powder into the warm chocolate-butter mixture until no lumps remain. Add the granulated sugar and brown sugar and whisk until glossy and thick; it may look grainy at first, then like thick chocolate syrup.1 cup unsweetened cocoa powder, 1 3/4 cups granulated sugar, 1/2 cup light brown sugar
- Add the eggs one at a time, whisking well after each addition to build a shiny, crackly top. Whisk in the vanilla extract. The batter should look glossy and slightly thick.4 large eggs, 2 teaspoons pure vanilla extract
- In a separate medium bowl, whisk together the gluten free flour blend, baking powder, salt, and espresso powder (if using) to distribute them evenly.1 cup 1:1 gluten free all-purpose flour blend, 1/4 teaspoon baking powder, 1/2 teaspoon fine sea salt, 1 teaspoon instant espresso powder
- Sprinkle the dry mixture over the chocolate mixture. Using a rubber spatula or wooden spoon, gently fold until just combined and no streaks of dry flour remain. Do not over-mix to keep the brownies tender and fudgy.
- Gently fold in the remaining 1 cup chocolate chips or chunks and the chopped nuts, if using. Optionally reserve a small handful of chips or nuts to sprinkle over the top.1 cup chocolate chips or chunks, 1/2–1 cup chopped walnuts or pecans
- Pour the thick brownie batter into the prepared pan and smooth the top with an offset spatula or the back of a spoon. Sprinkle any reserved chips or nuts evenly over the surface.
- Bake on the center rack for 24–30 minutes, starting to check around 22 minutes. The brownies are done when the edges are set and a toothpick inserted about 2 inches from the edge comes out with a few moist, fudgy crumbs but no wet batter. The center may look slightly soft; it will firm as it cools.
- Let the brownies cool completely in the pan on a wire rack for at least 60–90 minutes. Use the parchment overhang to lift the slab out, then cut into squares with a sharp knife, wiping the blade between cuts for neat edges.