I have to admit, I may still be a kid at heart—especially when it comes to cookie dough. Just last weekend, my neighbor’s little boy, Tommy, tiptoed into the kitchen while I was whipping up a batch of this edible sugar cookie dough, all big-eyed and breathless, “May I please have just a teeny taste?” And honestly, who could blame him? There’s something about that sweet, creamy vanilla-flecked dough that takes me right back to my own childhood—minus the raw-egg worries. It’s like eating a spoonful of pure nostalgia (and yes, really safe, thanks to heat-treated flour).
I first dreamed up this recipe at my granddaughter’s preschool holiday party. We’d decked the halls with glittery crafts, and I set out bowls of cookie dough for the kids to scoop and decorate. Twenty little hands scrambled for seconds (sometimes even thirds), and the excited chatter was so contagious I almost forgot to snap a photo—almost. By the end of the day, parents were sliding recipe cards across the craft table like it was gold. That’s exactly when I knew I had to share it with all of you.

Why You’ll Love This Recipe
- Zero oven time—just mix, chill, and spoon out (perfect when it’s 95°F outside and who wants the kitchen to heat up?).
- Ready in under half an hour (yep, you can whip it up during commercial breaks).
- Egg-free and ultra-safe—thank you, heat-treated flour!
- Super adaptable: chocolate chips, sprinkles, nuts, you name it (go wild!).
- Great party trick—serve in little jars or festive tins for DIY dessert bars.
- Double-duty dough: use as cupcake frosting, dip for fruit, or straight-up spoonfuls.
- Kiddie-approved, teen-approved, even grandpa-approved.
- Your secret weapon for last-minute company (no one will guess how easy it is!).
Ingredient Notes
- Butter: 1 cup (2 sticks) unsalted, softened. I’m a Land O’Lakes gal, but any quality brand will do—just let it sit out ‘til it’s squishy enough to mash with your finger (not melting, though!).
- Sugars: ¾ cup granulated plus ½ cup packed light brown sugar. The brown sugar brings that cozy caramel whisper in the background.
- Vanilla: 1 teaspoon pure extract (or scrape in a whole vanilla bean if you’re feeling fancy—those little black specs are dreamy!).
- Cream or milk: 1–2 tablespoons heavy cream or whole milk. Start small—you want a dough that holds together but isn’t runny.
- Flour: 2¼ cups all-purpose, heat-treated. Trust me, this step’s a must for safety (though I promise it doesn’t change the taste or texture one bit).
- Sea salt: ¼ teaspoon. A tiny pinch really wakes up the sweetness.
- Mix-ins: ½ cup mini chocolate chips (or swap in rainbow sprinkles, chopped nuts, white chocolate chips—you do you!).
Pro tip: If you’ve never heat-treated flour, just spread it out on a baking sheet, bake at 350°F for 5–7 minutes, then let it cool. Easy-peasy and totally worth it!
Step-by-Step Directions
- Cream together butter and sugars. In a large bowl—or your stand mixer fitted with the paddle attachment—beat the softened butter, granulated sugar, and brown sugar on medium. Give it about 2–3 minutes until it looks light and fluffy. You’ll notice pale streaks in the mixture—that’s your signal to move on. (Don’t rush it—those fluffier crumbs are what make this so craveable.)
- Add vanilla and cream. Turn the mixer to low and drizzle in the vanilla extract plus 1 tablespoon of cream (or milk). Mix just ’til combined. If your dough feels too stiff or dry, splash in that second tablespoon—little by little—until it’s perfectly scoopable.
- Fold in flour and salt. Keep the mixer on low as you slowly add the heat-treated flour and sea salt. Stop occasionally to scrape down the sides with a spatula—that ensures no surprise pockets of flour later on. You’re aiming for a dough that’s moist yet not sticky. If it clings to your spatula like crazy, sprinkle in a teaspoon more flour.
- Stir in the mix-ins. Pop the bowl off the mixer and gently fold in your mini chocolate chips (or sprinkles). I like to do this by hand so I don’t overmix—plus, it’s kind of therapeutic. Spread the chips around until they’re evenly distributed.
- Chill briefly. Cover with plastic wrap and slide it into the fridge for at least 20 minutes. I know it’s hard to wait (I’ve definitely peeked), but this step firms up the dough so you can shape it without making a sticky mess.
- Scoop or roll. Grab a small cookie scoop or a teaspoon and portion the dough onto a parchment-lined tray—aim for about 1 tablespoon per bite. If you love uniform balls, lightly dust your palms with a bit of flour before rolling.
- Optional chocolate dip. For a little extra pizzazz, melt dark or white chocolate in a double boiler (or microwave in short bursts). Dip half of each dough bite, place it back on parchment, and let it set. Totally optional, but so fun (and fancy!).
- Final chill and serve. Pop the tray back in the fridge until any dipped chocolate firms up—about 15 minutes—or into the freezer for five if you’re in a hurry. Then dive right in. Seriously, these are divine straight from the fridge.
Variations & Flavor Twists
- Peanut Butter Bliss: Swap ¼ cup butter for creamy peanut butter and stir in chopped salted peanuts.
- Sprinkle Party: Rainbow jimmies instead of chocolate chips—hello, confetti in every bite (perfect for birthdays!).
- Citrus Zing: Grate in 1 teaspoon lemon or orange zest for a bright pop of flavor.
- Vegan Version: Use dairy-free spread, almond (or oat) milk, and vegan chocolate chips—still dreamy, still nostalgic (and totally plant-based).
- Pumpkin Spice: Stir in 1 teaspoon pumpkin pie spice plus a splash of molasses—my go-to for autumn movie nights.
- Mocha Magic: Add 1 tablespoon instant espresso powder and swap in bittersweet chips for a coffeehouse twist.
Storage & Reheating Tips
Pop any leftovers into an airtight container in the fridge, where they’ll keep for up to one week—if they last that long! For longer stashes, freeze them flat on a tray, then transfer to a sealable bag. They’ll last up to two months frozen (just grab a few bites when the craving hits). No reheating needed—serve chilled for that perfect chewy, melt-in-your-mouth texture.
Make-ahead trick: Press the dough into silicone molds (mini hearts, stars, whatever), freeze overnight, then pop them out and stash in a bag. You’ve got grab-and-go dough bites ready whenever sugar cravings strike—life-changing, I swear.
Final Thoughts & A Sweet Goodbye
There you have it—a no-bake, totally nostalgic, endlessly customizable edible sugar cookie dough that feels like a hug in dessert form. I’d love to hear how you jazz it up (or if you stick to the classic version). Got questions? Shoot me a comment below! And hey, if you snap a pic, don’t forget to tag me on Instagram @YourCozyKitchenChronicles—I get so excited seeing your creations. Thanks for hanging out in my kitchen today. Now, go whip up some dough and make life a little sweeter!
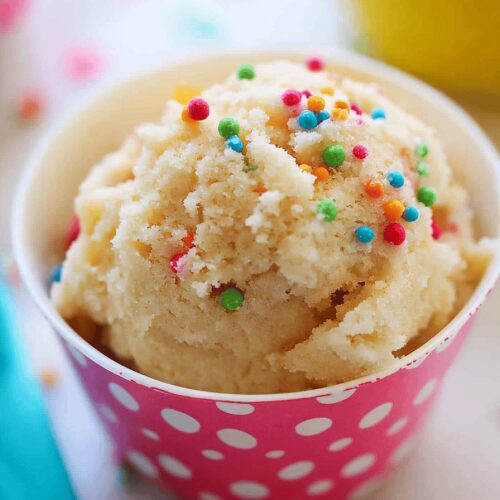
Edible Sugar Cookie Dough
Ingredients
- 1 cup (2 sticks) unsalted butter unsalted butter softened
- 3/4 cup granulated sugar granulated sugar choose organic cane sugar for extra depth
- 1/2 cup light brown sugar light brown sugar for that caramel hint
- 1 teaspoon pure vanilla extract pure vanilla extract or scrape a vanilla bean
- 1-2 tablespoons heavy cream or whole milk heavy cream or whole milk adjust for desired creaminess
- 2 1/4 cups all-purpose flour all-purpose flour heat-treated
- 1/4 teaspoon fine sea salt fine sea salt
- 1/2 cup mini chocolate chips mini chocolate chips or interchange with rainbow sprinkles
- 2 tablespoons white chocolate chips or chopped nuts white chocolate chips or chopped nuts
Instructions
- In a large bowl or the bowl of a stand mixer fitted with the paddle attachment, beat the softened butter, granulated sugar, and brown sugar on medium speed until light and fluffy, about 2–3 minutes. You’ll see pale streaks—that’s your cue.
- Lower the mixer speed and add the vanilla extract plus 1 tablespoon of cream. Mix just until combined; if the dough looks too stiff, add the extra tablespoon.
- Switch to low speed and gradually pour in the flour and sea salt. Scrape the sides with a rubber spatula to ensure everything gets incorporated. The dough should look like classic sugar cookie dough—moist but not sticky.
- Remove the mixer bowl and use a spatula to gently fold in the mini chocolate chips (or sprinkles). If you like a more even distribution, give the dough a quick stir by hand.
- Cover the bowl with plastic wrap and pop it in the fridge for at least 20 minutes. This helps firm up the dough so you can shape it easily.
- Use a small cookie scoop or teaspoon to portion dough onto a parchment-lined tray—about 1 tablespoon per bite. For clean lines, lightly dust your hands with flour when rolling into balls.
- Melt dark or white chocolate in a double boiler (or microwave in 20-second bursts), then dip half of each dough ball and set back on parchment paper.
- Refrigerate the truffles until the chocolate sets, about 15 minutes, or freeze for 5 minutes if you’re in a hurry. Enjoy straight from the fridge!