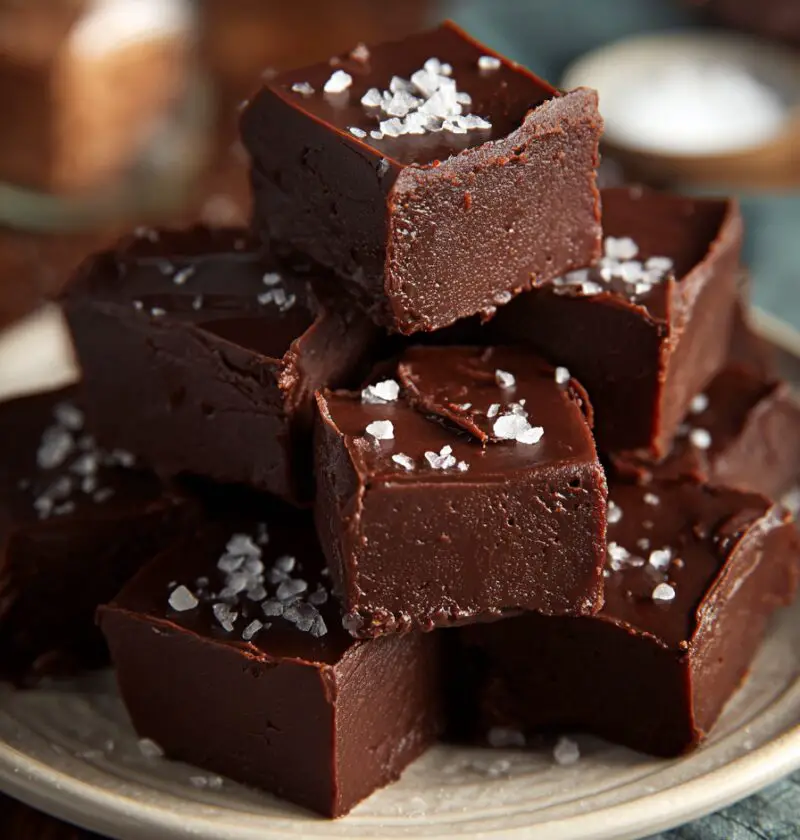
Easy 2-Ingredient Chocolate Fudge Recipe
If you’ve got chocolate chips, a can of sweetened condensed milk, and about 10 minutes, you’re moments away from the creamiest Easy 2-Ingredient Chocolate Fudge Recipe you’ll ever make. This simple fudge recipe is no-bake, beginner-friendly, and perfect for last-minute holidays, potlucks, or “I just need chocolate now” nights.
This easy chocolate fudge is the kind of recipe I wish I’d had when my kids were little and our December calendar was packed. No candy thermometer, no guessing about “soft ball stage,” no fuss. Just melt, stir, chill, slice. It’s a classic chocolate sweetened condensed milk fudge that tastes like you spent hours on it, but really, you were probably wrapping gifts or watching a movie while it set in the fridge.
I love serving this 2 ingredient chocolate fudge on cookie trays, tucked into gift boxes, or just piled on a cute plate with a little sea salt sprinkled over the top. It’s rich and smooth, so a small piece goes a long way, but somehow everyone always comes back for one more square. If you’re new to candy making, this is a perfect beginner fudge recipe. And if you’re a seasoned home baker, this will be your new fast chocolate dessert for busy days.
You can make this Easy 2-Ingredient Chocolate Fudge Recipe in the microwave or on the stovetop, and it holds up beautifully at room temperature for parties. No baking, no mixer, and almost no dishes. Honestly, it’s dangerous how simple this is.
Why You’ll Love This Recipe
- Just 2 ingredients. You need only chocolate chips and sweetened condensed milk—no butter, cream, or sugar syrup.
- No candy thermometer. This microwave chocolate fudge skips all the tricky stages of old-school fudge.
- Quick to make. About 5–10 minutes of active prep, then the fridge does the rest.
- Beginner-friendly. If you can stir, you can make this easy homemade fudge.
- No-bake dessert. Great for hot days or when your oven is already full of cookies.
- Perfect for gifting. Cuts into neat squares that look beautiful in tins and treat bags.
- Easy to customize. Add nuts, peppermint, peanut butter, or sea salt for endless variations.
- Crowd-pleasing flavor. Deep chocolate taste with a creamy, fudge-like texture—like a fancy candy shop, but from your own kitchen.
- Great make-ahead recipe. Keeps well in the fridge or freezer, so you can get ahead for holidays and parties.
Ingredients
For this Easy 2-Ingredient Chocolate Fudge Recipe, you’ll need:
- 3 cups (18 oz / 510 g) semi-sweet chocolate chips
- Use a good-quality brand like Ghirardelli, Guittard, or Nestlé.
- You can mix semi-sweet and dark chocolate for a more intense flavor.
- 1 can (14 oz / 396 g) sweetened condensed milk
- Make sure it’s sweetened condensed milk, not evaporated milk—they’re not the same.
- Brands like Eagle Brand or store brands both work well.
Optional, but highly recommended:
- 1 teaspoon vanilla extract – Adds a cozy bakery-style flavor.
- Pinch of fine sea salt – Balances the sweetness and makes the chocolate taste deeper.
- Flaky sea salt, chopped nuts, or sprinkles for topping – For looks and a bit of crunch.
A quick note: Different chocolates can change the texture a little. Milk chocolate will make a softer, sweeter fudge. Dark chocolate will make a firmer, more grown-up fudge. Semi-sweet is that happy middle ground for most people.

Directions
This is a true quick chocolate fudge. You can use the microwave (my lazy-weeknight method) or the stovetop.
Microwave Method (Fastest)
-
Prepare your pan.
Line an 8×8-inch (20×20 cm) baking pan with parchment paper or foil, leaving some overhang on the sides to lift the fudge out later. Lightly grease the parchment so nothing sticks. -
Combine ingredients.
Add the chocolate chips and sweetened condensed milk to a medium microwave-safe bowl. If using, stir in the vanilla and pinch of salt. Don’t worry if it looks very thick at this stage. -
Microwave in short bursts.
Heat on HIGH for 30 seconds, then stir very well. Repeat in 20–30 second bursts, stirring after each one, until the chocolate is almost melted. This usually takes about 60–90 seconds total, depending on your microwave. -
Finish melting and stir until smooth.
When the chocolate chips look about 75–80% melted, stop heating and stir until completely smooth and glossy. The residual heat will finish melting the chocolate. The mixture will be thick but pourable. -
Spread in the pan.
Scrape the fudge mixture into your prepared pan. Use a spatula to press it into the corners and smooth the top. If you’d like toppings (nuts, sprinkles, flaky salt), add them now and gently press them in so they stick. -
Chill.
Refrigerate for at least 2–3 hours, or until firm enough to slice. For the cleanest cuts, chill 4 hours or overnight. -
Slice and serve.
Use the parchment overhang to lift the fudge out of the pan. Place on a cutting board and cut into small squares with a sharp knife. Wipe the knife with a warm, damp cloth between cuts for perfect edges.
Stovetop Method
-
Prepare your pan the same way as above.
-
Melt gently.
Add chocolate chips and sweetened condensed milk to a small, heavy-bottomed saucepan. Warm over low heat, stirring constantly, until melted and smooth. Don’t walk away; chocolate can scorch fast. -
Flavor and chill.
Remove from heat, stir in vanilla and salt (if using), spread in the pan, and chill as described in the microwave method.
That’s it. Two ingredients, one bowl, and a fridge. This is about as easy as minimal ingredient fudge gets.
Servings & Timing
- Yield: About 36 small squares (or 25 larger pieces)
- Prep Time: 10 minutes
- Chill Time: 2–4 hours
- Total Time: 2 hours 10 minutes to 4 hours 10 minutes
For parties, I like to cut the pieces smaller—this fudge is rich, so bite-sized works well on a dessert tray.
Variations
Once you’ve tried the basic 2 ingredient chocolate fudge, it’s fun to play a little. Here are some easy twists:
- Nutty Crunch Fudge – Stir in 1 cup chopped toasted walnuts, pecans, or almonds before spreading in the pan.
- Peppermint Holiday Fudge – Add ½ teaspoon peppermint extract and sprinkle crushed candy canes on top—great for Christmas cookie boxes.
- Peanut Butter Swirl Fudge – Warm ¼ cup peanut butter and drizzle over the top of the fudge in the pan, then swirl with a knife.
- Mocha Fudge – Stir 1–2 teaspoons instant espresso powder into the sweetened condensed milk before heating for a subtle coffee kick.
- Rocky Road Fudge – Fold in 1 cup mini marshmallows and ½ cup chopped nuts for a chewy, crunchy texture.
- Salted Dark Chocolate Fudge – Use dark chocolate chips (60–70% cocoa) and finish with flaky sea salt for a more grown-up treat.
You can keep the base recipe the same while making each batch feel brand new. It’s like having a whole list of recipes from one simple method.
Storage & Reheating (Well, Softening!)
-
Room Temperature:
- This simple fudge recipe keeps well at cool room temperature (around 68–70°F) for 3–4 days, in an airtight container.
- Great for parties or when you’re sending treat boxes that might not be refrigerated right away.
-
Refrigerator:
- Store in a sealed container with parchment between layers for up to 2 weeks.
- Let pieces sit at room temperature for 10–15 minutes before serving for the best texture.
-
Freezer:
- For long-term storage, freeze fudge squares in a single layer on a sheet pan, then transfer to a freezer bag or container.
- Keeps up to 3 months.
- Thaw in the fridge overnight or at room temperature for 30–60 minutes; no reheating needed.
If you like your fudge very soft, you can microwave a single piece for 5–7 seconds, but don’t overdo it or it will start to melt.
Notes (From My Kitchen to Yours)
-
Pan size matters.
An 8×8 pan gives thicker, classic fudge squares. A 9×9 pan makes slightly thinner pieces, which can be nice if you’re feeding a crowd. -
Chocolate quality shows.
Because this is such a minimal ingredient fudge, the chocolate you use really shines. Use something you enjoy snacking on straight from the bag. -
Don’t overheat.
The most common issue with microwave chocolate fudge is overheating the chocolate. Short bursts and lots of stirring help keep it smooth and glossy, not grainy. -
Humidity and heat.
If you live in a warm or humid climate (hello, Southern summers), keep the fudge chilled until close to serving time so it holds its shape. -
Cut small pieces.
I know it’s tempting to slice big chunks, but this stuff is rich. Smaller squares mean people can have “just a taste”—and then happily reach for a second one. -
Data-driven little fun fact.
Around the holidays, searches for “2 ingredient dessert” and “no bake chocolate fudge” shoot up, especially on weekends. That tells me a lot of us are juggling work, school events, and gatherings—and we still want a homemade touch. This recipe was written with that busy season in mind.
You know what? Sometimes it’s the simplest things that actually get made. Complicated recipes are lovely, but this one you’ll actually pull out again and again.
FAQs
1. Can I make this Easy 2-Ingredient Chocolate Fudge Recipe dairy-free?
Yes—use dairy-free chocolate chips and a vegan sweetened condensed coconut milk. The flavor will have a light coconut note, but the texture is still rich and creamy.
2. Why is my fudge soft or not setting?
Usually this happens when there’s too much sweetened condensed milk or not enough chocolate, or if you used evaporated milk by mistake. Chill it longer, and next time double-check your can size and ingredient labels.
3. Can I use milk chocolate instead of semi-sweet?
You can, but the fudge will be softer and sweeter. If you go all milk chocolate, consider increasing the chocolate to about 3¼ cups to help it set more firmly.
4. Do I have to refrigerate this fudge?
No, not strictly—this quick chocolate fudge is safe at room temperature for a few days if your kitchen isn’t too warm, but it stays fresher and firmer in the fridge.
5. Can I double the recipe?
Yes. Use a 9×13-inch pan for a double batch. Just be sure your bowl is large enough and stir very well so the chocolate melts evenly.
6. My fudge looks greasy on top—what happened?
Sometimes chocolate separates a bit if overheated. Try stirring vigorously; often it comes back together. If not, sprinkle toppings over the surface—nuts or sprinkles hide a lot, and it still tastes great.
7. Can I add mix-ins like cookies or candy?
Absolutely. Stir in chopped Oreos, M&M’s, or other candies right before spreading into the pan. Just remember that anything very sugary can make the fudge extra sweet, so small amounts go a long way.
8. How far in advance can I make this for the holidays?
You can make it up to 2 weeks ahead and keep it in the fridge, or freeze up to 3 months. Slice just before gifting so the edges stay neat and fresh-looking.
Conclusion
This Easy 2-Ingredient Chocolate Fudge Recipe is the kind of “keep in your back pocket” dessert that saves you on busy days—no bake, no thermometer, and ready with pantry staples. It’s rich, smooth, and endlessly customizable, whether you’re making a fast chocolate dessert for the family or filling pretty tins for neighbors.
Give it a try this week, then come back and tell me how you served it—plain, peppermint, nutty, or something totally creative. And if you love super-fast treats like this, you might also enjoy exploring more simple fudge and no-bake dessert recipes next; once you see how easy this one is, you’ll be hooked.

Easy 2-Ingredient Chocolate Fudge
Ingredients
- 3 cups semi-sweet chocolate chips about 18 oz / 510 g; or a mix of semi-sweet and dark chocolate
- 1 can sweetened condensed milk 14 oz / 396 g; do not substitute evaporated milk
- 1 teaspoon vanilla extract optional, for flavor
- 1 pinch fine sea salt optional, to balance sweetness
- flaky sea salt, chopped nuts, or sprinkles optional, for topping
Instructions
- Line an 8×8-inch (20×20 cm) baking pan with parchment paper or foil, leaving overhang on two sides to lift the fudge out later. Lightly grease the parchment or foil to prevent sticking.
- Add the chocolate chips and sweetened condensed milk to a medium microwave-safe bowl. If using, stir in the vanilla extract and a pinch of fine sea salt. The mixture will be thick at this stage.
- Microwave on HIGH for 30 seconds, then stir very well. Continue microwaving in 20–30 second bursts, stirring after each, until the chocolate is about 75–80% melted (usually 60–90 seconds total).
- Stop heating and stir until the mixture is completely smooth and glossy. The residual heat will finish melting any remaining chocolate chips. The mixture should be thick but pourable.
- Scrape the fudge mixture into the prepared pan. Use a spatula to press it into the corners and smooth the top. If desired, sprinkle flaky sea salt, chopped nuts, or sprinkles over the surface and gently press them in so they adhere.
- Refrigerate the pan for at least 2–3 hours, or until the fudge is firm enough to slice. For the cleanest cuts, chill 4 hours or overnight.
- Use the parchment overhang to lift the fudge out of the pan and place it on a cutting board. Cut into about 36 small squares (or 25 larger pieces) with a sharp knife, wiping the blade with a warm, damp cloth between cuts for neat edges.
- For the stovetop method, prepare the pan as above. Add the chocolate chips and sweetened condensed milk to a small, heavy-bottomed saucepan. Warm over low heat, stirring constantly, until melted and smooth. Remove from heat, stir in vanilla and salt if using, then spread into the prepared pan, add toppings if desired, and chill as directed.