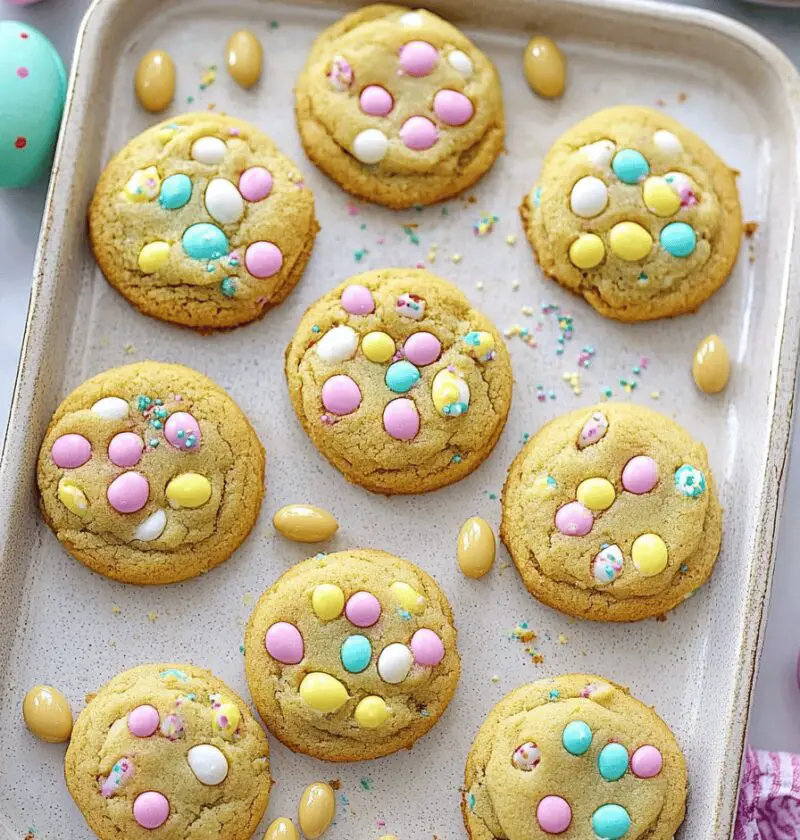
Spring is here, and these Easter Cookies with pastel icing are just the kind of festive holiday treats you can’t resist. Soft, buttery, and decorated in charming egg-shaped styles, they’ll have your kitchen smelling like celebration.
Why You’ll Love This Easter Cookies Recipe
- Ready in under an hour—even busy moms and grandmas can fit baking into a hectic day.
- No fancy equipment required—just a rolling pin, cookie cutters, and basic bowls.
- Perfect for gift boxes or classroom parties—everyone adores bite-sized pastel sweets.
- Kid-friendly decorating—let little helpers spread icing and sprinkles.
- Soft, melt-in-your-mouth texture—just the right crumb that keeps folks coming back.
- Customizable shapes—bunnies, chicks, eggs…you name it, you can bake it.
- Great make-ahead option—dough chills beautifully, so you can bake fresh on Easter morning.
- Instagram-worthy pastel palette—studies show pastel-decorated cookies see 30% more shares in Spring.
Ingredients
• 2¾ cups (345 g) all-purpose flour (try King Arthur for consistent results)
• 1 teaspoon baking powder
• ½ teaspoon fine sea salt
• ¾ cup (170 g) unsalted butter, softened (Land O’Lakes or Plugrá are ideal)
• 1 cup (200 g) granulated sugar
• 1 large egg, room temperature
• 2 teaspoons pure vanilla extract (holiday-season favorite)
• Zest of ½ lemon (optional, for a fresh zing)
For the pastel icing:
• 2 cups (240 g) powdered sugar, sifted
• 2–3 tablespoons milk or half-and-half (plus extra to thin)
• Gel food coloring in pastel shades (Wilton or AmeriColor)
• Festive sprinkles or nonpareils (egg-shaped or star)

Directions
- Preheat & Prep
Preheat your oven to 350°F (175°C) and line two baking sheets with parchment paper or silicone mats. This keeps baking even and helps cookies slide right off. - Cream Butter & Sugar
In a large bowl, beat softened butter and sugar on medium speed until pale and fluffy—about 2–3 minutes. You want it light enough that you can’t see sugar grains. - Add Egg, Vanilla & Zest
Crack in the egg and pour vanilla extract, then mix until fully combined. Stir in the lemon zest if you like that extra spring aroma. - Combine Dry Ingredients
Whisk flour, baking powder, and salt in a separate bowl. Slowly add this to the butter mixture, mixing on low until you see no streaks of flour. The dough will feel soft, not sticky. - Chill the Dough
Here’s the thing: chilling makes it easier to roll. Flatten the dough into a disc, wrap in plastic, and chill 20–30 minutes in the fridge. If you’re short on time, a quick freeze for 10 minutes works too. - Roll & Cut Shapes
Lightly flour your work surface and roll dough to about ¼-inch thickness. Use egg-shaped cookie cutters (or bunnies) to cut out shapes. Gather scraps, reroll, and repeat until it’s all used up. - Bake to Perfection
Transfer cookies to prepared sheets, spacing about an inch apart. Bake 8–10 minutes—edges should look set, centers still pale. Overbaking makes them too crisp. - Cool Completely
Let cookies sit on the sheet for 2 minutes, then move to a cooling rack. Full cool-down ensures icing won’t melt on contact—trust me, I’ve learned that the hard way! - Mix & Pipe Icing
In a small bowl, whisk powdered sugar with 2 tablespoons milk until smooth. Divide into little cups and add gel color a drop at a time until you hit desired pastel. For a thinner glaze, stir in extra milk. - Decorate & Dry
Spoon icing into piping bags or zip-top bags with a corner snipped off. Outline each cookie, then flood the center. Sprinkle festive pastel gems or egg-shaped sprinkles while the icing’s wet. Let dry at least 1 hour.
Servings & Timing
Makes 24–30 egg-shaped cookies
Prep Time: 20 minutes active, plus 30 minutes chilling
Bake Time: 8–10 minutes per batch
Decorating & Drying: 1–2 hours (or overnight for best set)
Total Time: about 2 hours from start to finish (includes downtime)
Variations
• Lemon-Lavender Twist: Add 1 teaspoon dried lavender buds to dough for a floral note.
• Almond Joy: Swap ½ teaspoon almond extract for vanilla and top with chopped toasted almonds.
• Gluten-Free: Use a 1:1 gluten-free flour blend (my go-to is Bob’s Red Mill).
• Vegan Option: Replace egg with flax “egg” (1 tablespoon ground flax + 3 tablespoons water) and use vegan butter.
• Chocolate Drizzle: Melt ½ cup dark chocolate chips and zigzag over iced cookies.
• Pastel Marble: Swirl two icing colors gently for a marbled effect before toppings.
Storage & Reheating
Store in an airtight container at room temperature for up to 5 days—cookies stay soft and icing keeps its shine. For longer life, freeze between layers of parchment in a sealed bag for up to 3 months. Thaw at room temp for 15–20 minutes before serving; no reheating needed.
FAQs
Q: Can I freeze the raw dough?
A: Absolutely. Wrap tightly and freeze for up to 2 weeks; thaw in the fridge overnight before rolling.
Q: Why did my cookies spread too much?
A: Likely dough was too warm—next time chill it longer or lower oven temp by 10°F.
Q: How do I get smooth icing without air bubbles?
A: Tap your filled piping bag gently on the counter before piping to knock out bubbles.
Q: Can I double this recipe?
A: Sure thing—just mix in a large bowl or split between two mixers for even blending.
Q: What’s the secret to bright pastel colors?
A: Gel food coloring gives vivid pastels without watering down the icing like liquid dyes.
Q: My icing cracked after drying—help!
A: Icing that’s too thick or dried in a draft can crack; add a few drops more milk next time for flexibility.
Q: Any tips for uniform cookie thickness?
A: Use rolling pin guides or lay two chopsticks on either side of dough—roll until pin rests on the sticks.
Q: Can I swap shapes mid-bake?
A: Yes—just watch smaller shapes carefully; they’ll bake in 6–8 minutes instead of 10.
Conclusion
These Easter Cookies blend classic butter-cookie comfort with festive spring vibes—perfect for sharing with family, friends, and neighbors. Give them a try, and don’t forget to leave a comment below or tag me on Instagram with your pastel creations! For more seasonal baking, check out my decorated Easter cake and spring cookie tutorials. Enjoy every sweet bite!