Easter Bunny Cake Recipe
If there’s ever a dessert that makes people smile before they even take a bite, it’s this Easter Bunny Cake Recipe—soft, sweet, festive, and charming enough to be the star of your holiday table.
A Sweet Little Centerpiece for Spring
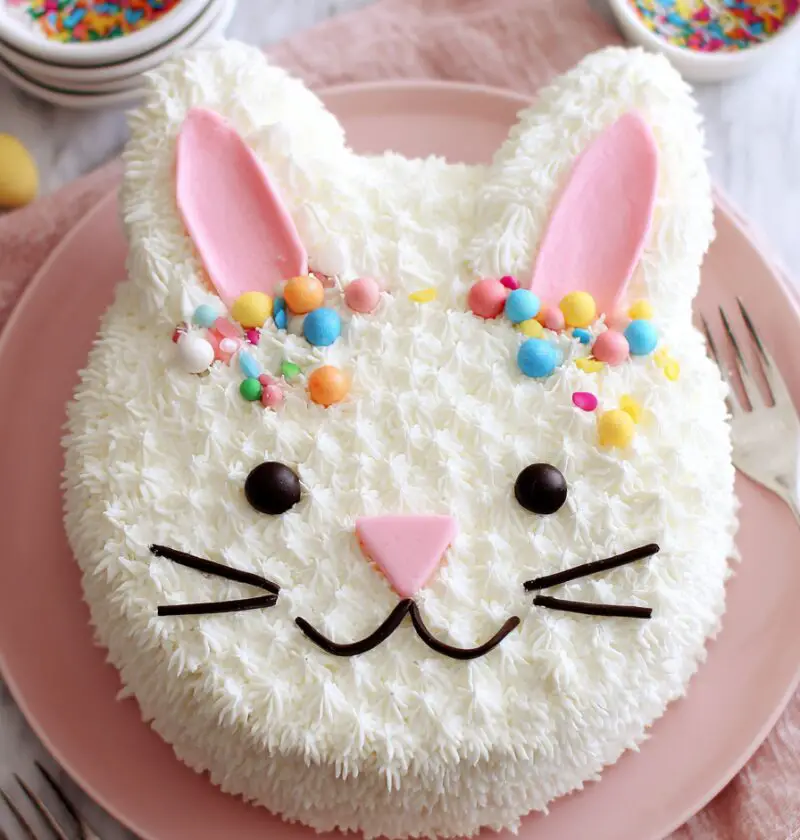
This Easter Bunny Cake Recipe is one of those old-fashioned, feel-good desserts that brings out the child in everyone. It starts with a simple homemade cake, gets shaped into an adorable bunny face, and is finished with fluffy frosting, coconut, and candy details. The result is a cute bunny cake that looks bakery-worthy but is surprisingly doable in a home kitchen.
I’ve always loved making a homemade Easter cake that feels a little whimsical. When my kids were young, this was the sort of festive Easter dessert that made them hover around the kitchen, sneaking jelly beans and asking if they could help place the bunny’s eyes. Now that I’m in my fifties, I still make it because some traditions are just too sweet to let go. It’s a lovely spring celebration cake, perfect for Easter brunch, a family dinner, or even a bunny-themed birthday party.
And while it’s definitely a treat, what makes this Easter cake recipe special is how approachable it is. You don’t need fancy decorating skills or specialty pans. Just two round cake layers, a little creativity, and a willingness to have fun with it.
Why You’ll Love This Recipe
- It uses basic pantry staples you may already have.
- No specialty bunny pan required.
- The bunny shape is easy and beginner-friendly.
- It doubles as dessert and table décor.
- Kids love helping decorate it.
- It’s perfect for Easter, spring parties, and birthdays.
- The cake stays soft and moist for days.
- You can make parts of it ahead of time.
- It’s easy to customize with your favorite candies and colors.
- It photographs beautifully for holiday memories.
Ingredients
For the cake:
- 2 1/2 cups all-purpose flour
- 2 1/2 teaspoons baking powder
- 1/2 teaspoon salt
- 3/4 cup unsalted butter, softened
- 1 3/4 cups granulated sugar
- 4 large eggs, room temperature
- 1 tablespoon vanilla extract
- 1 cup whole milk, room temperature
For the frosting:
- 1 cup unsalted butter, softened
- 4 cups powdered sugar, sifted
- 2 to 3 tablespoons whole milk or heavy cream
- 2 teaspoons vanilla extract
- Pinch of salt
For decorating the bunny:
- 2 to 3 cups sweetened shredded coconut
- Pink sanding sugar or pink coconut
- Jelly beans, M&M’s, or pastel candy-coated chocolates
- 2 black jelly beans or chocolate chips for the eyes
- 1 pink jelly bean, pink candy, or gumdrop for the nose
- Licorice strings or piped frosting for whiskers
Optional substitutions and helpful notes:
- Use cake flour instead of all-purpose flour for an even softer crumb; substitute 1 cup plus 2 tablespoons cake flour for each cup of all-purpose flour.
- Whole milk gives the richest flavor, but 2% works fine too.
- If you’re short on time, a quality white or yellow cake mix can work for the cake base. Honestly, I won’t judge.
- Sweetened coconut gives that classic fluffy bunny look. If you prefer less sweetness, use unsweetened coconut and toss it lightly with a spoonful of powdered sugar.
- For the pink ears, you can tint coconut with a drop of red food coloring or use pink decorating sugar.

Directions
-
Prep your pans and oven.
Preheat your oven to 350°F. Grease and flour two 8-inch or 9-inch round cake pans, then line the bottoms with parchment paper if you want easy release. That extra step saves a lot of heartache later. -
Mix the dry ingredients.
In a medium bowl, whisk together the flour, baking powder, and salt. Set it aside. This quick whisk helps distribute the leavening evenly, which means a more even rise. -
Cream the butter and sugar.
In a large mixing bowl, beat the softened butter and sugar for 3 to 4 minutes until pale and fluffy. Don’t rush this part. This is where the cake gets a lot of its tender texture. -
Add the eggs and vanilla.
Beat in the eggs one at a time, mixing well after each addition. Stir in the vanilla extract. If the batter looks a little curdled, that’s okay—it usually smooths out once the flour goes in. -
Alternate the dry ingredients and milk.
Add the flour mixture in three additions, alternating with the milk in two additions. Start and end with the flour. Mix just until combined. Overmixing can make the cake less tender, and nobody wants a tough bunny. -
Bake the cake layers.
Divide the batter evenly between the pans and smooth the tops. Bake for 25 to 30 minutes, or until the centers spring back lightly and a toothpick comes out clean. Let the cakes cool in the pans for 10 minutes, then turn them out onto wire racks to cool completely. -
Make the frosting.
Beat the butter until creamy. Gradually add the powdered sugar, then mix in the vanilla, salt, and enough milk or cream to make the frosting smooth and spreadable. If it feels too thick, add a splash more milk. If it gets too soft, stir in a bit more powdered sugar. -
Cut and shape the bunny.
Place one whole cake round in the center of a large platter—this is the bunny’s face. Cut the second cake round into three pieces: two oval-shaped ear pieces and one bow tie or bunny cheek piece, depending on your preferred design. The classic method is to cut the second round in half, then use those halves as ears. It doesn’t have to be perfect. Once frosted, the bunny shape comes together beautifully. -
Arrange the cake pieces.
Position the ear pieces above the full round cake to create the bunny head. Add the remaining cake piece below the face to form a bow tie if you like. Gently press the pieces together so the frosting can “glue” them in place. -
Frost the entire bunny.
Spread a thin crumb coat over all the cake pieces, then chill for 15 to 20 minutes if you have time. After that, add a thicker layer of frosting over the top and sides. This makes the coconut stick better and gives a neater finish. -
Add the coconut and decorate.
Sprinkle or gently press shredded coconut onto the frosted bunny. Fill the inner ears with pink coconut or sanding sugar. Use black jelly beans for eyes, a pink candy for the nose, and licorice strings for whiskers. Add a few candies to the bow tie or around the platter for that cheerful Easter party cake look. -
Serve and enjoy.
Slice and serve at room temperature. Expect a few delighted gasps when you bring it to the table. That’s part of the fun.
Servings & Timing
- Yield: 10 to 12 servings
- Prep Time: 30 minutes
- Bake Time: 25 to 30 minutes
- Cooling Time: 1 hour
- Decorating Time: 20 minutes
- Total Time: About 2 hours 20 minutes
If you bake the cake layers a day ahead, this easy Easter baking project feels much more relaxed.
Variations
- Chocolate Bunny Cake: Use your favorite chocolate cake batter and chocolate frosting for a richer take on this bunny cake recipe.
- Coconut Lover’s Version: Add 1 teaspoon coconut extract to the batter and frosting for extra spring flavor.
- Lemon Spring Cake: Add lemon zest to the batter and a touch of lemon juice to the frosting for a bright spring celebration cake.
- Gluten-Free Version: Use a reliable 1:1 gluten-free baking flour blend for a holiday-friendly alternative.
- Pastel Party Bunny: Tint the frosting pale pink, yellow, or blue for a playful kids Easter cake.
- Birthday Bunny Cake: Add sprinkles to the batter and decorate with candles for a charming bunny birthday cake.
Storage & Reheating
Store the finished cake covered at room temperature for up to 1 day, or refrigerate it for up to 4 days. If your kitchen is warm, I’d go straight to the fridge, especially with buttercream.
For longer storage, freeze individual slices or unfrosted cake layers tightly wrapped for up to 2 months. Thaw overnight in the refrigerator, then bring to room temperature before serving for the best texture.
This holiday cake recipe is a great make-ahead choice. Bake the layers one day ahead, wrap them well once cooled, and decorate the next day. That little bit of planning makes Easter morning much calmer.
Notes
One thing I’ve learned from making many an Easter Bunny Dessert over the years is that the shape does not need to be perfect. Really. Once the frosting, coconut, and candy details go on, people see a bunny—not your tiny cutting mistakes.
Room-temperature ingredients matter more than folks think. They help the batter mix evenly and give you a smoother crumb. Also, don’t skip cooling the cakes completely before frosting. Warm cake and buttercream are not friends.
If you want clean slices, chill the decorated cake for 20 to 30 minutes before serving, then wipe your knife between cuts. It’s a small trick, but it makes this Easter dessert idea look much tidier on the plate.
And if you’re serving a crowd, you can pair this Easter Bunny Cake with fresh berries, coffee, and a lighter fruit salad. That balance works nicely, especially after a big holiday meal.
FAQs
Can I use a cake mix for this Easter Bunny Cake Recipe?
Yes, absolutely. A white, yellow, or even strawberry cake mix works well if you want a quicker version.
How do I make the bunny shape without a special pan?
Use two round cake layers—one whole for the face and one cut into ears and a bow tie. It’s the classic, easy method for a bunny shaped cake.
Can I make this cake the day before Easter?
Yes. In fact, that’s often the easiest route. Bake the cake layers ahead, then frost and decorate the next day.
What type of frosting works best?
Buttercream is the easiest because it spreads well and holds the coconut nicely. Cream cheese frosting also tastes wonderful, but it’s a bit softer.
How can I keep the coconut from falling off?
Press it gently into a generous layer of frosting rather than sprinkling it from too high above the cake. Your hands work better than a spoon here.
Can kids help decorate this cake?
They sure can. Let them place the candies, make the face, or add the pink ears. It’s a fun kitchen project and a sweet memory-maker.
Can I make this recipe gluten-free?
Yes, use a dependable gluten-free 1:1 baking flour blend and check that your candies and decorations are gluten-free too.
What if I don’t like coconut?
No problem. Leave it off and use extra frosting, sprinkles, or even piped fur-style stars for texture.
Conclusion
This Easter Bunny Cake Recipe is cheerful, simple, and full of nostalgic charm—the kind of homemade Easter cake that turns dessert into part of the celebration. It’s soft, delicious, and easy enough for home bakers, even if cake decorating isn’t usually your thing.
If you give this Easter Bunny Cake a try, I’d love to hear how it turned out. Leave a comment, share your favorite decorations, and be sure to check out more Easter dessert ideas and holiday cake recipes for your spring table.