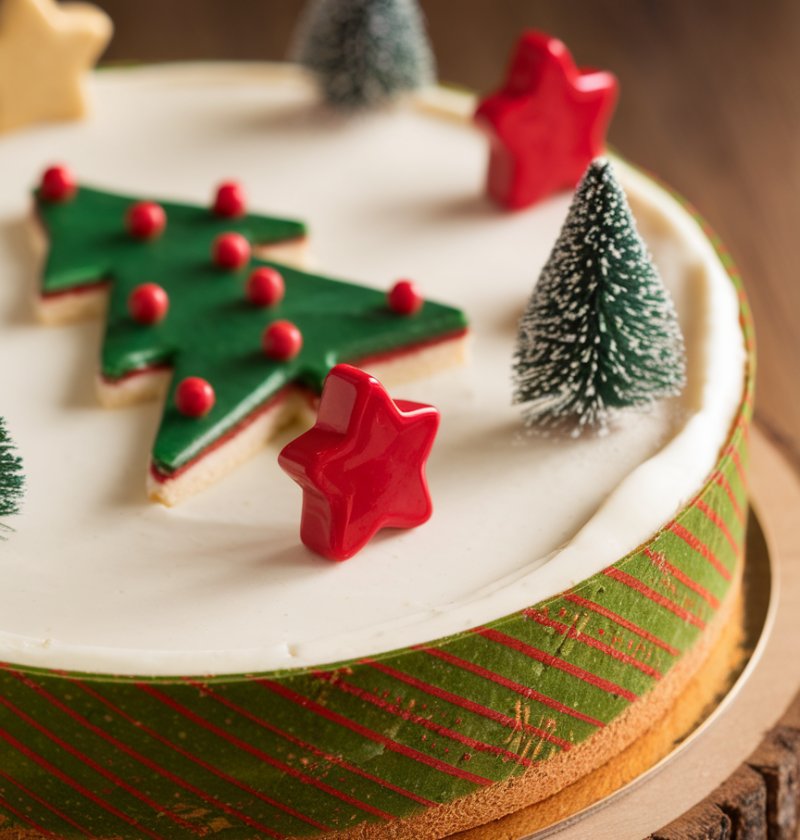
This no-bake holiday showstopper blends your favorite Little Debbie Christmas Tree Cakes with a creamy cheesecake filling for a festive dessert you can’t resist. It’s sweet, homemade, and perfect for sharing under the tree.
Why You’ll Love This Recipe
• No oven required—just mix, press, and chill.
• Ready in under 30 minutes prep time.
• Uses iconic Little Debbie Christmas Tree Cakes for a fun twist.
• Creamy cheesecake filling balances sweet chocolate and vanilla.
• Ideal for holiday parties, gift boxes, or dessert tables.
• Customizable with dairy-free or gluten-free swaps.
• Hands-on enough to involve kids in the kitchen.
• Eye-catching Christmas tree shape makes it a conversation starter.
Ingredients
– 12 Little Debbie Christmas Tree Cakes, fudge tops removed and bottoms reserved (see tip)
– 4 tablespoons unsalted butter, melted (for crust)
– 16 oz (450 g) cream cheese, softened to room temperature
– ½ cup granulated sugar (or ¾ cup powdered sugar for extra smoothness)
– 1 teaspoon pure vanilla extract
– 1 cup (240 ml) sour cream (or Greek yogurt for tangier filling)
– 1 cup (240 ml) heavy whipping cream, cold
– Pinch of sea salt
– Optional garnishes: mini silver dragees, holiday sprinkles, or extra fudge drizzle

Directions
1. Prep the Little Debbie Cakes
Gently slice off the chocolate-fudge tops from all 12 cakes; reserve half as garnish. Place the remaining cake bottoms in a food processor and pulse into fine crumbs. You’ll need about 1½ cups of crumbs for the crust.
- Make the Crust
In a medium bowl, combine cake crumbs with melted butter. Stir until evenly moistened, then press firmly into the bottom of a 9-inch springform pan (or a tree-shaped mold). Use the bottom of a measuring cup to create a smooth, compact base. Chill while you prepare the filling. - Whip the Cheesecake Filling
In a large bowl, beat softened cream cheese on medium speed until smooth and fluffy (about 1–2 minutes). Add sugar and vanilla extract; beat until fully incorporated. Fold in sour cream and a pinch of salt. In a separate chilled bowl, whip the heavy cream to stiff peaks, then gently fold it into the cream cheese mixture using a spatula. - Assemble and Chill
Pour the filling over the chilled crust, smoothing the top with an offset spatula or the back of a spoon. Cover with plastic wrap and refrigerate for at least 4 hours (or overnight) until firm. Tip: chilling time can vary—use a toothpick to test for set filling. - Garnish and Serve
Just before serving, arrange the reserved cake tops (halves or quarters) around the cheesecake edge like little ornaments. Drizzle any extra reserved fudge over the top, then sprinkle with festive dragees or holiday sprinkles. Slice with a warm, clean knife for perfect wedges.
Servings & Timing
Yield: 12 slices
Prep Time: 20 minutes
Chill Time: 4 hours (or overnight for best results)
Total Time: 4 hours 20 minutes
Variations
• Peppermint Twist: add ½ teaspoon peppermint extract to the filling and top with crushed candy canes.
• Berry Bliss: swirl ½ cup strawberry jam into the filling before chilling.
• Gluten-Free Option: swap Little Debbie Cakes for a certified gluten-free cookie or Graham cracker.
• Mini Cheesecakes: divide filling among lined muffin tins for individual servings.
• Salted Caramel Drizzle: use caramel sauce instead of reserved fudge for a sophisticated finish.
Storage & Reheating
Store covered in the refrigerator for up to 5 days to maintain creaminess. For longer storage, wrap individual slices in plastic wrap and freeze up to 2 months—thaw overnight in the fridge before serving. No reheating needed; serve chilled or at room temperature for best flavor.
FAQs
Q: Can I make this ahead of time?
A: Absolutely—you can assemble and chill overnight; just garnish right before serving.
Q: What if I don’t have a springform pan?
A: Use a loose-bottom tart pan or a regular cake pan lined with parchment for easy removal.
Q: How do I prevent cracks in the filling?
A: Don’t overbeat your filling. Fold whipped cream gently and avoid sudden temperature changes.
Q: Can I use low-fat cream cheese?
A: Yes, but expect a slightly less creamy texture—opt for full-fat for the richest results.
Q: Is there a dairy-free version?
A: Swap in dairy-free cream cheese, coconut cream, and non-dairy whipping cream—keeping proportions the same.
Q: Can I double the recipe?
A: Sure! Just use a larger pan or two springform pans; adjust chilling space in your fridge.
Q: Why remove the fudge tops?
A: Reserving the fudge creates a crunchy crust base and allows for a glossy drizzle garnish.
Q: How do I slice perfectly?
A: Dip your knife in hot water, wipe dry, then slice—repeat between cuts for clean edges.
Conclusion
This Creating A Little Debbie Christmas Tree Cheesecake is the sweetest way to celebrate the season—combining nostalgic holiday cakes with silky cheesecake for a dessert everyone will love. Give it a try at your next gathering, leave a comment below with your favorite variation, and explore more festive recipes for a merry, sweet holiday!
Creating A Little Debbie Christmas Tree Cheesecake
Ingredients
- 12 cakes Little Debbie Christmas Tree Cakes fudge tops removed and halves reserved for garnish
- 4 tablespoons unsalted butter melted, for crust
- 16 oz cream cheese softened
- 1/2 cup granulated sugar or 3/4 cup powdered sugar
- 1 teaspoon vanilla extract pure
- 1 cup sour cream
- 1 cup heavy whipping cream cold
- Pinch of sea salt
- Holiday sprinkles or silver dragees optional, for decoration
Instructions
- Slice off chocolate-fudge tops from cakes; reserve halves for garnish. Pulse remaining cake bottoms to fine crumbs in a food processor.
- Combine cake crumbs with melted butter and press firmly into a 9-inch springform pan. Chill while preparing filling.
- Beat softened cream cheese until smooth, add sugar and vanilla, then fold in sour cream and salt. Whip heavy cream to stiff peaks and gently fold in.
- Pour filling over crust and smooth top. Cover and refrigerate for at least 4 hours or overnight until set.
- Arrange reserved cake-top halves around the edge, drizzle with reserved fudge, and sprinkle decor. Slice with a warm knife.