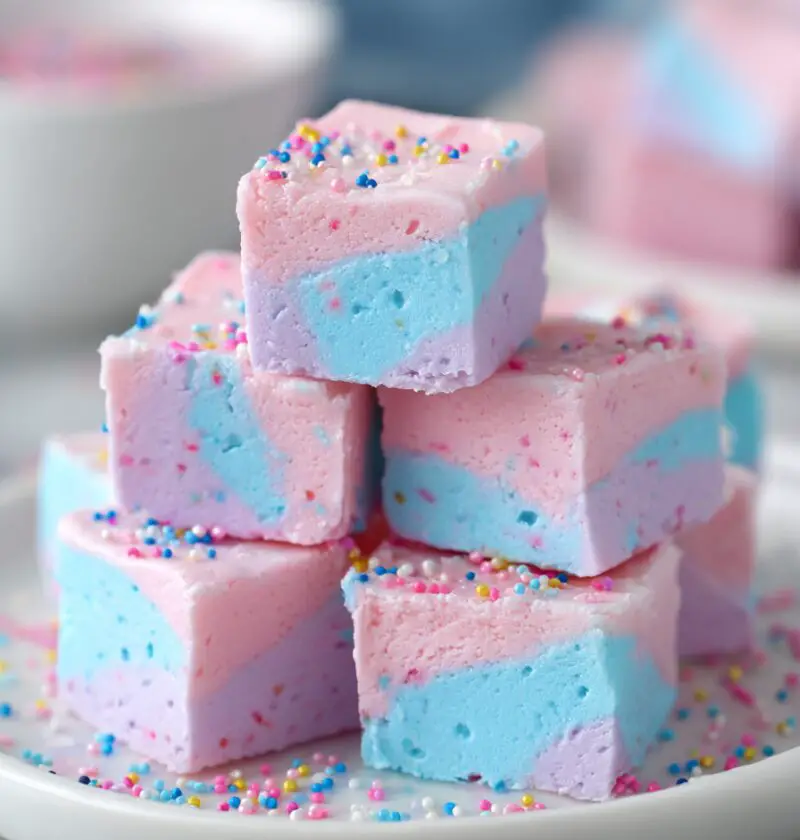
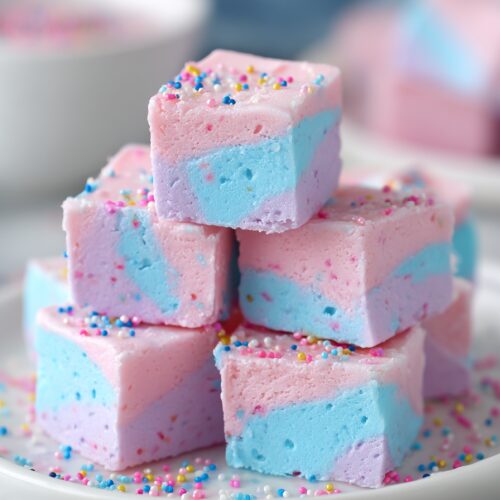
This Cotton Candy Fudge Recipe is a soft, creamy, no-bake treat that brings all the fun of the fair right to your kitchen—pastel pink and blue swirls, sweet “carnival” flavor, and ready with just a few simple ingredients.
I started making this cotton candy fudge a few summers ago when my youngest niece requested a “carnival themed dessert” table for her birthday. I wanted something colorful, easy, and kid-approved that didn’t require heating up the oven, and this cotton candy dessert checked every box. It’s a condensed milk fudge that sets up beautifully, holds its shape on a party tray, and tastes like a bite of the county fair—without the sticky fingers or long lines.
What makes this Cotton Candy Fudge Recipe extra special is how practical it is. We use the microwave for quick melting, sweetened condensed milk for that creamy candy fudge texture, and just a bit of flavoring to get that nostalgic cotton candy taste. It’s a no-bake fudge, which makes it perfect for busy parents, last-minute birthday party treats, and anyone who prefers quick wins in the kitchen.
If you’re planning a kids party dessert table, a baby shower with pastel colors, or a birthday bash where you want something beyond cupcakes, these colorful fudge candy squares look gorgeous on a platter. You can swirl pink and blue fudge together for that classic cotton candy vibe, or play around with other colors for holidays and seasons. Honestly, once you make this once, you’ll start “seeing” it on every party menu.

Now let’s walk through how to make this microwave fudge recipe step-by-step—nothing fancy, just real kitchen talk from someone who’s juggled plenty of sheet cakes and snack tables over the years.
Why You’ll Love This Cotton Candy Fudge Recipe
- No oven needed: This is a true no bake fudge—everything comes together right in the microwave.
- Quick to make: About 10 minutes of hands-on time, then the fridge does the rest.
- Party-perfect colors: The pink and blue fudge swirls look stunning on any carnival themed dessert table or kids party.
- Kid and teen approved: The cotton candy flavor is a huge hit with younger guests (and plenty of adults quietly snag seconds).
- Beginner-friendly: If you can stir and microwave, you can make this homemade fudge candy—no candy thermometer, no stress.
- Flexible flavors: Swap cotton candy flavoring for strawberry, birthday cake, or bubblegum for an easy twist.
- Great for gifting: These pastel fudge squares pack beautifully into treat boxes or bags for birthdays and holidays.
- Crowd-feeding yield: You get a full pan of creamy candy fudge that cuts into plenty of bite-size pieces.
Ingredients
Here’s everything you’ll need to make this creamy cotton candy fudge. The base is a classic condensed milk fudge, then we add color and flavor for that fun “fairground” finish.
- 3 cups white chocolate chips (about 18 oz; use a good brand like Ghirardelli or Guittard for best texture)
- 1 can (14 oz) sweetened condensed milk (not evaporated milk)
- 3 tablespoons unsalted butter, cut into small pieces
- 1 teaspoon cotton candy flavoring or extract
- 1 teaspoon vanilla extract (rounds out the flavor)
- Pinch of fine sea salt (balances the sweetness)
- Pink gel food coloring
- Blue gel food coloring
- 3–4 tablespoons cotton candy sprinkles or pastel rainbow sprinkles (optional, for topping)
- Loose cotton candy for garnish (optional; great for serving day-of)
Ingredient tips from my kitchen:
- White chocolate chips: Chips with a higher cocoa butter content melt smoother. If yours are stubborn, add an extra teaspoon of butter.
- Condensed milk: Make sure the can says “sweetened condensed milk.” Evaporated milk will not set into fudge.
- Butter: Using unsalted butter lets you control the salt. If you only have salted butter, skip the added pinch of salt.
- Food coloring: Gel or paste food coloring works better than liquid because it doesn’t thin the fudge. I like AmeriColor or Wilton for strong pastel colors.
- Cotton candy flavoring: Brands like LorAnn make strong cotton candy flavor oils. Start with ½ teaspoon, taste, and add more as needed—some are quite concentrated.
Directions
-
Prepare your pan.
Line an 8×8-inch baking pan with parchment paper, letting some hang over the sides to create “handles.” Lightly spray the parchment with nonstick spray. This makes it much easier to lift the pastel fudge squares out cleanly later. -
Combine the fudge base.
In a large microwave-safe bowl, add the white chocolate chips, sweetened condensed milk, and butter pieces. Use a silicone spatula to gently stir them together so the chips are coated in the condensed milk. This helps everything melt more evenly. -
Melt in the microwave.
Microwave the mixture on 50–60% power for 30 seconds. Stir well. Continue microwaving in 20–30 second bursts at reduced power, stirring after each burst, until the mixture is mostly melted and smooth. A few small soft lumps are okay—they’ll finish melting as you stir. -
Add flavor and salt.
Quickly stir in the cotton candy flavoring, vanilla extract, and pinch of salt. Taste a tiny bit (careful, it’s warm). If you want a stronger cotton candy flavor, add another ¼–½ teaspoon flavoring. Keep in mind the flavor will mellow just a bit as it chills. -
Divide and color the fudge.
Working fairly quickly, divide the warm fudge base evenly between two medium bowls. Add a drop or two of pink gel food coloring to one bowl and blue to the other. Stir each bowl until the color is fully blended. Add more coloring, a drop at a time, if you want a brighter pastel. -
Create the swirl.
Spoon large dollops of pink and blue fudge mixture into the prepared pan, alternating colors—think checkerboard, not stripes. Once all the fudge is in the pan, use a butter knife or wooden skewer to gently swirl the colors together. Don’t over-swirl or you’ll lose the distinct pink and blue fudge look. -
Add sprinkles.
While the top is still soft, scatter cotton candy sprinkles or pastel rainbow sprinkles over the surface. Gently press them in with your fingertips so they stick. If you’re adding loose cotton candy, wait until just before serving, or it will melt into the fudge. -
Chill until set.
Cover the pan lightly with plastic wrap or foil and refrigerate for at least 2 hours, or until the fudge is firm enough to slice. For very clean squares, I usually chill mine 3–4 hours. -
Slice and serve.
Use the parchment “handles” to lift the fudge out of the pan and onto a cutting board. With a sharp knife, cut into 1-inch squares (or any size you like). Wipe the knife with a warm, damp cloth between cuts for neat edges. Top with small tufts of cotton candy right before serving, if desired.
Servings & Timing
- Yield: About 36–49 bite-size squares (depending on how big you slice them)
- Prep Time: 10–15 minutes
- Chill Time: 2–4 hours
- Total Time: About 2 hours, 15 minutes to 4 hours, 15 minutes
For parties, I like making this Cotton Candy Fudge Recipe the night before. It gives the fudge plenty of time to firm up, and it’s one less thing on your to-do list the day of the event.
Easy Variations & Fun Twists
You know what? Once you get this base recipe down, it becomes your little candy playground. Here are a few fun ways to change things up:
- Rainbow Carnival Fudge: Divide the fudge base into 3–4 bowls and tint each a different pastel color for a full “fair” rainbow.
- Birthday Party Fudge: Swap the cotton candy flavor for “birthday cake” or vanilla, and stir rainbow sprinkles into the fudge itself.
- Unicorn Swirl Fudge: Add a touch of lavender gel coloring to a third bowl and swirl pink, blue, and purple together for a magical unicorn-themed dessert.
- Gluten-Free Treat: As long as your flavoring and sprinkles are gluten-free, this recipe naturally fits a gluten-free dessert table.
- Nut-Free Party Fudge: This is already nut-free, but always double-check your chocolate and sprinkles labels if serving to allergy-sensitive guests.
- White Chocolate Confetti Fudge: Skip the cotton candy flavor, use only vanilla, and stir in confetti sprinkles for a simple, creamy candy fudge.
Storage & Make-Ahead Tips
One of the reasons I love this cotton candy dessert for parties and holidays is how well it stores.
- Room temperature: In a cool kitchen, the fudge can sit out on a party table for 2–3 hours without getting too soft.
- Refrigerator: Store sliced fudge in an airtight container, with parchment or wax paper between layers, for up to 1 week.
- Freezer: For longer storage, freeze the fudge (without cotton candy garnish) in an airtight container for up to 2–3 months. Thaw in the fridge overnight for best texture.
- Cotton candy topping: Add any fluffy cotton candy garnish just before serving, since it will melt and dissolve when exposed to moisture in the fridge.
If you’re planning a big birthday party or school event, you can make this no bake fudge a few days ahead, chill it in the pan, and slice it the morning of. That small bit of planning saves a whole lot of last-minute stress.
Notes From My Kitchen Tests
- About sweetness: Cotton candy fudge is sweet—there’s no way around it. The pinch of salt and a slightly stronger vanilla help keep that sweetness from feeling too heavy.
- Thickness of the fudge: If you prefer a thicker fudge, use a 9×5-inch loaf pan instead of an 8×8. You’ll get taller squares, but fewer of them.
- Melting method: Every microwave is different. Using 50–60% power is key; high power can scorch the white chocolate and cause it to seize. If you see any graininess starting, stop and stir thoroughly.
- Stovetop method: If you don’t like using the microwave, you can melt the white chocolate, condensed milk, and butter together in a heavy saucepan over low heat, stirring constantly until smooth.
- For cleaner swirls: Let the colored fudge sit for 1–2 minutes after tinting so it thickens slightly before you swirl—it helps keep the colors more defined.
- Serving size for kids: For little ones, I often cut squares even smaller, about ¾ inch each, so you get more pieces and a more manageable sugar boost.
FAQs
1. Can I make this Cotton Candy Fudge Recipe without a microwave?
Yes. Melt the white chocolate chips, condensed milk, and butter in a saucepan over low heat, stirring constantly until smooth, then proceed with the coloring and swirling steps.
2. My fudge turned grainy—what went wrong?
Usually that means the white chocolate overheated. Next time, lower the microwave power, shorten the bursts, and stir more often to help melt gently.
3. Can I use candy melts instead of white chocolate chips?
You can, but the texture will be slightly different and a bit waxier. If you do use candy melts, reduce the butter to 2 tablespoons.
4. Is this cotton candy fudge safe for a hot outdoor party?
It holds up fairly well at room temperature, but for very warm days, keep it chilled and bring out smaller trays at a time so it doesn’t soften too much in the sun.
5. How can I make this recipe less sweet?
Use a high-quality white chocolate (not “white baking chips”), add a tiny extra pinch of salt, and cut the fudge into smaller pieces; you can also add more vanilla and a drop less cotton candy flavoring to soften the sugary edge.
6. Can I double this recipe?
Absolutely. Double all the ingredients and use a 9×13-inch pan. The chill time may be slightly longer because of the thicker layer.
7. Is this recipe safe for people with nut allergies?
The recipe itself doesn’t include nuts, but always check the labels on your chocolate, sprinkles, and flavoring, since some brands are processed in facilities that handle nuts.
8. Can I ship this fudge as a gift?
Yes, especially in cooler weather. Pack it in a snug, airtight container with parchment between layers, then place that container in a well-padded shipping box; skip the loose cotton candy topping when mailing.
Conclusion
This Cotton Candy Fudge Recipe is everything I love in a party dessert: easy, colorful, and guaranteed to spark smiles—from toddlers to grandparents. It’s a fun little nod to the carnival, wrapped up in creamy pastel fudge squares that are just as pretty as they are nostalgic.
If you make this cotton candy recipe for your next birthday party or holiday gathering, let me know how it goes—leave a comment, share your spin (unicorn colors, anyone?), and feel free to explore more no bake fudge and kids party dessert ideas on the site. Happy swirling!
Cotton Candy Fudge
Ingredients
- 3 cups white chocolate chips about 18 oz; use a good brand like Ghirardelli or Guittard for best texture
- 14 oz sweetened condensed milk 1 can; not evaporated milk
- 3 tablespoons unsalted butter cut into small pieces
- 1 teaspoon cotton candy flavoring or extract or to taste
- 1 teaspoon vanilla extract
- 1 pinch fine sea salt to balance sweetness
- pink gel food coloring as needed
- blue gel food coloring as needed
- 3-4 tablespoons cotton candy sprinkles or pastel rainbow sprinkles optional, for topping
- loose cotton candy optional, for garnish just before serving
Instructions
- Line an 8x8-inch baking pan with parchment paper, letting some hang over the sides to create handles. Lightly spray the parchment with nonstick spray to make it easier to lift out and slice the fudge later.
- In a large microwave-safe bowl, add the white chocolate chips, sweetened condensed milk, and butter pieces. Use a silicone spatula to gently stir so the chips are coated in the condensed milk for more even melting.3 cups white chocolate chips, 14 oz sweetened condensed milk, 3 tablespoons unsalted butter
- Microwave the mixture on 50–60% power for 30 seconds, then stir well. Continue microwaving in 20–30 second bursts at reduced power, stirring after each burst, until the mixture is mostly melted and smooth. A few small soft lumps are fine; they will melt as you stir.3 cups white chocolate chips, 14 oz sweetened condensed milk, 3 tablespoons unsalted butter
- Quickly stir in the cotton candy flavoring, vanilla extract, and pinch of fine sea salt. Taste a tiny bit carefully (it will be warm) and add up to an additional 1/4–1/2 teaspoon cotton candy flavoring if you want a stronger flavor, keeping in mind it will mellow slightly as it chills.1 teaspoon cotton candy flavoring or extract, 1 teaspoon vanilla extract, 1 pinch fine sea salt
- Working fairly quickly while the mixture is still warm, divide the fudge base evenly between two medium bowls. Add a drop or two of pink gel food coloring to one bowl and blue gel food coloring to the other. Stir each until the color is fully blended, adding more coloring a drop at a time until you reach your desired pastel shade.pink gel food coloring, blue gel food coloring
- Spoon large dollops of pink and blue fudge into the prepared pan, alternating colors in a rough checkerboard pattern. Once all the fudge is in the pan, use a butter knife or wooden skewer to gently swirl the colors together. Avoid over-swirling so you keep distinct pink and blue ribbons.
- While the top is still soft, scatter cotton candy sprinkles or pastel rainbow sprinkles evenly over the surface. Gently press them into the fudge with your fingertips so they adhere. Do not add loose cotton candy yet, as it will melt in the fridge.3-4 tablespoons cotton candy sprinkles or pastel rainbow sprinkles
- Cover the pan lightly with plastic wrap or foil and refrigerate for at least 2 hours, or until the fudge is firm enough to slice. For very clean squares, chill 3–4 hours or overnight.
- Use the parchment handles to lift the fudge out of the pan onto a cutting board. With a sharp knife, cut into 1-inch squares or your preferred size, wiping the blade with a warm, damp cloth between cuts for neat edges. If desired, top each piece with a small tuft of loose cotton candy just before serving.loose cotton candy