Christmas Rice Krispies Treats
You know that feeling when you’re wrapping presents, sipping hot cocoa, and a familiar kitchen scent sneaks up on you? That sticky-sweet marshmallow aroma—oh, it’s like a holiday hug for your heart. Last December, my living room was strewn with tinsel, my Spotify was blasting carols, and I found myself craving something fun, easy, and just plain festive. Enter: Christmas Rice Krispies Treats. These no-bake bars have become my go-to cheat code for last-minute dessert tables, neighbor gifts, or a cheeky mid-afternoon pick-me-up.
I still remember the first time I made them—my five-year-old insisted on helping (bless her little sprinkle-covered fingers), and we ended up with smiles plastered across our faces and sprinkles everywhere. It’s one of those recipes that’s as much about the memories as it is about the sugar rush. So grab your favorite spatula, crank up those holiday tunes, and let’s get cozy in the kitchen!

Why You’ll Love This
- No oven required—these are ready in under an hour (yes, really!).
- Just six simple ingredients you probably have hanging out in your pantry.
- Perfect for cookie exchanges, classroom parties, or sweet little gift boxes.
- Customizable sprinkles, mix-ins, or flavor twists to suit your holiday vibe.
- Kid-friendly steps—the littles will feel like junior chefs (and they’ll adore “testing” the marshmallow sauce!).
- Makes about 16 perfect, portion-controlled bars—no sticky fingers to fight over!
- Light enough for an afternoon treat, yet festive enough for your dessert spread.
- Keeps beautifully at room temp—ideal for buffet tables, bake sales, or last-minute potlucks.
Ingredient Notes
- Rice Krispies Cereal (6 cups): Go with Kellogg’s or your favorite store brand. The key is crispness—nobody likes soggy cereal (trust me on this one!).
- Mini Marshmallows (10 oz): I reach for Jet-Puffed because they melt into the silkiest, stickiest dream. But hey, if you’ve got jumbo marshmallows, just chop ’em up (in a sealed bag, for mess control).
- Unsalted Butter (3 tbsp): Plugrá or Land O’Lakes are my go-to. Butter gives these treats that rich, comforting flavor you can’t get with margarine (although I’ve heard vegan friends have success with plant-based spreads!).
- Pure Vanilla Extract (1 tsp): This isn’t the time to skimp—Madagascar vanilla transforms ordinary marshmallow goo into something luxuriant. Plus, a little extra vanilla feels downright festive.
- Holiday Sprinkles (½ cup): Red and green nonpareils, jimmies, or tiny holiday shapes—whatever makes you smile. Feel free to mix and match colors or even go metallic for extra sparkle.
- Pinch of Fine Sea Salt: Tiny but mighty! This pinch balances the sweetness and makes the flavors pop (do not skip!).
Substitutions & Casual Tips: If gluten’s a no-no, swap in your favorite gluten-free puffed rice. Dairy-free? Try vegan spreading butter (or coconut oil) plus Dandies marshmallows—your vegan pals will thank you. For the stickiness-factor (and fewer scratched knuckles), grab a silicone spatula—OXO Good Grips is my workhorse.
Step-by-Step Directions
- Prep Your Pan: Lightly grease a 9×9-inch baking pan with butter or nonstick spray. Line it with parchment if you’re feeling fancy—this helps you lift the whole slab out like one giant Rice Krispie brownie. (More brownie vibes = more fun.)
- Melt the Butter: In a large saucepan over low-medium heat, let the butter do its thing until it’s foaming ever so slightly. Keep an eye on it—nobody wants scorched dairy drama.
- Add Marshmallows: Dump in your mini marshmallows and stir, stir, stir! You’re looking for that glossy, gooey texture—about 2–3 minutes. If things get too bubbly, just lower the heat and slow your stir.
- Flavor Boost: Remove from heat and swirl in your vanilla extract and pinch of salt right away. This tiny step is like putting on lipstick—suddenly everything feels polished.
- Fold in Cereal: Gently fold in the Rice Krispies with a spatula, trying your best not to crush the puffs. Make sure every flake is cloaked in marshmallow goodness—no naked bits allowed.
- Press Into Pan: Transfer the blob of bliss to your pan. Lay a piece of parchment over the top or grease your spatula and press firmly but not maniacally hard. You want even bars, but still a little fluff.
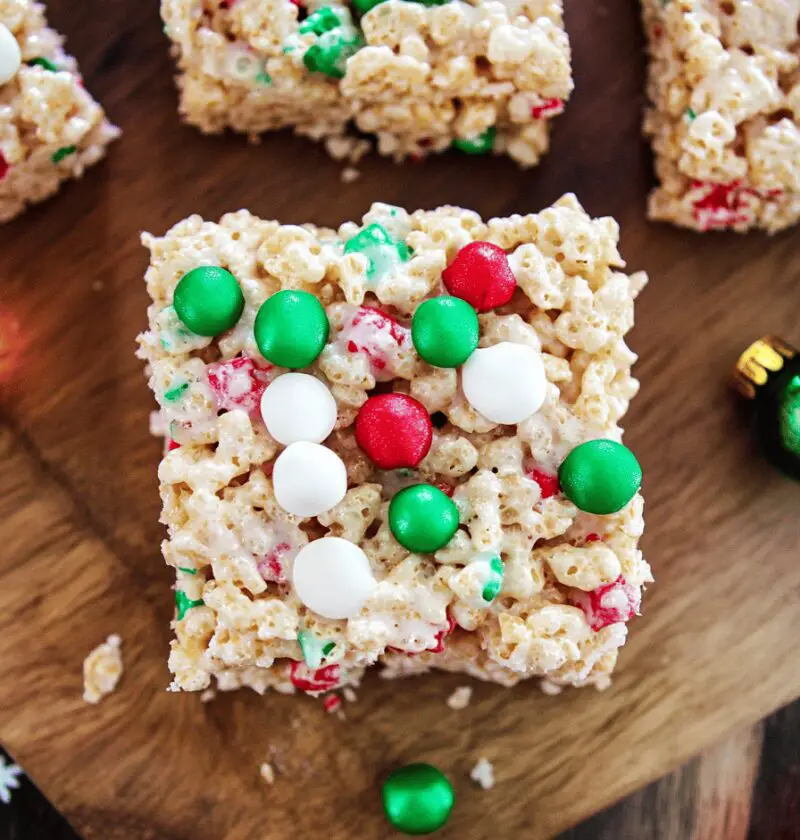
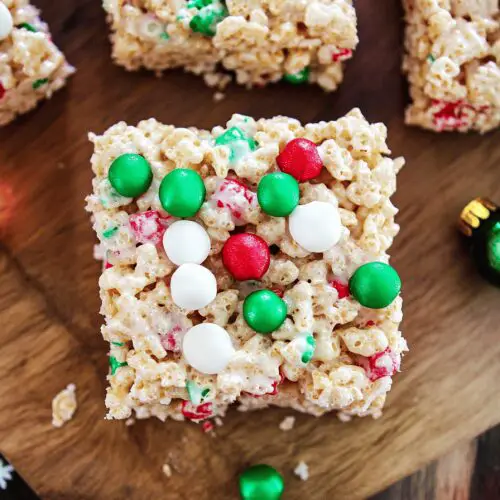
- Sprinkle Time: Generously top with red and green nonpareils. Give ’em a gentle press so they stick—this is the moment your treats go from “cute” to “absolutely magical.”
- Chill Out: Let the pan hang out on the counter for about 10 minutes, then pop it in the fridge for 20–30 minutes. You’re aiming for bars that hold together but still melt in your mouth.
- Slice & Serve: Lift the slab out by the parchment, slice into 16 squares (or go rogue with fun shapes if you dare), and watch everyone’s eyes light up. Holiday magic, right there.
Variations & Flavor Twists
- Peppermint Patty: Swap ½ tsp peppermint extract for vanilla and scatter crushed candy canes on top. Minty fresh meets sticky-sweet perfection.
- Chocolate Cheer: Stir in 2 tbsp unsweetened cocoa powder when you add the vanilla, then drizzle melted white chocolate over the finished bars for a “black-and-white” holiday jam.
- Nutty Neighbor Gift: Fold in ½ cup toasted chopped pecans or almonds for a satisfying crunch that feels extra homey (and looks impressive in a mason jar).
- Fruity Fusion: Mix in ½ cup chopped dried cranberries or cherries for a tangy pop. The red bits sparkly against the white base—love it!
- Peanut Butter Bliss: Press mini peanut butter cups into the warm slab before chilling. Ooey-gooey peanut butter pockets? Yes, please.
Storage & Reheating Tips
Once your treats are set, tuck them into an airtight container at room temperature for up to 3 days. No fridge required—unless your kitchen doubles as a sauna. If you want to stash extras for later, freeze layers between parchment paper in a freezer-safe bag for up to 2 months. When you’re ready to indulge, just let them thaw on the counter for 15 minutes.
Craving that fresh-sticky feel? Pop a bar in the microwave for 5–7 seconds (really, just a quick zap) and watch the marshmallow come back to life in all its stretchy glory. Warning: you might need a napkin (or five).
Final Thoughts & Warm Wishes
There you have it—Christmas Rice Krispies Treats that are equal parts nostalgic, festive, and downright craveable. Whether you’re decking the halls, wrapping last-minute gift baskets, or just need a sweet cuddle-in-your-mouth snack, these bars deliver. I’d love to hear how yours turned out: Did you try the peppermint twist? Or maybe you invented your own secret add-in? Drop a comment below, share your photos, or ask any questions—this is a kitchen that thrives on community and cheer.
From my cozy corner to yours, happy holidays and happy snacking! May your days be merry, bright, and a little bit sticky.
Christmas Rice Krispies Treats
Ingredients
- 6 cups Rice Krispies cereal Kellogg’s or store brand crisp rice
- 10 oz Mini marshmallows Jet-Puffed recommended
- 3 tbsp Unsalted butter Plugrá or Land O’Lakes
- 1 tsp Pure vanilla extract Madagascar vanilla adds depth
- 1/2 cup Festive red & green nonpareils or holiday sprinkles
- Pinch Fine sea salt balances sweetness
Instructions
- Lightly grease a 9×9-inch pan with butter or nonstick spray.
- In a large saucepan, melt butter over low-medium heat. Add marshmallows, stir until smooth. Remove from heat, stir in vanilla and salt.
- Fold in Rice Krispies cereal, mix gently. Transfer to pan, press evenly. Top with red & green nonpareils.
- Let set in the fridge for 20-30 minutes. Slice into 16 squares and serve.