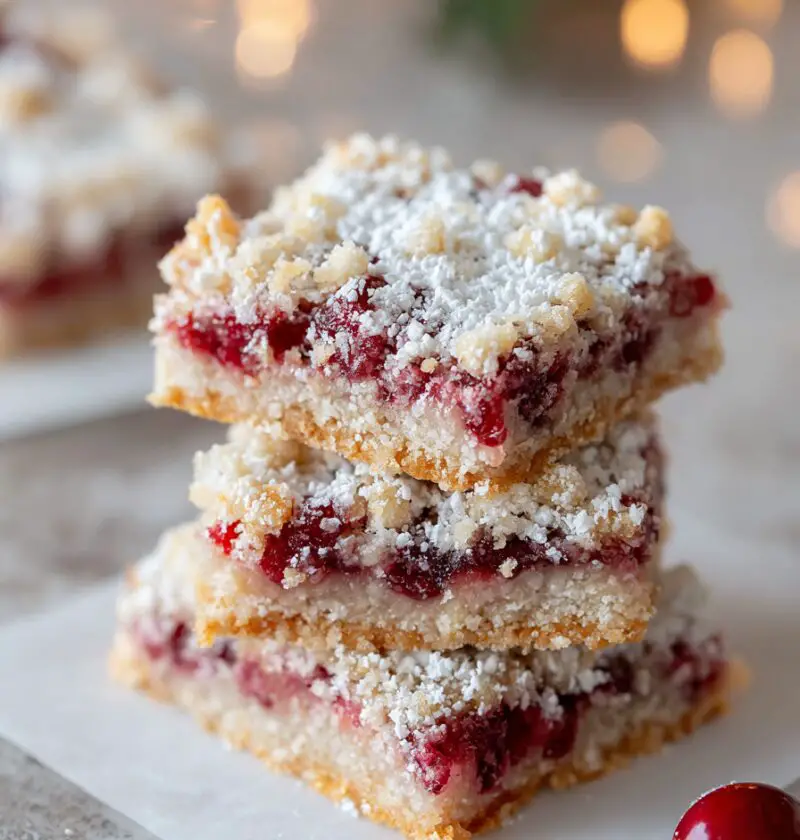
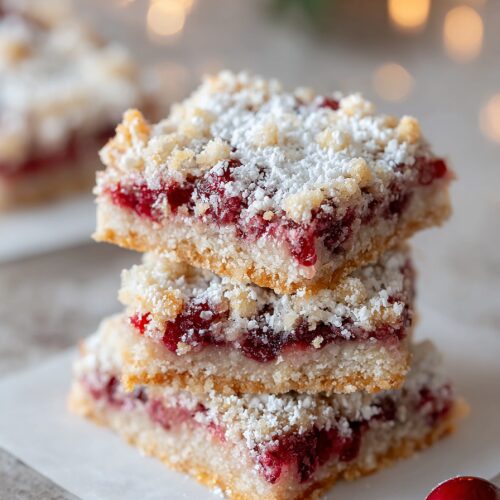
Christmas Cherry Bars Recipe
This Christmas Cherry Bars Recipe is a buttery, jammy, crowd-pleasing treat with a soft cookie base, sweet-tart cherry layer, and golden crumb topping that looks like it was made for a holiday cookie tray. These festive cherry bars are easy enough for a busy weeknight and special enough to bring to any Christmas party dessert table.
I’ve been baking some version of these cherry cookie bars for more than 20 years, tweaking little things each December as my kids grew up, my oven changed, and my pantry got a bit more “grown-up” (hello, almond extract). This cherry bar recipe has become our Christmas Eve dessert, our go-to Christmas potluck dessert, and the treat I send home with neighbors wrapped in wax paper and tied with red string.
Think of them as the love child between a shortbread cookie and a cherry pie: soft in the middle, gently crisp on the edges, and scented with vanilla and almond. They slice beautifully, they freeze well, and they hold up like champs on a Christmas cookie tray, tucked between gingerbread and peppermint bark.
And you know what? They’re surprisingly low-stress for a Christmas baking recipe—no rolling, no fiddly shapes, just press, spread, crumble, and bake.

Why You’ll Love This Recipe
- Soft cookie crust with a gentle crunch on top—like the best bar cookie recipe you’ve had at a church bake sale.
- Uses pantry-friendly ingredients you probably already have (plus a can or jar of cherries).
- Makes a big 9×13 pan of holiday dessert bars, perfect for sharing or gifting.
- Easy holiday bars: no mixer required if you don’t feel like pulling it out.
- Festive red cherry layer that looks beautiful on any Christmas dessert recipe spread.
- Customizable: use cherry pie filling or cherry jam for different textures.
- Freezer-friendly, so you can bake ahead for a busy Christmas party dessert schedule.
- Kid- and grandkid-approved, and simple enough for little helpers to press and sprinkle.
- Scales well—bake two pans for a big Christmas potluck dessert and watch them vanish.
Ingredients
Let me walk you through what you’ll need for these baked cherry bars. Nothing fancy, just honest, reliable ingredients that turn into something festive and special.
For the cookie crust and crumb topping:
- 1 cup (2 sticks / 226 g) unsalted butter, softened
– Room temperature butter gives you a soft, tender crumb. If you only have salted butter, reduce the added salt just a bit. - 1 cup (200 g) granulated sugar
- 1/2 cup (100 g) packed light brown sugar
– The brown sugar adds moisture and a hint of caramel flavor that loves cherries. - 2 large eggs, at room temperature
- 2 teaspoons pure vanilla extract
- 1 teaspoon almond extract
– This is what turns these into cherry almond bars; it gives that “bakery” flavor. - 2 1/2 cups (300 g) all-purpose flour, spooned and leveled
- 1 teaspoon baking powder
- 1/2 teaspoon fine sea salt (or table salt)
- 1/2 cup sliced almonds, for topping (optional but highly recommended for crunch and looks)
For the cherry filling:
-
1 (21-ounce / about 595 g) can cherry pie filling
– This gives a softer, pie-like layer—great for classic christmas cherry bars.OR
-
1 1/2 cups (about 450 g) cherry jam or cherry preserves
– This makes thicker, slightly chewier cherry jam bars with more concentrated flavor.
Optional extras (totally fun, not required):
- 1/4 cup finely chopped maraschino cherries (for extra Christmas red)
- 1/2 cup white chocolate chips for sprinkling on top after baking
If you bake a lot, you probably already know this—but for the best results, measure your flour carefully. Too much flour and your cherry bar recipe can turn dry around the edges. Spoon the flour into your measuring cup and level with a knife instead of scooping.
Directions
-
Preheat the oven and prepare the pan.
Preheat your oven to 350°F (175°C). Line a 9×13-inch baking pan with parchment paper, letting a little overhang on the sides so you can lift the bars out later. Lightly spray with cooking spray. This step makes slicing and removing the holiday dessert bars much easier. -
Cream the butter and sugars.
In a large mixing bowl, beat the softened butter, granulated sugar, and brown sugar together until light and fluffy—about 2–3 minutes with a hand mixer on medium speed. If you’re mixing by hand, use a sturdy wooden spoon and a bit of elbow grease; it’ll still work. -
Add eggs and flavorings.
Beat in the eggs, one at a time, until fully blended. Add the vanilla extract and almond extract and mix again. The mixture should look smooth and slightly thick. Take a second to smell it—this is the base of that classic bakery-style bar cookie recipe aroma. -
Combine dry ingredients.
In a separate bowl, whisk together the flour, baking powder, and salt. Whisking helps disperse the baking powder so you don’t end up with any uneven spots. -
Make the dough.
Add the dry ingredients to the butter mixture in two additions, mixing just until combined after each. The dough will be thick—almost like a cookie dough that’s a little softer. Don’t worry if it looks slightly sticky; that’s what you want for tender cherry cookie bars. -
Press most of the dough into the pan.
Scoop about 2/3 of the dough into the prepared pan (leave the remaining 1/3 in the bowl for the crumb topping). Using clean hands or the back of a measuring cup, press it into an even layer. Make sure to press into the corners for a sturdy base that can hold the filling. -
Par-bake the crust.
Bake the crust for 10 minutes. This quick bake helps the base set so it doesn’t get soggy under the cherry layer. When you pull it out, it won’t look fully baked—and that’s exactly right. -
Add the cherry layer.
Gently stir the cherry pie filling (or cherry jam) in its bowl to loosen it. If you’re using chopped maraschino cherries, fold them in. Spread the cherry filling evenly over the hot crust, all the way to the edges. Try to get a smooth, even layer so every square gets a good cherry swirl. -
Crumb and almond topping.
Take the remaining dough and break it into little clumps with your fingers, scattering them over the cherry layer. You want some cherries peeking through—they look so pretty after baking. Sprinkle sliced almonds evenly over the top. -
Bake until golden.
Return the pan to the oven and bake for 25–30 minutes, or until the top is lightly golden and the edges are set. The center should look just set and not jiggly. Every oven runs a little differently, so start checking around 23–24 minutes. -
Cool completely before slicing.
This is the hardest part. Let the pan cool on a wire rack for at least 2 hours. The cherry layer firms up as it cools, which gives you clean, neat slices for your Christmas party dessert or cookie trays. -
Optional white chocolate finish.
If you’d like, melt 1/2 cup white chocolate chips in a small bowl in the microwave (15-second bursts, stirring in between) and drizzle over the cooled bars. It adds a pretty snowy touch and a bit of sweetness that plays so nicely with the cherries. -
Slice and serve.
Use the parchment overhang to lift the slab out of the pan. Cut into 24 smaller squares or 18 larger bars, depending on how many treats you need for your Christmas baking recipe lineup.
Servings & Timing
- Yield: About 18–24 bars, depending on how large you slice them
- Prep Time: 20 minutes
- Par-Bake + Bake Time: 35–40 minutes total
- Cooling Time: 2 hours
- Total Time: About 3 hours (mostly hands-off cooling—perfect time to wrap gifts or make another holiday dessert bars recipe)
Variations
If you’re anything like me, once you love a recipe you want to make different versions of it. Here are some easy twists:
- Triple-Cherry Bars: Use cherry pie filling plus a handful of chopped dried cherries for extra texture and tartness.
- Chocolate-Cherry Cookie Bars: Stir 1/2 cup mini chocolate chips into the dough and drizzle with melted dark chocolate after baking.
- Glazed Cherry Almond Bars: Skip the white chocolate and instead drizzle with a simple almond glaze (powdered sugar + milk + almond extract).
- Mixed Berry Holiday Bars: Swap the cherry filling for a mixed berry jam for a slightly less sweet, very colorful tray of easy holiday bars.
- Gluten-Friendly Version: Use a cup-for-cup gluten-free baking blend and check that your fillings are gluten-free; texture will be a bit more delicate but still lovely.
- Orange-Kissed Christmas Cherry Bars: Add 1 teaspoon orange zest to the dough for a bright citrus note that feels very “holiday brunch.”
Storage & Reheating
- Room Temperature: Store the bars in an airtight container at room temperature for up to 2 days. I like to layer them with parchment paper so the tops stay pretty.
- Refrigerator: For longer storage (up to 5 days), keep them in the fridge. The cherry layer firms up nicely, and the flavors meld even more—great for planning ahead for a Christmas potluck dessert.
- Freezer: Freeze cut bars on a baking sheet until solid, then transfer to a freezer bag or container. They keep well for up to 2 months.
- Thawing: Let frozen bars thaw at room temperature for 30–45 minutes, or in the fridge overnight.
- Reheating (if you like them warm): Warm a bar in the microwave for about 10–15 seconds; it’ll taste like a warm cherry crumble in cookie form.
For make-ahead Christmas baking, I often bake these festive cherry bars one weekend, freeze half, and pull them out the night before I need a Christmas party dessert. No one has ever guessed they were baked ahead.
Notes
- On sweetness: If you prefer desserts that are less sweet, use cherry preserves instead of pie filling and cut the granulated sugar down by 2 tablespoons.
- Texture tip: For softer bars, bake closer to 25 minutes; for firmer, more “cookie-like” bars that pack well for gifting, go toward 30 minutes, watching the color.
- Pan type matters: A light-colored metal pan bakes more evenly than glass; if using glass, you may need a couple more minutes of bake time.
- Almond extract caution: Almond extract is strong; stick close to the 1 teaspoon. A little goes a long way in cherry almond bars.
- Clean cuts: Use a long, sharp knife, wipe it between cuts, and make sure the bars are completely cool. If you’re going for picture-perfect Christmas dessert recipe photos, you can even chill the pan briefly before slicing.
When I tested this Christmas Cherry Bars Recipe for the blog, the main lesson I learned was not to rush the cooling time. The first batch, I cut too soon (because I was hungry, honestly), and the cherry layer oozed a bit. Still delicious, just a little messy. The fully cooled bars, though, sliced like a dream.
FAQs
Can I use homemade cherry pie filling?
Yes, absolutely—just use about 2 1/2 cups of your favorite homemade filling for these christmas cherry bars and bake as directed.
Can I halve the recipe?
Yes, you can bake a half batch in an 8×8 or 9×9 pan; reduce the bake time slightly and start checking a bit earlier.
Do these travel well for parties or mailing?
They hold their shape nicely, so they’re great for Christmas potluck dessert tables and cookie exchanges; for mailing, wrap each bar in wax paper, then pack snugly in a tin.
Can I use other fruit fillings?
Yes—raspberry, blueberry, or even cranberry jam all work well and keep the spirit of easy holiday bars, though the flavor profile will change.
Why did my bars turn out dry?
Most often, it’s from adding too much flour or overbaking; next time, measure flour carefully and pull them from the oven as soon as the top is just golden.
Do I have to use almonds?
No, you can leave them out, or swap in chopped pecans or walnuts, or keep them nut-free for school events while still enjoying festive cherry bars.
Can I make these dairy-free?
You can use a good-quality dairy-free butter stick and check your cherry filling for added dairy; texture may be slightly different, but still very tasty.
How far ahead can I make these for a Christmas cookie tray?
Bake them up to 3 days ahead and store in the fridge, or freeze for up to 2 months and thaw the day before assembling your cookie tray.
Conclusion
This Christmas Cherry Bars Recipe gives you everything you want in a holiday dessert: buttery cookie layers, bright cherry filling, and a pretty, festive finish that looks like you fussed much more than you actually did. They’re reliable, crowd-pleasing, and flexible enough to fit into any Christmas baking recipe lineup—from quiet family nights to big holiday potlucks.
If you try these cherry cookie bars, let me know how they turned out and whether you went the pie-filling route or the cherry jam bars version. And if you’re building a full christmas dessert recipe spread, pair these with something chocolatey and something peppermint for a tray that makes everyone linger just a little longer around the dessert table.
Christmas Cherry Bars
Ingredients
- 1 cup unsalted butter softened (2 sticks / 226 g)
- 1 cup granulated sugar (200 g)
- 1/2 cup light brown sugar packed (100 g)
- 2 large eggs at room temperature
- 2 teaspoons pure vanilla extract
- 1 teaspoon almond extract
- 2 1/2 cups all-purpose flour spooned and leveled (300 g)
- 1 teaspoon baking powder
- 1/2 teaspoon fine sea salt or table salt
- 1/2 cup sliced almonds for topping, optional but recommended
- 1 can cherry pie filling 21 oz / about 595 g, OR use cherry jam/preserves instead
- 1 1/2 cups cherry jam or cherry preserves about 450 g, alternative to pie filling
- 1/4 cup maraschino cherries finely chopped, optional
- 1/2 cup white chocolate chips for optional drizzle after baking
- nonstick cooking spray for greasing the pan
- parchment paper to line a 9×13-inch pan
Instructions
- Preheat the oven to 350°F (175°C). Line a 9×13-inch baking pan with parchment paper, leaving an overhang on the long sides for easy removal. Lightly spray the parchment and exposed sides of the pan with nonstick cooking spray.nonstick cooking spray, parchment paper
- In a large mixing bowl, beat the softened butter, granulated sugar, and light brown sugar together until light and fluffy, about 2–3 minutes with a hand mixer on medium speed. If mixing by hand, use a sturdy wooden spoon and mix until well combined and slightly creamy.1 cup unsalted butter, 1 cup granulated sugar, 1/2 cup light brown sugar
- Beat in the eggs one at a time until fully incorporated. Add the vanilla extract and almond extract and mix until smooth and slightly thick.2 large eggs, 2 teaspoons pure vanilla extract, 1 teaspoon almond extract
- In a separate bowl, whisk together the flour, baking powder, and salt until well blended.2 1/2 cups all-purpose flour, 1 teaspoon baking powder, 1/2 teaspoon fine sea salt
- Add the dry ingredients to the butter mixture in two additions, mixing on low speed or by hand just until combined after each addition. The dough should be thick and slightly sticky, similar to a soft cookie dough.2 1/2 cups all-purpose flour, 1 teaspoon baking powder, 1/2 teaspoon fine sea salt
- Transfer about 2/3 of the dough to the prepared pan, leaving the remaining 1/3 in the bowl for the crumb topping. Press the dough evenly into the bottom of the pan, making sure to press it into the corners for a uniform base.
- Bake the crust for 10 minutes. It will not look fully baked yet; it should appear slightly puffed but still pale. Remove from the oven and leave the oven on.
- While the crust par-bakes, gently stir the cherry pie filling in a bowl to loosen it, or stir the cherry jam/preserves until spreadable. If using, fold in the finely chopped maraschino cherries.1 can cherry pie filling, 1 1/2 cups cherry jam or cherry preserves, 1/4 cup maraschino cherries
- Spread the cherry pie filling OR cherry jam evenly over the hot par-baked crust, all the way to the edges, creating an even layer so each bar gets plenty of cherry.1 can cherry pie filling, 1 1/2 cups cherry jam or cherry preserves
- Break the remaining dough into small clumps with your fingers and scatter them evenly over the cherry layer, allowing some of the cherries to peek through. Sprinkle the sliced almonds evenly over the top.1/2 cup sliced almonds
- Return the pan to the oven and bake for 25–30 minutes, or until the top is lightly golden and the edges are set. The center should look just set and not jiggly. Start checking around 23–24 minutes, as ovens vary.
- Place the pan on a wire rack and let the bars cool completely for at least 2 hours. This allows the cherry layer to firm up so the bars slice cleanly.
- If desired, melt the white chocolate chips in a microwave-safe bowl in 15-second bursts, stirring between each, until smooth. Drizzle the melted white chocolate over the cooled bars and let it set.1/2 cup white chocolate chips
- Use the parchment overhang to lift the cooled slab out of the pan. Place on a cutting board and slice into 18 larger bars or up to 24 smaller squares, wiping the knife between cuts for the neatest edges. Serve at room temperature.
Notes
- Triple-Cherry Bars: Use cherry pie filling and add a handful of chopped dried cherries to the filling.
- Chocolate-Cherry Cookie Bars: Stir 1/2 cup mini chocolate chips into the dough and drizzle the baked, cooled bars with melted dark chocolate instead of or in addition to white chocolate.
- Glazed Cherry Almond Bars: Skip the white chocolate and drizzle the cooled bars with an almond glaze (powdered sugar, milk, and a little almond extract).
- Mixed Berry Holiday Bars: Substitute mixed berry jam for the cherry filling.
- Gluten-Friendly Version: Use a cup-for-cup gluten-free baking blend and ensure your fillings are gluten-free; bars will be slightly more delicate.
- Orange-Kissed Bars: Add 1 teaspoon orange zest to the dough for a citrusy holiday note. STORAGE & REHEATING:
- Room Temperature: Store in an airtight container for up to 2 days, layering bars with parchment so the tops stay neat.
- Refrigerator: Store up to 5 days; the cherry layer firms and flavors meld.
- Freezer: Freeze cut bars on a baking sheet until solid, then transfer to a freezer-safe container or bag for up to 2 months.
- Thawing: Thaw at room temperature for 30–45 minutes or in the fridge overnight.
- Reheating: Warm individual bars in the microwave for 10–15 seconds if you like them warm. TIPS:
- For less sweetness, use cherry preserves instead of pie filling and reduce the granulated sugar by 2 tablespoons.
- For softer bars, bake closer to 25 minutes; for firmer, more cookie-like bars that travel well, bake closer to 30 minutes, watching the color.
- A light-colored metal pan bakes more evenly than glass; if using glass, you may need a few extra minutes of bake time.
- Almond extract is strong; 1 teaspoon is usually plenty.
- For very clean cuts, cool completely and optionally chill briefly before slicing, wiping the knife between cuts.